Artemis was initially generated using JHipster 6.10.3. (Documentation and help)
Artemis supports the following exercises:
- Programming exercises with version control and automatic assessment with test cases and continuous integration
- Quiz exercises with multiple choice, drag and drop and short answer quiz questions
- Modeling exercises with semi-automatic assessment using machine learning concepts
- Text exercises with manual (and experimental semi-automatic) assessment
- File upload exercises with manual assessment
Artemis supports all these exercises to run either live in the lecture with instant feedback or as homework. Students can submit their solutions multiple times within the due date and use the (semi-)automatically provided feedback to improve their solution.
Artemis also supports an exam mode now. You can find more information on Exam mode student features and on Exam mode instructor features.
- How to set up your local development environment
- Server coding and design guidelines
- Client coding and design guidelines
- Code Review Guidelines
Read the Docs hosts the Artemis documentation. You can find a guide on how to write documentation.
You can set up Artemis in conjunction with either GitLab and Jenkins or with Jira, Bitbucket and Bamboo.
Artemis uses these external tools for user management and the configuration of programming exercises.
If needed, you can configure self-service user registration.
Please read the guide on how to contribute to Artemis.
To build and optimize the Artemis application for production, run:
./gradlew -Pprod -Pwar clean bootWarThis will create a Artemis-.war file in the folder build/libs. The build command compiles the TypeScript into JavaScript files, concatenates and minifies the created files (including HTML and CSS files). It will also modify index.html so it references these new files. To ensure everything worked, run the following command to start the application on your local computer:
java -jar build/libs/*.war --spring.profiles.active=dev,artemis,bamboo,bitbucket,jira(You might need to copy a yml file into the folder build/libs before, also see development setup)
Then navigate to http://localhost:8080 in your browser.
Refer to Using JHipster in production for more details.
The following command can automate the deployment to a server. The example shows the deployment to the main Artemis test server (which runs a virtual machine):
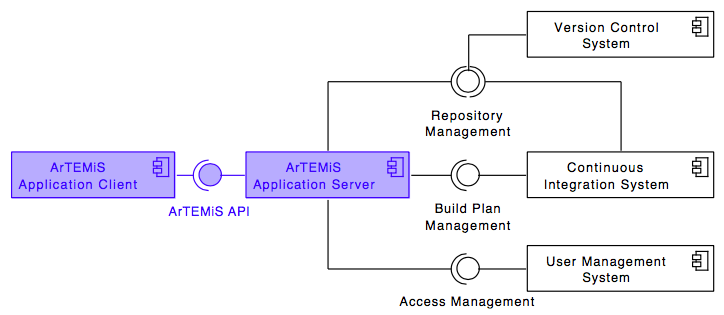
./artemis-server-cli deploy [email protected] -w build/libs/Artemis-4.4.5.warThe following diagram shows the top level design of Artemis which is decomposed into an application client (running as Angular web app in the browser) and an application server (based on Spring Boot). For programming exercises, the application server connects to a version control system (VCS) and a continuous integration system (CIS). Authentication is handled by an external user management system (UMS).
While Artemis includes generic adapters to these three external systems with a defined protocol that can be instantiated to connect to any VCS, CIS or UMS, it also provides 3 concrete implementations for these adapters to connect to:
- VCS: Atlassian Bitbucket Server
- CIS: Atlassian Bamboo Server
- UMS: Atlassian JIRA Server (more specifically Atlassian Crowd on the JIRA Server)
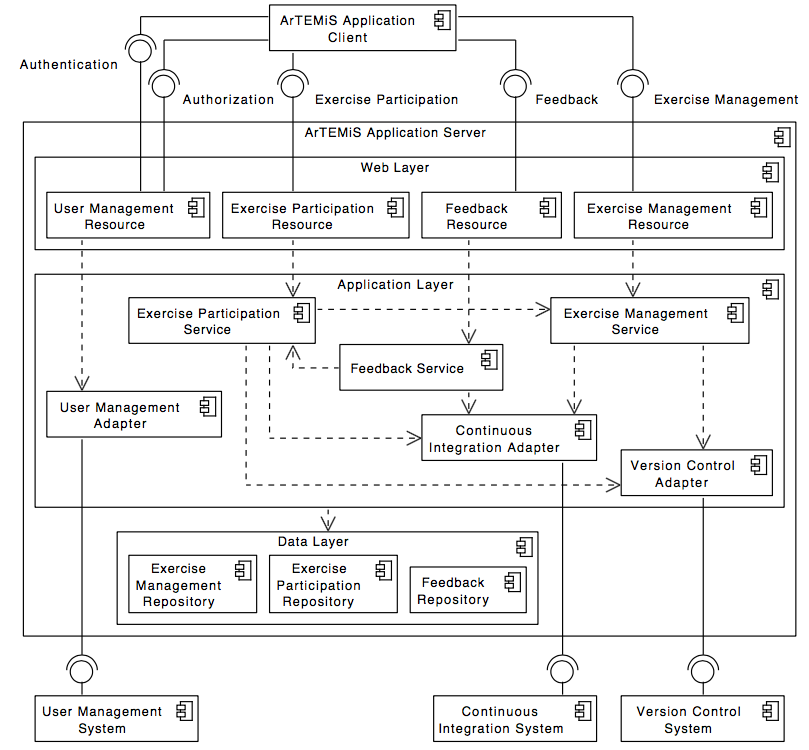
The following UML component diagram shows more details of the Artemis application server architecture and its REST interfaces to the application client.
The following UML deployment diagram shows a typical deployment of Artemis application server and application client. Student, Instructor and Teaching Assistant (TA) computers are all equipped equally with the Artemis application client being displayed in the browser.
The Continuous Integration Server typically delegates the build jobs to local build agents within the university infrastructure or to remote build agents, e.g. hosted in the Amazon Cloud (AWS).
The Artemis application server uses the following (simplified) data model in the MySQL database. It supports multiple courses with multiple exercises. Each student in the participating student group can participate in the exercise by clicking the Start Exercise button. Then a repository and a build plan for the student (User) will be created and configured. The initialization state helps to track the progress of this complex operation and allows recovering from errors. A student can submit multiple solutions by committing and pushing the source code changes to a given example code into the version control system or using the user interface. The continuous integration server automatically tests each submission, and notifies the Artemis application server, when a new result exists. In addition, teaching assistants can assess student solutions and "manually" create results.
Please note, that the actual database model is more complex. The UML class diagram above omits some details for readability (e.g. lectures, student questions, exercise details, static code analysis, quiz questions, exam sessions, submission subclasses, etc.)
There is a growing community of university instructors who are using Artemis.
We communicate using Github issues and pull requests. Additionally, you can join us on Slack to ask questions and get support. If you are interested, please send an email to Stephan Krusche.
The following universities are actively using Artemis or are currently evaluating Artemis.
- https://artemis.ase.in.tum.de
- Main contact person: Stephan Krusche
- https://artemis.codeability.uibk.ac.at
- codeAbility project
- Main contact person: Michael Breu
- https://artemis.sqa.ddnss.org
- Main contact person: Steffen Becker
- https://alpro.besec.uni-bonn.de
- Main contact person: Alexander von Trostorff
- https://artemis.se2.fim.uni-passau.de
- Main contact person: Christian Bachmaier
- https://artemis.praktomat.cs.kit.edu
- Main contact person: Dominik Fuchß


