- Terminology
- Full-NAT Mode
- DR Mode (one-arm)
- Tunnel Mode(one-arm)
- NAT Mode(one-arm)
- SNAT Mode (two-arm)
- IPv6 Support
- Virtual devices
- UDP Option of Address (UOA)
- Launch DPVS in Virtual Machine (Ubuntu)
To compile and launch DPVS, pls check README.md for this project.
About the concepts of Full-NAT (FNAT), DR, Tunnel, toa, OSPF/ECMP and keepalived, pls refer LVS and Alibaba/LVS.
Note DPVS support FNAT, DR, Tunnel, SNAT forwarding modes, and each mode can be configured as one-arm or two-arm topology, with or without OSFP/ECMP/keepalived. There're too many combinations, I cannot list all the examples here. Let's just give some popular working models used in our daily work.
The term two-arm means, you have clients in one side of load-balancer (LB) and servers (RS) in another side, then LB forwards packets between its two logical network interfaces. For example, WAN-to-LAN load balancing.
On the other hand, one-arm means all clients and servers are in same side of load-balancer, LB forwards traffic through the same logical network interface.
Logical interface (or device) could be physical
DPDKinterface, orDPVSvirtual devices like bonding, vlan and tunnel devices.
To make things easier, we do not consider virtual devices for now. Thus, two-arm topology need
- two DPDK interfaces loaded with
igb_uiodriver, and /etc/dpvs.confshould also be configured with two interfaces. Pls refer the fileconf/dpvs.conf.sample.
$ dpdk-devbind --status

Network devices using DPDK-compatible driver
============================================
0000:06:00.0 'Ethernet Controller 10-Gigabit X540-AT2' drv=igb_uio unused=uio_pci_generic
0000:06:00.1 'Ethernet Controller 10-Gigabit X540-AT2' drv=igb_uio unused=uio_pci_generic
For one-arm, only one DPDK intreface needed, and you can refer conf/dpvs.conf.single-nic.sample.
Like LVS, DPVS can be deployed as different sort of Cluster models for High-Available (HA) purpose. Both OSPF/ECMP and Master/Backup models are supported. OSPF/ECMP model need package quagga and its zebra and ospfd programs. And master/back model need Keepalived.
Considering DPDK application manages the networking interface completely (except the extra control NIC if exist), Linux Kernel and programs run on Kernel TCP/IP stack cannot receive packets from DPDK interface directly. To make Linux programs like sshd, zebra/ospfd and keepalived work, DPDK kni device is used. Then the Linux programs can working on kni device with Linux TCP/IP stack. Actually, DPVS passes the packets, which it's not interested in, to kni device. For instance, OSPF/VRRP/ssh packets. So that the programs "working" on Linux stack are able to handle them.
We do not want to port
ospfd/keepalieved/sshdto DPDK environment, beacause TCP and Socket layer is needed. And the work load is another reason.
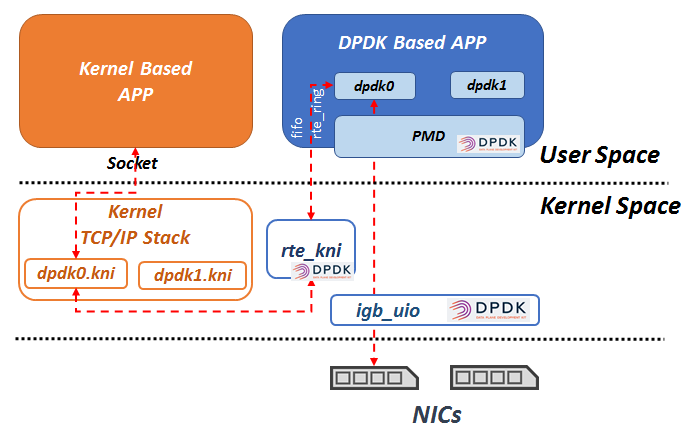
Note, keepalived is modified by DPVS project to support some specific parameters. The codes is resident in tools/keepalived and the executable is bin/keepalived. And ospfd/sshd is the standard version.
Let's start from Full-NAT example first, it's not the easiest but really popular.
This is a simple example for FullNAT (FNAT), forwarding between two interfaces. Assuming one is WAN interface (dpdk1) and another is LAN interface (dpdk0).
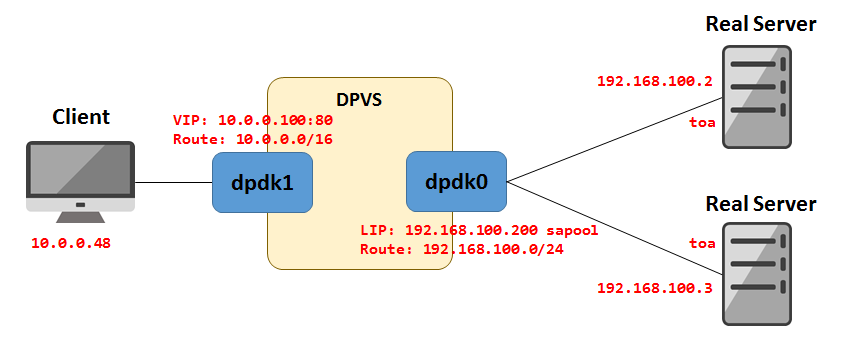
The setting including:
- ip-addresses and routes for DPDK LAN/WAN network.
- VIP on WAN interface (
dpdk1) FNATservice (vip:vport) and relatedRSFNATmode need at least one LIP on LAN interface (dpdk0)
#!/bin/sh -

# add VIP to WAN interface
./dpip addr add 10.0.0.100/32 dev dpdk1

# route for WAN/LAN access
# add routes for other network or default route if needed.
./dpip route add 10.0.0.0/16 dev dpdk1
./dpip route add 192.168.100.0/24 dev dpdk0

# add service <VIP:vport> to forwarding, scheduling mode is RR.
# use ipvsadm --help for more info.
./ipvsadm -A -t 10.0.0.100:80 -s rr

# add two RS for service, forwarding mode is FNAT (-b)
./ipvsadm -a -t 10.0.0.100:80 -r 192.168.100.2 -b
./ipvsadm -a -t 10.0.0.100:80 -r 192.168.100.3 -b

# add at least one Local-IP (LIP) for FNAT on LAN interface
./ipvsadm --add-laddr -z 192.168.100.200 -t 10.0.0.100:80 -F dpdk0
And you can use the commands below to check what's just set:
$ ./dpip addr show
inet 10.0.0.100/32 scope global dpdk1
     valid_lft forever preferred_lft forever
inet 192.168.100.200/32 scope global dpdk0
     valid_lft forever preferred_lft forever sa_used 0 sa_free 1032176 sa_miss 0
$ ./dpip route show
inet 10.0.0.100/32 via 0.0.0.0 src 0.0.0.0 dev dpdk1 mtu 1500 tos 0 scope host metric 0 proto auto
inet 192.168.100.200/32 via 0.0.0.0 src 0.0.0.0 dev dpdk0 mtu 1500 tos 0 scope host metric 0 proto auto
inet 192.168.100.0/24 via 0.0.0.0 src 0.0.0.0 dev dpdk0 mtu 1500 tos 0 scope link metric 0 proto auto
inet 10.0.0.0/16 via 0.0.0.0 src 0.0.0.0 dev dpdk1 mtu 1500 tos 0 scope link metric 0 proto auto$ ./ipvsadm -ln
IP Virtual Server version 0.0.0 (size=0)
Prot LocalAddress:Port Scheduler Flags
-> RemoteAddress:Port Forward Weight ActiveConn InActConn
TCP 10.0.0.100:80 rr
-> 192.168.100.2:80 FullNat 1 0 0
-> 192.168.100.3:80 FullNat 1 0 0$ ./ipvsadm -G
VIP:VPORT TOTAL SNAT_IP CONFLICTS CONNS
10.0.0.100:80 1
192.168.100.200 0 0And now to verify if FNAT (two-arm) works. I've setup Nginx server on RS (with TOA module) to response the HTTP request with Client's real IP and port. The response format is plain text (not html).
client$ curl 10.0.0.100
Your ip:port : 10.0.0.48:37177LIP or Local-IP is needed for FNAT translation, clients' CIP:cport will be replaced with LIP:lport, while VIP:vport will be translated to RS's RIP:rport. That's why the mode called "Full-NAT" I think.
Pls use ipvsadm --add-laddr to set LIP instead of dpip addr add .... Because the both ipvs and inet module need LIP address, and sapool option will be set automatically.
Another tip is you can use dpip addr add 10.0.0.100/16 dev dpdk1 to set VIP and WAN route simultaneously. But let's use two commands to make it clear.
Optionally, if RS need to obtain client's real IP:port by socket API, e.g., getpeername or accept, instead of some application manner. TOA kernel module should be installed on RS. TOA is developped for some version of Linux kernel, and porting may needed for other versions or other OS Kernel like BSD or mTCP.
You could refer to following links to get TOA source code and porting to your RS if needed.
To work with OSPF, the patch in patch/dpdk-stable-17.05.2/ must be applied to dpdk-stable-17.05.2 and the correct rte_kni.ko should be installed.
DPVS OSPF-cluster model looks like this, it leverage OSPF/ECMP for HA and high-scalability. This model is widely used in practice.
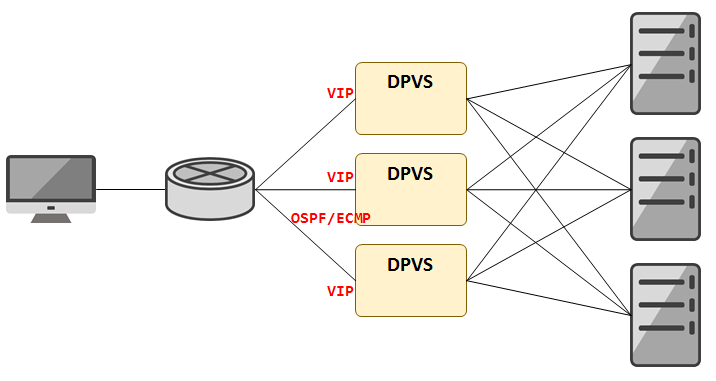
For DPVS, things become more complicated. As mentioned above, DPDK program (here is dpvs) have full control of DPDK NICs, so Linux program (ospfd) needs receive/send packets through kni device (dpdk1.kni) related to DPDK device (dpdk1).
DPDK apps based on whole TCP/IP stack like user-space Linux/BSD do not have this kind of configuration complexity, but more developing efforts are needed to porting
ospfdandkeepalivedto the TCP/IP stack used by DPDK. Anyway, that's another solution.
Thus, the internal relationship among interfaces and programs looks like below,
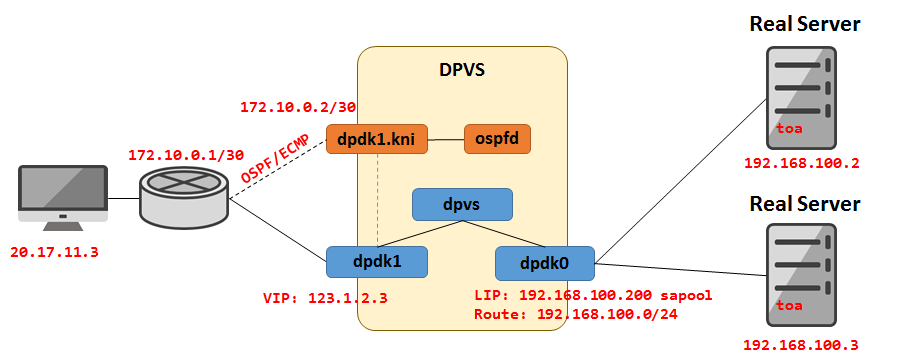
Now the configuration has two parts, one is for dpvs and another is for zebra/ospfd.
dpvs part is almost the same with the example in simple fnat, except
- one more address/route is needed to communicate between dpvs and wan-side L3-switch. For ospf packets, dpvs will just send them to kernel.
- VIP should not only set to
dpvsbydpip addr, but also need to set tokni, so thatospfdcan be aware of it and then to publish.
If you add any kni_host route which means all packets will be sent to kernel by dpvs, the prefix length of
kni_hostmust be 32.
#!/bin/sh -

# routes for LAN access
./dpip route add 192.168.100.0/24 dev dpdk0

# add service <VIP:vport> to forwarding, scheduling mode is RR.
# use ipvsadm --help for more info.
./ipvsadm -A -t 123.1.2.3:80 -s rr

# add two RS-es for service, forwarding mode is FNAT (-b)
./ipvsadm -a -t 123.1.2.3:80 -r 192.168.100.2 -b
./ipvsadm -a -t 123.1.2.3:80 -r 192.168.100.3 -b

# add at Local-IPs (LIPs) for FNAT on LAN interface
./ipvsadm --add-laddr -z 192.168.100.200 -t 123.1.2.3:80 -F dpdk0
./ipvsadm --add-laddr -z 192.168.100.201 -t 123.1.2.3:80 -F dpdk0

# add addr/route for dpvs.
./dpip addr add 123.1.2.3/32 dev dpdk1
./dpip addr add 172.10.0.2/30 dev dpdk1
./dpip route add default via 172.10.0.1 dev dpdk1
Then, the zebra/ospfd part. Firstly, run the OSPF protocol between DPVS server and wan-side L3-switch, with the "inter-connection network" (here is 172.10.0.2/30). For DPVS, we set the inter-connection IP on dpdk1.kni.
Assuming
quaggapackage is installed, if not, pls use 'yum' (CentOS) or 'apt-get' (Ubuntu) to install it. After installed, you should havezebraandospfd, as well as their config files.
$ ip link set dpdk1.kni up
$ ip addr add 172.10.0.2/30 dev dpdk1.kni
$ ip addr add 123.1.2.3/32 dev dpdk1.kni # add VIP to kni for ospfd
$ ip route add default via 172.10.0.1 dev dpdk1.kni
VIP should be add to kni device, to let ospfd to publish it.
Check if inter-connection works by ping switch.
$ ping 172.10.0.1
PING 172.10.0.1 (172.10.0.1) 56(84) bytes of data.
64 bytes from 172.10.0.1: icmp_seq=1 ttl=255 time=2.19 ms
Now let's config zebra and ospfd. Nothing special for zebra, just use it with the default configuration.
$ cat /etc/quagga/zebra.conf  # may installed to other path
! -*- zebra -*-
!
! zebra sample configuration file
!
! Id: zebra.conf.sample,v 1.1 2002/12/13 20:15:30 paul Exp $
!
hostname localhost.localdomain # change to it real hostname
password ****
enable password ****

log file /var/log/quagga/zebra.log
service password-encryption
For ospfd, these parameters need be set:
- interface: it's WAN interface
dpdk1.kni - route-id: not that significant, just use the LAN IP.
- network: which network to advertise
- the inter-connection network
172.10.0.0/30, and - the VIP
123.1.2.3/32.
- the inter-connection network
- area-ID: should be the same with switch, here is
0.0.0.0for example. - Other parameters, like "p2p", "authentication", ... they must be consistent with Switch.
$ cat /etc/quagga/ospfd.conf   # may installed to other path
log file /var/log/quagga/ospf.log
log stdout
log syslog
password ****
enable password ****
interface dpdk1.kni      # should be wan-side kni device
ip ospf hello-interval 10
ip ospf dead-interval 40
router ospf
ospf router-id 192.168.100.200 # just use LAN IP
log-adjacency-changes
auto-cost reference-bandwidth 1000
network 172.10.0.0/30 area 0.0.0.0 # announce inter-connection network
network 123.1.2.3/32 area 0.0.0.0 # announce VIP
Note OSPF must also be configured on l3-switch. This Tutorial is not about OSPF's configuration, so no more things about switch here.
Now start zebra and ospfd:
service restart zebra
service restart ospfd
Hopefully (if OSPF works), the VIP is accessible by client:
client: curl 123.1.2.3This is an example for FullNAT used in internal network (LAN). Keepalived (DPVS modified version) is used for to make DPVS works as Master/Backup model.
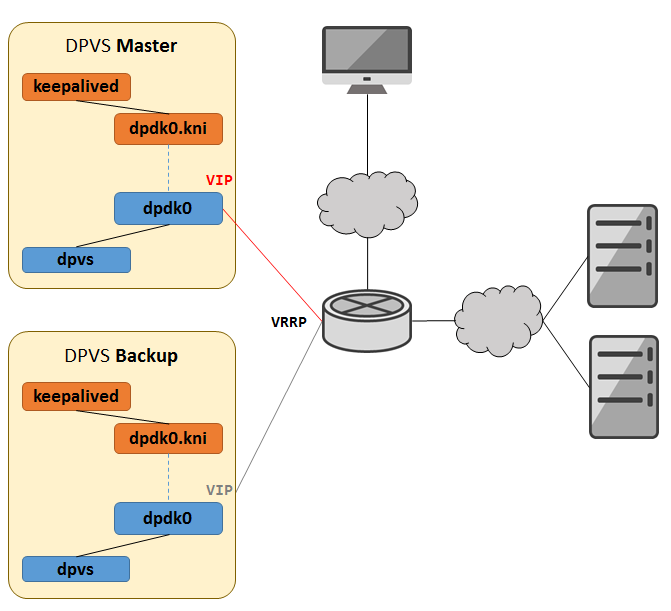
By using keepalived, routes, LIP, VIP and RS can be configured through keepalived config file. Note the configure parameters for DPVS modified keepalived is slight different from original keepalived.
$ cat /etc/keepalived/keepalived.conf
! Configuration File for keepalived

global_defs {
    notification_email {
        [email protected]
    }
    notification_email_from [email protected]
    smtp_server 1.2.3.4
    smtp_connect_timeout 60
    router_id DPVS_DEVEL
}

local_address_group laddr_g1 {
    192.168.100.200 dpdk0    # use DPDK interface
    192.168.100.201 dpdk0    # use DPDK interface
}

#
# VRRP section
#
vrrp_instance VI_1 {
    state MASTER                  # master
    interface dpdk0.kni           # should be kni interface
    dpdk_interface dpdk0          # should be DPDK interface
    virtual_router_id 123         # VID should be unique in network
    priority 100                  # master's priority is bigger than worker
    advert_int 1
    authentication {
        auth_type PASS
        auth_pass ****
    }

    virtual_ipaddress {
        192.168.100.254
    }
}

#
# Virtual Server Section
#
virtual_server_group 192.168.100.254-80 {
    192.168.100.254 80
}

virtual_server group 192.168.100.254-80 {
    delay_loop 3
    lb_algo rr         # scheduling algorithm Round-Robin
    lb_kind FNAT       # Forwarding Mode Full-NAT
    protocol TCP       # Protocol TCP

    laddr_group_name laddr_g1   # Local IP group-ID

    real_server 192.168.100.2 80 { # real-server
        weight 100
        inhibit_on_failure
        TCP_CHECK {    # health check
            nb_sock_retry 2
            connect_timeout 3
            connect_port 80
        }
    }

    real_server 192.168.100.3 80 { # real-server
        weight 100
        inhibit_on_failure
        TCP_CHECK { # health check
            nb_sock_retry 2
            connect_timeout 3
            connect_port 80
        }
    }
}
The keepalived config for backup is the same with Master, except the state should be 'BACKUP', and priority should be lower.
vrrp_instance VI_1 {
    state BACKUP
    priority 80
    ... ...
}
Start keepalived on both Master and Backup.
./keepalived -f /etc/keepalived/keepalived.confFor test only, add VIP and routes to DPDK interface manually on Master. Do not set VIP on both master and backup, in practice they should be added to keepalived configure file.
./dpip addr add 192.168.100.254/32 dev dpdk0
./dpip route add 192.168.100.0/24 dev dpdk0
Check if parameters just set are correct:
$ ./ipvsadm  -ln
IP Virtual Server version 0.0.0 (size=0)
Prot LocalAddress:Port Scheduler Flags
  -> RemoteAddress:Port           Forward Weight ActiveConn InActConn
TCP  192.168.100.254:80 rr
  -> 192.168.100.2:80             FullNat 100    0          0
  -> 192.168.100.3:80             FullNat 100    0          0

$ ./dpip addr show
inet 192.168.100.254/32 scope global dpdk0
     valid_lft forever preferred_lft forever
inet 192.168.100.201/32 scope global dpdk0
     valid_lft forever preferred_lft forever sa_used 0 sa_free 1032176 sa_miss 0
inet 192.168.100.200/32 scope global dpdk0
     valid_lft forever preferred_lft forever sa_used 0 sa_free 1032176 sa_miss 0

$ ./dpip route show
inet 192.168.100.200/32 via 0.0.0.0 src 0.0.0.0 dev dpdk0 mtu 1500 tos 0 scope host metric 0 proto auto
inet 192.168.100.201/32 via 0.0.0.0 src 0.0.0.0 dev dpdk0 mtu 1500 tos 0 scope host metric 0 proto auto
inet 192.168.100.0/24 via 0.0.0.0 src 0.0.0.0 dev dpdk0 mtu 1500 tos 0 scope link metric 0 proto auto

$ ./ipvsadm  -G
VIP:VPORT            TOTAL    SNAT_IP              CONFLICTS  CONNS
192.168.100.254:80   2
                              192.168.100.200      0          0
                              192.168.100.201      0          0
Seems good, then try access the VIP from client.
client$ curl 192.168.100.254
Your ip:port : 192.168.100.146:42394
We just explain how DPVS works with keepalived, and not verify if the master/backup feature provided by keepalived works. Pls refer LVS docs if needed.
Let's make a simple example for DR mode, some users may need it.
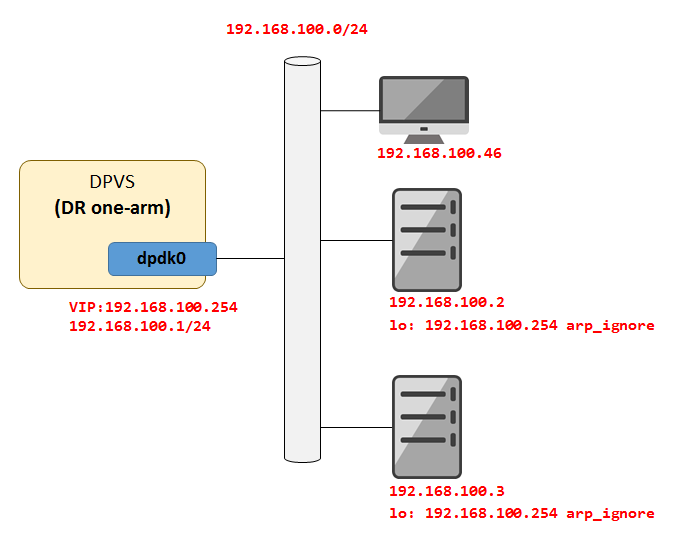
To use DR:
- dpvs needs a LAN IP first. (for one-arm, it must be different from VIP).
- the
RSandDPVSmust in same sub-network (on-link). - On
RS:VIPmust be added to its lo interface. - On
RS:arp_ignoremust be set to lo interface.
DPVSneeds a RS-faced IP itself (here means "LAN-side" IP, it's not the same conception as Local-IP (LIP) used by FNAT, just a normal IP address). BecauseDPVSneed communicated withRSes. For one-arm, this LAN IP and VIP are on same DPDK interface. But they cannot be same, becauseVIPwill also be set onRSes, if we do not use a separated LAN-IP,RSes will not reply the ARP request. Furthermore, the LAN-IP ofDPVSmust be added before VIP. For tow-arm DR,DPVSalso need a LAN side IP to talk with LAN-side hosts, while VIP is configured on client-faced (WAN) interface.
On DPVS, The DR configuration can be,
# on DPVS

# add LAN IP for DPVS, it must be different from VIP
# and must be added before VIP.
./dpip addr add 192.168.100.1/24 dev dpdk0
# add VIP and the route will generate automatically.
./dpip addr add 192.168.100.254/32 dev dpdk0

# route for LAN network, just a hint.
#./dpip route add 192.168.100.0/24 dev dpdk0

# add service <VIP:vport> to forwarding, scheduling mode is RR.
# use ipvsadm --help for more info.
./ipvsadm -A -t 192.168.100.254:80 -s rr

# add two RS for service, forwarding mode is DR
./ipvsadm -a -t 192.168.100.254:80 -r 192.168.100.2 -g
./ipvsadm -a -t 192.168.100.254:80 -r 192.168.100.3 -g
And then on RSes,
# for each Real Server
rs$ ip addr add 192.168.100.254/32 dev lo    # add VIP to each RS's lo
rs$ sysctl -w net.ipv4.conf.lo.arp_ignore=1  # ignore ARP on lo
net.ipv4.conf.lo.arp_ignore = 1
Try if client can access VIP with DR mode.
client$ curl 192.168.100.254
Your ip:port : 192.168.100.46:13862
DR mode for two-arm is similar with two-arm FNAT, pls change the forwarding mode by
ipvsadm -g, and you need NOT configLIP. Configuration ofRSes are the same with one-arm.
Traffic flow of tunnel mode is the same as DR mode. It forwards packets to RSs, and then RSs send replies to clients directly. Different with DR mode, tunnel mode can forward packets across L2 network through ipip tunnels between DPVS and RSs.
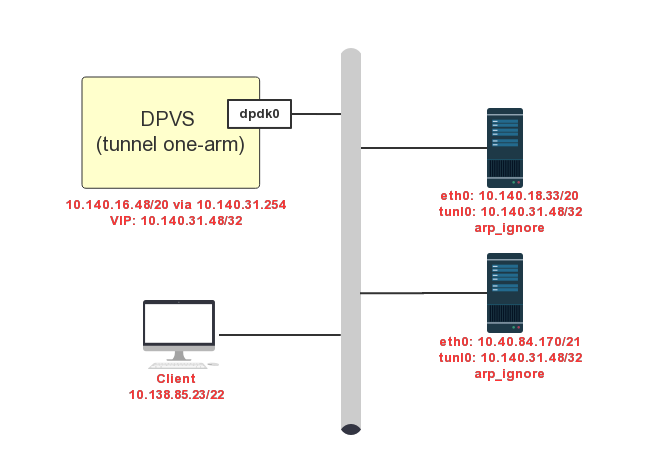
DPVS configs of the above diagram as follows.
## DPVS configs ##
# config LAN network on dpdk0
./dpip addr add 10.140.16.48/20 dev dpdk0
# config default route, `src` must be set for tunnel mode
./dpip route add default via 10.140.31.254 src 10.140.16.48 dev dpdk0
# add service <VIP:vport> to forwarding, scheduling mode is RR
./ipvsadm -A -t 10.140.31.48:80 -s rr
# add RS in the same subnet with DPVS, forwarding mode is tunnel
./ipvsadm -a -t 10.140.31.48:80 -r 10.140.18.33 -i
# add another RS in different subnet with DPVS, forwarding mode is tunnel
./ipvsadm -a -t 10.140.31.48:80 -r 10.40.84.170 -i
# add VIP and the route will generate automatically
./dpip addr add 10.140.31.48/32 dev dpdk0
DPVS tunnel requires RS supports ip tunnel. VIP should be configured and arp_ignore should be set on RS.
## for each Real Server ##
rs$ ifconfig tunl0 10.140.31.48 netmask 255.255.255.255 broadcast 10.140.31.48 up
rs$ sysctl -w net.ipv4.conf.tunl0.arp_ignore=1  # ignore ARP on tunl0
rs$ sysctl -w net.ipv4.conf.tunl0.rp_filter=2 # use loose source validation
You should note that default rp_filter uses strict source validation, but source route for incoming packets on tunl0 is not configured on tunl0. So we change rp_filter behavior of tunl0 to loose source validation mode to avoid packet drop on RSs.
You can test the dpvs tunnel service now.
client$ curl 10.140.31.48:80
Hi, I am 10.140.18.33.
client$ curl 10.140.31.48:80
Hi, I am 10.40.84.170.
A strict limitation exists for DPVS NAT mode: DPVS NAT mode can only work in single lcore. It is hard for DPVS to support multi-lcore NAT forwarding mode due to the following facts.
- DPVS session entries are splited and distributed on lcores by RSS.
- NAT forwarding requires both inbound and outbound traffic go through DPVS.
- Only dest IP/port is translated in NAT forwarding, source IP/port is not changed.
- Very limited maximum flow director rules can be set for a NIC.
So, if no other control of the traffic flow, outbound packets may arrive at different lcore from inbound packets. If so, outbound packets would be dropped because session lookup miss. Full-NAT fixes the problem by using Flow Director(FDIR). However, there are very limited rules can be added for a NIC, i.e. 8K for XT-540. Unlike Full-NAT, NAT does not have local IP/port, so FDIR rules can only be set on source IP/port, which means only thousands concurrency is supported. Therefore, FDIR is not feasible for NAT.
Whatever, we give a simple example for NAT mode. Remind it only works single lcore.
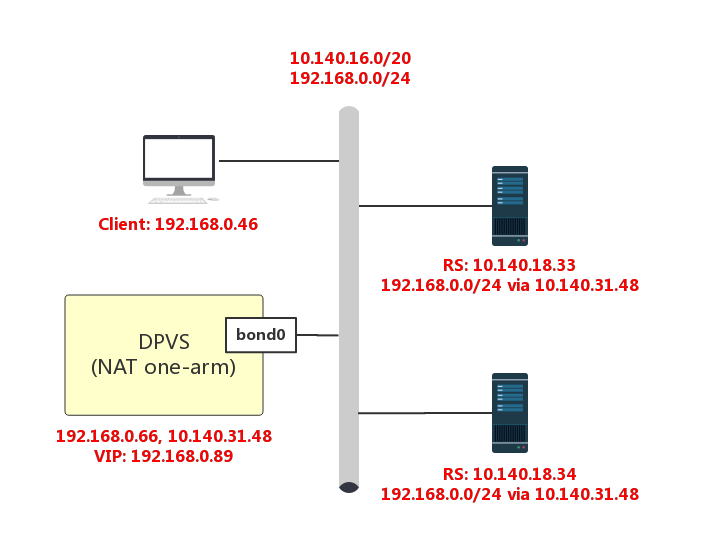
## DPVS configs ##
# config LAN network on bond0, routes will generate automatically
./dpip addr add 192.168.0.66/24 dev bond0
./dpip addr add 10.140.31.48/20 dev bond0

# add service <VIP:vport> to forwarding, scheduling mode is RR
./ipvsadm -A -t 192.168.0.89:80 -s -rr

# add two RSs, forwarding mode is NAT
./ipvsadm -A -t 192.168.0.89:80 -r 10.140.18.33 -m
./ipvsadm -A -t 192.168.0.89:80 -r 10.140.18.34 -m

# add VIP and the route will generate automatically
./dpip addr add 192.168.0.89/32 dev bond0

## keepalived.conf ##
static_ipaddress {
    192.168.0.66/24 dev bond0
    10.140.31.48/20 dev bond0
}

virtual_server_group vip_nat {
    192.168.0.89 80
}

virtual_server group vip_nat {
    protocol tcp
    lb_algo rr
    lb_kind NAT

    real server 10.140.18.33 80 {
         weight 100
         inhibit_on_failure
         TCP_CHECK {
            nb_sock_retry 2
            connect_timeout 3
            connect_port 80
        }
    }

    real server 10.140.18.34 80 {
         weight 100
         inhibit_on_failure
         TCP_CHECK {
            nb_sock_retry 2
            connect_timeout 3
            connect_port 80
        }
    }
}
On RSs, back routes should be pointed to DPVS.
## for each real server ##
ip route add 192.168.0.0/24 via 10.140.31.48 dev eth0
Now you can test DPVS NAT mode.
client$ curl 192.168.0.89:80
Hi, I am 10.140.18.33.
client$ curl 192.168.0.89:80
Hi, I am 10.140.18.34.
SNAT mode can be used to let hosts in internal network without WAN IP (e.g., servers in IDC) to have Internet access.
To configure SNAT,
- WAN-side IP must be configured with
sapooloption. - SNAT uses "match" service instead of vip:vport for TCP/UDP,
- default route may be needed on DPVS WAN interface.
matchsupportsproto,src-range,dst-range,oifandiif. For example:proto=tcp,src-range=192.168.0.0-192.168.0.254,dst-range=0.0.0.0:1-1024,oif=dpdk1.
The SNAT setting could be:
#!/bin/sh -

WAN_IP=123.1.2.3        # WAN IP can access Internet.
WAN_PREF=24             # WAN side network prefix length.
GATEWAY=123.1.2.1       # WAN side gateway

LAN_IP=192.168.100.1
LAN_PREF=24

# add WAN-side IP with sapool
./dpip addr add $WAN_IP/$WAN_PREF dev dpdk1 sapool # must add sapool for WAN-side IP
# add LAN-side IP as well as LAN route (generated)
./dpip addr add $LAN_IP/$LAN_PREF dev dpdk0

# add default route for WAN interface
./dpip route add default via $GATEWAY dev dpdk1

# SNAT section
# -H MATCH       SNAT uses -H for "match" service instead of -t or -u
#                MATCH support "proto", "src-range", "oif" and "iif".
# -r <WIP:0>     used to specify the WAN IP after SNAT translation,
#                the "port" part must be 0.
# -J             for "SNAT" forwarding mode.
MATCH0='proto=tcp,src-range=192.168.100.0-192.168.100.254,oif=dpdk1'
MATCH1='proto=icmp,src-range=192.168.100.0-192.168.100.254,oif=dpdk1'

./ipvsadm -A -s rr -H $MATCH0
./ipvsadm -a -H $MATCH0 -r $WAN_IP:0 -w 100 -J

./ipvsadm -A -s rr -H $MATCH1
./ipvsadm -a -H $MATCH1 -r $WAN_IP:0 -w 100 -J
You can also use keepalived to configure SNAT instead of using ipvsadm. Every SNAT serivce should has parameter 'match':
virtual_server match SNAT1 {
    protocol UDP
    lb_algo rr
    lb_kind SNAT
    src-range 192.168.100.0-192.168.100.254
    oif dpdk1

    real_server 123.1.2.1  0 {
        weight 4
    }
}

virtual_server match SNAT2 {
    protocol ICMP
    lb_algo wrr
    lb_kind SNAT
    src-range 192.168.100.1-192.168.100.254
    dst-range 123.1.2.0-123.1.2.254
    oif dpdk1
    iif dpdk0

    real_server 123.1.2.1  0 {
        weight 4
    }
}
If you also want to use keepalived instead of using dpip to configure WAN/LAN IP, you can using 'alpha' and 'omega' to configure keepalived. Healthy check is needed in alpha mode, so you have to make a healthy check. And the result of the healthy check must always be true or RS(LAN IP in fact) will be deleted. You can use MISC_CHECK to make real_server/WAN IP always be healthy:
virtual_server match SNAT {
    protocol UDP
    delay_loop 3
    lb_algo rr
    lb_kind SNAT
    src-range 192.168.100.0-192.168.100.254
    oif dpdk1
    alpha
    omega
    quorum 1
    quorum_up "dpip addr add XXX;" ##Here is your cmd, you can also use a script.
    quorum_down "dpip addr del XXX;"

    real_server 123.1.2.2 0 {
        weight 4
        MISC_CHECK {
           misc_path "exit 0"##Just make a healthy check which will always judge real_server healthy
           misc_timeout 10
        }
    }
}
For hosts in "LAN", the default route should be set to DPVS server's LAN IP.
host$ ip route add default via 192.168.100.1 dev eth0Then try Internet access from hosts through SNAT DPVS server.
host$ ping www.iqiyi.com
host$ curl www.iqiyi.comDPVS support IPv6 since 1.7-0. You can configure IPv6 fullnat just like IPv4:
#!/bin/sh -

# add VIP to WAN interface
./dpip addr add 2001::1/128 dev dpdk1

# route for WAN/LAN access
# add routes for other network or default route if needed.
./dpip route -6 add 2001::/64 dev dpdk1

# add service <VIP:vport> to forwarding, scheduling mode is RR.
# use ipvsadm --help for more info.
./ipvsadm -A -t [2001::1]:80 -s rr

# add two RS for service, forwarding mode is FNAT (-b)
./ipvsadm -a -t [2001::1]:80 -r 2001::3 -b
./ipvsadm -a -t [2001::1]:80 -r 2001::4 -b

# add at least one Local-IP (LIP) for FNAT on LAN interface
./ipvsadm --add-laddr -z 2001::2 -t [2001::1]:80 -F dpdk0
You can use commands to check what's you have set like IPv4 except route:
$./dpip route -6 show
inet6 2001::1/128 dev dpdk0 mtu 1500 scope host
inet6 2001::2/128 dev dpdk0 mtu 1500 scope host
inet6 2001::/64 dev dpdk0 mtu 1500 scope link
You can configure IPv6 OSPF's configuration like this:
$ cat /etc/quagga/ospf6d.conf   # may installed to other path
log file /var/log/quagga/ospf6.log
log stdout
log syslog
password ****
enable password ****
interface dpdk1.kni
 ipv6 ospf6 network point-to-point
 ipv6 ospf6 hello-interval 10
 ipv6 ospf6 dead-interval 40
!
router ospf6
 router-id 192.168.100.200
 area 0.0.0.0 range 2001::1/64 # announce VIP
 area 0.0.0.0 range fec0::172:10:10:11/127 # announce inter-connection network
 interface dpdk1.kni area 0.0.0.0
!
If you prefer keepalived, you can configure it like this:
$ cat /etc/keepalived/keepalived.conf
! Configuration File for keepalived

global_defs {
    notification_email {
        [email protected]
    }
    notification_email_from [email protected]
    smtp_server 1.2.3.4
    smtp_connect_timeout 60
    router_id DPVS_DEVEL
}

local_address_group laddr_g1 {
    2001::2 dpdk0    # use DPDK interface
}

#
# VRRP section
#
vrrp_instance VI_1 {
    state MASTER                  # master
    interface dpdk0.kni           # should be kni interface, and IPv4 should be configured for vrrp
    dpdk_interface dpdk0          # should be DPDK interface
    virtual_router_id 123         # VID should be unique in network
    priority 100                  # master's priority is bigger than worker
    advert_int 1
    authentication {
        auth_type PASS
        auth_pass ****
    }

    virtual_ipaddress {
        2001::1
    }
}

#
# Virtual Server Section
#
virtual_server_group 2001-1-80 {
    2001::1 80
}

virtual_server group 2001-1-80 {
    delay_loop 3
    lb_algo rr         # scheduling algorithm Round-Robin
    lb_kind FNAT       # Forwarding Mode Full-NAT
    protocol TCP       # Protocol TCP

    laddr_group_name laddr_g1   # Local IP group-ID

    real_server 2001::3 80 { # real-server
        weight 100
        inhibit_on_failure
        TCP_CHECK {    # health check
            nb_sock_retry 2
            connect_timeout 3
            connect_port 80
        }
    }

    real_server 2001::4 80 { # real-server
        weight 100
        inhibit_on_failure
        TCP_CHECK { # health check
            nb_sock_retry 2
            connect_timeout 3
            connect_port 80
        }
    }
}
DPVS supports virtual devices, such as Bonding, VLAN, IP-in-IP and GRE Tunnel.
For Bonding device, both DPVS and connected Switch/Router need to set the Bonding interfaces with same Bonding mode. Note DPVS just supports bonding mode 0 and 4 for now. To enable Bonding device on DPVS, pls refer conf/dpvs.bond.conf.sample. Each Bonding device needs one or more DPDK Physical device (dpdk0, ...) to work as it's slaves.
To use VLAN device, you can use dpip tool, VLAN device can be created based on real DPDK Physical device (e.g., dpdk0, dpdk1) or Bonding device (e.g., bond0). But cannot create VLAN device on VLAN device.
This is the VLAN example, pls check dpip vlan help for more info.
$ dpip vlan add dpdk0.100 link dpdk0 proto 802.1q id 100
$ dpip vlan add link dpdk0 proto 802.1q id 101            # auto generate dev name
$ dpip vlan add link dpdk1 id 102
$ dpip vlan add link bond1 id 103DPVS support tunnel devices, including IP-in-IP and GRE tunnel. This can be used for example "SNAT-GRE" cluster, remote host use tunnel to access Internet through DPVS SNAT cluster.
Setting up tunnel device is just like what we do on Linux, use dpip instead of ip(8).
$ dpip tunnel add mode ipip ipip1 local 1.1.1.1 remote 2.2.2.2
$ dpip tunnel add gre1 mode gre local 1.1.1.1 remote 2.2.2.2 dev dpdk0
You can also use keepalived to configure tunnel instead of using ipvsadm.
tunnel_group tunnel_gre {
    tunnel_entry gre100 {
        kind gre
        local 10.62.5.10
        remote 10.62.5.20
    }
    tunnel_entry gre200 {
        kind gre
        local 10.62.5.10
        remote 10.62.6.10
   }
   tunnel_entry gre300 {
        kind gre
        local 10.62.5.10
        remote 10.62.6.11
   }
}
Pls also check dpip tunnel help for details.
Pls Note, by using Tunnel
- RSS schedule all packets to same queue/CPU since underlay source IP may the same. if one lcore's
sa_poolget full,sa_misshappens.fdir/rsswon't works well on tunnel deivce, do not use tunnel for FNAT.
Like DPDK Physical device, the Bonding and VLAN Virtual devices (e.g., bond0 and dpdk0.100) have their own related KNI devices on Linux environment (e.g., bond0.kni, dpdk0.100.kni).
This is the example devices relationship between physical, vlan, bonding and KNI devices.
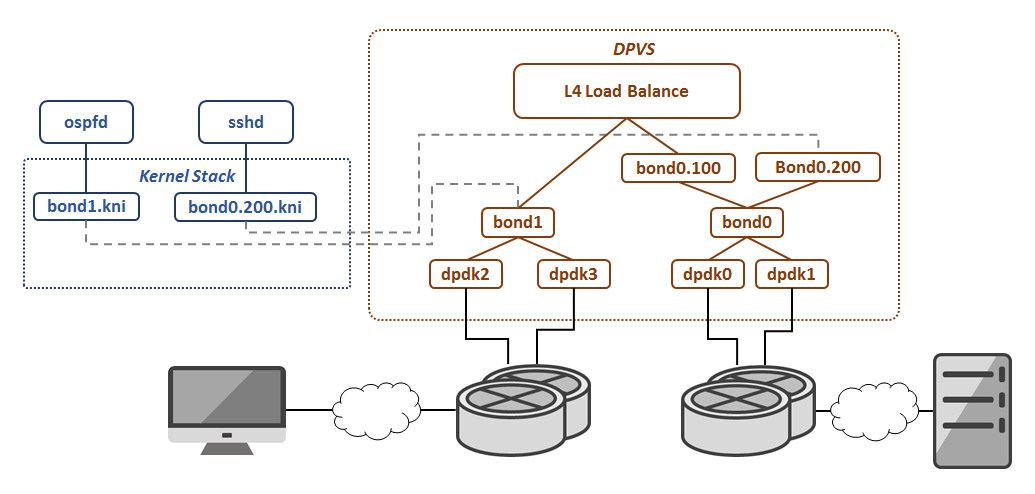
To configure DPVS (FNAT/DR/Tunnel/SNAT, one-arm/two-arm, keepalived/ospfd) for Virtual device is nothing special. Just "replace" the logical interfaces on sections above (like dpdk0, dpdk1, dpdk1.kni) with corresponding virtual devices.
As we know, TOA is used to get TCP's real Client IP/Port in LVS FNAT mode. We introduce UDP Option of Address or UOA, to let RS being able to retrieve real client IP/Port for the scenario source IP/port are modified by middle boxes (like UDP FNAT).
To achieve this,
- The kernel module
uoa.kois needed to be installed onRS, and - the program on
RSjust need agetsockopt(2)call to get the real client IP/port.
The example C code for RS to fetch Real Client IP can be found here.
rs$ insmod `uoa`
rs$ cat /proc/net/uoa_stats
 Success     Miss  Invalid|UOA  Got     None    Saved Ack-Fail
12866352 317136864        0  3637127 341266254  3628560        0
Statistics are supported for debug purpose. Note recvfrom(2) is kept untouched, it will still return the source IP/port in packets, means the IP/port modified or translated by DPVS in UDP FNAT mode.
It's useful to send the data back by socket. Pls note UDP socket is connect-less, one socket-fd can be used to communicate with different peers.
Actually, we use private IP option to implement UOA, pls check the details in uoa.md.
Before DPDK build and install ,fix code for ubuntu in vm
$ cd dpdk-stable-17.05.2/
$ sed -i "s/pci_intx_mask_supported(dev)/pci_intx_mask_supported(dev)||true/g" lib/librte_eal/linuxapp/igb_uio/igb_uio.c
Now to set up DPDK hugepage,for more messages ( single-node system) pls refer the link.
$ # for single node machine
$ echo 1024 > /sys/devices/system/node/node0/hugepages/hugepages-2048kB/nr_hugepagesmay need install dependencies, like
openssl,poptandnumactl, e.g.,apt-get install libpopt-dev libssl-dev libnuma-dev(Ubuntu).
Now, dpvs.conf must be put at /etc/dpvs.conf, just copy it from conf/dpvs.conf.single-nic.sample.
$ cp conf/dpvs.conf.single-nic.sample /etc/dpvs.confThe NIC for Ubuntu may not support flow-director(fdir),for that case ,pls use 'single worker',may decrease conn_pool_size .
queue_number        1
! worker config (lcores)
worker_defs {
    <init> worker cpu0 {
        type    master
        cpu_id  0
    }

    <init> worker cpu1 {
        type    slave
        cpu_id  1
        port    dpdk0 {
            rx_queue_ids     0
            tx_queue_ids     0
            ! isol_rx_cpu_ids  9
            ! isol_rxq_ring_sz 1048576
        }
    }