Project Page | Video | Paper | Data
Jing Lin, Ailing Zeng, Haoqian Wang, Lei Zhang, Yu Li
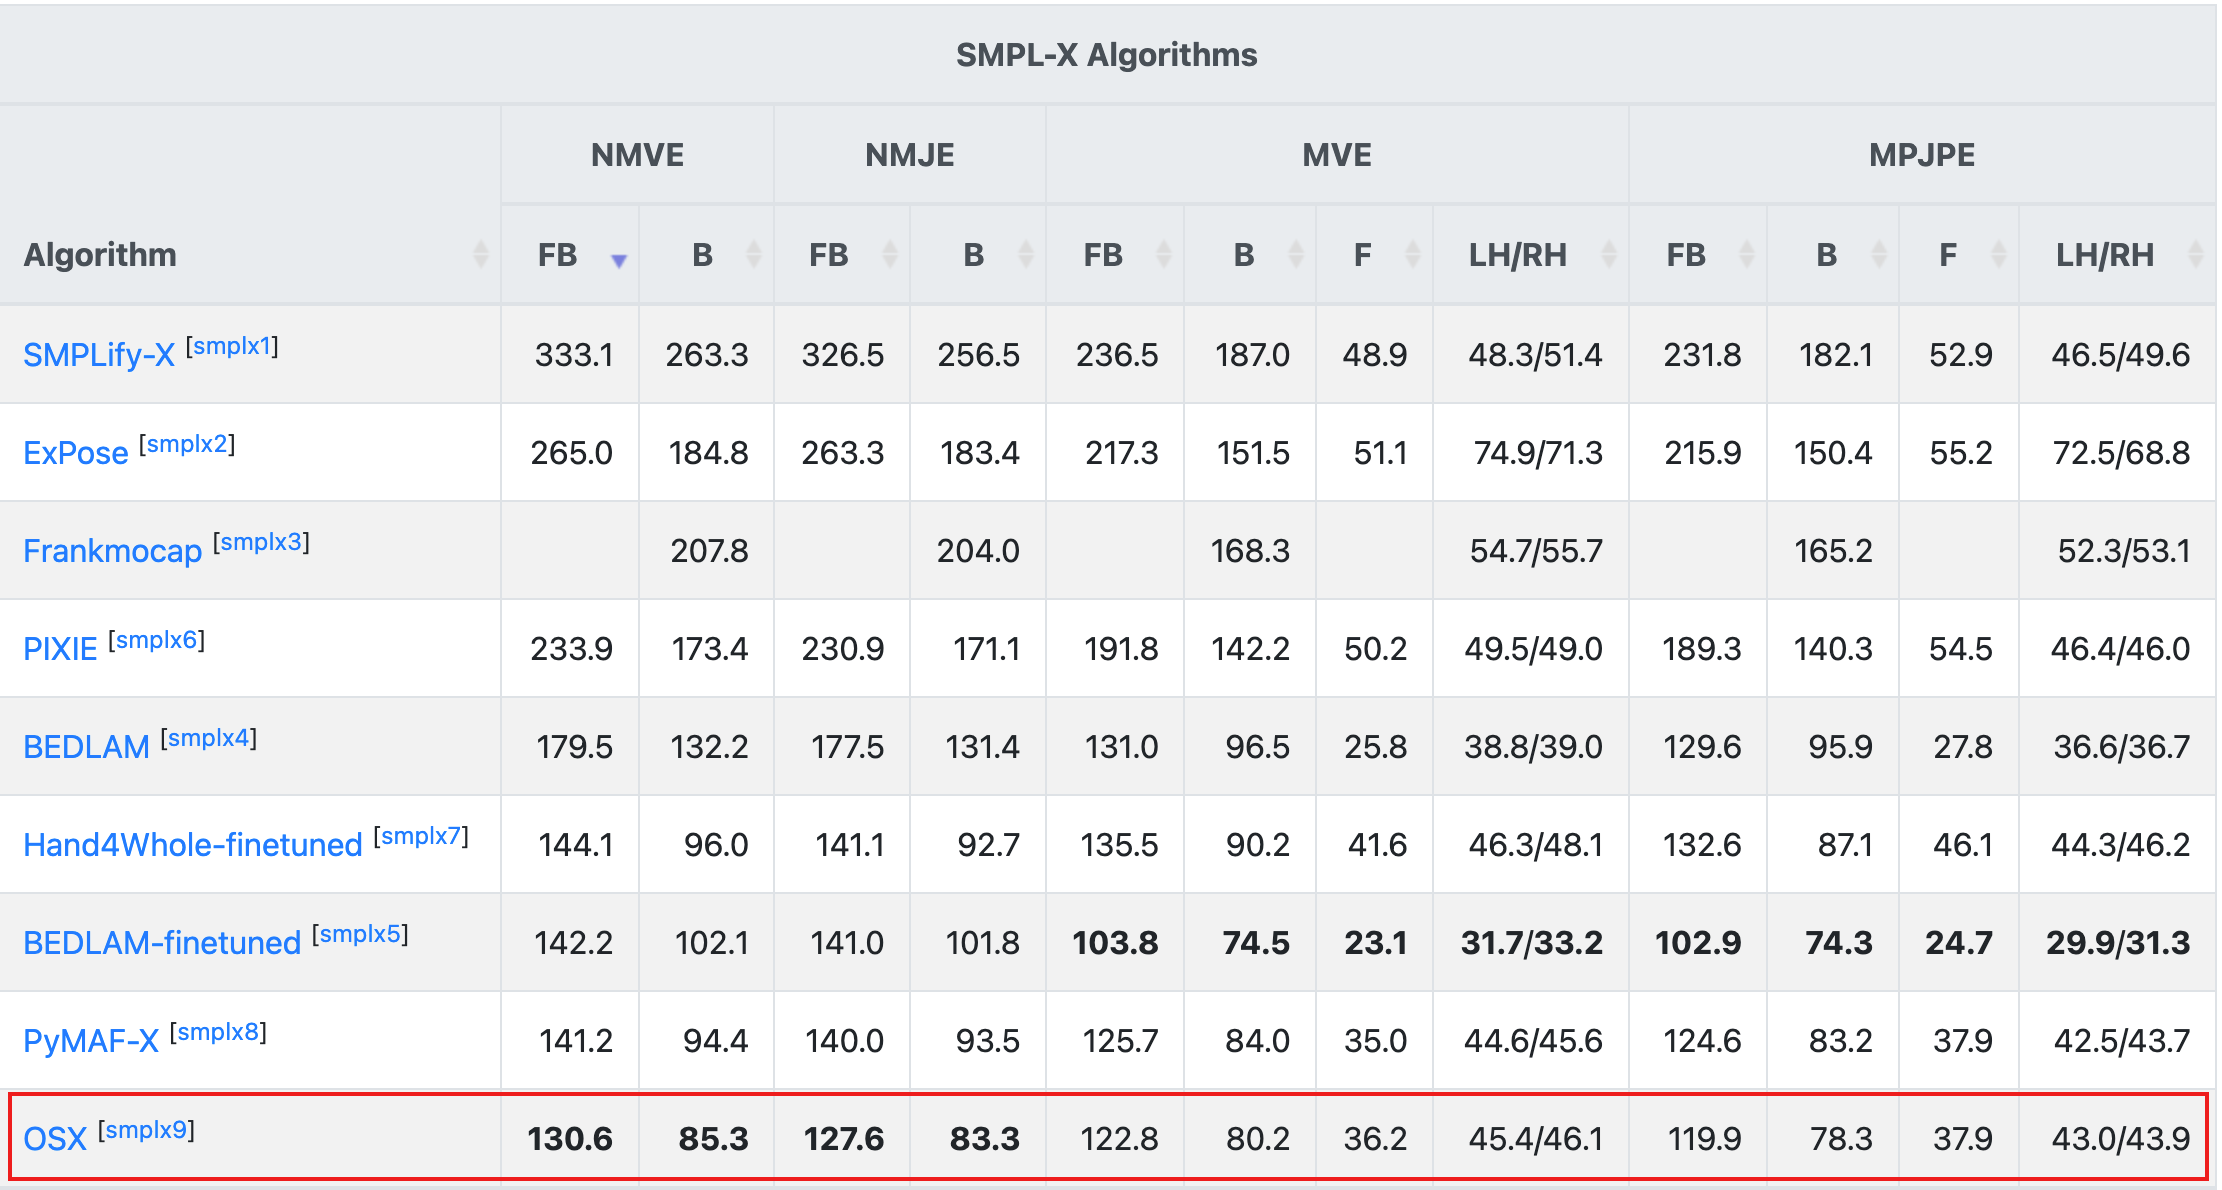
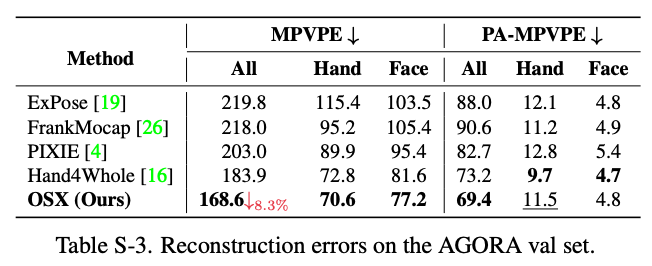
This repo is official PyTorch implementation of One-Stage 3D Whole-Body Mesh Recovery with Component Aware Transformer (CVPR2023). We propose the first one-stage whole-body mesh recovery method (OSX) and build a large-scale upper-body dataset (UBody). It is the top-1 method on AGORA benchmark SMPL-X Leaderboard (dated March 2023).
-
Recommend to install by:
pip install torch==1.11.0+cu113 torchvision==0.12.0+cu113 torchaudio==0.11.0 --extra-index-url https://download.pytorch.org/whl/cu113
-
Python packages:
pip install -r requirements.txt
-
mmcv-full:
pip install openmim
mim install mmcv-full==1.7.1
-
mmpose:
cd main/transformer_utils
python setup.py develop
- Slightly change
torchgeometrykernel code following here. - Download the pre-trained OSX from here.
- Prepare
input.pngand pre-trained snapshot atdemofolder. - Prepare
human_model_filesfolder following belowDirectorypart and place it atcommon/utils/human_model_files. - Go to any of
mainfolders and editbboxofdemo.py. - Run
python demo.py --gpu 0. - If you run this code in ssh environment without display device, do follow:
1、Install oemesa follow https://pyrender.readthedocs.io/en/latest/install/
2、Reinstall the specific pyopengl fork: https://github.com/mmatl/pyopengl
3、Set opengl's backend to egl or osmesa via os.environ["PYOPENGL_PLATFORM"] = "egl"
The ${ROOT} is described as below.
${ROOT}
|-- data
|-- dataset
|-- demo
|-- main
|-- pretrained_models
|-- tool
|-- output
|-- common
|   |-- utils
|   |   |-- human_model_files
|   |   |   |-- smpl
|   |   |   |   |-- SMPL_NEUTRAL.pkl
|   |   |   |   |-- SMPL_MALE.pkl
|   |   |   |   |-- SMPL_FEMALE.pkl
|   |   |   |-- smplx
|   |   |   |   |-- MANO_SMPLX_vertex_ids.pkl
|   |   |   |   |-- SMPL-X__FLAME_vertex_ids.npy
|   |   |   |   |-- SMPLX_NEUTRAL.pkl
|   |   |   |   |-- SMPLX_to_J14.pkl
|   |   |   |-- mano
|   |   |   |   |-- MANO_LEFT.pkl
|   |   |   |   |-- MANO_RIGHT.pkl
|   |   |   |-- flame
|   |   |   |   |-- flame_dynamic_embedding.npy
|   |   |   |   |-- flame_static_embedding.pkl
|   |   |   |   |-- FLAME_NEUTRAL.pkl
datacontains data loading codes.datasetcontains soft links to images and annotations directories.pretrained_modelscontains pretrained models.democontains demo codes.maincontains high-level codes for training or testing the network.toolcontains pre-processing codes of AGORA and pytorch model editing codes.outputcontains log, trained models, visualized outputs, and test result.commoncontains kernel codes for Hand4Whole.human_model_filescontainssmpl,smplx,mano, andflame3D model files. Download the files from [smpl] [smplx] [SMPLX_to_J14.pkl] [mano] [flame]. If you have problems about the model preparation, please refer to this issue, where I provide the link for each files.
You need to follow directory structure of the dataset as below.
${ROOT}
|-- dataset
|   |-- AGORA
|   |   |-- data
|   |   |   |-- AGORA_train.json
|   |   |   |-- AGORA_validation.json
|   |   |   |-- AGORA_test_bbox.json
|   |   |   |-- 1280x720
|   |   |   |-- 3840x2160
|   |-- EHF
|   |   |-- data
|   |   |   |-- EHF.json
|   |-- Human36M
|   |   |-- images
|   |   |-- annotations
|   |-- MPII
|   |   |-- data
|   |   |   |-- images
|   |   |   |-- annotations
|   |-- MPI_INF_3DHP
|   |   |-- data
|   |   |   |-- images_1k
|   |   |   |-- MPI-INF-3DHP_1k.json
|   |   |   |-- MPI-INF-3DHP_camera_1k.json
|   |   |   |-- MPI-INF-3DHP_joint_3d.json
|   |   |   |-- MPI-INF-3DHP_SMPL_NeuralAnnot.json
|   |-- MSCOCO
|   |   |-- images
|   |   |   |-- train2017
|   |   |   |-- val2017
|   |   |-- annotations
|   |-- PW3D
|   |   |-- data
|   |   |   |-- 3DPW_train.json
|   |   |   |-- 3DPW_validation.json
|   |   |   |-- 3DPW_test.json
|   |   |-- imageFiles
- Download AGORA parsed data [data][parsing codes]
- Download EHF parsed data [data]
- Download Human3.6M parsed data and SMPL-X parameters [data][SMPL-X parameters from NeuralAnnot]
- Download MPII parsed data and SMPL-X parameters [data][SMPL-X parameters from NeuralAnnot]
- Download MPI-INF-3DHP parsed data and SMPL-X parameters [data][SMPL-X parameters from NeuralAnnot]
- Download MSCOCO data and SMPL-X parameters [data][SMPL-X parameters]
- Download 3DPW parsed data [data]
- All annotation files follow MSCOCO format. If you want to add your own dataset, you have to convert it to MSCOCO format.
You need to follow the directory structure of the output folder as below.
${ROOT}
|-- output
|   |-- log
|   |-- model_dump
|   |-- result
|   |-- vis
- Creating
outputfolder as soft link form is recommended instead of folder form because it would take large storage capacity. logfolder contains training log file.model_dumpfolder contains saved checkpoints for each epoch.resultfolder contains final estimation files generated in the testing stage.visfolder contains visualized results.
Download pretrained encoder osx_vit_l.pth and osx_vit_b.pth from here and place the pretrained model to pretrained_models/.
In the main folder, run
python train.py --gpu 0,1,2,3 --lr 1e-4 --exp_name output/train_setting1 --end_epoch 14 --train_batch_size 16After training, run the following command to evaluate your pretrained model on EHF and AGORA-val:
# test on EHF
python test.py --gpu 0,1,2,3 --exp_name output/train_setting1/ --pretrained_model_path ../output/train_setting1/model_dump/snapshot_13.pth --testset EHF
# test on AGORA-val
python test.py --gpu 0,1,2,3 --exp_name output/train_setting1/ --pretrained_model_path ../output/train_setting1/model_dump/snapshot_13.pth --testset AGORA
To speed up, you can use a light-weight version OSX by change the encoder setting by adding --encoder_setting osx_b or change the decoder settiing by adding --decoder_setting wo_face_decoder
In the main folder, run
python train.py --gpu 0,1,2,3 --lr 1e-4 --exp_name output/train_setting2 --end_epoch 140 --train_batch_size 16 --agora_benchmark --decoder_setting wo_decoderAfter training, run the following command to evaluate your pretrained model on AGORA-test:
python test.py --gpu 0,1,2,3 --exp_name output/train_setting2/ --pretrained_model_path ../output/train_setting2/model_dump/snapshot_139.pth --testset AGORA --agora_benchmark --test_batch_size 64 --decoder_setting wo_decoderThe reconstruction result will be saved at output/train_setting2/result/.
You can zip the predictions folder into predictions.zip and submit it to the AGORA benchmark to obtain the evaluation metrics.
You can use a light-weight version OSX by adding --encoder_setting osx_b.
Download pretrained models osx_l.pth.tar and osx_l_agora.pth.tar from here and place the pretrained model to pretrained_models/.
In the main folder, run
python test.py --gpu 0,1,2,3 --exp_name output/test_setting1 --pretrained_model_path ../pretrained_models/osx_l.pth.tar --testset EHFIn the main folder, run
python test.py --gpu 0,1,2,3 --exp_name output/test_setting1 --pretrained_model_path ../pretrained_models/osx_l.pth.tar --testset AGORAIn the main folder, run
python test.py --gpu 0,1,2,3 --exp_name output/test_setting2 --pretrained_model_path ../pretrained_models/osx_l_agora.pth.tar --testset AGORA --agora_benchmark --test_batch_size 64The reconstruction result will be saved at output/test_setting2/result/.
You can zip the predictions folder into predictions.zip and submit it to the AGORA benchmark to obtain the evaluation metrics.
-
RuntimeError: Subtraction, the '-' operator, with a bool tensor is not supported. If you are trying to invert a mask, use the '~' or 'logical_not()' operator instead.: Go to here -
TypeError: startswith first arg must be bytes or a tuple of bytes, not str.: Go to here. It seems that this solusion only works for RTX3090. If it works for V100 or A100 in your case, please tell me in the issue :)
This repo is mainly based on Hand4Whole. We thank the well-organized code and patient answers of Gyeongsik Moon in the issue!
@article{lin2023osx,
  author    = {Lin, Jing and Zeng, Ailing and Wang, Haoqian and Zhang, Lei and Li, Yu},
  title     = {One-Stage 3D Whole-Body Mesh Recovery with Component Aware Transformer},
  journal   = {CVPR},
  year      = {2023},
}


