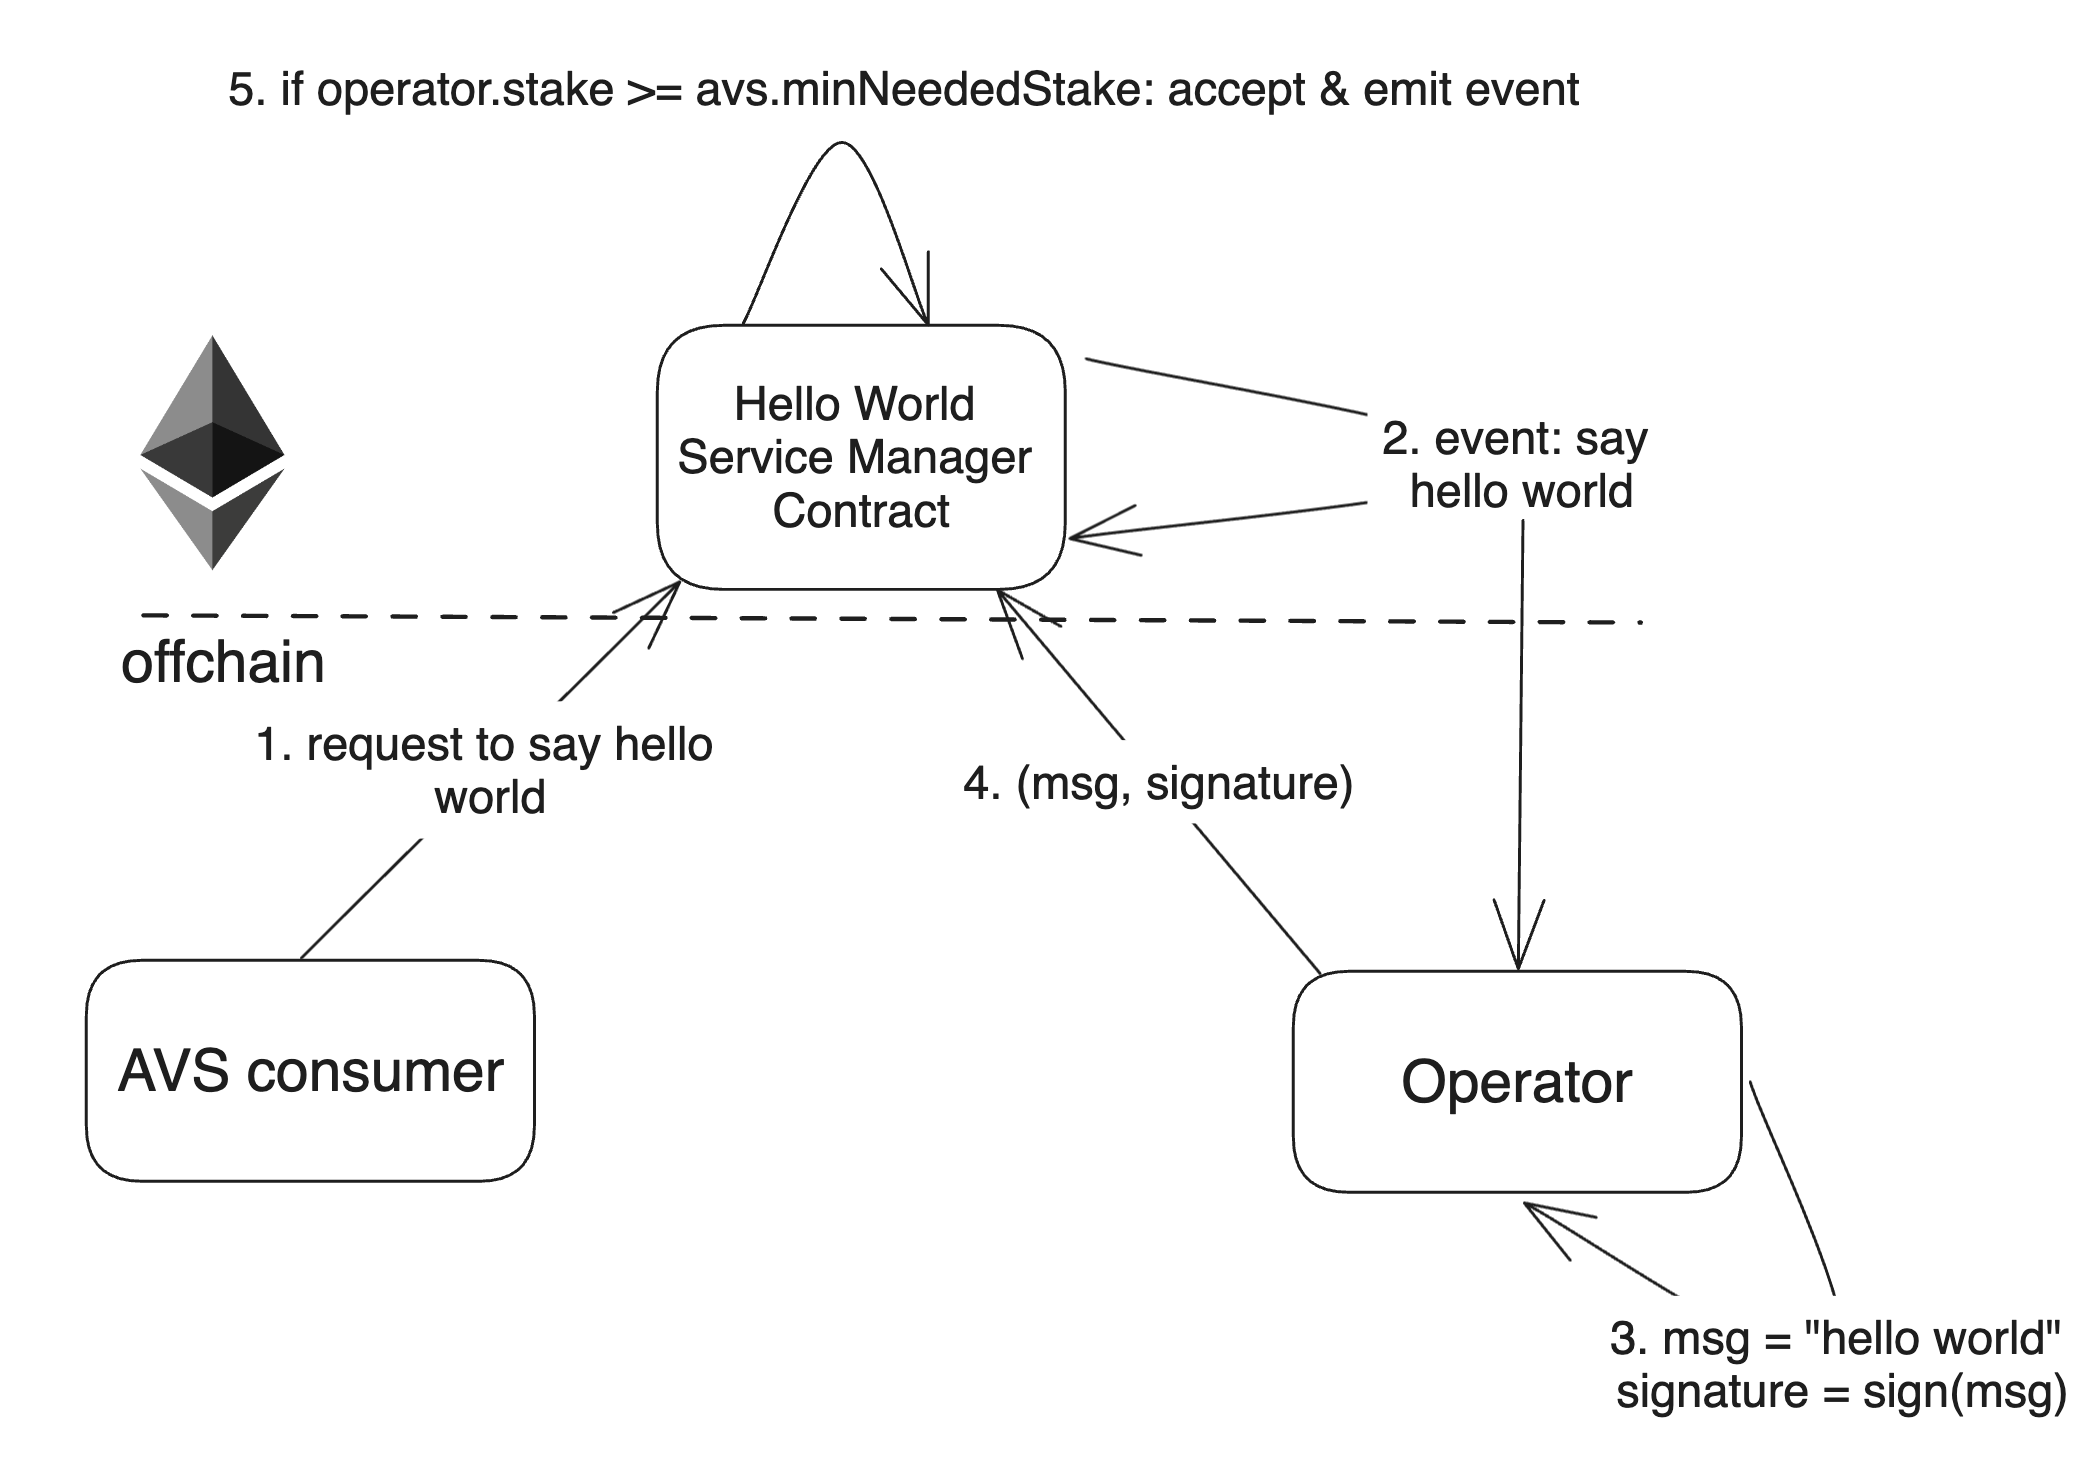
Welcome to the Hello World AVS.
This project shows you the simplest functionality you can expect from an AVS.
It will give you a concrete understanding of the basic components.
There are 5 steps to this AVS:
- AVS consumer requests a "Hello World" message to be generated and signed
- AVS takes on the request by emitting an event for operators to pick up the request
- any operator who is staked to serve this AVS takes this request, generates this message and signs it
- the operator submits this message with their signature back to the AVS
- if the operator is in fact registered to the AVS and has the minimum needed stake, the submission is accepted
That's it. This simple flow highlights some of the core mechanics of how AVSs work.
Where additional sophistication with AVSs come into the picture:
- the nature of the request is more sophisticated than generating a constant string
- the operators might need to coordinate with each other
- the type of signature is different based on the constraints of the service
- the type and amount of security used to secure the AVS
- and so on...
Following global NodeJS packages:
- Run
npm install - Run
cp .env.local .env - Run
make start-chain-with-contracts-deployed- This will build the contracts, start an Anvil chain, deploy the contracts to it, and leaves the chain running in the current terminal
- Open new terminal tab and run
make start-operator- This will compile the AVS software and start monitering new tasks
- Open new terminal tab and run
make spam-tasks(Optional)- This will spam the AVS with random names every 15 seconds
This walks you through how to manually deploy using Foundry (Anvil, Forge, and Cast)
- Run
npm installto install the TypeScript dependencies - Run
cp .env.local .env - Compile the contracts.
cd contracts && forge build- Start Anvil by opening your terminal and running the following command:
anvil- In a separate terminal window, deploy the EigenLayer contracts.
To do so, change into contracts/lib/eigenlayer-middleware/lib/eigenlayer-contracts and run the following commands:
forge script script/deploy/devnet/M2_Deploy_From_Scratch.s.sol --rpc-url http://localhost:8545 \
--private-key 0xac0974bec39a17e36ba4a6b4d238ff944bacb478cbed5efcae784d7bf4f2ff80 --broadcast \
--sig "run(string memory configFile)" -- M2_deploy_from_scratch.anvil.config.json- In a separate terminal window, deploy the AVS contracts.
cd contracts

forge script script/HelloWorldDeployer.s.sol --rpc-url http://localhost:8545 --private-key 0xac0974bec39a17e36ba4a6b4d238ff944bacb478cbed5efcae784d7bf4f2ff80 --broadcast -v- Start the operator
tsc && node dist/index.js- In a separate window, start creating tasks
tsc && node dist/createNewTasks.js-
Run
make start-chain-with-contracts-deployed- This will build the contracts, start an Anvil chain, deploy the contracts to it, and leaves the chain running in the current terminal
-
Run
make start-rust-operator -
Run
make spam-rust-tasks
Tests are supported in anvil only . Make sure to run the 1st command before running the tests:
cargo test --workspace
| Contract Name | Holesky Address |
|---|---|
| Hello World Service Manager | 0x3361953F4a9628672dCBcDb29e91735fb1985390 |
| Delegation Manager | 0xA44151489861Fe9e3055d95adC98FbD462B948e7 |
| Avs Directory | 0x055733000064333CaDDbC92763c58BF0192fFeBf |
You don't need to run any script for holesky testnet.
-
Use the HOLESKY_ namespace env parameters in the code , instead of normal parameters.
-
Run
make start-rust-operator -
Run
make spam-rust-tasks
- Operator needs a minimum stake amount to make submissions
- Add another strategy to the AVS
- Operator must respond within a certain number of blocks
To deploy the Hello World AVS contracts to the Holesky network, follow these steps:
- Ensure you have the necessary RPC URL and private key for the Holesky network.
- Run the deployment script using Foundry:
Replace
forge script script/HoleskyDeployer.s.sol:HoleskyDeployer --rpc-url $RPC_URL --private-key $PRIVATE_KEY --broadcast -vvvv
$RPC_URLwith your Holesky RPC URL and$PRIVATE_KEYwith your private key.
To add a new strategy to the Hello World AVS, follow the guide provided in AddNewStrategy.md. This guide walks you through the necessary steps to add and whitelist a new strategy for the AVS.
