dotnet new install Amantinband.CleanArchitecture.Template

dotnet new clean-arch -o CleanArchitecture- ️Important notice
⚠️ - Give it a star ⭐
- Domain Overview 🌍
- Use Cases / Features 🤓
- Getting Started 🏃
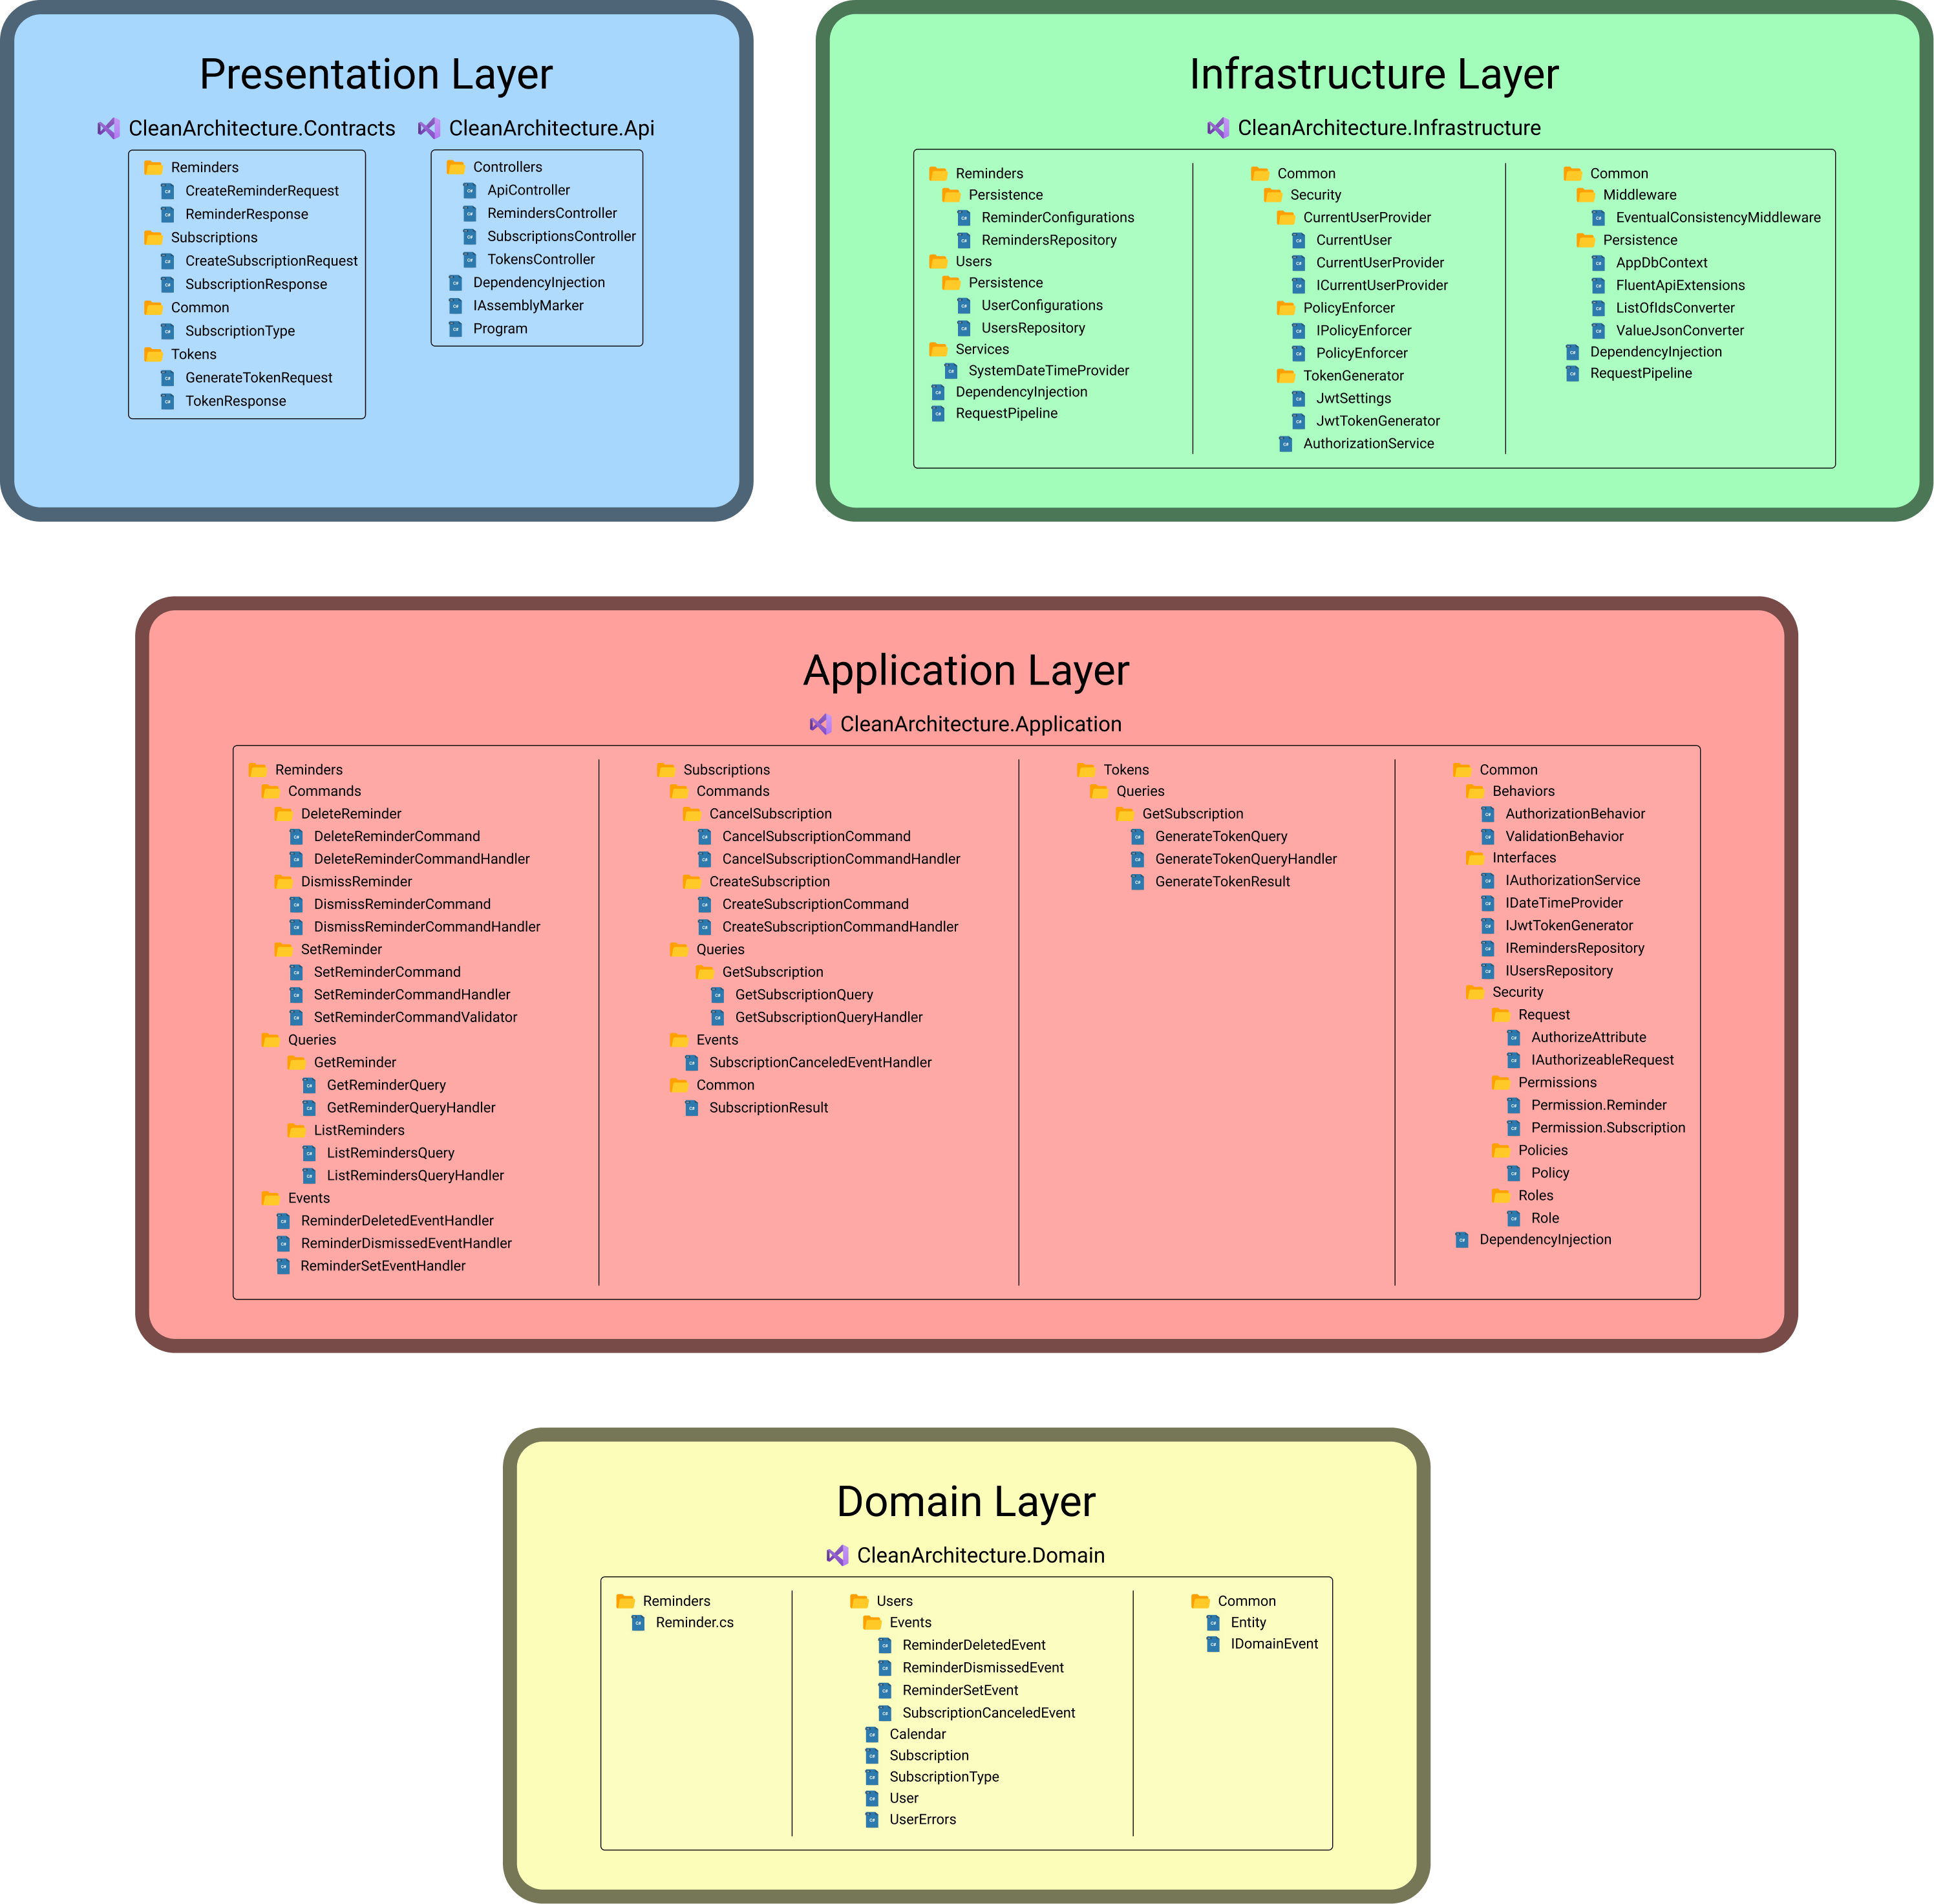
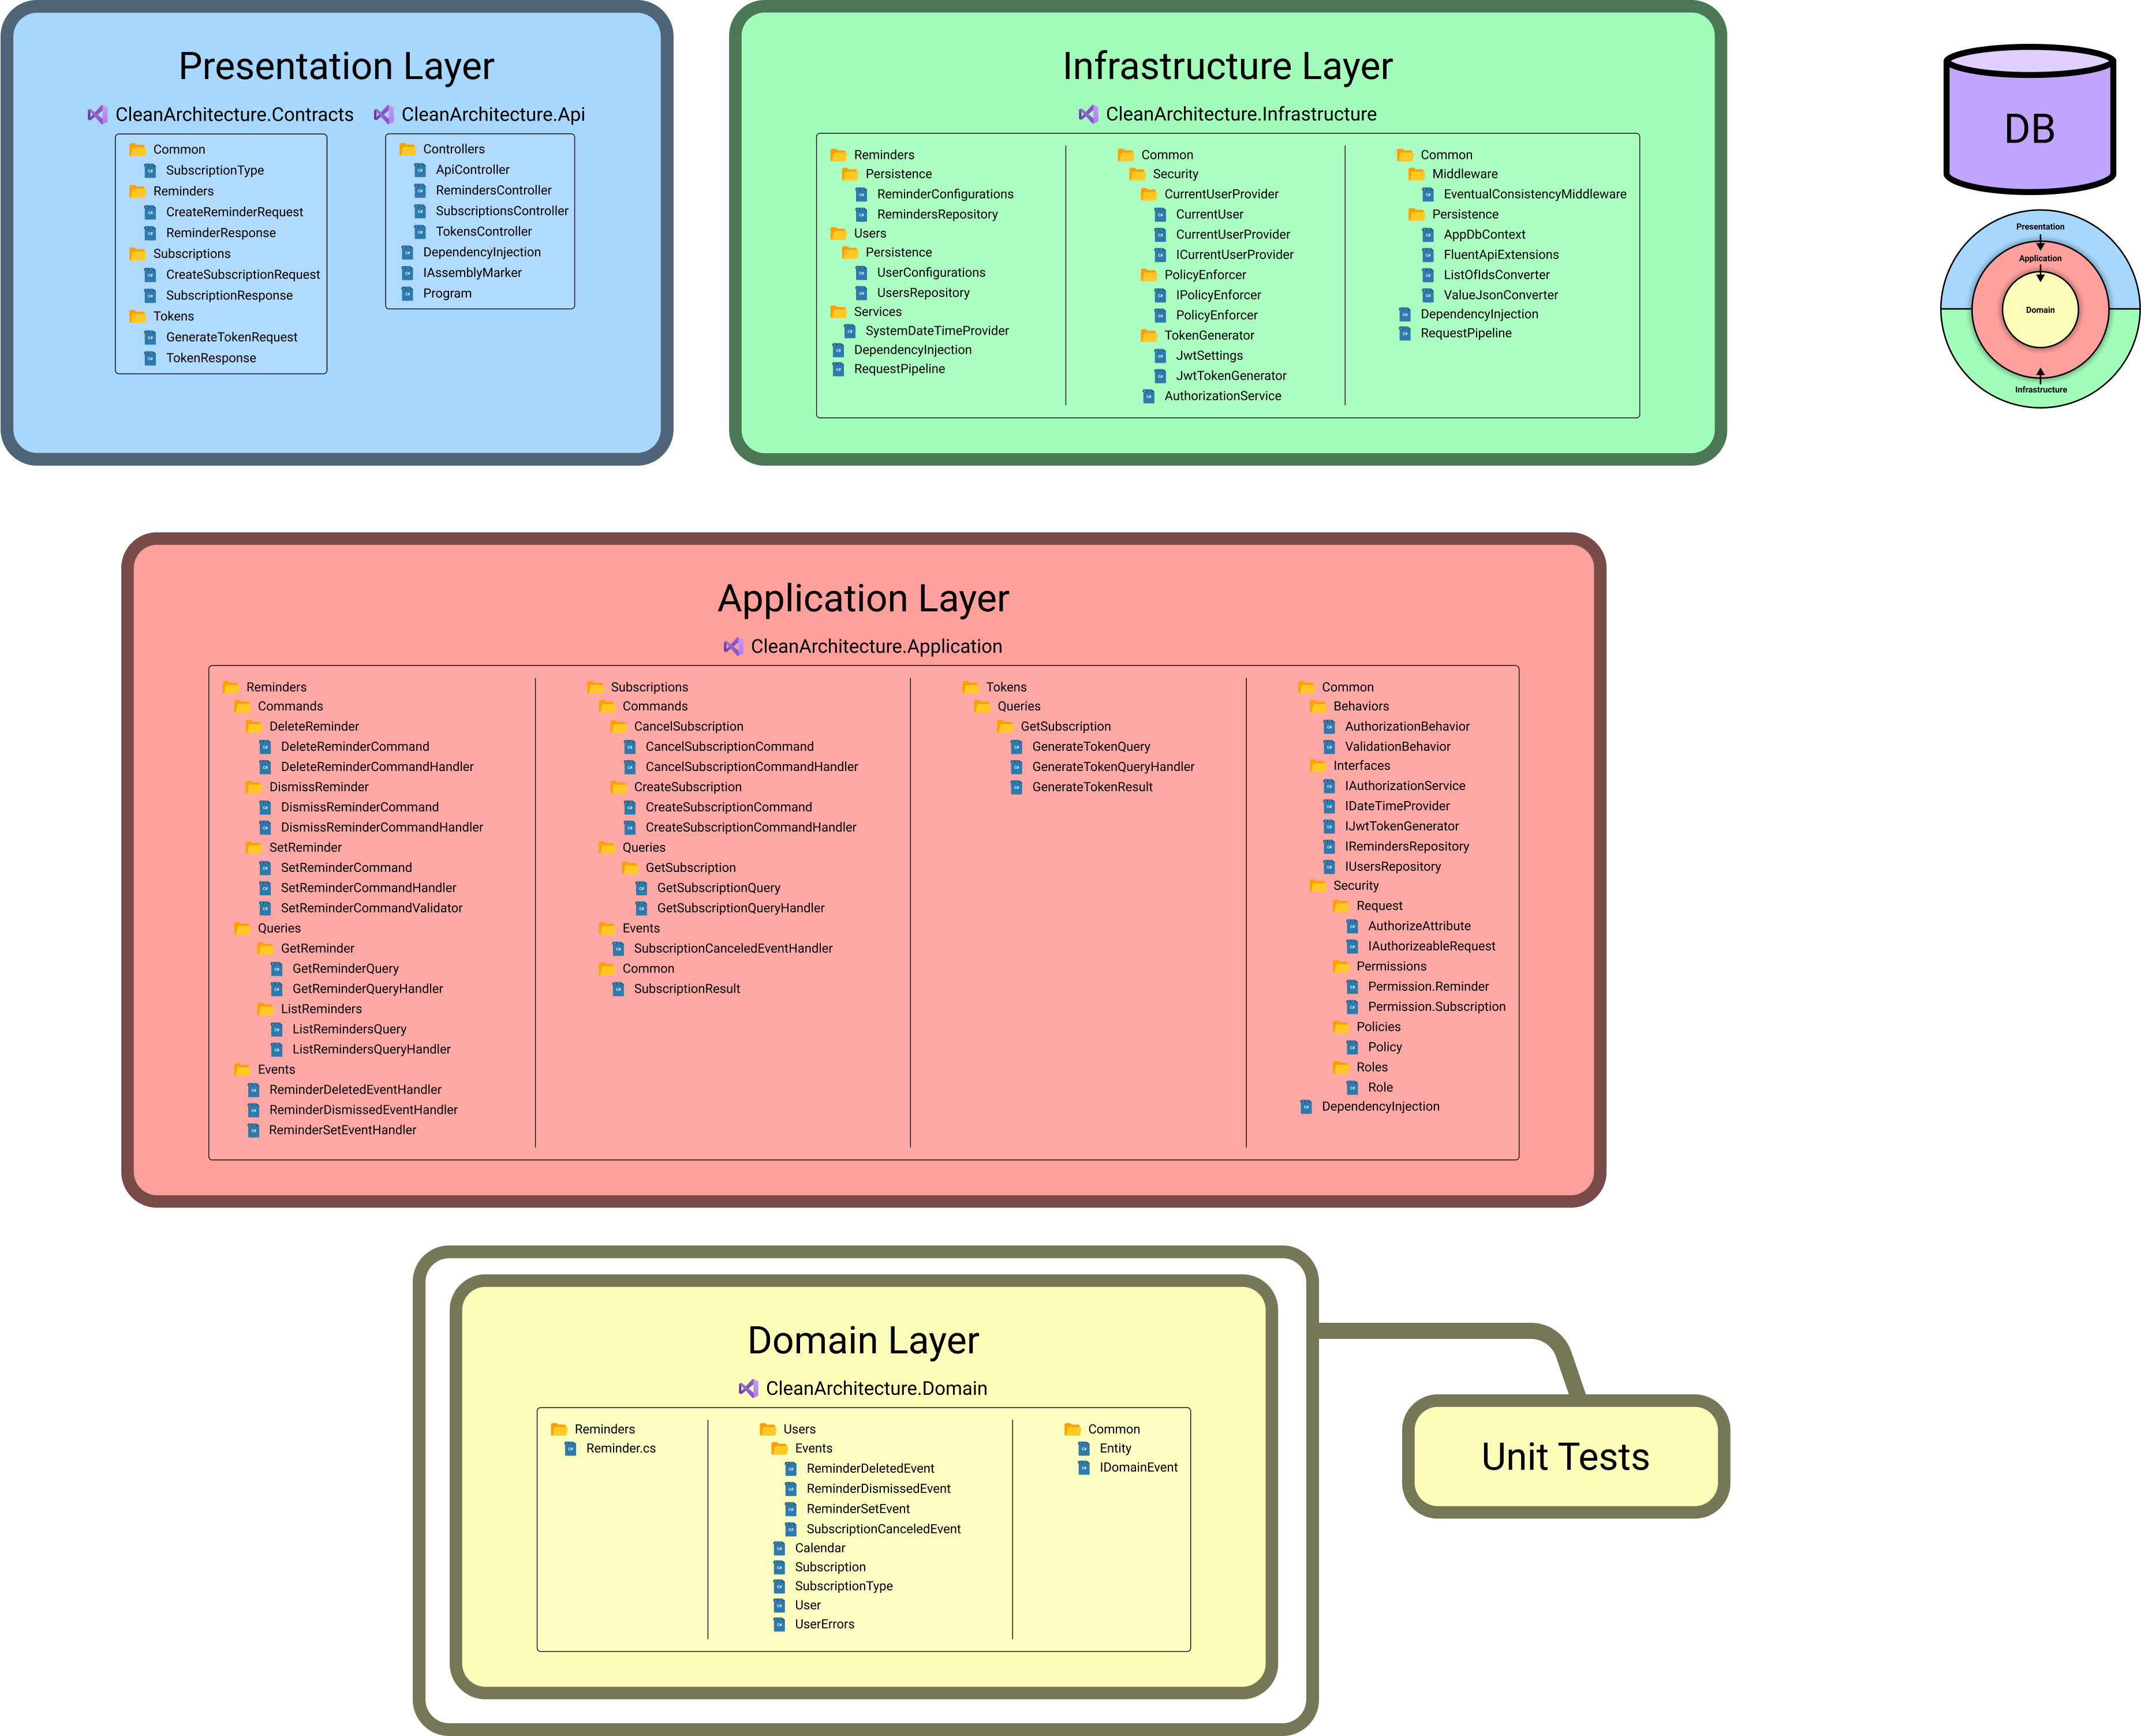
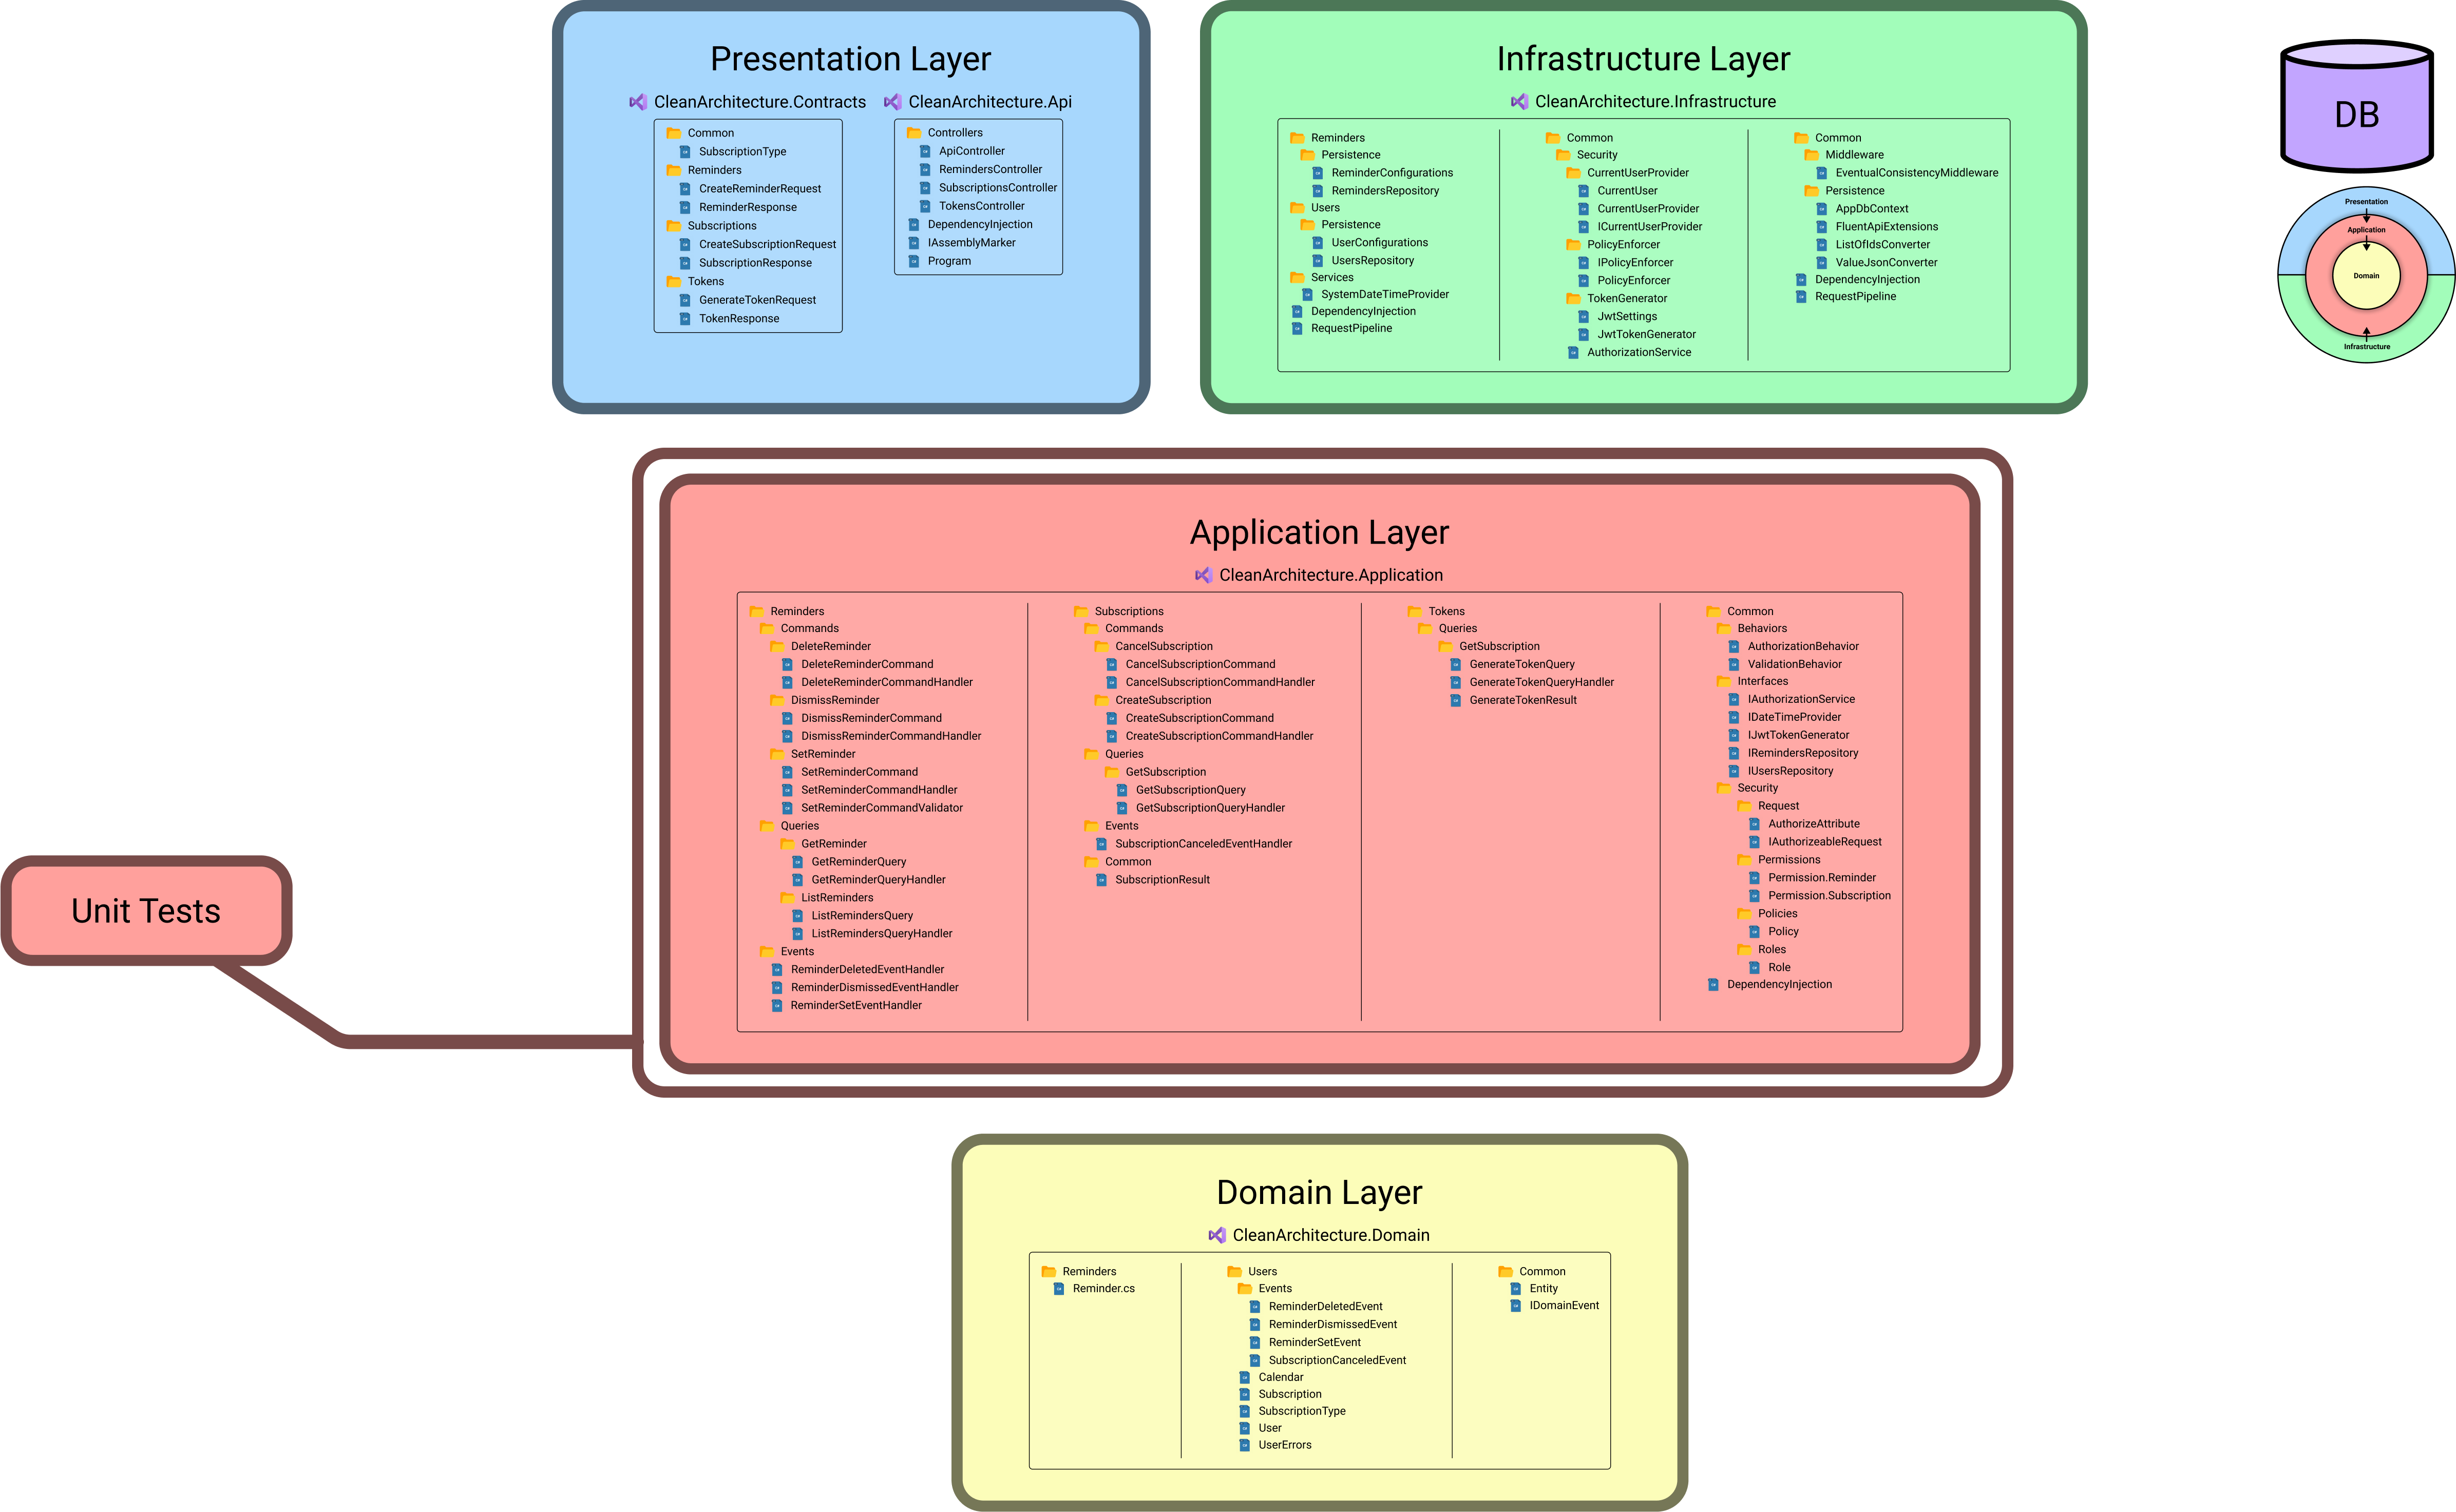
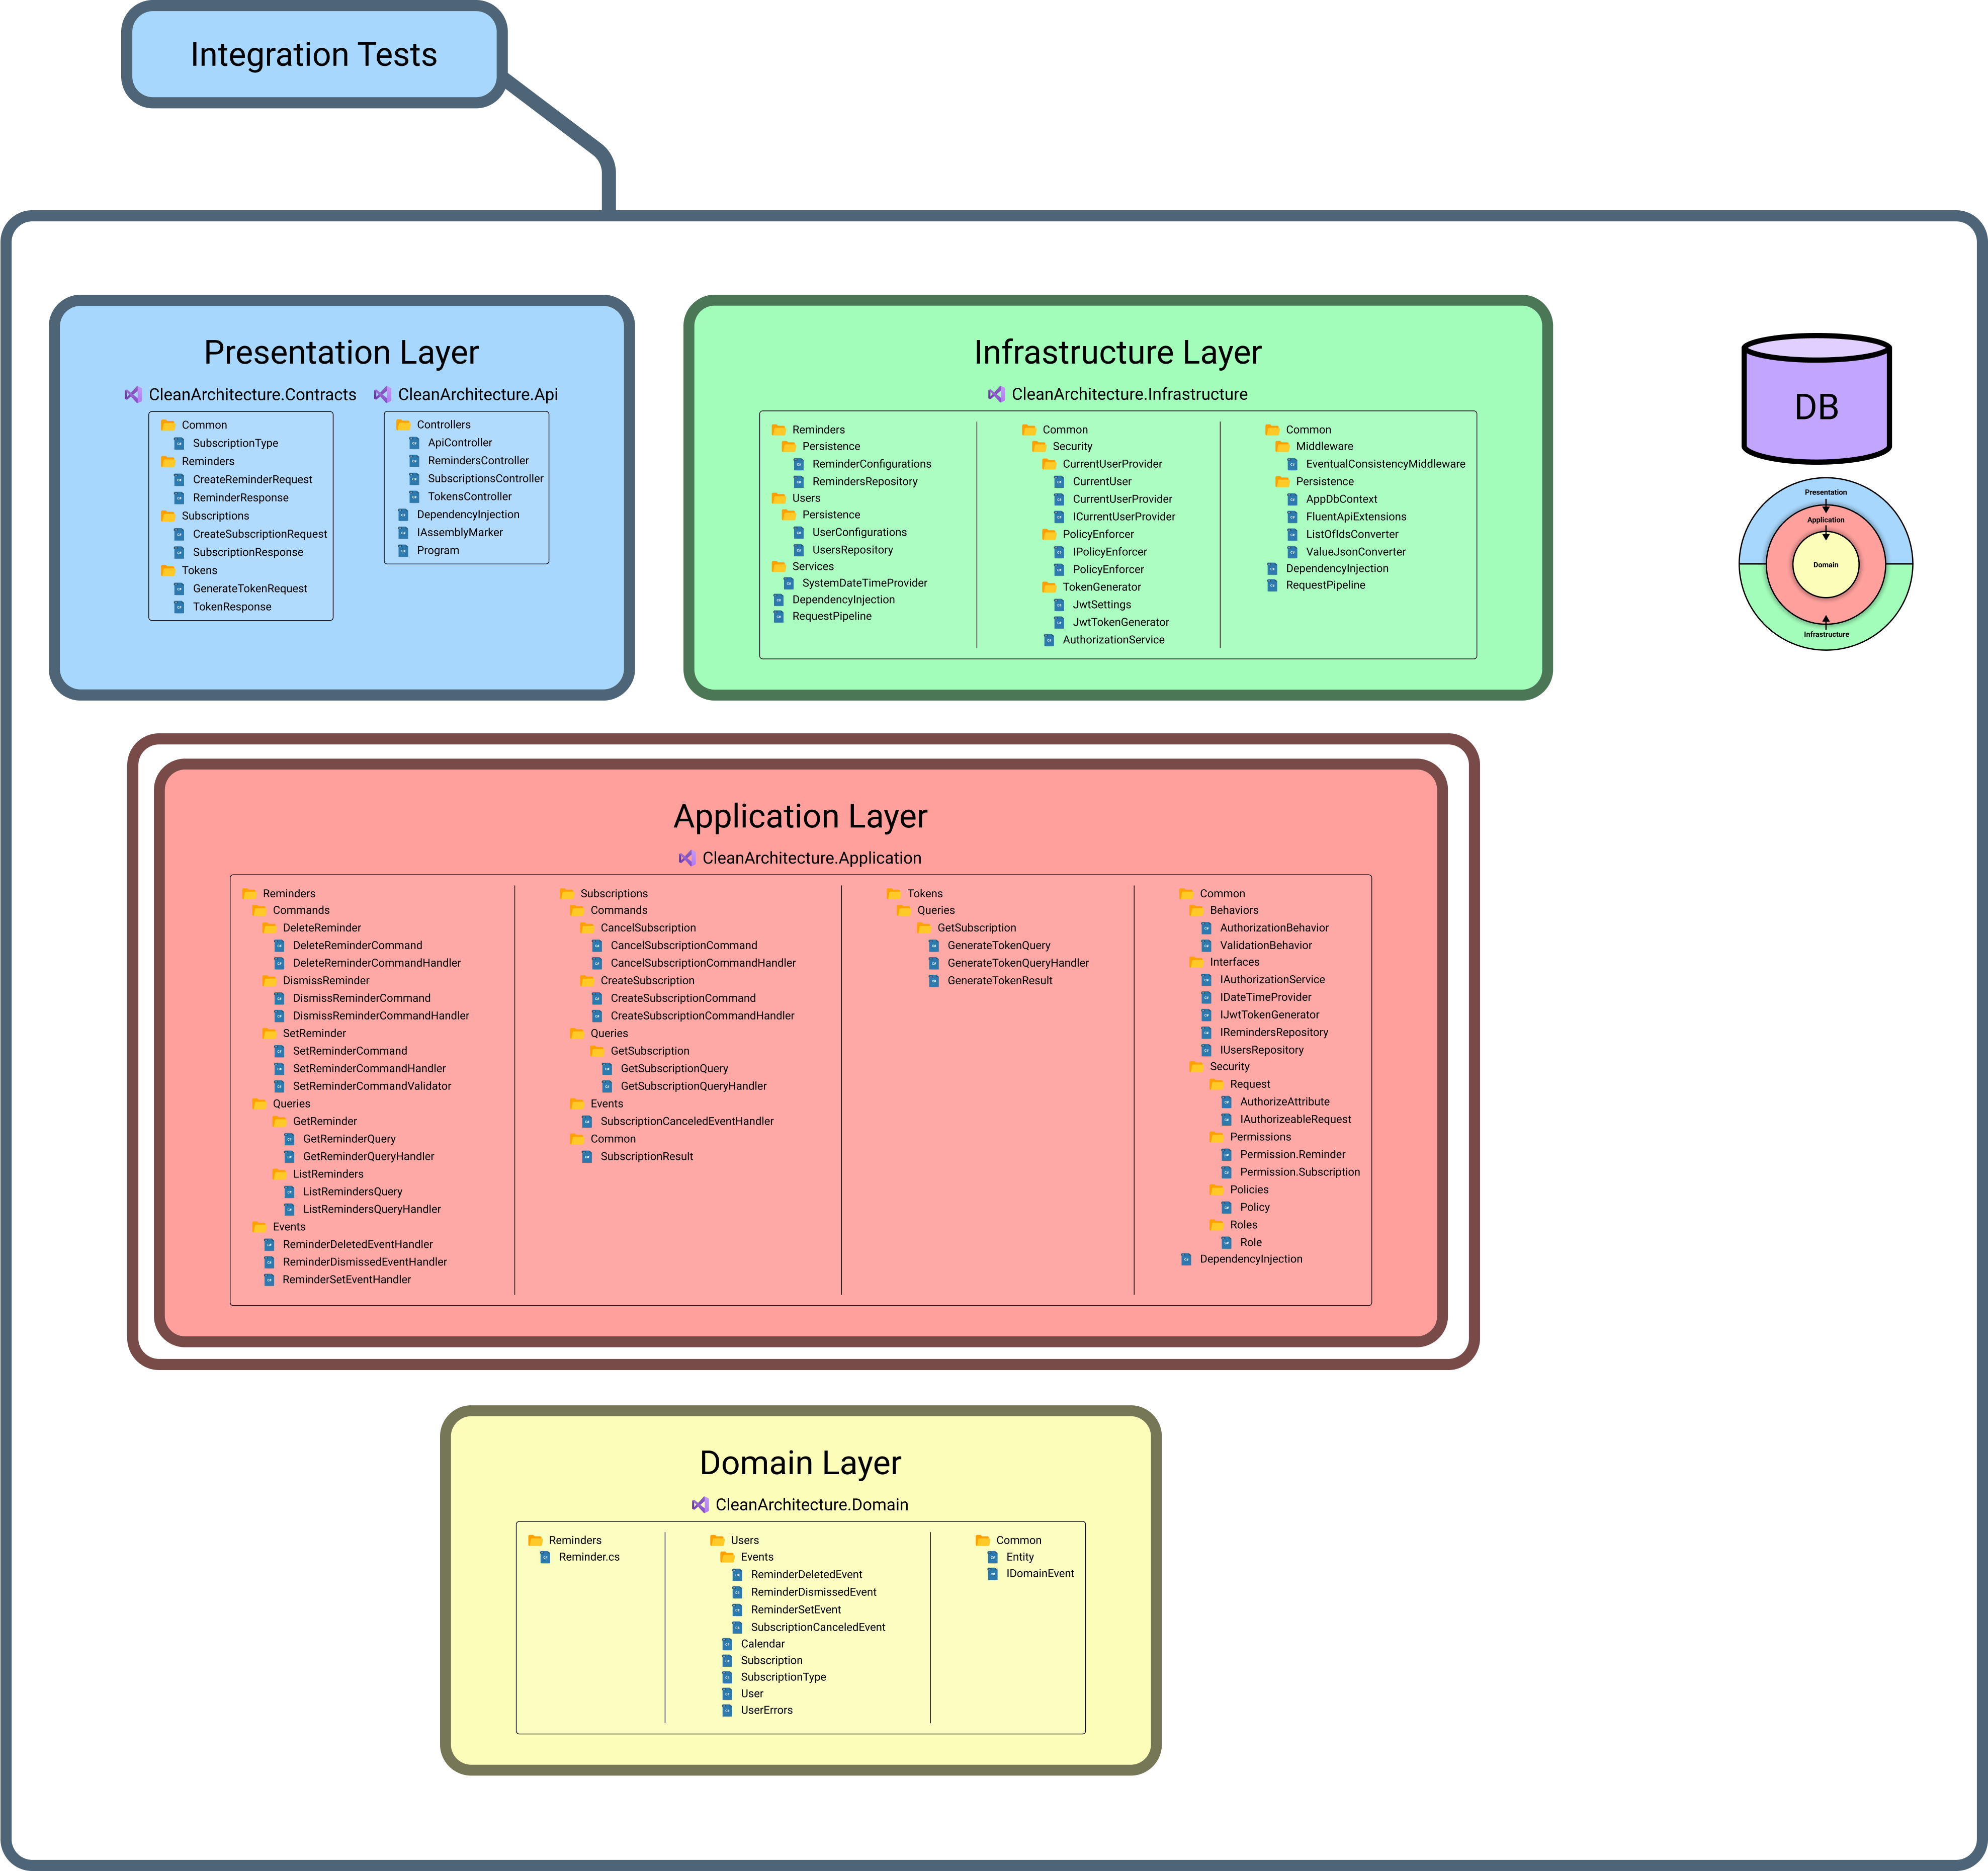
- Folder Structure 📁
- Authorization 🔐
- Testing 📝
- Fun features 💃🕺
- Contribution 🤲
- Credits 🙏
- License 🪪
This template is still under construction 👷.
Check out my comprehensive course on Dometrain where I cover everything you need to know when building production applications structured following clean architecture. Use the exclusive coupon code GITHUB to get 5% off (btw this is the only promo code for a discount on the bundle, which is already 20% off).
Loving it? Show your support by giving this project a star!
This is a simple reminder application. It allows users to create and manage their reminders.
To create reminders, a user must have an active subscription.
Users with a basic subscription can create up to 3 daily reminders.
Users with a pro subscription do not have a daily limit on the number of reminders.
- Create Subscription
- Get Subscription
- Cancel Subscription
- Set Reminder
- Get Reminder
- Delete Reminder
- Dismiss Reminder
- List Reminders
dotnet new install Amantinband.CleanArchitecture.Template

dotnet new clean-arch -o CleanArchitecture
or
git clone https://github.com/amantinband/clean-architecturedocker compose upor
dotnet run --project src/CleanArchitecture.ApiNavigate to requests/Tokens/GenerateToken.http and generate a token.
Note: Since most systems use an external identity provider, this project uses a simple token generator endpoint that generates a token based on the details you provide. This is a simple way to generate a token for testing purposes and is closer to how your system will likely be designed when using an external identity provider.
POST {{host}}/tokens/generate
Content-Type: application/json
{
"Id": "bae93bf5-9e3c-47b3-aace-3034653b6bb2",
"FirstName": "Amichai",
"LastName": "Mantinband",
"Email": "[email protected]",
"Permissions": [
"set:reminder",
"get:reminder",
"dismiss:reminder",
"delete:reminder",
"create:subscription",
"delete:subscription",
"get:subscription"
],
"Roles": [
"Admin"
]
}Option 1 (recommended) - Using the REST Client extension for VS Code
Use the REST Client extension for VS Code + update the values under .vscode/settings.json. This will update the value for all http files.
{ "rest-client.environmentVariables": { "$shared": { // these will be shared across all http files, regardless of the environment "token": "eyJhbGciOiJIUzI1NiIsInR5cCI6IkpXVCJ9.eyJuYW1lIjoiTGlvciIsImZhbWlseV9uYW1lIjoiRGFnYW4iLCJlbWFpbCI6Imxpb3JAZGFnYW4uY29tIiwiaWQiOiJhYWU5M2JmNS05ZTNjLTQ3YjMtYWFjZS0zMDM0NjUzYjZiYjIiLCJodHRwOi8vc2NoZW1hcy5taWNyb3NvZnQuY29tL3dzLzIwMDgvMDYvaWRlbnRpdHkvY2xhaW1zL3JvbGUiOiJBZG1pbiIsInBlcm1pc3Npb25zIjpbInNldDpyZW1pbmRlciIsImdldDpyZW1pbmRlciIsImRpc21pc3M6cmVtaW5kZXIiLCJkZWxldGU6cmVtaW5kZXIiLCJjcmVhdGU6c3Vic2NyaXB0aW9uIiwiZGVsZXRlOnN1YnNjcmlwdGlvbiIsImdldDpzdWJzY3JpcHRpb24iXSwiZXhwIjoxNzA0MTM0MTIzLCJpc3MiOiJSZW1pbmRlclNlcnZpY2UiLCJhdWQiOiJSZW1pbmRlclNlcnZpY2UifQ.wyvn9cq3ohp-JPTmbBd3G1cAU1A6COpiQd3C_e_Ng5s", "userId": "aae93bf5-9e3c-47b3-aace-3034653b6bb2", "subscriptionId": "c8ee11f0-d4bb-4b43-a448-d511924b520e", "reminderId": "08233bb1-ce29-49e2-b346-5f8b7cf61593" }, "dev": { // when the environment is set to dev, these values will be used "host": "http://localhost:5001", }, "prod": { // when the environment is set to prod, these values will be used "host": "http://your-prod-endpoint.com", } } }Define the variables in the http file itself. This will only update the value for the current http file.
@host = http://localhost:5001 POST {{host}}/tokens/generateReplace the variables manually.
POST {{host}}/tokens/generate👇
POST http://localhost:5001/tokens/generate
POST {{host}}/users/{{userId}}/subscriptions
Content-Type: application/json
Authorization: Bearer {{token}}
{
"SubscriptionType": "Basic"
}POST {{host}}/users/{{userId}}/subscriptions/{{subscriptionId}}/reminders
Content-Type: application/json
Authorization: Bearer {{token}}{
"text": "let's do it",
"dateTime": "2025-2-26"
}You can use the this figma community file to explore or create your own folder structure respresentation.
This project puts an emphasis on complex authorization scenarios and supports role-based, permission-based and policy-based authorization.
To apply role based authorization, use the Authorize attribute with the Roles parameter and implement the IAuthorizeableRequest interface.
For example:
[Authorize(Roles = "Admin")]
public record CancelSubscriptionCommand(Guid UserId, Guid SubscriptionId) : IAuthorizeableRequest<ErrorOr<Success>>;
Will only allow users with the Admin role to cancel subscriptions.
To apply permission based authorization, use the Authorize attribute with the Permissions parameter and implement the IAuthorizeableRequest interface.
For example:
[Authorize(Permissions = "get:reminder")]
public record GetReminderQuery(Guid UserId, Guid SubscriptionId, Guid ReminderId) : IAuthorizeableRequest<ErrorOr<Reminder>>;
Will only allow users with the get:reminder permission to get a subscription.
To apply policy based authorization, use the Authorize attribute with the Policy parameter and implement the IAuthorizeableRequest interface.
For example:
[Authorize(Policies = "SelfOrAdmin")]
public record GetReminderQuery(Guid UserId, Guid SubscriptionId, Guid ReminderId) : IAuthorizeableRequest<ErrorOr<Reminder>>;
Will only allow users who pass the SelfOrAdmin policy to get a subscription.
Each policy is implemented as a simple method in the PolicyEnforcer class.
The policy "SelfOrAdmin" for example, can be implemented as follows:
public class PolicyEnforcer : IPolicyEnforcer
{
    public ErrorOr<Success> Authorize<T>(
        IAuthorizeableRequest<T> request,
        CurrentUser currentUser,
        string policy)
    {
        return policy switch
        {
            "SelfOrAdmin" => SelfOrAdminPolicy(request, currentUser),
            _ => Error.Unexpected(description: "Unknown policy name"),
        };
    }

    private static ErrorOr<Success> SelfOrAdminPolicy<T>(IAuthorizeableRequest<T> request, CurrentUser currentUser) =>
        request.UserId == currentUser.Id || currentUser.Roles.Contains(Role.Admin)
            ? Result.Success
            : Error.Unauthorized(description: "Requesting user failed policy requirement");
}You can mix and match authorization types to create complex authorization scenarios.
For example:
[Authorize(Permissions = "get:reminder,list:reminder", Policies = "SelfOrAdmin", Roles = "ReminderManager")]
public record ListRemindersQuery(Guid UserId, Guid SubscriptionId, Guid ReminderId) : IAuthorizeableRequest<ErrorOr<Reminder>>;
Will only allow users with the get:reminder and list:reminder permission, and who pass the SelfOrAdmin policy, and who have the ReminderManager role to list reminders.
Another option, is specifying the Authorize attribute multiple times:
[Authorize(Permissions = "get:reminder")]
[Authorize(Permissions = "list:reminder")]
[Authorize(Policies = "SelfOrAdmin")]
[Authorize(Roles = "ReminderManager")]
public record ListRemindersQuery(Guid UserId, Guid SubscriptionId, Guid ReminderId) : IAuthorizeableRequest<ErrorOr<Reminder>>;This project puts an emphasis on testability and comes with a comprehensive test suite.
The domain layer is tested using unit tests. By the bare minimum, each domain entity should have a test that verifies its invariants.
The application layer is tested using both unit tests and subcutaneous tests.
Since each one of the application layer use cases has its corresponding subcutaneous tests, the unit tests are used to test the application layer standalone components, such as the ValidationBehavior and the AuthorizationBehavior.
Subcutaneous tests are tests that operate right under the presentation layer. These tests are responsible for testing the core logic of our application, which is the application layer and the domain layer.
The reason there are so many of these tests, is because each one of the application layer use cases has its corresponding subcutaneous tests.
This allows us to test the application layer and the domain layer based on the actual expected usage, giving us the confidence that our application works as expected and that the system cannot be manipulated in a way we don't allow.
I recommend spending more effort on these tests than the other tests, since they aren't too expensive to write, and the value they provide is huge.
The api layer is tested using integration tests. This is where we want to cover the entire system, including the database, external dependencies and the presentation layer.
Unlike the subcutaneous tests, the focus of these tests is to ensure the integration between the various components of our system and other systems.
Note: Eventual consistency and the domain events pattern add a layer of complexity. If you don't need it, don't use it. If you need it, make sure your system is designed properly and that you have the right tools to manage failures.
The domain is designed so each use case which manipulates data, updates a single domain object in a single transaction.
For example, when a user cancels a subscription, the only change that happens atomically is the subscription is marked as canceled:
public ErrorOr<Success> CancelSubscription(Guid subscriptionId)
{
    if (subscriptionId != Subscription.Id)
    {
        return Error.NotFound("Subscription not found");
    }

    Subscription = Subscription.Canceled;

    _domainEvents.Add(new SubscriptionCanceledEvent(this, subscriptionId));

    return Result.Success;
}
Then, in an eventual consistency manner, the system will update all the relevant data. Which includes:
- Deleting the subscription from the database and marking all reminders as deleted (Subscriptions/Events/SubscriptionDeletedEventHandler.cs])
- Deleting all the reminders marked as deleted from the database (Reminders/Events/ReminderDeletedEventHandler.cs]
Note: Alongside the performance benefits, this allows to reuse reactive behavior. For example, the
ReminderDeletedEventHandleris invoked both when a subscription is deleted and when a reminder is deleted.
- Each invariant is encapsulated in a single domain object. This allows performing changes by updating a single domain object in a single transaction.
- If
domain object Bneeds to react to changes indomain object A, a Domain Event is added todomain object Aalongside the changes. - Upon persisting
domain object Achanges to the database, the domain events are extracted and added to a queue for offline processing:private void AddDomainEventsToOfflineProcessingQueue(List<IDomainEvent> domainEvents) { Queue<IDomainEvent> domainEventsQueue = new(); domainEvents.ForEach(domainEventsQueue.Enqueue); _httpContextAccessor.HttpContext.Items["DomainEvents"] = domainEventsQueue; }
- After the user receives a response, the EventualConsistencyMiddleware is invoked and processes the domain events:
public async Task InvokeAsync(HttpContext context, IEventualConsistencyProcessor eventualConsistencyProcessor)
{
    context.Response.OnCompleted(async () =>
    {
        if (context.Items.TryGetValue("DomainEvents", out var value) ||
            value is not Queue<IDomainEvent> domainEvents)
        {
            return;
        }

        while (domainEvents.TryDequeue(out var nextEvent))
        {
            await publisher.Publish(nextEvent);
        }
    });
}
Note: the code snippets above are a simplified version of the actual implementation.
There is a simple background service that runs every minute and sends email reminders for all reminders that are due (ReminderEmailBackgroundService):
private async void SendEmailNotifications(object? state)
{
    await _fluentEmail
        .To(user.Email)
        .Subject($"{dueReminders.Count} reminders due!")
        .Body($"""
              Dear {user.FirstName} {user.LastName} from the present.

              I hope this email finds you well.

              I'm writing you this email to remind you about the following reminders:
              {string.Join('\n', dueReminders.Select((reminder, i) => $"{i + 1}. {reminder.Text}"))}

              Best,
              {user.FirstName} from the past.
              """)
        .SendAsync();
}To configure the service to send emails, make sure to update the email settings under the appsettings.json/appsettings.Development.json file:
You can use your own SMTP server or use a service like Brevo.
{
  "EmailSettings": {
    "EnableEmailNotifications": false,
    "DefaultFromEmail": "[email protected] (also, change EnableEmailNotifications to true 👆)",
    "SmtpSettings": {
      "Server": "smtp.gmail.com",
      "Port": 587,
      "Username": "[email protected]",
      "Password": "your-password"
    }
  }
}
note: you may need to allow less secure apps to access your email account.
dotnet user-secrets --project src/CleanArchitecture.Api set EmailSettings:EnableEmailNotifications true
dotnet user-secrets --project src/CleanArchitecture.Api set EmailSettings:DefaultFromEmail [email protected]
dotnet user-secrets --project src/CleanArchitecture.Api set EmailSettings:SmtpSettings:Server smtp-relay.brevo.com
dotnet user-secrets --project src/CleanArchitecture.Api set EmailSettings:SmtpSettings:Port 587
dotnet user-secrets --project src/CleanArchitecture.Api set EmailSettings:SmtpSettings:Username [email protected]
dotnet user-secrets --project src/CleanArchitecture.Api set EmailSettings:SmtpSettings:Password your-passwordIf you have any questions, comments, or suggestions, please open an issue or create a pull request 🙂
- CleanArchitecture - An awesome clean architecture solution template by Jason Taylor
This project is licensed under the terms of the MIT license.


