CAUTION: This add-on is now in the incubating state and its API and behavior may be modified in the future minor and patch releases.
The Jmix Authorization Server add-on enables you to issue access and refresh tokens and protect API resources (REST API, custom controllers) using these tokens. The add-on is built on top of Spring Authorization Server.
The Jmix Authorization Server add-on provides the following features:
- Contains predefined Spring configurations for working as participant with "authorization server" and "resource server" roles described in OAuth 2.1 protocol flows. This means that your Jmix application may issue access and refresh tokens and protect API resources with these tokens.
- Supports authorization code grant for web applications and mobile devices.
- Supports client credentials grant for server-to-server interaction.
- Only opaque tokens are supported out of the box.
To add the Jmix Authorization Server add-on to your application, include the jmix-authserver-starter dependency:
implementation 'io.jmix.authserver:jmix-authserver-starter'When the add-on is included to the application, the auto-configuration performs the following initial setup:
- Adds
SecurityFilterChainfor OAuth2 protocol endpoints (token endpoint, authorization endpoint etc.). - Adds
SecurityFilterChainfor the login form. - Registers
InMemoryClientRepository. - Adds
SecurityFilterChainfor resource server configuration (URLs that must be protected using access tokens).
If you want to completely disable the default auto-configuration and provide your own configuration, set the following application property:
jmix.authserver.use-default-configuration=falseTo register an Authorization Server client, follow the instructions provided in the Spring Authorization Server documentation. You can either specify a RegisteredClientRepository bean or use application properties.
Here's an example of client configuration using application properties:
spring.security.oauth2.authorizationserver.client.myapp.registration.client-id=myapp
spring.security.oauth2.authorizationserver.client.myapp.registration.client-secret={noop}mysecret
spring.security.oauth2.authorizationserver.client.myapp.registration.client-authentication_methods=client_secret_basic
spring.security.oauth2.authorizationserver.client.myapp.registration.authorization-grant-types=authorization_code,refresh_token
# replace with redirect URI of your client application here
spring.security.oauth2.authorizationserver.client.myapp.registration.redirect-uris=https://oauth.pstmn.io/v1/callback
# use opaque tokens instead of JWT
spring.security.oauth2.authorizationserver.client.myapp.token.access-token-format=reference
# whether to use PKCE when performing the Authorization Code Grant flow
spring.security.oauth2.authorizationserver.client.myapp.require-proof-key=true
In the property names above, myapp represents the Spring internal client identifier.
The redirect-uris property should contain the redirect URL for your application. The value https://oauth.pstmn.io/v1/callback is used here as an example for testing with Postman (see its docs). Adjust it according to your client application's redirect URL.
When using the Authorization Code Grant type to obtain a token from a web or mobile application, the client must first request the authorization code:
GET /oauth2/authorize?response_type=code
    &client_id=<client_id>
    &redirect_uri=<redirect_uri>
    &code_challengle=<code_challenge>
    &code_challenge_method=<code_challenge_method>
A special login page will be displayed where the user must enter their credentials. If credentials are valid, a request to the redirect_uri will be made with the authorization code as a request parameter.
To exchange the authorization code to an access token, the client application must make a request to the following URL:
POST /oauth2/token
Content-Type: application/x-www-form-urlencoded

grant_type=authorization_code&code=<authorization_code>
&redirect_uri=<redirect_uri>
&code_verifier=<code_verifier>
The response will contain the access and refresh tokens.
When it is not possible to enter user credentials in the browser login window, such as in case of some integration between two applications, the client credentials grant flow can be used.
To enable a Client Credentials Grant flow you need to specify the corresponding authorization-grant-types:
spring.security.oauth2.authorizationserver.client.jmix2-client.registration.client-id=jmix2
spring.security.oauth2.authorizationserver.client.jmix2-client.registration.client-secret={noop}secret2
spring.security.oauth2.authorizationserver.client.jmix2-client.registration.client-authentication_methods=client_secret_basic
spring.security.oauth2.authorizationserver.client.jmix2-client.registration.authorization-grant-types=client_credentials
There must be Basic authentication on behalf of one of the registered clients (e.g jmix2/secret2).
   POST /oauth2/token
   Authorization: Basic am1peDI6c2VjcmV0Mg==
   Content-Type: application/x-www-form-urlencoded

   grant_type=client_credentials
The response will contain an access token. To specify the actions that can be performed in the application using this token, you must assign roles to this client using application properties:
jmix.authserver.client.jmix2.client-id = jmix2
jmix.authserver.client.jmix2.resource-roles = resource-role1, resource-role2
jmix.authserver.client.jmix2.row-level-roles = row-level-role1, row-level-role-2
An alternative way to configure client role assignments is to register a Spring bean implementing the io.jmix.authserver.roleassignment.RegisteredClientRoleAssignmentRepository interface:
@Configuration
public class MyAuthServerConfiguration {

    @Bean
    public RegisteredClientRoleAssignmentRepository registeredClientRoleAssignmentRepository() {
        RegisteredClientRoleAssignment roleAssignment = RegisteredClientRoleAssignment.builder()
                .clientId("myapp")
                .resourceRoles(List.of("system-full-access", "rest-minimal"))
                .build();

        return new InMemoryRegisteredClientRoleAssignmentRepository(roleAssignment);
    }
}An easy way to test your API and to obtain OAuth access tokens is to use Postman.
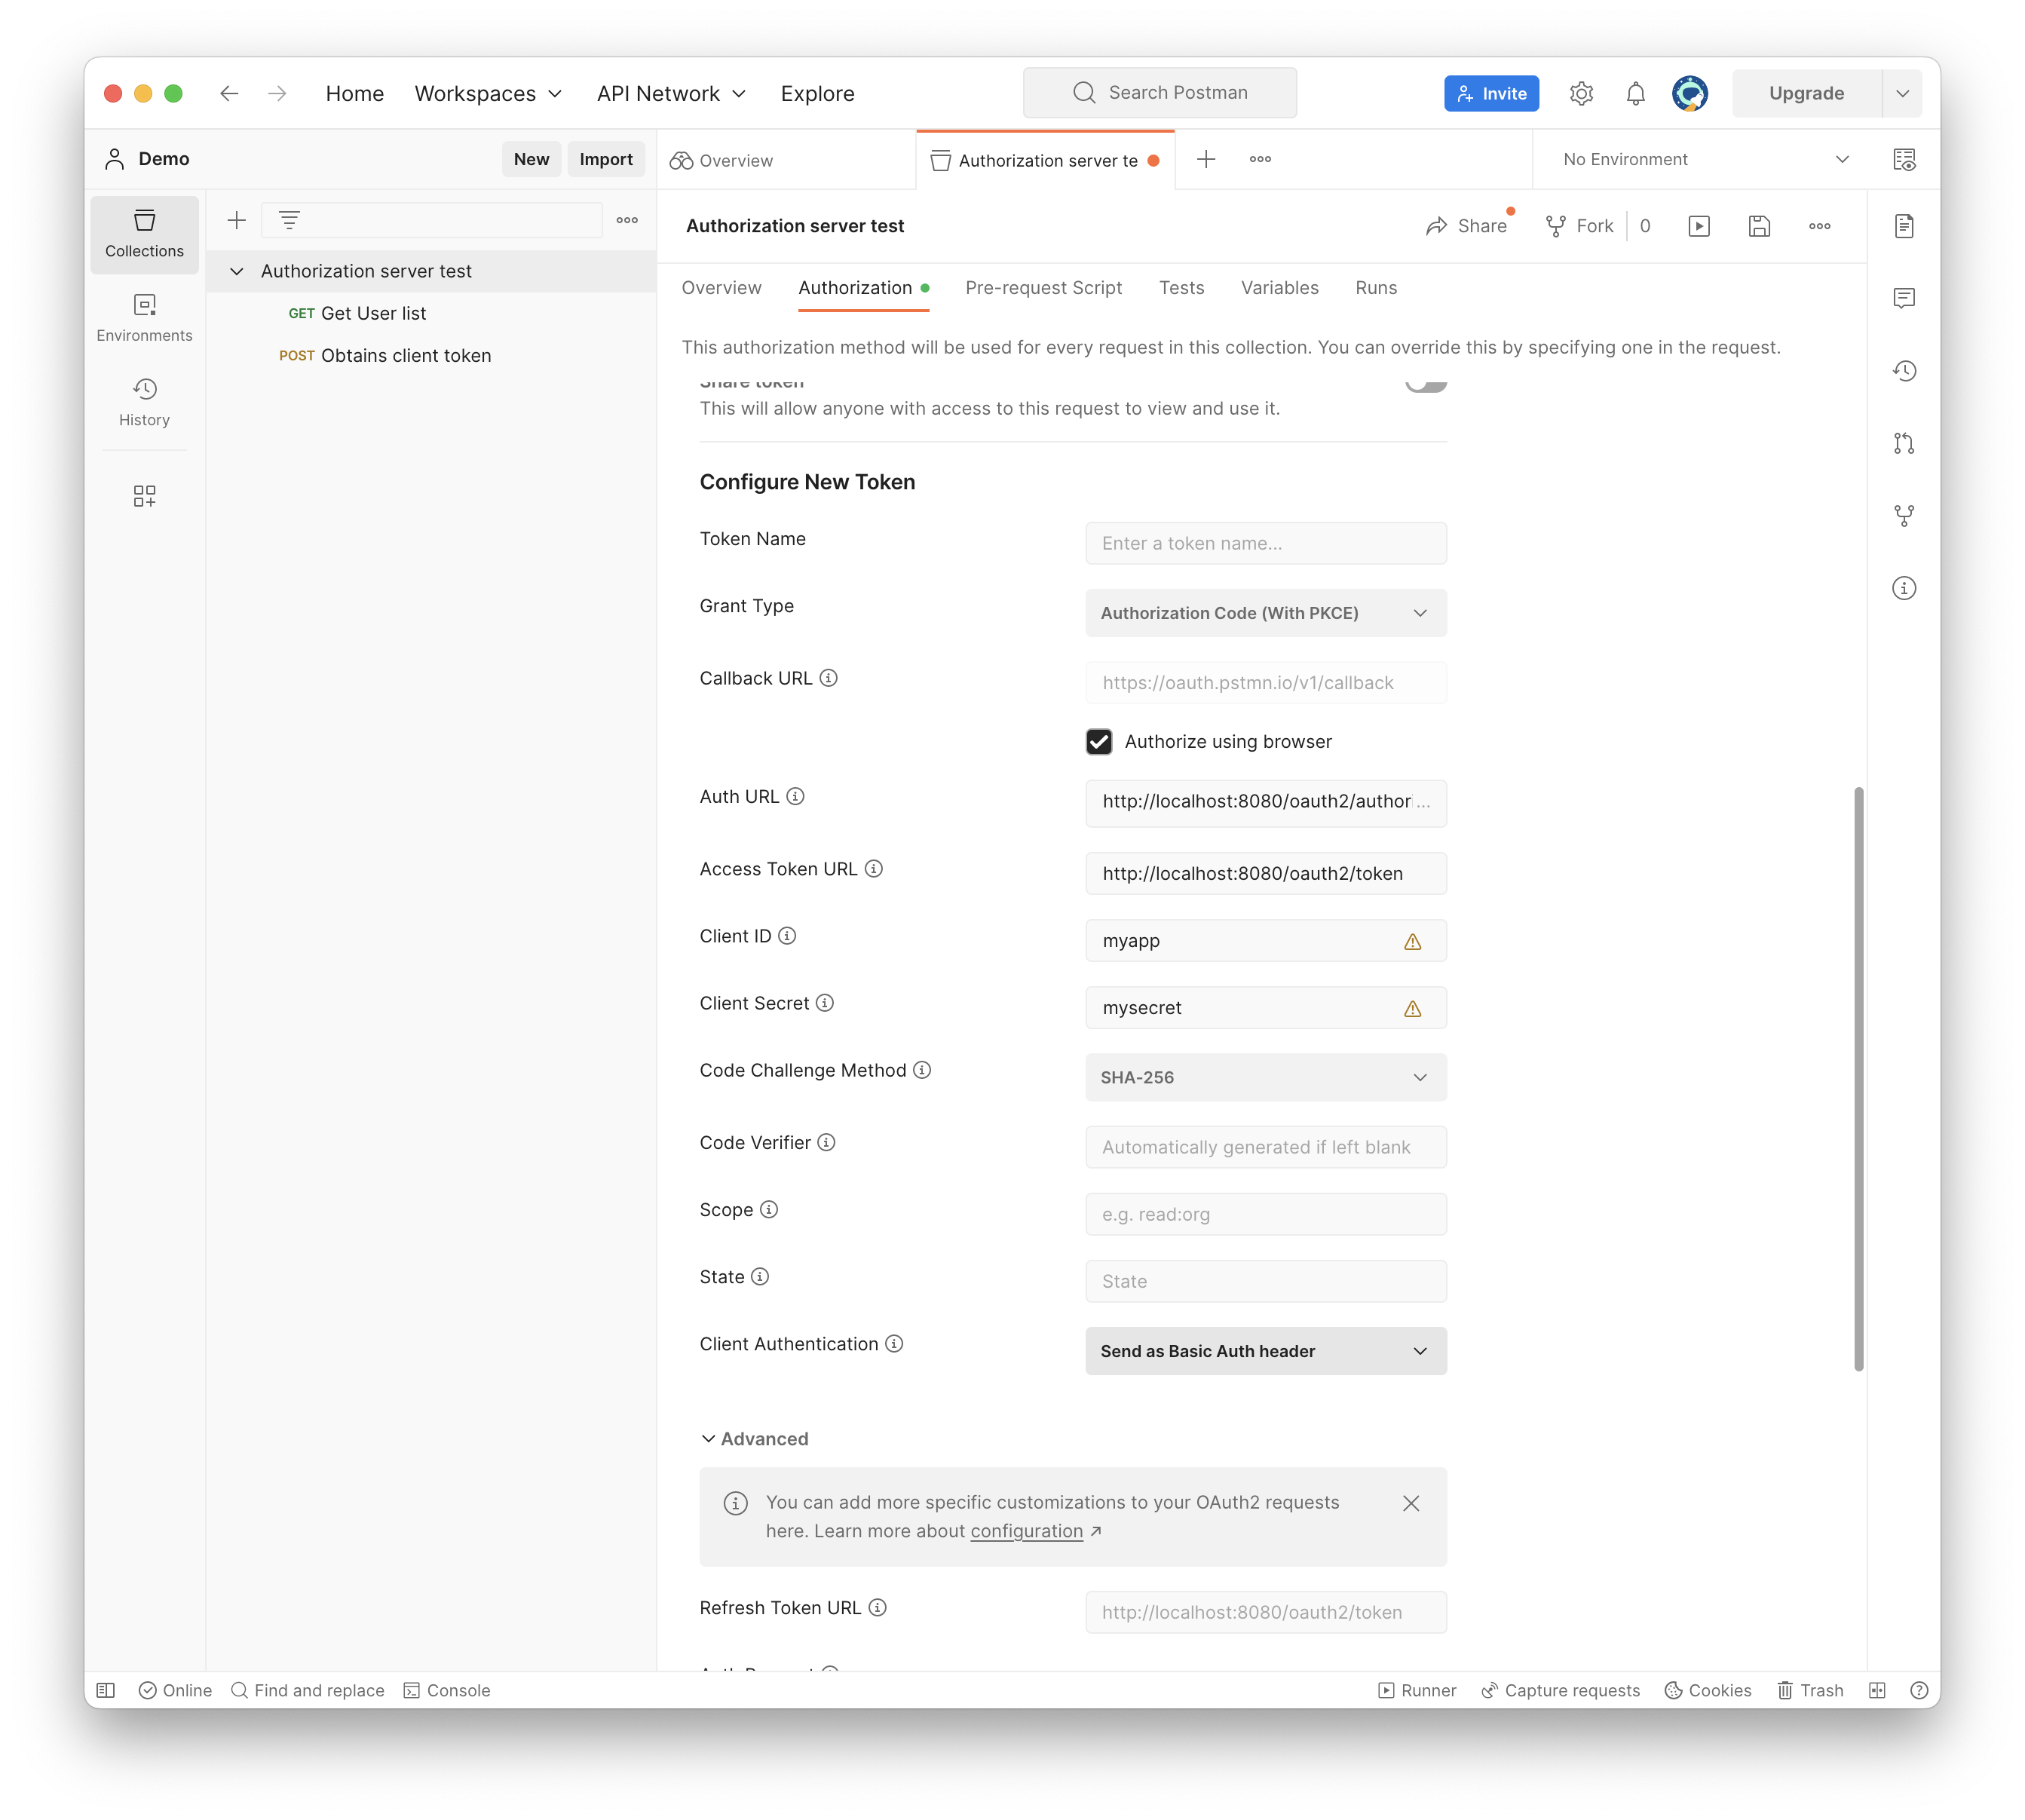
To obtain access tokens for testing, you can define an authorization in the corresponding tab of the Postman collection. The example below uses the Authorization Code Grant flow.
-
Open the Postman application.
-
Create a new collection and give it a name, e.g. "Authorization server test".
-
Specify the type as OAuth 2.0.
-
Select the grant type as Authorization code (With PKCE).
-
Enable the Authorize using browser checkbox and provide Auth URL and Access Token URL of your Jmix applications. By default, for application running on localhost, they will be:
- Provide the client id and secret values (the ones you specified in the
application.propertiesfile). If you followed the previous section, the values will be myapp and mysecret.
- Click the Get New Access Token button. Postman will open a special login page from your Jmix application. Enter user credentials there (e.g. admin/admin). The browser will redirect the request with the authorization code to the postman website. Postman will make a second request to exchange authorization code for access token, and you will see an access token in your Postman app.
By default, the authorization server add-on validates the bearer access token for all URLs defined in implementations of io.jmix.core.security.AuthorizedUrlsProvider. The AuthorizedUrlsProvider returns two collections with strings that holds URL patterns for secured and for anonymous resources.
If you have added the REST API add-on to your application, the add-on provides AuthorizedUrlsProviders that protect the following:
- URLs starting with
/rest/** - URLs defined in the
jmix.rest.authenticated-url-patternsapplication property.
To make REST controllers in your application protected by access token security, you can create and register a Spring bean with an implementation of AuthorizedUrlsProvider:
import io.jmix.core.security.AuthorizedUrlsProvider;
import org.springframework.stereotype.Component;

import java.util.Collection;
import java.util.Collections;
import java.util.List;

@Component
public class CustomAuthorizedUrlProvider implements AuthorizedUrlsProvider {
    @Override
    public Collection<String> getAuthenticatedUrlPatterns() {
        return List.of("/custom/hello");
    }

    @Override
    public Collection<String> getAnonymousUrlPatterns() {
        return Collections.emptyList();
    }
}
Token introspection is performed by checking whether the token from the request header exists in the OAuth2AuthorizationService. This ensures the security and validity of the access token.
