Pyarmor is a tool used to run and import encrypt python scripts.
WebApp is a web-gui interface of Pyarmor. This tutorial mainly show the usage of WebApp.
First download Pyarmor WebApp from https://github.com/dashingsoft/pyarmor/releases/download/v3.3.0/pyarmor-webapp.zip
Then extract it to any path, for example /opt. In this turorial, /opt will be as the installed path of Pyarmor WebApp. Replace it with real path when run these examples.
Enter path /opt/pyarmor/webapp, double click start-server.bat for Windows or start-server.sh for Linux.
Or start WebApp from command line, suppose python installed at D:/tools/Python27
cd /opt/pyarmor/webapp
D:/tools/Python27/python server.py
It will lanch a console window, at the same time a web page will be opened in the web browser. This is WebApp.
Click tab Project, enter the graphic world of Pyarmor.
If there is a button Demo Version in the top right corner of tab Project, it is to say, Oh, what I'm doing is not reality. The purpose of this mode is only to help users to understand the functions of Pyarmor, there are 2 cases:
- Pyarmor official online demo
- Open /opt/pyarmor/webapp/index.html in web browser directly.
Here are 4 cases to show basic usage:
- First case it's to run a simple encrypted script
- Then a more complicated example, used encrypted module and package.
- Next one is to bind encrypted scripts to some machine
- Last is to expire encrypted scripts on some day
This example show how to encrypt script /opt/pyarmor/src/examples/queens.py and run it.
-
Encrypt script
- Type Title, Base Path, Startup Script, Build Path as the following figure
- Click button Encrypt
After this action, in the Build Path /opt/pyarmor/webapp/build, enccrypted script queens.py, and some extra files will be found.
-
Run it
    # Encrypted files are saved here
    cd /opt/pyarmor/webapp/build

    # Run ecnrypted queens.py with arguments "6"
    python queens.py 6
- Check the content of queens.py
    import pyimcore
    __pyarmor__(__name__, b'xxxxx')
- Click button Save to save project information
/opt/pyarmor/src/examples/pybench is a collection of tests that provides a standardized way to measure the performance of Python implementations. This example show how to use encrypted pybench.
-
Click button New to create a new project
-
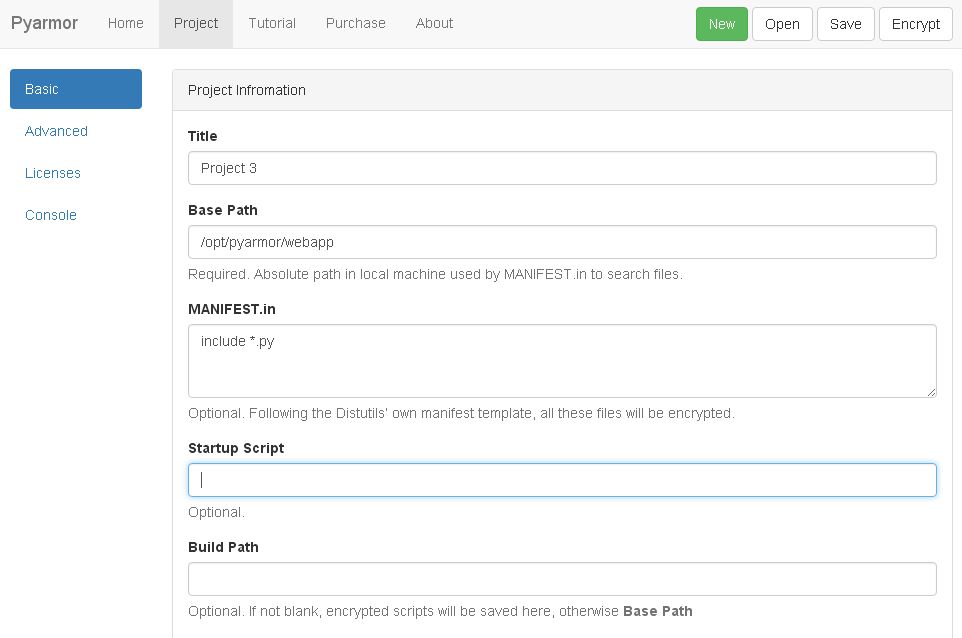
Type Title, Base Path, Build Path, MANIFEST.in as the following figure
About the format of MANIFEST.in, refer to appendix MANIFEST.in
-
Click side tab Advanced
-
Click button Save to save project information
-
Click button Encrypt
All the encrypted files will saved in Build Path
- Run pybench.py in command window
    cd /opt/pyarmor/webapp/build/pybench
    python pybench.py
- Check encrypted file "pybench.py"
    import pyimcore
    __pyarmor__(__name__, b'xxx')
This examble show how to bind encrypted script to this machine. Here we reuse project Queen created in the first example, the encrypted script has been saved in /opt/pyarmor/webapp/build.
- Get serial number of harddisk before this example
    cd /opt/pyarmor/src
    python pyarmor.py hdinfo
    Harddisk's serial number is '100304PBN2081SF3NJ5T'
-
Click button Open, back first example
-
Select project-1:Queen in the project list, then click Open in the dialog
-
Click side tab Licenses
-
Check Run encrypted scripts in special machine, type harddisk serial number of target machine
-
Type 100304PBN2081SF3NJ5T in the below text box
-
Click bottom button Generate
Note that new license will be list in Available Licenses, here it is Bind to 100304PBN2081SF3NJ5T (projects\project-2\license-0.lic)
The license filename is the part in the parentheses, fullpath would be /opt/pyarmor/webapp/projects/project-2/license-0.lic
-
Replace the default license /opt/pyarmor/webapp/build/license.lic generated in first example
cp /opt/pyarmor/webapp/projects/project-2/license-0.lic /opt/pyarmor/webapp/build/license.lic
- Run queens.py again
    cd /opt/pyarmor/webapp/build
    python queens.py
It would not work if you run queens.py in other machine.
This examble show how to expire encrypted script on some day. Here we still reuse project Queen.
-
Click side tab Licenses
-
Check Expired encrypted scripts at some point, type expired date (YYYY-MM-NN)
-
Type 2017-12-25 in the below text box
-
Click bottom button Generate
New license will be list in Available Licenses, the filename will be shown in the parentheses.
-
Replace /opt/pyarmor/webapp/build/license.lic with this file as above example
-
Run queens.py again
It would not work after Christmas of 2017 even in this machine.
The manifest template has one command per line, where each command specifies a set of files to include or exclude from the encrypted project. For an example, let’s look at the Distutils’ own manifest template:
include *.py
recursive-include examples *.py
The meanings should be fairly clear: include all files in the project path matching *.py, all files anywhere under the examples directory matching *.py. All of this is done after the standard include set, so you can exclude files from the standard set with explicit instructions in the manifest template.
              Command                             Description
---------------------------------------------------------------------------------------------------------------------------
include pat1 pat2 ...                include all files matching any of the listed patterns
exclude pat1 pat2 ...                exclude all files matching any of the listed patterns
recursive-include dir pat1 pat2 ...  include all files under dir matching any of the listed patterns
recursive-exclude dir pat1 pat2 ...  exclude all files under dir matching any of the listed patterns
global-include pat1 pat2 ...         include all files anywhere in the source tree matching — & any of the listed patterns
global-exclude pat1 pat2 ...         exclude all files anywhere in the source tree matching — & any of the listed patterns
prune dir                            exclude all files under dir
graft dir                            include all files under dir
The patterns here are Unix-style “glob” patterns: * matches any sequence of regular filename characters, ? matches any single regular filename character, and [range] matches any of the characters in range (e.g., a-z, a-zA-Z, a-f0-9_.). The definition of “regular filename character” is platform-specific: on Unix it is anything except slash; on Windows anything except backslash or colon.


