###RGBA to BW
人眼吸收綠色比其他顏色敏感,所以當影像變成灰階時,僅僅將紅色、綠色、藍色加總取平均,這是不夠的,常見的方法是將 red * 77, green * 151, blue * 28,這三個除數的總和為 256,可使除法變簡單。
給定每個 pixel 為 32-bit 的 RGBA (A = alpha, 透明度) 的 bitmap,其轉換為黑白影像的函式為:
    void rgba_to_bw(uint32_t *bitmap, int width, int height, long stride) {
        int row, col;
        uint32_t pixel, r, g, b, a, bw;
        for (row = 0; row < height; row++) {
            for (col = 0; col < width; col++) {
                pixel = bitmap[col + row * stride / 4];
                a = (pixel >> 24) & 0xff;
                r = (pixel >> 16) & 0xff;
                g = (pixel >> 8) & 0xff;
                b = pixel & 0xff;
                bw = (uint32_t) (r * 0.299 + g * 0.587 + b * 0.114);
                bitmap[col + row * stride / 4] = (a << 24) + (bw << 16) + (bw << 8) + (bw);
            }
        }
    }
請提出效能改善的方案: 1.建立表格加速浮點數操作 (L1 cache?) 2.減少位移數量 3.最終輸出的緩衝區 (in-place)
Hint: 如果先計算針對「乘上 0.299」一類的運算,先行計算後建立表格呢?
###*Implementation* [詳細筆記參考:Week 4 (Aug 24) 課堂測驗](https://embedded2015.hackpad.com/ep/pad/static/7sVmkgm4Hre)
BMP (BitMaP) 檔是是很早以前微軟所開發並使用在 Windows 系統上的圖型格式,通常不壓縮,不像 JPG、GIF、PNG 會有破壞性或非破壞性的壓縮。雖然 BMP 缺點是檔案非常大,不過因為沒有壓縮,即使不借助 OpenCV、ImageMagick 或 .NET Framework 等等,也可以很容易地直接用 Standard C Library 作影像處理。
BMP 主要有四個部份組成
- Bitmap File Header:Magic Number ('BM')、file size、Offset to image data
- Bitmap Info Header:image width and height、the number of bits per pixel、Compression type
- Color Table (Palette)
- Image data
####未優化版本: 以下是我使用一張 1920x1080 的 BMP 圖片所印出來的資訊
==== Header ====
Signature = 4D42
FileSize = 8294456
DataOffset = 54
==== Info ======
Info size = 40
Width = 1920
Height = 1080
BitsPerPixel = 32
Compression = 0
================
RGBA to BW is in progress....
Save the picture successfully!
Execution time of rgbaToBw() : 0.034494
=>執行時間:0.034494 sec
####優化版本:
- Version 1
RGB 分別都是 8 bit,可以建立三個大小為 256 bytes 的 table,這樣就不用在每次轉 bw 過程中進行浮點數運算。
原本 : bw = (uint32_t) (r * 0.299 + g * 0.587 + b * 0.114);
查表 : bw = (uint32_t) (table_R[r] + table_G[g] + table_B[b]);
=>執行時間:0.028148 sec
- Version 2
參考了 LIU TIM 的實作,使用 pointer 的 offset 取代原本的繁雜的 bitwise operation。
uint32_t *pixel = bmp->data;
r = (BYTE *) pixel + 2;
g = (BYTE *) pixel + 1;
b = (BYTE *) pixel;
=>執行時間:0.020379 sec
- Version 3
將上述兩種優化方法合併在一起
=>執行時間:0.018061 sec
- Version 4 & Version 5
使用 NEON instruction set 來加速,執行環境是 Raspberry Pi 2 (Cortex-A7)
CC = gcc-4.8
CFLAGS = -O0 -Wall -fdump-tree-vect-details -ftree-vectorize -mcpu=cortex-a7 -mfpu=neon-vfpv4 -mfloat-abi=hard
[Original version]
Execution time of rgbaToBw() : 0.353600
[Version 1 : using RGB table]
Execution time of rgbaToBw() : 0.319600
[Version 2 : using pointer]
Execution time of rgbaToBw() : 0.251800
[Version 3] : versoin1 + versoin2`
Execution time of rgbaToBw() : 0.226800
[Version 4] : NEON
Execution time of rgbaToBw() : 0.016000
[Version 5] : NEON (unroll loop + PLD)
Execution time of rgbaToBw() : 0.013200
####效能分析
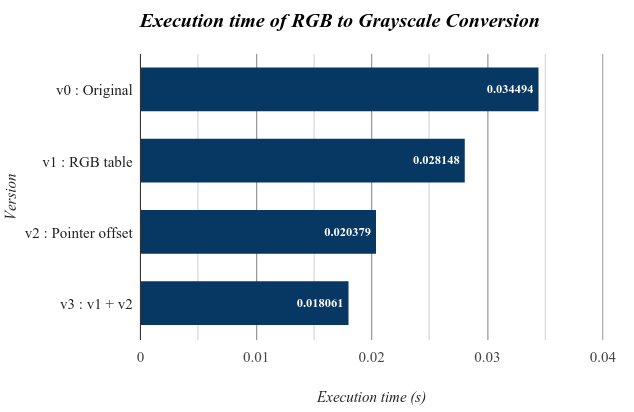 以上各版本執行時間都是 50 次迴圈平均下來的結果,測試檔為 1920x1080 32bit bmp 圖片。可以明顯看到 v2 效能表現比起 v1 來說 還好上許多,可見原始程式中「多次」的 bitwise operation 結果所帶來損耗比起浮點數運算還更多一些。若我們再將浮點數運算改成查表的話,最後時間能進步到 0.018061 secs ,幾乎是原來的一半。
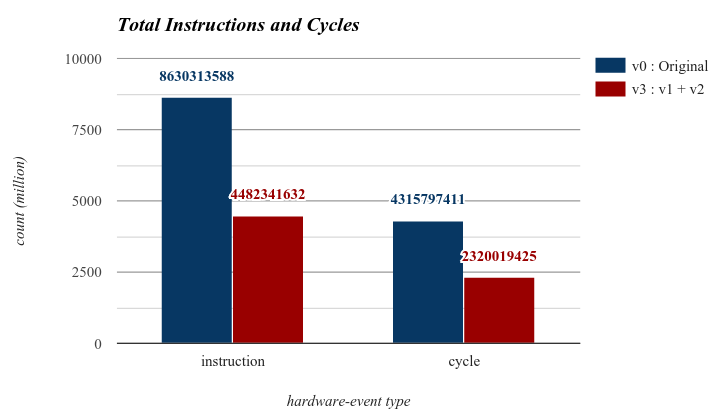 另外我也使用 perf 效能分析工具來觀察原始版本和 version 3 中 instruction 和 cycle 數量,可以看到 version 3 的 instruction 和 cycle 大約都只有原來的一半,這結果也正好反應在上面的執行時間上。
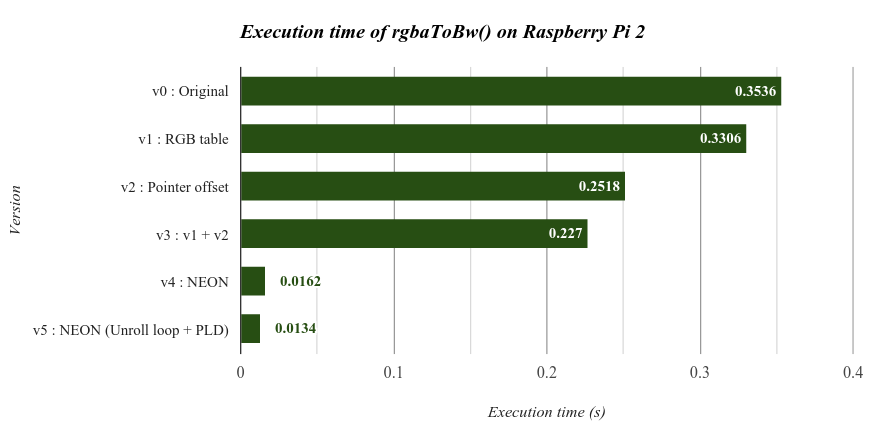 從這張表就可以很清楚了解使用 NEON 指令集加速後所得到的效能增長, Version 4 只花了原本 4.6% 的時間就完成彩色轉灰階處理。
Version 5 的程式我還沒細看,詳情可以先看上面 Bi-Ruei Chiu 的討論,其結果更減少到原本的 3.8 %的時間就完成。
從這張表就可以很清楚了解使用 NEON 指令集加速後所得到的效能增長, Version 4 只花了原本 4.6% 的時間就完成彩色轉灰階處理。
Version 5 的程式我還沒細看,詳情可以先看上面 Bi-Ruei Chiu 的討論,其結果更減少到原本的 3.8 %的時間就完成。