-
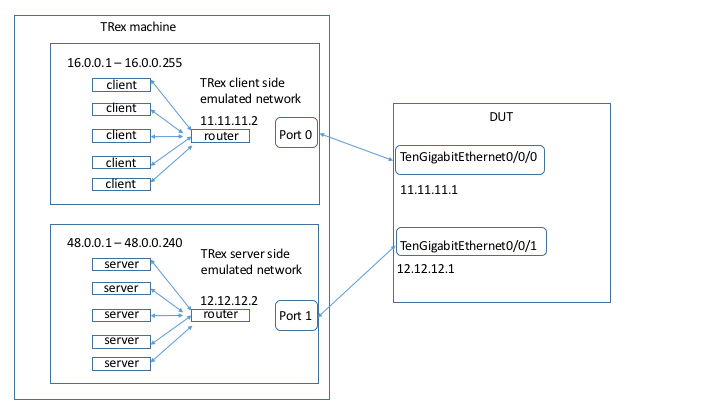
This guide will help you configure Cisco ASR1K as DUT connected to TRex running in stateful mode.
-
This can be easily adopted for working with any L3 device. Equivalent commands for configuring Linux as your DUT are shown at the end as well.
-
Two options are given for configuring the router. Policy based route, and static route. You should choose the one appropriate for your needs.
-
TRex should be directly connected to ASR1K ports, and will act as both client and server.
-
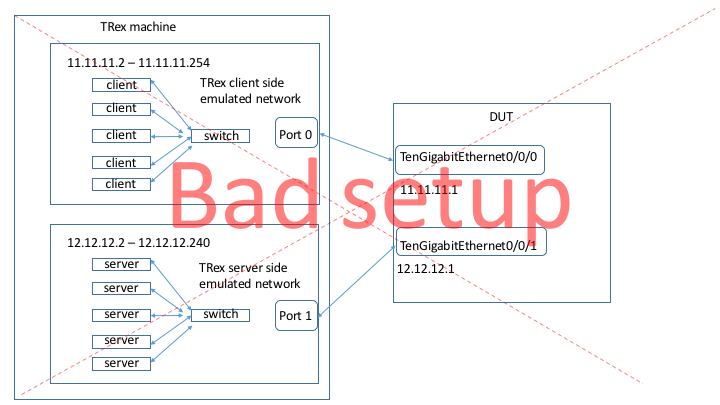
Notice that the following setup is not supported (Having TRex emulate a bunch of hosts connected by switch to the DUT). This means that the TRex IP addresses defined in “generator” section should be in different network then the DUT addresses and TRex addresses defined in port_info section.
-
You can specify config file to use by the
--cfgcommand line argument or use the default config file/etc/trex_cfg.yaml -
Below is an example of how to configure TRex IP addresses. TRex will issue ARP for default_gw, and send gratuitous ARP for ip, on each port. This works, starting from TRex version 2.10. If you want to configure MAC addresses manually (equivalent to static ARP), or running older TRex version, information is available at the end of the presentation. Full description of config file parameters can be found in the manual.
 - port_limit      : 2
    port_info       :
    - default_gw      : 11.11.11.1 #(1)
      ip              : 11.11.11.2 #(2)
    - default_gw      : 12.12.12.1 #(3)
ip : 12.12.12.2 #(4)-
TRex port 0 config- should be router’s TenG 0/0/0 IP. TRex will try to resolve this address by sending ARP request.
-
Next hop of router’s TenG 0/0/0. TRex will send gratuitous ARP for this address.
-
TRex port 1 config- should be router’s TenG 0/0/1 IP. TRex will try to resolve this address by sending ARP request.
-
Next hop of router’s TenG 0/0/0. TRex will send gratuitous ARP for this address.
-
You specify traffic config file by running TRex with -f <file name> (TRex stateful mode).
-
Examples for client config files exist in TREX_ROOT/scripts/cfg directory.
-
Add following section to the traffic config file, to define the range of IPs for clients and servers.
generator :
  distribution : "seq"
  clients_start : "16.0.0.1"
  clients_end   : "16.0.0.255"
  servers_start : "48.0.0.1"
servers_end : "48.0.0.240"-
In this example, there are:
-
255 clients talking to 240 servers
-
interface TenGigabitEthernet0/0/0
 ip address 11.11.11.1 255.255.255.0
!
`
interface TenGigabitEthernet0/0/1
 ip address 12.12.12.1 255.255.255.0
!
ip route 16.0.0.0 255.0.0.0 11.11.11.2  (1)
ip route 48.0.0.0 255.0.0.0 12.12.12.2 (2)-
Route clients network to TRex server emulation interface.
-
Route servers network to TRex client emulation interface.
-
Router is configured to statically route packets from 0/0/0 to 0/0/1 and from 0/0/1 to 0/0/0.
- Router configuration:
interface TenGigabitEthernet0/0/0
 ip address 11.11.11.1 255.255.255.0           (1)
 ip policy route-map p1_to_p2                   (2)
 load-interval 30
!

interface TenGigabitEthernet0/0/1
 ip address 12.12.12.1 255.255.255.0           (1)
 ip policy route-map p2_to_p1                   (2)
 load-interval 30
!
-
Configure ip address for the port.
-
Configure PBR policy - see next slide
route-map p1_to_p2 permit 10
 set ip next-hop 12.12.12.2    (1)
!
route-map p2_to_p1 permit 10
set ip next-hop 11.11.11.2 (2)-
Set the destination to be 12.12.12.2, in the subnet of TenG 0/0/1.
-
Set the destination to be 11.11.11.2 , in the subnet to TenG 0/0/0.
-
To verify that TRex port-0 is really connected to Router 0/0/0, you can run the following.
$./t-rex-64 -f cap2/dns.yaml -m 1 -d 10 -l 1000 --lo --lm 1
-
It sends packets only from TRex port-0 (
--lm 1) -
to send only from TRex port 1 do this:
$./t-rex-64 -f cap2/dns.yaml -m 1 -d 10 -l 1000 --lo --lm 2
-
If you are connected to a switch, you must send packets from both directions for few seconds first, to allow the switch to learn the MAC addresses of both sides.
$./t-rex-64 -f cap2/dns.yaml -m 1 -d 10 -l 1000
-
If you use TRex version older than 2.10, or wish to have MAC based configuration, TRex config file must contain the following (instead of the “ip” and “default_gw”).
 - port_limit      : 2
    port_info       :  # set eh mac addr
    - dest_mac        :   [0x0,0x0,0x0,0x1,0x0,0x0]
      src_mac         :   [0x0,0x0,0x0,0x2,0x0,0x0]
    - dest_mac        :   [0x0,0x0,0x0,0x3,0x0,0x0]
      src_mac         :   [0x0,0x0,0x0,0x4,0x0,0x0]
-
Should be Router’s TenG 0/0/0 mac-address.
-
Router should be configured to send to this mac-address.
-
Should be Router’s TenG 0/0/1 mac-address.
-
Router should be configured to send to this mac-address.
-
On the router side, you must add the following static ARP configuration.
 arp 11.11.11.2 0000.0002.0000 ARPA  #(1)
arp 12.12.12.2 0000.0004.0000 ARPA #(2)-
TRex port 0 source mac-address.
-
TRex port 1 source mac-address.
-
Assuming the same setup with Linux as DUT instead of the router, you can do the following.
-
Configure IPs of Linux interfaces to 12.12.12.1 and 11.11.11.1
route add -net 48.0.0.0 netmask 255.0.0.0 gw 12.12.12.2
route add -net 16.0.0.0 netmask 255.0.0.0 gw 11.11.11.2
-
If you have MAC based TRex config, you should also add:
arp -s 11.11.11.2 00:00:00:02:00:00 #(1)
arp -s 12.12.12.2 00:00:00:04:00:00 #(2)
-
TRex port 0 source mac-address.
-
TRex port 1 source mac-address.
interface TenGigabitEthernet1/0/0
 ip address 11.11.11.1 255.255.255.0
 ip policy route-map p1_to_p2
 load-interval 30
 ipv6 enable                                                  #(1)
 ipv6 address 2001:DB8:1111:2222::1/64                        #(2)
 ipv6 policy route-map ipv6_p1_to_p2                          #(3)
!


ipv6 unicast-routing                                          #(4)

ipv6 neighbor 3001::2 TenGigabitEthernet0/1/0 0000.0002.0002  #(5)
ipv6 neighbor 2001::2 TenGigabitEthernet0/0/0 0000.0003.0002

route-map ipv6_p1_to_p2 permit 10                             #(6)
 set ipv6 next-hop 2001::2
!
route-map ipv6_p2_to_p1 permit 10
 set ipv6 next-hop 3001::2
!


csi-mcp-asr1k-40(config)#ipv6 route 4000::/64 2001::2
csi-mcp-asr1k-40(config)#ipv6 route 5000::/64 3001::2-
Enable ipv6
-
Add ipv6 address
-
Add pbr
-
Enable ipv6 routing
-
Mac-addr setting should be like TRex
-
PBR configuraion

