One of the really nice things about developing with Node.js is the ability to move fairly seamlessly between JavaScript and native C++ code - thanks to the V8's addon API. The ability to move into C++ is sometimes driven by processing speed; but more often it's because we already have C++ code and we just want to be able to use it from JavaScript. We can categorize the different use cases for addons over (at least) two axes - (1) amount of processing time we'll spend in the C++ code, and (2) the amount of data flowing between C++ and JavaScript.
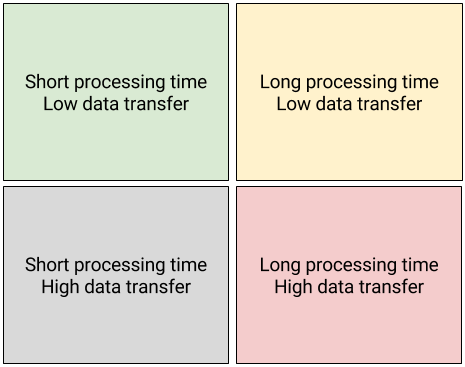
Most articles discussing C++ addons for Node.js focus on the differences between the left and right quadrants. If you are in the left quadrants (short processing time), your addon can possibly be synchronous - meaning the C++ code that executes is run directly in the Node.js event loop when called. In this situation, your addon function blocks - the calling JavaScript code simply waits for the return value from the addon. In the right quadrants, you would almost certainly design the addon using the asynchronous pattern. In an asynchronous addon function, the calling JavaScript code returns immediately. The calling code passes a callback function to the addon, and the addon does it's work in a separate worker thread. This avoids locking up the Node.js event loop, as the addon function does not block.
The difference between the top and bottom quadrants is often overlooked however - but can be just as important. This post is going to focus on this topic - and we'll wind up presenting Node.js Buffers as a powerful solution to the data problems we are about to describe.
If you are new to writing native addons, one of the first things you must master is the differences between V8-owned data (which you can access from C++ addons) and normal C++ memory allocations. When we say "V8-owned", we are referring to the storage cells that hold JavaScript data. These storage cells are accessibly through V8's C++ API - but they aren't ordinary C++ variables, they can be accessed in only limited ways. While your addon could restrict itself to ONLY using V8 data, it's more than likely it will also create it's own variables - in plain old C++. These could be stack or heap variables, and of course are completely independent of V8.
In JavaScript, primitives (numbers, strings, booleans, etc.) are immutable - storage cells associated with primitive JavaScript variables cannot be altered by a C++ addon. The primitive JavaScript variables can be reassigned to new storage cells created by C++ - but this means changing data always results in new memory allocation. In the upper quadrant (low data transfer), this really isn't a big deal - if you are designing an addon that doesn't have a lot of data exchange, then the overhead of all the new memory allocation in your addon probably doesn't mean much. As your addons moves closer to the lower quadrant however, the allocation / copying starts to cost you. For one, It costs you in terms of peak memory usage, and it also costs you in performance! The time cost of copying all this data between JavaScript (V8 storage cells) to C++ (and back) usually kills the performance benefits you might be getting from running C++ in the first place! For addons in the lower left quadrant (low processing, high data usage), the latency associated with data copying can push your addon towards the right - forcing you to consider an asynchronous design.
In asynchronous addons, we execute the bulk of our C++ processing code a worker thread. If you are unfamiliar with asynchronous callbacks, you might want to checkout a few tutorials (like here and here).
A central tenant of asynchronous addons is that you can't access V8 (JavaScript) memory outside the event-loop's thread. This leads us to our next problem - if we have lots of data, that data must be copied out of V8 memory and into your addon's native address space from the event loop's thread, before the worker thread starts. Likewise, any data produced or modified by the worker thread must be copied back into V8 by code executing in the event loop (in the callback). If you are interested in high throughput Node.js applications, you should hate spending lots of time in the event loop copying data!
Ideally, we'd prefer a way to do this:

So, we have two somewhat related problems. When working with synchronous addons, unless we aren't changing/producing data, it's likely we'll need to spend a lot of time moving our data between V8 storage cells and plain old C++ variables - which costs us. If we are working with asynchronous addons - where ideally we should spend as little time in the event loop as possible, we are still "up a creek" - since we must do our data copying in the event loop's thread due to V8's multi-threaded restrictions. This is where an often overlooked features of Node.js helps us with addon development - the Buffer. Quoting the Node.js official documentation,
Instances of the Buffer class are similar to arrays of integers but correspond to fixed-sized, raw memory allocations outside the V8 heap.
This is exactly what we are looking for - because the data inside a Buffer is not stored in a V8 storage cell, it is not subject to the multi-threading rules of V8. This means we can interact with it in place from a C++ worker thread started by an asynchronous addon.
Buffers store raw binary data, they are found in the Node.js API for reading files and other I/O devices.
Borrowing again from some examples in the Node.js documentation, we can create unitialized buffers of a specified size, buffers pre-set with a specified value, buffers from arrays of bytes, and buffers from strings.
// buffer with size 10 bytes
const buf1 = Buffer.alloc(10);

// buffer filled with 1's (10 bytes)
const buf2 = Buffer.alloc(10, 1);

//buffer containing [0x1, 0x2, 0x3]
const buf3 = Buffer.from([1, 2, 3]);

// buffer containing ASCII bytes [0x74, 0x65, 0x73, 0x74].
const buf4 = Buffer.from('test');

// buffer containing bytes from a file
const buf5 = fs.readFileSync("some file");
Buffers can be turned back into traditional JavaScript data (strings) or written back out to files, databases, or other I/O devices.
When building an addon for Node.js, the best place to start is by making use of the NAN (Native Abstractions for Node.js) API rather than directly using the V8 API - which can be a moving target. There are many tutorials on the web for getting started with NAN addons - including examples in NAN's code base itself. I've written a bit about it here, and it's also covered in a lot of depth in my ebook. While I'm going to assume you know the basics of addon development, lets take a look specifically at how Buffers are used.
First lets see how an addon can access a Buffer sent to it from JavaScript. We'll start with a simple JS program that require's an addon that we'll create in a moment:
'use strict';
// Requiring the addon that we'll build in a moment...
const addon = require('./build/Release/buffer_example');

// Allocates memory holding ASCII "ABC" outside of V8.
const buffer = Buffer.from("ABC");

// synchronous, rotates each character by +13
addon.rotate(buffer, buffer.length, 13);

console.log(buffer.toString('ascii'));
The expected output is "NOP", the ascii rotation by 13 of "ABC". Let's take a look the addon - it consists of three files (in the same directory, for simplicity):
// binding.gyp
{
  "targets": [
    {
        "target_name": "buffer_example",
        "sources": [ "buffer_example.cpp" ],
        "include_dirs" : ["<!(node -e \"require('nan')\")"]
    }
  ]
}
//package.json
{
"name": "buffer_example",
"version": "0.0.1",
"private": true,
"gypfile": true,
"scripts": {
"start": "node index.js"
},
"dependencies": {
"nan": "*"
}
}// buffer_example.cpp
#include <nan.h>
using namespace Nan;
using namespace v8;
NAN_METHOD(rotate) {
char* buffer = (char*) node::Buffer::Data(info[0]->ToObject());
unsigned int size = info[1]->Uint32Value();
unsigned int rot = info[2]->Uint32Value();
for(unsigned int i = 0; i < size; i++ ) {
buffer[i] += rot;
}
}
NAN_MODULE_INIT(Init) {
Nan::Set(target, New<String>("rotate").ToLocalChecked(),
GetFunction(New<FunctionTemplate>(rotate)).ToLocalChecked());
}
NODE_MODULE(buffer_example, Init)The most interesting file is buffer_example.cpp - notice we've used node::Buffer's Data method to convert the first parameter sent to the addon to an unsigned character array. This is now free for us to use in any way we see fit - in this case we just perform an ASCII rotation of the text. Notice there is no return value - the memory associated with the Buffer has been modified in place.
We can build the addon by just typing npm install - the package.json tells npm to download NAN and build the addon using the binding.gyp file. Running it will give us the "NOP" output we expect.
We can also create new buffers while inside the addon. Let's modify the rotate function to increment the input, but return another buffer containing the string resulting from a decrement operation:
NAN_METHOD(rotate) {
    char* buffer = (char*) node::Buffer::Data(info[0]->ToObject());
    unsigned int size = info[1]->Uint32Value();
    unsigned int rot = info[2]->Uint32Value();

    char * retval = new char[size];
    for(unsigned int i = 0; i < size; i++ ) {
        retval[i] = buffer[i] - rot;
        buffer[i] += rot;
    }

    info.GetReturnValue().Set(Nan::NewBuffer(retval, size).ToLocalChecked());
}
var result = addon.rotate(buffer, buffer.length, 13);
console.log(buffer.toString('ascii'));
console.log(result.toString('ascii'));Now the resulting buffer will contain '456'. Note the use of NAN's NewBuffer function, which wraps the dynamically allocated retval array in a Node buffer. Doing so transfers ownership of this memory to Node.js - the memory associated with retval will be reclaimed (by calling free) when the buffer goes out of scope in JavaScript. More on this issue later - as we don't always want to have this happen this way!
You can find additional information about how NAN handles buffers here.
The example above is pretty basic - and not particularly exciting. Let's turn to a more practical example - image processing with C++. If you want to get the full source code for both the example above, and the image processing code below, you can head over to my nodecpp-demo repository at https://github.com/freezer333/nodecpp-demo, the code is in the "buffers" directory.
Image processing is a good candidate for C++ addons, as it can often be time consuming, CPU intensive, and some processing techniques have parallelism that C++ can exploit well. For the example we'll look at now, we'll simply convert png formatted data into bmp formatted data 1. There are a good number of existing, open source C++ libraries that can help us with this task, I'm going to use LodePNG as it is dependency free and quite simple to use. LodePNG can be found at http://lodev.org/lodepng/, and it's source code is at https://github.com/lvandeve/lodepng. Many thanks to the developer, Lode Vandevenne for providing such an easy to use library!
For this addon, we'll create the following directory structure, which includes source code downloaded from https://github.com/lvandeve/lodepng, namely lodepng.h and lodepng.cpp.
/png2bmp
 |
 |--- binding.gyp
 |--- package.json
 |--- png2bmp.cpp  # the addon
 |--- index.js     # program to test the addon
 |--- sample.png   # input (will be converted to bmp)
 |--- lodepng.h    # from lodepng distribution
 |--- lodepng.cpp  # From loadpng distribution
lodepng.cpp contains all the necessary code for doing image processing, and I will not discuss it's working in detail. In addition, the lodepng distribution contains sample code that allows you to specifically convert between png and bmp - I've adapted it slightly, and will put it in the addon source code file png2bmp.cpp which we will take a look at shortly. Let's first look at what the actual JavaScript program looks like though - before diving into the addon code itself:
'use strict';
const fs = require('fs');
const path = require('path');
const png2bmp = require('./build/Release/png2bmp');

const png_file = process.argv[2];
const bmp_file = path.basename(png_file, '.png') + ".bmp";
const png_buffer = fs.readFileSync(png_file);

const bmp_buffer = png2bmp.getBMP(png_buffer, png_buffer.length);
fs.writeFileSync(bmp_file, bmp_buffer);
The program uses accepts a filename for a png image as a command line option. It calls an addon function getBMP which accepts a buffer containing the png file and it's length. This addon is synchronous we'll take a look at the asynchronous version later on.
Here's the package.json, which is setting up npm start to invoke the index.js program with a command line argument of sample.png. It's a pretty generic image:
{
  "name": "png2bmp",
  "version": "0.0.1",
  "private": true,
  "gypfile": true,
  "scripts": {
    "start": "node index.js sample.png"
  },
  "dependencies": {
  	"nan": "*"
  }
}
Here is the binding.gyp file - which is fairly standard, other than a few compiler flags needed to compile lodepng. It also includes the requisite references to NAN.
{
  "targets": [
    {
      "target_name": "png2bmp",
      "sources": [ "png2bmp.cpp", "lodepng.cpp" ],
      "cflags": ["-Wall", "-Wextra", "-pedantic", "-ansi", "-O3"],
      "include_dirs" : ["<!(node -e \"require('nan')\")"]
    }
  ]
}
png2bmp.cpp will mostly contain V8/NAN code, however it does have one image processing utility function - do_convert, adapted from lodepng's png to bmp example code. The function accepts a vector<unsigned char> containing input data (png format) and a vector<unsigned char> to put it's output (bmp format) data into. That function in turn calls encodeBMP, which is straight from the lodepng examples. Here is the full code listing of these two functions. The details are not important to understanding addon Buffer objects, but are included here for completeness. Our addon entry point(s) will call do_convert.
/*
ALL LodePNG code in this file is adapted from lodepng's
examples, found at the following URL:
https://github.com/lvandeve/lodepng/blob/
master/examples/example_bmp2png.cpp'
*/

void encodeBMP(std::vector<unsigned char>& bmp,
  const unsigned char* image, int w, int h)
{
  //3 bytes per pixel used for both input and output.
  int inputChannels = 3;
  int outputChannels = 3;

  //bytes 0-13
  bmp.push_back('B'); bmp.push_back('M'); //0: bfType
  bmp.push_back(0); bmp.push_back(0);
  bmp.push_back(0); bmp.push_back(0);
  bmp.push_back(0); bmp.push_back(0); //6: bfReserved1
  bmp.push_back(0); bmp.push_back(0); //8: bfReserved2
  bmp.push_back(54 % 256);
  bmp.push_back(54 / 256);
  bmp.push_back(0); bmp.push_back(0);

  //bytes 14-53
  bmp.push_back(40); bmp.push_back(0);
  bmp.push_back(0); bmp.push_back(0);  //14: biSize
  bmp.push_back(w % 256);
  bmp.push_back(w / 256);
  bmp.push_back(0); bmp.push_back(0); //18: biWidth
  bmp.push_back(h % 256);
  bmp.push_back(h / 256);
  bmp.push_back(0); bmp.push_back(0); //22: biHeight
  bmp.push_back(1); bmp.push_back(0); //26: biPlanes
  bmp.push_back(outputChannels * 8);
  bmp.push_back(0); //28: biBitCount
  bmp.push_back(0); bmp.push_back(0);
  bmp.push_back(0); bmp.push_back(0);  //30: biCompression
  bmp.push_back(0); bmp.push_back(0);
  bmp.push_back(0); bmp.push_back(0);  //34: biSizeImage
  bmp.push_back(0); bmp.push_back(0);
  bmp.push_back(0); bmp.push_back(0);  //38: biXPelsPerMeter
  bmp.push_back(0); bmp.push_back(0);
  bmp.push_back(0); bmp.push_back(0);  //42: biYPelsPerMeter
  bmp.push_back(0); bmp.push_back(0);
  bmp.push_back(0); bmp.push_back(0);  //46: biClrUsed
  bmp.push_back(0); bmp.push_back(0);
  bmp.push_back(0); bmp.push_back(0);  //50: biClrImportant

  int imagerowbytes = outputChannels * w;
  //must be multiple of 4
  imagerowbytes = imagerowbytes % 4 == 0 ? imagerowbytes :
            imagerowbytes + (4 - imagerowbytes % 4);

  for(int y = h - 1; y >= 0; y--)
  {
    int c = 0;
    for(int x = 0; x < imagerowbytes; x++)
    {
      if(x < w * outputChannels)
      {
        int inc = c;
        //Convert RGB(A) into BGR(A)
        if(c == 0) inc = 2;
        else if(c == 2) inc = 0;
        bmp.push_back(image[inputChannels
            * (w * y + x / outputChannels) + inc]);
      }
      else bmp.push_back(0);
      c++;
      if(c >= outputChannels) c = 0;
    }
  }

  // Fill in the size
  bmp[2] = bmp.size() % 256;
  bmp[3] = (bmp.size() / 256) % 256;
  bmp[4] = (bmp.size() / 65536) % 256;
  bmp[5] = bmp.size() / 16777216;
}


bool do_convert(
  std::vector<unsigned char> & input_data,
  std::vector<unsigned char> & bmp)
{
  std::vector<unsigned char> image; //the raw pixels
  unsigned width, height;
  unsigned error = lodepng::decode(image, width,
    height, input_data, LCT_RGB, 8);
  if(error) {
    std::cout << "error " << error << ": "
              << lodepng_error_text(error)
              << std::endl;
    return false;
  }
  encodeBMP(bmp, &image[0], width, height);
  return true;
}
Sorry... that listing was long, but it's important to see what's actually going on! Let's get to work bridging all this code to JavaScript.
The png image data is actually read when we are in JavaScript, so it's passed in as a Node.js Buffer. We'll use NAN to access the buffer itself. Here's the complete code for the synchronous version.
void buffer_delete_callback(char* data, void* hint) {
    free(data);
}

NAN_METHOD(GetBMP) {
  unsigned char*buffer = (unsigned char*) node::Buffer::Data(info[0]->ToObject());

  unsigned int size = info[1]->Uint32Value();

  std::vector<unsigned char> png_data(buffer, buffer + size);
  std::vector<unsigned char> bmp = vector<unsigned char>();

  if ( do_convert(png_data, bmp)) {
      info.GetReturnValue().Set(
          NewBuffer(
            (char *)bmp.data(),
            bmp.size(),
            buffer_delete_callback,
            0)
            .ToLocalChecked());
    }
}

NAN_MODULE_INIT(Init) {
   Nan::Set(target, New<String>("getBMP").ToLocalChecked(),
        GetFunction(New<FunctionTemplate>(GetBMP)).ToLocalChecked());
}

NODE_MODULE(png2bmp, Init)
In GetBMP we use the familiar Data method to unwrap the buffer so we can work with it like a normal character array. Next, we build a vector around the input so we can pass it to our do_convert function listed above. Once the bmp vectors is filled in by do_convert, we wrap it up in a Buffer and return to JavaScript.
Note the third parameter to the NewBuffer function. It is a callback - which ends up being called when the Buffer gets garbage collected by V8. Recall, Buffers are JavaScript objects, whose data is stored outside V8 - but the object itself is under V8's control. From this perspective, it should make sense that a callback would be handy - when V8 destroys the buffer, we need some way of freeing up the data we have created - which is passed into the callback as it's first parameter. The signature of the callback is defined by NAN - Nan::FreeCallback(). The seconds parameter is a hint to aid in deallocation, we can use it however we want.
So - here is the problem with this code: The data contained in the buffer we return is likely deleted before our JavaScript gets to use it. Why? The bmp vector is going to go out of scope as our GetBMP function returns. C++ vector semantics hold that when the vector goes out of scope, the vector's destructor will delete all data within the vector - in this case, our bmp data! This is a huge problem, since the Buffer we send back to JavaScript will have it's data deleted out from under it. You might get away with this (race conditions are fun right?), but it will eventually cause your program to crash.
We can fix this issue by utilizing 4th parameter to NewBuffer - which is a hint passed in to the deletion callback. Since our problem is that the vector containing bitmap data goes out of scope, we can instead dynamically allocate the vector itself, and pass it into the free callback, where it can be properly deleted when the Buffer has been garbage collected. Below is the new delete_callback, along with the new call to NewBuffer.
void buffer_delete_callback(char* data, void* the_vector) {
  delete reinterpret_cast<vector<unsigned char> *> (the_vector);
}

NAN_METHOD(GetBMP) {

  unsigned char*buffer =  (unsigned char*) node::Buffer::Data(info[0]->ToObject());
  unsigned int size = info[1]->Uint32Value();

  std::vector<unsigned char> png_data(buffer, buffer + size);
  std::vector<unsigned char> * bmp = new vector<unsigned char>();

  if ( do_convert(png_data, *bmp)) {
      info.GetReturnValue().Set(
          NewBuffer(
            (char *)bmp->data(),
            bmp->size(),
            buffer_delete_callback,
            bmp)
            .ToLocalChecked());
  }
}
Run this program by doing an npm install and then an npm start and you'll see a sample.bmp generated that looks eerily similar to sample.png, just a whole lot bigger (bmp compression is far less efficient than png).
Let's develop an asynchronous version of the png to bitmap converter. We'll perform the actual conversion in a C++ worker thread, using Nan::AsyncWorker. Through the use of Buffer objects we can avoid copying the png data - we will only need to hold a pointer to the underlying data such that our worker thread can access it. Likewise, the data produced by the worker thread (the bmp vector) can be used to create a new Buffer without copying data.
 class PngToBmpWorker : public AsyncWorker {
    public:
    PngToBmpWorker(Callback * callback,
        v8::Local<v8::Object> &pngBuffer, int size)
        : AsyncWorker(callback) {
        unsigned char*buffer =
          (unsigned char*) node::Buffer::Data(pngBuffer);

        std::vector<unsigned char> tmp(
          buffer,
          buffer +  (unsigned int) size);

        png_data = tmp;
    }
    void Execute() {
       bmp = new vector<unsigned char>();
       do_convert(png_data, *bmp);
    }
    void HandleOKCallback () {
        Local<Object> bmpData =
               NewBuffer((char *)bmp->data(),
               bmp->size(), buffer_delete_callback,
               bmp).ToLocalChecked();
        Local<Value> argv[] = { bmpData };
        callback->Call(1, argv);
    }

    private:
        vector<unsigned char> png_data;
        std::vector<unsigned char> * bmp;
};

NAN_METHOD(GetBMPAsync) {
    int size = To<int>(info[1]).FromJust();
    v8::Local<v8::Object> pngBuffer =
      info[0]->ToObject();

    Callback *callback =
      new Callback(info[2].As<Function>());

    AsyncQueueWorker(
      new PngToBmpWorker(callback, pngBuffer , size));
}
Our new GetBMPAsync addon function first unwraps the input buffer sent from JavaScript and then initializes and queues a new worker - PngToBmpWorker - using NAN's API. The worker object's Execute method is called by libuv inside a worker thread - where the conversion is done. When the Execute function returns, libuv calls the HandleOKCallback in the Node.js event loop thread - which creates the buffer and invokes the callback sent from JavaScript.
Now we can utilize this addon function in JavaScript like this:
png2bmp.getBMPAsync(png_buffer,
  png_buffer.length,
  function(bmp_buffer) {
    fs.writeFileSync(bmp_file, bmp_buffer);
}); There were two core takeways in this post:
- You can't ignore the costs of copying data between V8 storage cells and C++ variables - if you aren't careful, you can easily kill the performance boost you might have thought you were getting by dropping into C++ to perform your work!
- Buffers offer a way to work with the same data in both JavaScript and C++ - thus avoiding the need to create copies.
Through a simple demo application that rotate ascii text, along with more practical synchronous and asynchronous image conversion examples, I hope you now see how using buffers in your addons can be pretty painless. Hopefully this post helps you boost the performance of your own addons!
If you are looking for some more tips on how to design Node.js C++ addons, please check out my ebook on C++ and Node.js Integration.
1: Converting from png to bmp is not particularly time consuming, it's probably overkill for an addon - but it's good for demonstration purposes. If you are looking for a pure JavaScript implementation of image processing (including much more than png to bmp conversion), take a look at JIMP at https://www.npmjs.com/package/jimphttps://www.npmjs.com/package/jimp.