This repository contains a sample Java REST application implemented according to hexagonal architecture.
It is part of the HappyCoders tutorial series on Hexagonal Architecture:
- Part 1: Hexagonal Architecture - What Is It? Why Should You Use It?.
- Part 2: Hexagonal Architecture with Java - Tutorial.
- Part 3: Ports and Adapters Java Tutorial: Adding a Database Adapter.
- Part 4: Hexagonal Architecture with Quarkus - Tutorial.
- Part 5: Hexagonal Architecture with Spring Boot - Tutorial.
In the main branch, you'll find the application implemented without an application framework. It's only using:
- RESTEasy (implementing Jakarta RESTful Web Services),
- Hibernate (implementing Jakarta Persistence API), and
- Undertow as a lightweight web server.
In the without-jpa-adapters branch, you'll find the application implemented without an application framework and without JPA adapters. It's only using RESTEasy and Undertow.
In the with-quarkus branch, you'll find an implementation using Quarkus as application framework.
In the with-quarkus branch, you'll find an implementation using Spring as application framework.
The source code is separated into four modules:
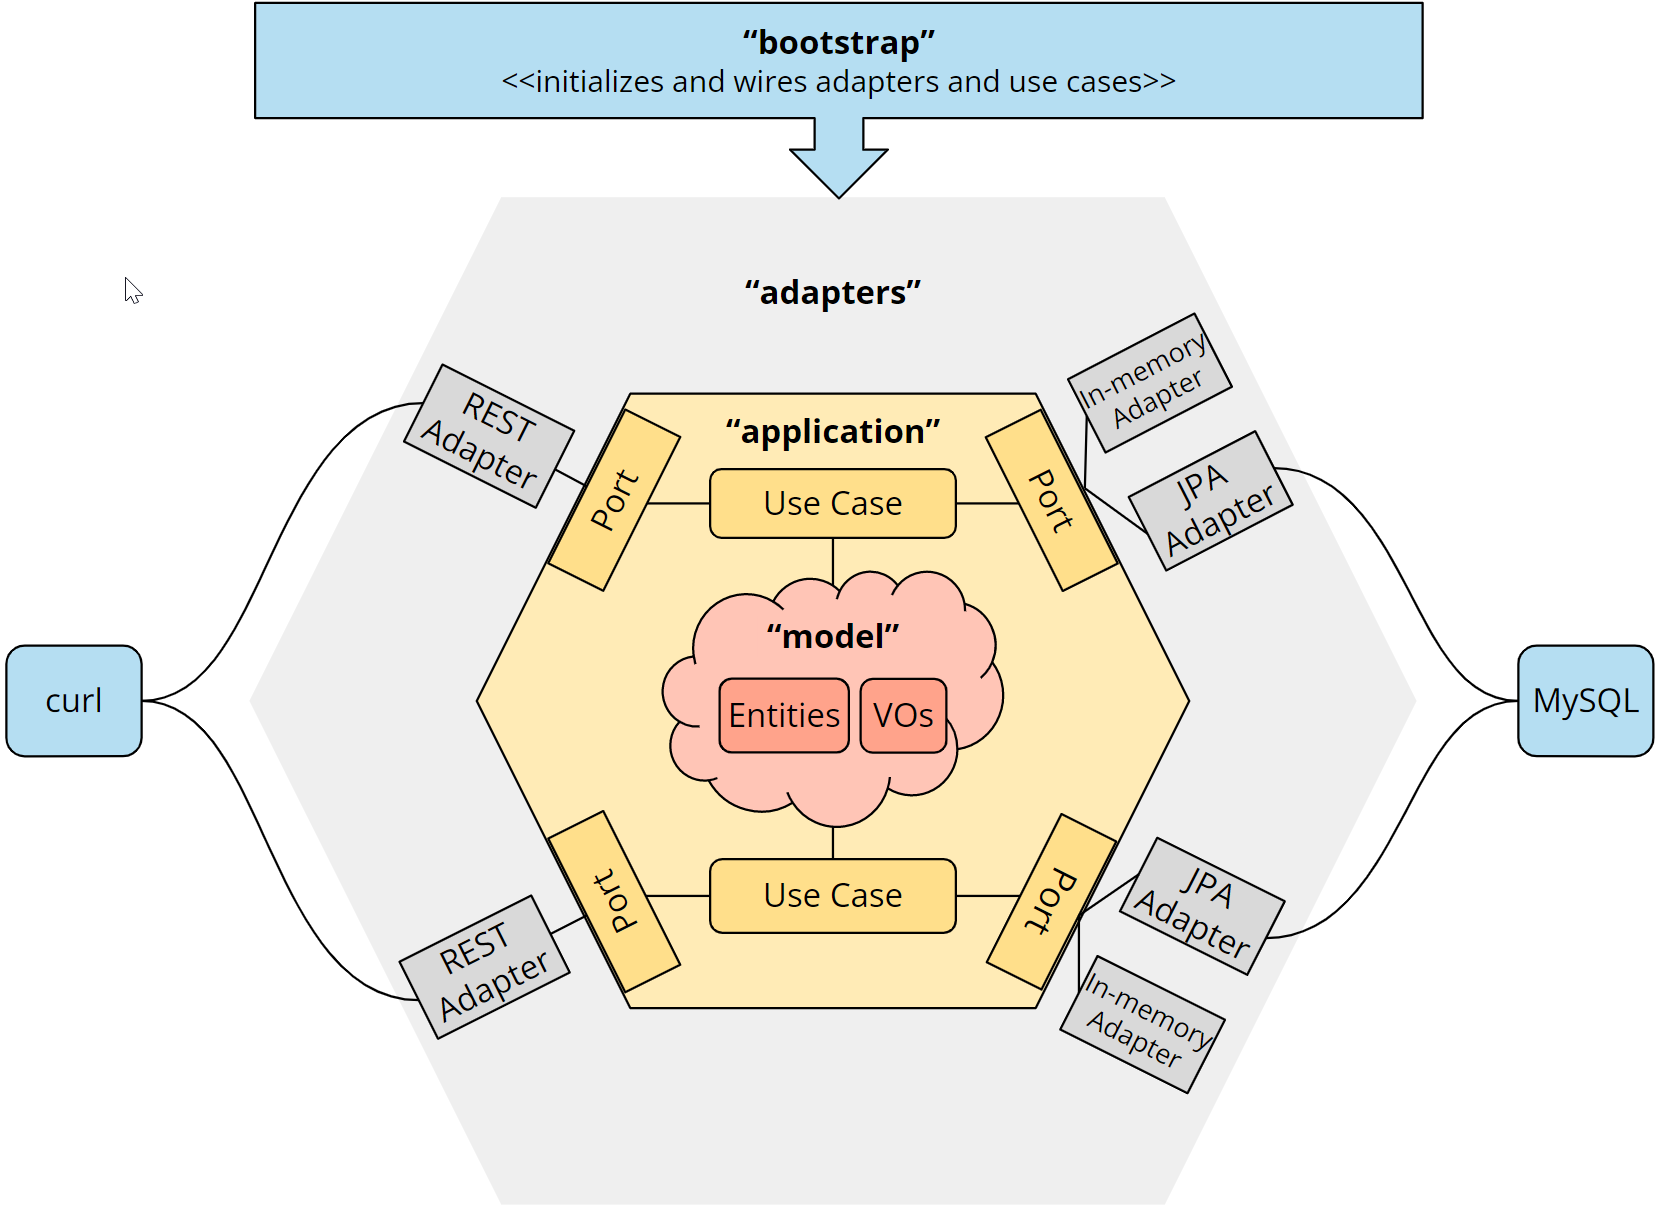
model- contains the domain modelapplication- contains the domain services and the ports of the hexagonadapters- contains the REST, in-memory and JPA adaptersboostrap- contains the configuration and bootstrapping logic
The following diagram shows the hexagonal architecture of the application along with the source code modules:
The model module is not represented as a hexagon because it is not defined by the Hexagonal Architecture. Hexagonal Architecture leaves open what happens inside the application hexagon.
The easiest way to run the application is to start the main method of the Launcher class (you'll find it in the boostrap module) from your IDE.
You can use one of the following VM options to select a persistence mechanism:
-Dpersistence=inmemoryto select the in-memory persistence option (default)-Dpersistence=mysqlto select the MySQL option
If you selected the MySQL option, you will need a running MySQL database. The easiest way to start one is to use the following Docker command:
docker run --name hexagon-mysql -d -p3306:3306 \
    -e MYSQL_DATABASE=shop -e MYSQL_ROOT_PASSWORD=test mysql:8.1
The connection parameters for the database are hardcoded in RestEasyUndertowShopApplication.initMySqlAdapter(). If you are using the Docker container as described above, you can leave the connection parameters as they are. Otherwise, you may need to adjust them.
The following curl commands assume that you have installed jq, a tool for pretty-printing JSON strings.
The following queries return one and two results, respectively:
curl localhost:8080/products/?query=plastic | jq
curl localhost:8080/products/?query=monitor | jq
The response of the second query looks like this:
[
  {
    "id": "K3SR7PBX",
    "name": "27-Inch Curved Computer Monitor",
    "price": {
      "currency": "EUR",
      "amount": 159.99
    },
    "itemsInStock": 24081
  },
  {
    "id": "Q3W43CNC",
    "name": "Dual Monitor Desk Mount",
    "price": {
      "currency": "EUR",
      "amount": 119.9
    },
    "itemsInStock": 1079
  }
]To show the cart of user 61157 (this cart is empty when you begin):
curl localhost:8080/carts/61157 | jqThe response should look like this:
{
  "lineItems": [],
  "numberOfItems": 0,
  "subTotal": null
}Each of the following commands adds a product to the cart and returns the contents of the cart after the product is added (note that on Windows, you have to replace the single quotes with double quotes):
curl -X POST 'localhost:8080/carts/61157/line-items?productId=TTKQ8NJZ&quantity=20' | jq
curl -X POST 'localhost:8080/carts/61157/line-items?productId=K3SR7PBX&quantity=2' | jq
curl -X POST 'localhost:8080/carts/61157/line-items?productId=Q3W43CNC&quantity=1' | jq
curl -X POST 'localhost:8080/carts/61157/line-items?productId=WM3BPG3E&quantity=3' | jq
After executing two of the four commands, you can see that the cart contains the two products. You also see the total number of items and the sub-total:
{
  "lineItems": [
    {
      "productId": "TTKQ8NJZ",
      "productName": "Plastic Sheeting",
      "price": {
        "currency": "EUR",
        "amount": 42.99
      },
      "quantity": 20
    },
    {
      "productId": "K3SR7PBX",
      "productName": "27-Inch Curved Computer Monitor",
      "price": {
        "currency": "EUR",
        "amount": 159.99
      },
      "quantity": 2
    }
  ],
  "numberOfItems": 22,
  "subTotal": {
    "currency": "EUR",
    "amount": 1179.78
  }
}
This will increase the number of plastic sheetings to 40:
curl -X POST 'localhost:8080/carts/61157/line-items?productId=TTKQ8NJZ&quantity=20' | jqTrying to add another 20 plastic sheetings will result in error message saying that there are only 55 items in stock:
curl -X POST 'localhost:8080/carts/61157/line-items?productId=TTKQ8NJZ&quantity=20' | jqThis is how the error response looks like:
{
  "httpStatus": 400,
  "errorMessage": "Only 55 items in stock"
}To empty the cart, send a DELETE command to its URL:
curl -X DELETE localhost:8080/carts/61157To verify it's empty:
curl localhost:8080/carts/61157 | jqYou'll see an empty cart again.
