
Horovod is a distributed training framework for TensorFlow. The goal of Horovod is to make distributed Deep Learning fast and easy to use.
The primary motivation for this project is to make it easy to take a single-GPU TensorFlow program and successfully train it on many GPUs faster. This has two aspects:
- How much modifications does one have to make to a program to make it distributed, and how easy is it to run it.
- How much faster would it run in distributed mode?
Internally at Uber we found that it's much easier for people to understand an MPI model that requires minimal changes to source code than to understand how to set up regular Distributed TensorFlow.
To give some perspective on that, this commit
into our fork of TF Benchmarks shows how much code can be removed if one doesn't need to worry about towers and manually
averaging gradients across them, tf.Server(), tf.ClusterSpec(), tf.train.SyncReplicasOptimizer(),
tf.train.replicas_device_setter() and so on. If none of these things makes sense to you - don't worry, you don't have to
learn them if you use Horovod.
In addition to being easy to use, Horovod is fast. We have done two benchmarks which demonstrate that Horovod scales very well.
The first benchmark was done on 4 servers with 4 Pascal GPUs each connected by RoCE-capable 25 Gbit/s network:
| Setup | Inception V3 | ResNet-101 | VGG-16 |
|---|---|---|---|
| Baseline single-GPU (batch size=64) | 134.4 | 119.4 | 130.9 |
| On 16 GPUs | x | x | x |
| Distributed TensorFlow | 1,345.8 (10.0x) | 959.6 (8.0x) | 74.7 (0.6x) |
| Distributed TensorFlow (variables on CPU) | 1,576.4 (11.7x) | 1,168.8 (9.8x) | 79.5 (0.6x) |
| TCP Horovod (allreduce on CPU) | 2,073.3 (15.4x) | 1,338.3 (11.2x) | 616.8 (4.7x) |
| RDMA Horovod (allreduce on CPU) | 2,073.1 (15.4x) | 1,446.3 (12.1x) | 618.0 (4.7x) |
| TCP Horovod (allreduce on GPU with NCCL) | 1,990.7 (14.8x) | 1,685.1 (14.1x) | 1,308.7 (10.0x) |
| RDMA Horovod (allreduce on GPU with NCCL) | 2,022.6 (15.0x) | 1,746.2 (14.6x) | 1,787.4 (13.7x) |
The second benchmark was done on 16 servers with 4 Pascal GPUs each connected by plain 40 Gbit/s network:
| Setup | Inception V3 | ResNet-101 | VGG-16 |
|---|---|---|---|
| Baseline single-GPU (batch size=64) | 148.8 | 136.0 | 149.6 |
| On 64 GPUs | x | x | x |
| Distributed TensorFlow | 4,225.3 (28.4x) | 2,996.0 (22.0x) | 97.0 (0.6x) |
| Distributed TensorFlow (variables on CPU) | 5,297.4 (35.6x) | 4,269.2 (31.4x) | 100.8 (0.7x) |
| TCP Horovod (allreduce on CPU) | 6,549.6 (44.0x) | 3,761.6 (27.7x) | 1,462.6 (9.8x) |
| TCP Horovod (allreduce on GPU with NCCL) | 7,932.1 (53.3x) | 7,741.6 (56.9x) | 6,084.2 (40.7x) |
While installing MPI and NCCL itself may seem like an extra hassle, it only needs to be done once by the team dealing with infrastructure, while everyone else in the company who builds the models can enjoy the simplicity of training them at scale.
To install Horovod:
- Install Open MPI or another MPI implementation.
Steps to install Open MPI are listed here.
- Install the
horovodpip package.
$ pip install horovodThis basic installation is good for laptops and for getting to know Horovod. If you're installing Horovod on a server with GPUs, read the Horovod on GPU section.
Horovod core principles are based on MPI concepts such as size, rank, local rank, allreduce, allgather and broadcast. These are best explained by example. Say we launched a training script on 4 servers, each having 4 GPUs. If we launched one copy of the script per GPU:
-
Size would be the number of processes, in this case 16.
-
Rank would be the unique process ID from 0 to 15 (size - 1).
-
Local rank would be the unique process ID within the server from 0 to 3.
-
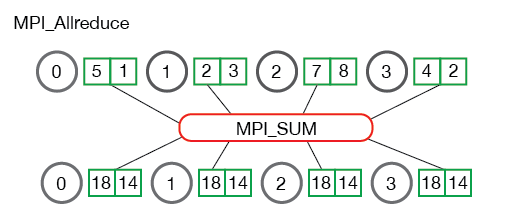
Allreduce is an operation that aggregates data among multiple processes and distributes results back to them. Allreduce is used to average dense tensors. Here's an illustration from the MPI Tutorial:
-
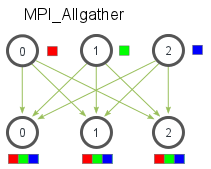
Allgather is an operation that gathers data from all processes on every process. Allgather is used to collect values of sparse tensors. Here's an illustration from the MPI Tutorial:
-
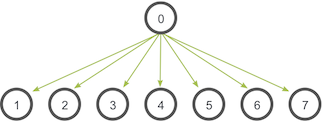
Broadcast is an operation that broadcasts data from one process, identified by root rank, onto every other process. Here's an illustration from the MPI Tutorial:
To use Horovod, make the following additions to your program:
-
Run
hvd.init(). -
Pin a server GPU to be used by this process using
config.gpu_options.visible_device_list. With the typical setup of one GPU per process, this can be set to local rank. In that case, the first process on the server will be allocated the first GPU, second process will be allocated the second GPU and so forth. -
Wrap optimizer in
hvd.DistributedOptimizer. The distributed optimizer delegates gradient computation to the original optimizer, averages gradients using allreduce or allgather, and then applies those averaged gradients. -
Add
hvd.BroadcastGlobalVariablesHook(0)to broadcast initial variable states from rank 0 to all other processes. Alternatively, if you're not usingMonitoredTrainingSession, you can simply execute thehvd.broadcast_global_variablesop after global variables have been initialized.
Example (see the examples directory for full training examples):
import tensorflow as tf
import horovod.tensorflow as hvd


# Initialize Horovod
hvd.init()

# Pin GPU to be used to process local rank (one GPU per process)
config = tf.ConfigProto()
config.gpu_options.visible_device_list = str(hvd.local_rank())

# Build model...
loss = ...
opt = tf.train.AdagradOptimizer(0.01)

# Add Horovod Distributed Optimizer
opt = hvd.DistributedOptimizer(opt)

# Add hook to broadcast variables from rank 0 to all other processes during
# initialization.
hooks = [hvd.BroadcastGlobalVariablesHook(0)]

# Make training operation
train_op = opt.minimize(loss)

# The MonitoredTrainingSession takes care of session initialization,
# restoring from a checkpoint, saving to a checkpoint, and closing when done
# or an error occurs.
with tf.train.MonitoredTrainingSession(checkpoint_dir="/tmp/train_logs",
                                       config=config,
                                       hooks=hooks) as mon_sess:
  while not mon_sess.should_stop():
    # Perform synchronous training.
    mon_sess.run(train_op)
To run on a machine with 4 GPUs:
$ mpirun -np 4 python train.pyTo run on 4 machines with 4 GPUs each using Open MPI:
$ mpirun -np 16 -x LD_LIBRARY_PATH -H server1:4,server2:4,server3:4,server4:4 python train.pyIf you're using Open MPI and you have RoCE or InfiniBand, we found this custom RDMA queue configuration to help performance a lot:
$ mpirun -np 16 -x LD_LIBRARY_PATH -mca btl_openib_receive_queues P,128,32:P,2048,32:P,12288,32:P,131072,32 -H server1:4,server2:4,server3:4,server4:4 python train.pyCheck your MPI documentation for arguments to the mpirun command on your system.
To use Horovod on GPU, read the options below and see which one applies to you best.
In most situations, using NCCL 2 will significantly improve performance over the CPU version. NCCL 2 provides the allreduce operation optimized for NVIDIA GPUs and a variety of networking devices, such as RoCE or InfiniBand.
- Install NCCL 2.
Steps to install NCCL 2 are listed here.
If you have installed NCCL 2 using the nccl-<version>.txz package, you should add the library path to LD_LIBRARY_PATH
environment variable or register it in /etc/ld.so.conf.
$ export LD_LIBRARY_PATH=$LD_LIBRARY_PATH:/usr/local/nccl-<version>/lib- Install Open MPI or another MPI implementation.
Steps to install Open MPI are listed here.
- Install the
horovodpip package.
If you have installed NCCL 2 using the nccl-<version>.txz package, you should specify the path to NCCL 2 using the HOROVOD_NCCL_HOME
environment variable.
$ HOROVOD_NCCL_HOME=/usr/local/nccl-<version> HOROVOD_GPU_ALLREDUCE=NCCL pip install --no-cache-dir horovodIf you have installed NCCL 2 using the Ubuntu package, you can simply run:
$ HOROVOD_GPU_ALLREDUCE=NCCL pip install --no-cache-dir horovodNote: Some models with a high computation to communication ratio benefit from doing allreduce on CPU, even if a
GPU version is available. To force allreduce to happen on CPU, pass device_dense='/cpu:0' to hvd.DistributedOptimizer:
opt = hvd.DistributedOptimizer(opt, device_dense='/cpu:0')GPUDirect allows GPUs to transfer memory among each other without CPU involvement, which significantly reduces latency and load on CPU. NCCL 2 is able to use GPUDirect automatically for allreduce operation if it detects it.
Additionally, Horovod uses allgather and broadcast operations from MPI. They are used for averaging sparse tensors
that are typically used for embeddings, and for broadcasting initial state. To speed these operations up with GPUDirect,
make sure your MPI implementation supports CUDA and add HOROVOD_GPU_ALLGATHER=MPI HOROVOD_GPU_BROADCAST=MPI to the pip
command.
- Install NCCL 2.
Steps to install NCCL 2 are listed here.
If you have installed NCCL 2 using the nccl-<version>.txz package, you should add the library path to LD_LIBRARY_PATH
environment variable or register it in /etc/ld.so.conf.
$ export LD_LIBRARY_PATH=$LD_LIBRARY_PATH:/usr/local/nccl-<version>/lib- Install nv_peer_memory driver.
Follow instructions from that page, and make sure to do /etc/init.d/nv_peer_mem start in the end.
- Install Open MPI or another MPI implementation with CUDA support.
Steps to install Open MPI are listed here. You should make sure you build it with CUDA support.
- Install the
horovodpip package.
If you have installed NCCL 2 using the nccl-<version>.txz package, you should specify the path to NCCL 2 using the HOROVOD_NCCL_HOME
environment variable.
$ HOROVOD_NCCL_HOME=/usr/local/nccl-<version> HOROVOD_GPU_ALLREDUCE=NCCL HOROVOD_GPU_ALLGATHER=MPI HOROVOD_GPU_BROADCAST=MPI pip install --no-cache-dir horovodIf you have installed NCCL 2 using the Ubuntu package, you can simply run:
$ HOROVOD_GPU_ALLREDUCE=NCCL HOROVOD_GPU_ALLGATHER=MPI HOROVOD_GPU_BROADCAST=MPI pip install --no-cache-dir horovodNote: Allgather allocates an output tensor which is proportionate to the number of processes participating in the
training. If you find yourself running out of GPU memory, you can force allreduce to happen on CPU by passing
device_sparse='/cpu:0' to hvd.DistributedOptimizer:
opt = hvd.DistributedOptimizer(opt, device_sparse='/cpu:0')If you happen to have network hardware not supported by NCCL 2 or your MPI vendor's implementation on GPU is faster, you can also use the pure MPI version of allreduce, allgather and broadcast on GPU.
-
Make sure your MPI implementation is installed.
-
Install the
horovodpip package.
$ HOROVOD_GPU_ALLREDUCE=MPI HOROVOD_GPU_ALLGATHER=MPI HOROVOD_GPU_BROADCAST=MPI pip install --no-cache-dir horovodWhat about inference? Inference may be done outside of the Python script that was used to train the model. If you do this, it will not have references to the Horovod library.
To run inference on a checkpoint generated by the Horovod-enabled training script you should optimize the graph and only keep operations necessary for a forward pass through model. The Optimize for Inference script from the TensorFlow repository will do that for you.
If you want to convert your checkpoint to Frozen Graph, you should do so after doing the optimization described above, otherwise the Freeze Graph script will fail to load Horovod op:
ValueError: No op named HorovodAllreduce in defined operations.
- Is TensorFlow installed?
If you see the error message below, it means that TensorFlow is not installed. Please install TensorFlow before installing Horovod.
error: import tensorflow failed, is it installed?

Traceback (most recent call last):
  File "/tmp/pip-OfE_YX-build/setup.py", line 29, in fully_define_extension
    import tensorflow as tf
ImportError: No module named tensorflow
- Are the CUDA libraries available?
If you see the error message below, it means that TensorFlow cannot be loaded. If you're installing Horovod into a container on a machine without GPUs, you may use CUDA stub drivers to work around the issue.
error: import tensorflow failed, is it installed?

Traceback (most recent call last):
  File "/tmp/pip-41aCq9-build/setup.py", line 29, in fully_define_extension
    import tensorflow as tf
  File "/usr/local/lib/python2.7/dist-packages/tensorflow/__init__.py", line 24, in <module>
    from tensorflow.python import *
  File "/usr/local/lib/python2.7/dist-packages/tensorflow/python/__init__.py", line 49, in <module>
    from tensorflow.python import pywrap_tensorflow
  File "/usr/local/lib/python2.7/dist-packages/tensorflow/python/pywrap_tensorflow.py", line 52, in <module>
    raise ImportError(msg)
ImportError: Traceback (most recent call last):
  File "/usr/local/lib/python2.7/dist-packages/tensorflow/python/pywrap_tensorflow.py", line 41, in <module>
    from tensorflow.python.pywrap_tensorflow_internal import *
  File "/usr/local/lib/python2.7/dist-packages/tensorflow/python/pywrap_tensorflow_internal.py", line 28, in <module>
    _pywrap_tensorflow_internal = swig_import_helper()
  File "/usr/local/lib/python2.7/dist-packages/tensorflow/python/pywrap_tensorflow_internal.py", line 24, in swig_import_helper
    _mod = imp.load_module('_pywrap_tensorflow_internal', fp, pathname, description)
ImportError: libcuda.so.1: cannot open shared object file: No such file or directory
To use CUDA stub drivers:
# temporary add stub drivers to ld.so.cache
$ ldconfig /usr/local/cuda/lib64/stubs

# install Horovod, add other HOROVOD_* environment variables as necessary
$ pip install --no-cache-dir horovod

# revert to standard libraries
$ ldconfig- Is MPI in PATH?
If you see the error message below, it means mpicxx was not found in PATH. Typically mpicxx is located in the same
directory as mpirun. Please add a directory containing mpicxx to PATH before installing Horovod.
error: mpicxx -show failed, is mpicxx in $PATH?

Traceback (most recent call last):
  File "/tmp/pip-dQ6A7a-build/setup.py", line 70, in get_mpi_flags
    ['mpicxx', '-show'], universal_newlines=True).strip()
  File "/usr/lib/python2.7/subprocess.py", line 566, in check_output
    process = Popen(stdout=PIPE, *popenargs, **kwargs)
  File "/usr/lib/python2.7/subprocess.py", line 710, in __init__
    errread, errwrite)
  File "/usr/lib/python2.7/subprocess.py", line 1335, in _execute_child
    raise child_exception
OSError: [Errno 2] No such file or directory
To use custom MPI directory:
$ export PATH=$PATH:/path/to/mpi/bin
$ pip install --no-cache-dir horovodIf you see the error message below, it means NCCL 2 was not found in the standard libraries location. If you have a directory
where you installed NCCL 2 which has both include and lib directories containing nccl.h and libnccl.so
respectively, you can pass it via HOROVOD_NCCL_HOME environment variable. Otherwise you can specify them separately
via HOROVOD_NCCL_INCLUDE and HOROVOD_NCCL_LIB environment variables.
build/temp.linux-x86_64-2.7/test_compile/test_nccl.cc:1:18: fatal error: nccl.h: No such file or directory
 #include <nccl.h>
                  ^
compilation terminated.
error: NCCL 2.0 library or its later version was not found (see error above).
Please specify correct NCCL location via HOROVOD_NCCL_HOME environment variable or combination of HOROVOD_NCCL_INCLUDE and HOROVOD_NCCL_LIB environment variables.

HOROVOD_NCCL_HOME - path where NCCL include and lib directories can be found
HOROVOD_NCCL_INCLUDE - path to NCCL include directory
HOROVOD_NCCL_LIB - path to NCCL lib directory
For example:
$ HOROVOD_GPU_ALLREDUCE=NCCL HOROVOD_NCCL_HOME=/path/to/nccl pip install --no-cache-dir horovodOr:
$ HOROVOD_GPU_ALLREDUCE=NCCL HOROVOD_NCCL_INCLUDE=/path/to/nccl/include HOROVOD_NCCL_LIB=/path/to/nccl/lib pip install --no-cache-dir horovodIf you see the error message below, it means NCCL 2 was not found in the standard libraries location. You should add the directory
where you installed NCCL 2 libraries to the LD_LIBRARY_PATH environment variable.
Traceback (most recent call last):
  File "tf_cnn_benchmarks.py", line 46, in <module>
    import horovod.tensorflow as hvd
  File "/home/asergeev/mpi/venv-nccl/local/lib/python2.7/site-packages/horovod/tensorflow/__init__.py", line 34, in <module>
    from horovod.tensorflow.mpi_ops import size
  File "/home/asergeev/mpi/venv-nccl/local/lib/python2.7/site-packages/horovod/tensorflow/mpi_ops.py", line 74, in <module>
    ['HorovodAllgather', 'HorovodAllreduce'])
  File "/home/asergeev/mpi/venv-nccl/local/lib/python2.7/site-packages/horovod/tensorflow/mpi_ops.py", line 56, in _load_library
    library = load_library.load_op_library(filename)
  File "/home/asergeev/mpi/venv-nccl/local/lib/python2.7/site-packages/tensorflow/python/framework/load_library.py", line 64, in load_op_library
    None, None, error_msg, error_code)
tensorflow.python.framework.errors_impl.NotFoundError: libnccl.so.2: cannot open shared object file: No such file or directory
For example:
$ export LD_LIBRARY_PATH=$LD_LIBRARY_PATH:/usr/local/nccl-<version>/lib
$ mpirun -np 16 -x LD_LIBRARY_PATH -H server1:4,server2:4,server3:4,server4:4 python train.pyIf you see the error message below, it means that your version of pip is out of date. You can remove the --no-cache-dir flag
since your version of pip does not do caching. The --no-cache-dir flag is added to all examples to ensure that when you
change Horovod compilation flags, it will be rebuilt from source and not just reinstalled from the pip cache, which is
modern pip's default behavior.
$ pip install --no-cache-dir horovod

Usage:
  pip install [options] <requirement specifier> ...
  pip install [options] -r <requirements file> ...
  pip install [options] [-e] <vcs project url> ...
  pip install [options] [-e] <local project path> ...
  pip install [options] <archive url/path> ...

no such option: --no-cache-dir
For example:
$ pip install horovodIf you notice that your program is running out of GPU memory and multiple processes
are being placed on the same GPU, it's likely that your program (or its dependencies)
create a tf.Session that does not use the config that pins specific GPU.
If possible, track down the part of program that uses these additional tf.Sessions and pass
the same configuration.
Alternatively, you can place following snippet in the beginning of your program to ask TensorFlow to minimize the amount of memory it will pre-allocate on each GPU:
small_cfg = tf.ConfigProto()
small_cfg.gpu_options.allow_growth = True
with tf.Session(config=small_cfg):
    pass
As a last resort, you can replace setting config.gpu_options.visible_device_list
with different code:
# Pin GPU to be used
import os
os.environ['CUDA_VISIBLE_DEVICES'] = str(hvd.local_rank())Note: Setting CUDA_VISIBLE_DEVICES is incompatible with config.gpu_options.visible_device_list.
Setting CUDA_VISIBLE_DEVICES has additional disadvantage for GPU version - CUDA will not be able to use IPC, which
will likely cause NCCL and MPI to fail. In order to disable IPC in NCCL and MPI and allow it to fallback to shared
memory, use:
export NCCL_P2P_DISABLE=1for NCCL.--mca btl_smcuda_use_cuda_ipc 0flag for OpenMPI and similar flags for other vendors.
One of the unique things about Horovod is its ability to interleave communication and computation coupled with the ability to batch small allreduce operations, which results in improved performance. We call this batching feature Tensor Fusion.
Tensor Fusion works by attempting to combine all the tensors that are ready to be reduced at given moment of time into one reduction operation. The algorithm of Tensor Fusion is as follows:
- Determine which tensors are ready to be reduced. Select first few tensors that fit in
HOROVOD_FUSION_THRESHOLDbytes and have the same data type. - Allocate fusion buffer of size
HOROVOD_FUSION_THRESHOLDif it was not allocated before. Default fusion buffer size is 64 MB. - Copy data of selected tensors into the fusion buffer.
- Execute the allreduce operation on the fusion buffer.
- Copy data from the fusion buffer into the output tensors.
- Repeat until there are no more tensors to reduce in this cycle.
The fusion buffer size can be tweaked using the HOROVOD_FUSION_THRESHOLD environment variable:
$ HOROVOD_FUSION_THRESHOLD=33554432 mpirun -np 4 -x HOROVOD_FUSION_THRESHOLD python train.pySetting the HOROVOD_FUSION_THRESHOLD environment variable to zero disables Tensor Fusion:
$ HOROVOD_FUSION_THRESHOLD=0 mpirun -np 4 -x HOROVOD_FUSION_THRESHOLD python train.pyHorovod has the ability to record the timeline of its activity, called Horovod Timeline.
To record a Horovod Timeline, set the HOROVOD_TIMELINE environment variable to the location of the timeline
file to be created. This file is only recorded on rank 0, but it contains information about activity of all workers.
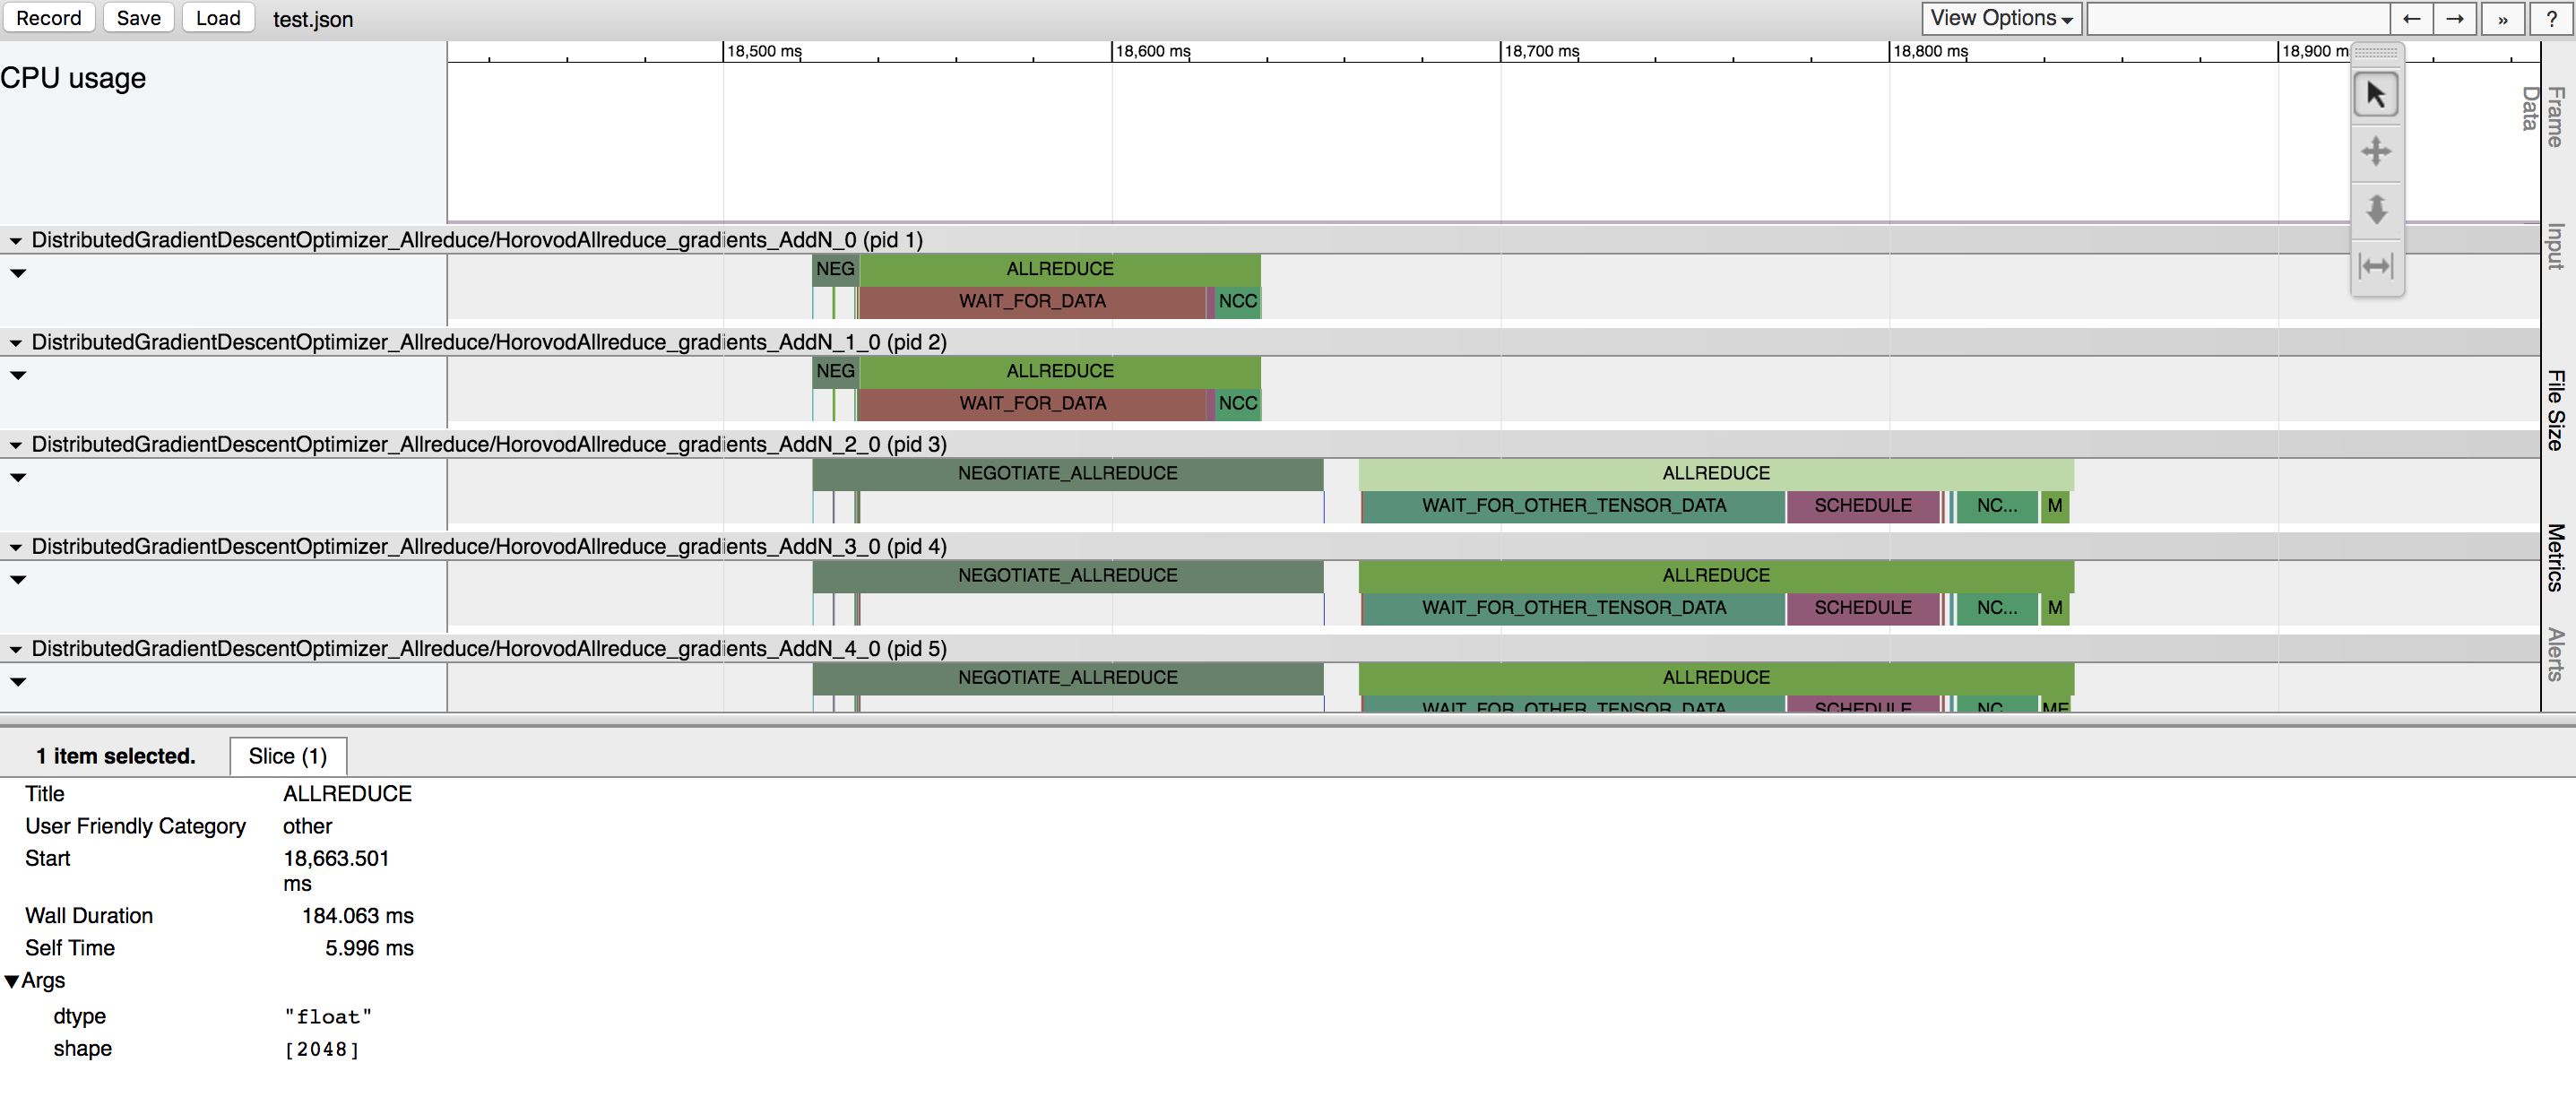
$ HOROVOD_TIMELINE=/path/to/timeline.json mpirun -np 4 -x HOROVOD_TIMELINE python train.pyYou can then open the timeline file using the chrome://tracing facility of the Chrome browser.
In the example above, you can see few tensors being reduced. There are two major phases for each tensor reduction:
- Negotiation - a phase when all workers send to rank 0 signal that they're ready to reduce the given tensor.
-
Each worker reporting readiness is represented by a tick under the NEGOTIATE_ALLREDUCE bar, so you can see which workers were early and which were late.
-
Immediately after negotiation, rank 0 sends all other workers signal to start reducing the tensor.
- Processing - a phase when the operation actually happens. It is further subdivided into multiple sub-phases:
-
WAIT_FOR_DATA indicates time taken to wait for GPU to finish computing input to the allreduce, allgather, or broadcast operations. This happens because TensorFlow tries to smartly interleave scheduling and GPU computation. This is only applicable to situations where the Horovod operation is placed on GPU.
-
WAIT_FOR_OTHER_TENSOR_DATA indicates time taken to wait for GPU to finish computing other inputs for other operations that are part of the same fusion batch.
-
SCHEDULE indicates how much time it took to schedule memory copies into and out of the fusion buffer and the NCCL operation itself.
-
QUEUE happens when reduction is done with NCCL, and the previous NCCL operation did not finish yet.
-
MEMCPY_IN_FUSION_BUFFER and MEMCPY_OUT_FUSION_BUFFER indicate time taken to copy data into and out of the fusion buffer.
-
NCCL_ALLREDUCE, MPI_ALLREDUCE, MPI_ALLGATHER, or MPI_BCAST indicate time taken to do the actual operation on GPU (or CPU) and highlights whether the operation was performed using NCCL or pure MPI.
- Gibiansky, A. (2017). Bringing HPC Techniques to Deep Learning. Retrieved from http://research.baidu.com/bringing-hpc-techniques-deep-learning/