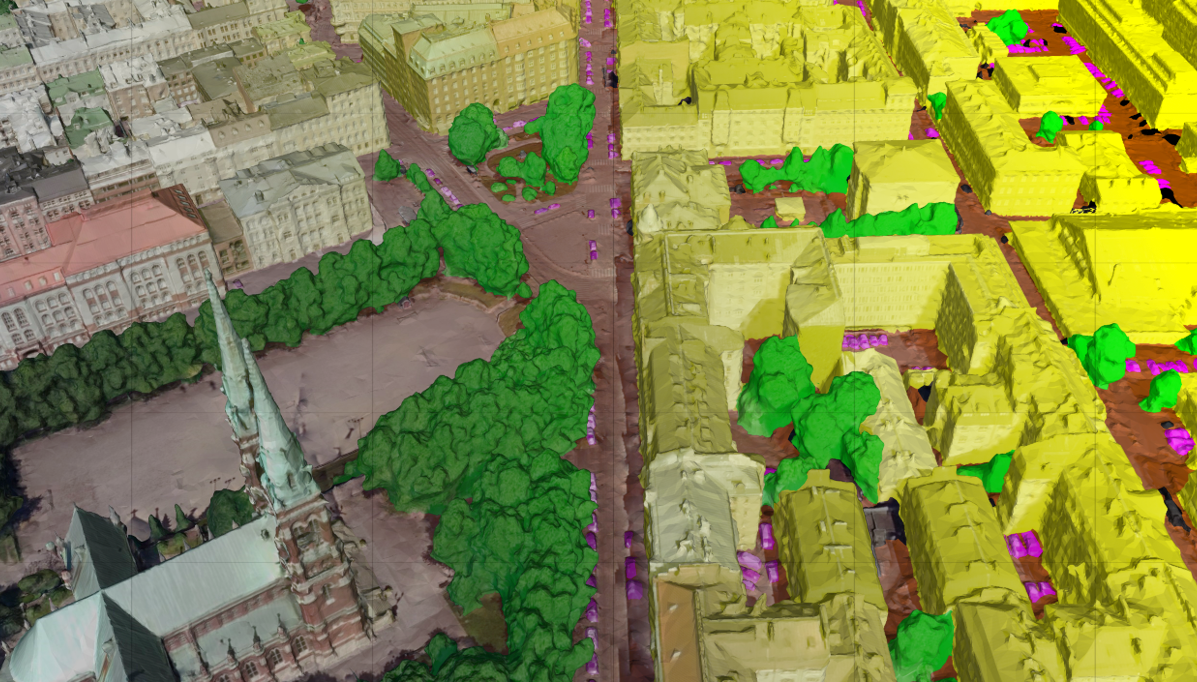
There are 3 programs involved in the segmentation, viewing, and labelling of the meshes. A broad overview of each is given below.
SUMS: Semantic Urban Mesh Segmentation by TUDelft
-
Open-source program for automatic segmentation of large-scale urban meshes (SUMS)
-
Implemented in C++ and other open-source libraries, such as CGAL and Easy3D
-
Read their paper: SUM: A Benchmark Dataset of Semantic Urban Meshes
-
Source code on GitHub
-
It can detect these classes
Label Classes RGB 0 unclassified 0, 0, 0 1 terrain 170, 85, 0 2 high vegetation 0, 255, 0 3 building 255, 255, 0 4 water 0, 255, 255 5 car 255, 0, 255 6 boat 0, 0, 153
- To visualise labelled output mesh
- Download only available from this link (a
.zipdownload of the software will begin upon clicking the link)
- Allows annotation of urban scenes
- Requirements
- Input mesh is in ASCII
*.plyformat - Mesh must be manifold
- Input mesh is in ASCII
- Download their release here
- Build-from-source option available using CMake
Tutorial available here.
- Download a release of SUMS here
- Create a folder to unzip the contents to
It can also be built from source using CMake, but this was not explored. Instructions can be found here.
-
Python 3.7.9
-
Windows 10/11
-
Imbalanced Learn
-
Install using
pipor follow their website for other installation options (install in Anaconda, or build from source)pip install -U imbalanced-learn
-
-
wget-
In an administrative PowerShell, install
chocolateyfollowing these instructions -
Install
wgetchoco install wget
-
*.plyformat triangular meshes- Associated
.jpegformat textures of the mesh - Manifold/Non-manifold Mesh
- The program claims to only support manifold meshes
- In testing, meshes fed were not manifold and it still worked
- Problem comes in the Mesh Annotator - mesh will not load into the annotator if it is not manifold
- Recommended Mesh Size
- TUDelft team recommends that each tile should be larger than 50 x 50 m
- Classification performance is however generally better on a higher-level (e.g. larger scale with lesser details) mesh, possibly due to it’s similarity with training data
-
Run the following command in the unzipped SUMS folder to download necessary
data_demofiles (a preview of the data can be found here)wget -r -np -nH --cut-dirs=3 --reject="index.html,index.htm,*tmp" https://3d.bk.tudelft.nl/opendata/sum/1.0/data_demo/
-
Download trained model
-
Navigate to
...\your_folder_name\data_demo\model\wget -r -np -nH --cut-dirs=5 --reject="index.html,index.htm,*tmp" --exclude "robots.txt" https://3d.bk.tudelft.nl/opendata/sum/1.0/trained_model/SUM_Helsinki_C6_trained_model/
-
The trained model is in
.gzformat, and is not used for direct decompression. The user can read it directly from the folder by setting the operation mode to ‘Test_config’
-
In ...\your_folder_name\data_demo\, there is a config.txt. In here, add the respective file paths for:
-
root_path-
Add path to data_demo file
# in config.txt
root_path = C:/Users/USER/.../your_folder_name/data_demo/
-
-
seg_aug_py_path-
Add path to
seg_aug.pyfile# in config.txt seg_aug_py_path = C:/Users/USER/.../your_folder_name/
-
Replace the ...\Python\Python37\Lib\site-packages\imblearn\over_sampling\_smote\filter.py with provided ...\your_folder_name\filter.py
Do this only after configuration has been completed.
-
Navigate to the directory where
semantic_urban_mesh_segmentation.exeis located -
Execute the command below, making sure to replace it with your specific file path to where
config.txtis located.\semantic_urban_mesh_segmentation.exe "C:/Users/USER/.../your_folder_name/data_demo/"
- Output mesh is in
...\data_demo\test\output - Open with Mapple to view results
-
If custom data is not in the required format, convert using
- MeshLab
- Preferred for conversion because of convenience (exports the
.plyand automatically “links” it with the corresponding texture files) - Ensure
.plyis exported with its normals and in ASCII format - Format of texture files can be changed by changing the name during export to end in “.jpeg”
- Preferred for conversion because of convenience (exports the
- Blender
-
Export converted mesh and texture in necessary file formats
-
In exported
.plyfile, add the following lines at the top for each corresponding texture file, changing “texture_0.jpeg” to the name of your texturecomment TextureFile texture_0.jpeg
-
- MeshLab
-
Put the meshes into
...\your_folder_name\data_demo\test\input -
Run the program
- View results using Mapple
- Labels
- The faces are color coded but the labels are not added (i.e. in the
.plyfile, each face is still “unlabeled” despite having an assigned RGB face color) - The RGB values are normalised
- An example code to add the labels is available in the example code folder
- The faces are color coded but the labels are not added (i.e. in the
All operation modes and their descriptions can be found here.
All these options can be modified within config.txt
- Detection
- Classes
- By default, it detects 6 classes classes
- Detected classes can only be modified by removing them, adding new classes are not possible
- Label Colors
- The colors of the associated labels can be changed
- Classes
- Saving Intermediate Data
- Intermediate data such as sampled point clouds, over-segmentation mesh and texture clouds can be saved
- Fine-Tuning Parameters
- For a broad overview, there are parameters that deal with
- Data processing
- Mesh and texture processing
- Mesh segmentation and region growing
- Feature selection and usage
- Random Forest
- Batch processing
- For a broad overview, there are parameters that deal with
- Refer to custom data section
- Following the examples given
- Ensure slashes are forward/backward
- Ensure ending slashes
- In
config.txt, ensure file paths are- Without inverted commas
- Are absolute file paths
Ensure that Python is 3.7.9
If the original data is in .glb format, it cause errors and the conversion from glb → gltf → glb → ply might be necessary. This can be done with Blender or MeshLab.
Ensure that the .ply file is “linked” to its respective .jpeg file by
-
Opening the
.plyfile in a text editor -
Checking the comments at the top of the file. For each corresponding texture file, there should be a comment as below. Change “texture_0.jpeg” to the name of the corresponding texture file.
comment TextureFile texture_0.jpeg
