Karmada (Kubernetes Armada) is a multi-cluster management system speaks Kubernetes native API. Karmada aims to provide turnkey automation for multi-cluster application management in multi-cloud and hybrid cloud scenarios, and intended to realize multi-cloud centralized management, high availability, failure recovery and traffic scheduling.
Its key capabilities include:
- Cross-cluster applications managements based on K8s native API, allow user migrate apps from single cluser to multi-cluster conveniently and quickly.
- Support provisioning or attaching Kubernetes clusters for centralized operations and management.
- Cross-cluster applications auto-scaling, failover and load-balancing on multi-cluster.
- Advanced scheduling strategy: region, available zone, cloud provider, cluster affinity/anti-affinity.
Notice: this project is developed in continuation of Kubernetes Federation v1 and v2. Some basic concepts are inherited from these two versions.
The Karmada Control Plane consists of the following components:
- ETCD for storing the karmada API objects
- Karmada API Server
- Karmada Controller Manager
- Karmada Scheduler
ETCD stores the karmada API objects, the API Server is the REST endpoint all other components talk to, and the Karmada Controller Manager perform operations based on the API objects you create through the API server.
The Karmada Controller Manager runs the various controllers, the controllers watch karmada objects and then talk to the underlying clusters’ API servers to create regular Kubernetes resources.
-
Cluster Controller: attach kubernetes clusters to Karmada for managing the lifecycle of the clusters by creating cluster object.
-
Policy Controller: the controller watches PropagationPolicy objects. When PropagationPolicy object is added, it selects a group of resources matching the resourceSelector and create ResourceBinding with each single resource object.
-
Binding Controller: the controller watches ResourceBinding object and create Work object corresponding to each cluster with single resource manifest.
-
Execution Controller: the controller watches Work objects.When Work objects are created, it will distribute the resources to member clusters.
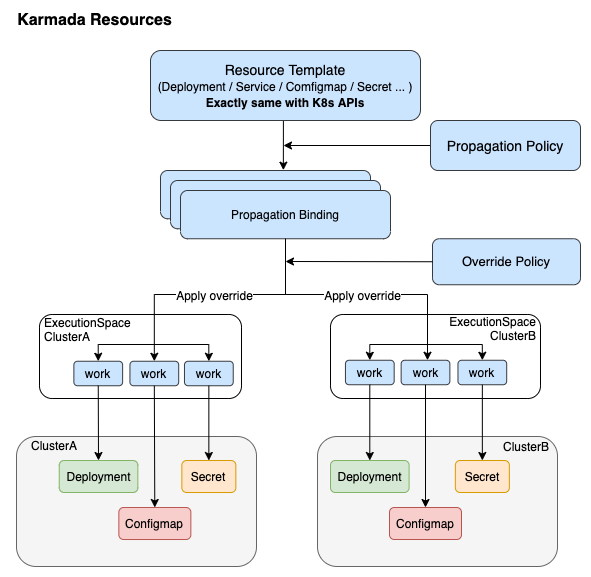
Resource template: Karmada uses Kubernetes Native API definition for federated resource template, to make it easy to integrate with existing tools that already adopt on Kubernetes
Propagation Policy: Karmada offers standalone (placement) policy API to define spreading requirements.
- Support 1:n mapping of Policy: workload, users don't need to indicate scheduling constraints every time creating federated applications.
- With default policies, users can just interact with K8s API
Override Policy: Karmada provides standalone override API for specializing cluster relevant configuration automation. E.g.:
- Override image prefix according to member cluster region
- Override StorageClass according to cloud provider
The following diagram shows how Karmada resources are involved when propagating resources to member clusters.
This guide will cover:
- Install
karmadacontrol plane components in a Kubernetes cluster which as known ashost cluster. - Join a member cluster to
karmadacontrol plane. - Propagate an application by
karmada.
# git clone https://github.com/karmada-io/karmada
# cd karmada
# hack/local-up-karmada.sh
The script hack/local-up-karmada.sh will do following tasks for you:
- Start a Kubernetes cluster to run the karmada control plane, aka. the
host cluster. - Build karmada control plane components based on current codebase.
- Deploy karmada control plane components on
host cluster.
If everything goes well, at the end of the script output, you will see similar messages as follows:
Local Karmada is running.
To start using your karmada, run:
  export KUBECONFIG=/var/run/karmada/karmada-apiserver.config
To start checking karmada components running status on the host cluster, please run:
  export KUBECONFIG="/root/.kube/karmada-host.config"
The two KUBECONFIG files after the script run are:
- karmada-apiserver.config
- karmada-host.config
The karmada-apiserver.config is the main kubeconfig to be used when interacting with karamda control plane, while karmada-host.config is only used for debuging karmada installation with host cluster.
In the following steps, we are going to create a member cluster and then join the cluster to karmada control plane.
We are going to create a cluster named member1 and we want the KUBECONFIG file
in /root/.kube/member1.config. Run following comand:
# hack/create-cluster.sh member1 /root/.kube/member1.config
The script hack/create-cluster.sh will create a standalone cluster.
The command karmadactl will help to join the member cluster to karmada control plane,
before that, we should set KUBECONFIG to karmada apiserver:
# export KUBECONFIG=/var/run/karmada/karmada-apiserver.config
Then, install karmadactl command and join the member cluster:
# go get github.com/karmada-io/karmada/cmd/karmadactl
# karmadactl join member1 --cluster-kubeconfig=/root/.kube/member1.config
The karmadactl join command will create a Cluster object to reflect the member cluster.
Now, check the member clusters from karmada control plane by following command:
# kubectl get clusters
NAME      VERSION   MODE   READY   AGE
member1   v1.20.2   Push   True    66s
In the following steps, we are going to propagate a deployment by karmada.
First, create a deployment named nginx:
# kubectl create -f samples/nginx/deployment.yaml
Then, we need create a policy to drive the deployment to our member cluster.
# kubectl create -f samples/nginx/propagationpolicy.yaml
You can check deployment status from karmadda, don't need to access member cluster:
# kubectl get deployment
NAME    READY   UP-TO-DATE   AVAILABLE   AGE
nginx   1/1     1            1           43s
If you're interested in being a contributor and want to get involved in developing the Karmada code, please see CONTRIBUTING for details on submitting patches and the contribution workflow.
Karmada is under the Apache 2.0 license. See the LICENSE file for details.

