In this document we'll cover the most important aspects of deploying Briefer to a production environment.
Briefer is a web application designed for multiple people to use.
Ideally, you should deploy it to a server that is accessible to all the people who will view and create reports and dashboards, like an EC2 instance on AWS, a droplet on DigitalOcean, or a virtual machine on Azure.

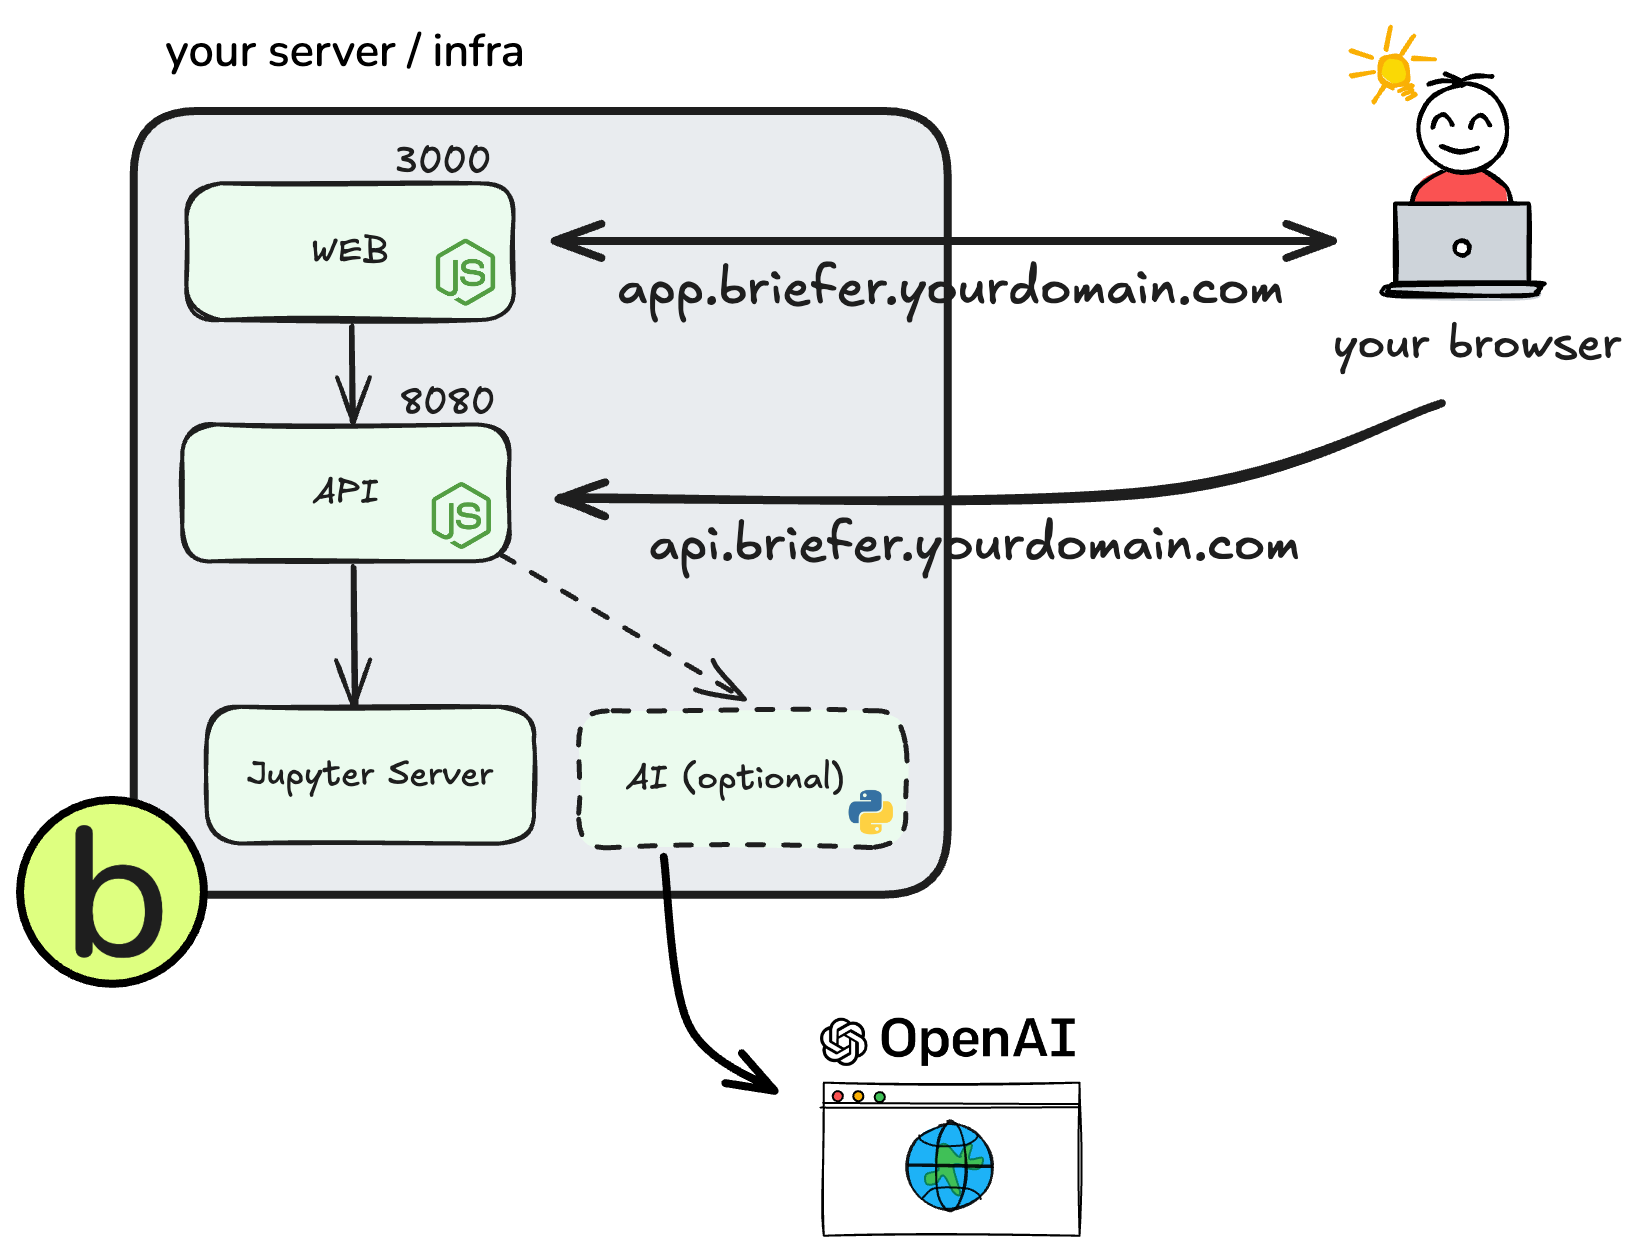
Briefer deployments have the following components:
- A web application that users will access in their browsers.
- An API that the web application will talk to.
- A database to store the data that users upload.
- A Jupyter server that runs the actual code.
- An optional AI service that runs the AI features like code generation and automatic fixes.
After deploying Briefer, you'll access the web application in your browser and it'll talk to the API. In turn, the API will talk to the database and the Jupyter server, which are not exposed.
In this guide, we'll cover the three recommended ways to deploy Briefer:
- Deploy Briefer as a single container on an remote server.
- Deploy Briefer as a multiple containers on an remote server.
- Deploy Briefer into Kubernetes.
If you're not sure which option to choose, we recommend starting with the first one.
Alternative 1: Deploying briefer as a single container on a remote server (recommended for small deployments)
This is the simplest way to deploy Briefer. You'll only need to install Docker on your server and run a single command to start the application.
Then, you'll have to make sure that this server is accessible to all the people who will use Briefer, and use the necessary DNS records to access the web application and the API.
Here's a step-by-step guide to deploy Briefer as a single container:
-
Get a machine and SSH into it.
-
Install Docker on the machine.
# On an EC2 instance, for example sudo yum update -y sudo yum install docker -y sudo systemctl start docker -
Pull and run the all-in-one Docker image for Briefer.
 # if using an IP set API_URL to https://your-ip:3000 and FRONTEND_URL to https://your-ip:8080
 docker run -d \
   -p 3000:3000 \
   -p 8080:8080 \
   -v briefer_psql_data:/var/lib/postgresql/data \
   -v briefer_jupyter_data:/home/jupyteruser \
   -v briefer_briefer_data:/home/briefer \
   --env API_URL="https://your_api_address" \
   --env FRONTEND_URL="https://your_frontend_address" \
   briefercloud/briefer
ℹ️ The most crucial part of this step is to make sure that
API_URLandFRONTEND_URLpoint to the host's address. For example, if you're running Briefer on a machine whose IP is192.168.0.1, you should set theAPI_URLtohttps://192.168.0.1:8080(considering API is running on port 8080) andFRONTEND_URLtohttps://192.168.0.1:3000(considering the front-end is running on port 3000).ℹ️ If you want to serve Briefer over HTTP (usually because you're using an IP directly) you should consider setting
--env ALLOW_HTTP="true"in the above command. -
Expose your server to the internet or your local network. Make sure that you allow traffic on ports 3000 and 8080. The first one is for the Briefer web application (the one you'll access in your browser), and the second one is for the API that the web application talks to.
-
If you want to use a domain name rather than an IP, create the necessary DNS records to access ports 3000 and 8080. Otherwise, skip this step. Use
app.briefer.your_domain_here.comas the name for the web application bound to port 3000, andapi.briefer.your_domain_here.comas the name for the API bound to port 8080.
Now you should be able to access the Briefer web application at app.briefer.your_domain_here.com and the API at api.briefer.your_domain_here.com.
Alternative 2: Deploying Briefer as multiple containers on an remote server (recommended for medium or large deployments)
Besides deploying Briefer as a single container, you can also deploy it as multiple containers. That way, you'll have separate containers for the web application, the API, the AI service, the database, and the Jupyter notebook server.
This approach is more complex than the previous one, but it allows you to use configure each container separately.
That way, you can scale each part of the application independently or just change the configuration of one part without affecting the others. If you want to use an RDS instance for the database, for example, you can do that by changing the configuration of the database container.
Here's a step-by-step guide to deploy Briefer as multiple containers:
- Get a machine and SSH into it.
- Install Docker on the machine.
# On an EC2 instance, for example sudo yum update -y sudo yum install docker -y sudo systemctl start docker - Run the
start.shscript and enter Briefer's TLD to start all the containers. We recommend usingbriefer.your_domain_here.comas the TLD../start.sh
- Expose your server to the internet or your local network. Make sure that you allow traffic on ports 3000 and 8080. The first one is for the Briefer web application (the one you'll access in your browser), and the second one is for the API that the web application talks to.
- Create the necessary DNS records to access ports 3000 and 8080.
Use
app.briefer.your_domain_here.comas the name for the web application bound to port 3000, andapi.briefer.your_domain_here.comas the name for the API bound to port 8080.
If you want to use an RDS instance for the database, you will need to:
- Comment-out the
postgresservice in thedocker-compose.ymlfile. - Change the
POSTGRES_PRISMA_URLenvironment variable in thedb_migrationservice to point to your RDS instance. - Change these variables in the
apiservice:POSTGRES_USERNAME: username for logging into the RDS database.POSTGRES_PASSWORD: password for logging into the RDS database.POSTGRES_HOSTNAME: hostname of the RDS instance.POSTGRES_PORT: port of the RDS instance.POSTGRES_DATABASE: name of the RDS database.
If you're already using Kubernetes, you can deploy Briefer into your cluster. This approach is more complex than the previous ones, but it allows you to keep Briefer in the same place as the rest of your applications.
We haven't yet published Kubernetes manifests for Briefer, but you can use the docker-compose.yml file as a starting point to create your own manifests.
If you're interested in contributing to Briefer, we'd love to have your help in creating Kubernetes manifests for the project.
If you have any issues deploying Briefer, please have a look at these common issues.
In case you need assistance, please don't feel shy to open an issue. We're here to help.
I can't access the web application
If you're not able to access the web application, Briefer is either not running or not exposed to the internet (or within your local network). The latter is the most common issue.
To check if Briefer is running, SSH into your server and run docker ps. You should see a container using the image briefercloud/briefer or briefercloud/briefer-web. If you don't see it, Briefer is not running.
If Briefer is running, have a look at its logs and see if there are any errors. You can do that by running docker logs <container_id>, where <container_id> is the ID of the Briefer container.
Finally, make sure that you've exposed your server to the internet or your local network. You can do that by allowing traffic on ports 3000 and 8080 and creating the necessary DNS records to access these ports, which should be app.briefer.your_domain_here.com and api.briefer.your_domain_here.com.
If you want to change the domains that Briefer uses, you can do that by changing the TLD environment variable in your root .env file and restarting the Briefer container.
I can access the web application, but it can't talk to the API
In this case, it's likely that the API is not available on api.briefer.your_domain_here.com, so double check that you've created the necessary DNS records using the correct values.
If you do have the correct DNS records, check if the API is running by SSHing into your server and running docker ps. You should see a container using the image briefercloud/briefer or briefercloud/briefer-api and exposing port 8080.
If the container is running, check its logs by running docker logs <container_id>, where <container_id> is the ID of the API container. Look for any errors that might indicate why the API is not working.
Also, see if you can cURL the API from your server. You can do that by running curl api.briefer.your_domain_here.com in your terminal. If you can cURL the API from the server but the web application can't talk to it, it's likely that there's a network issue at play.