by misan
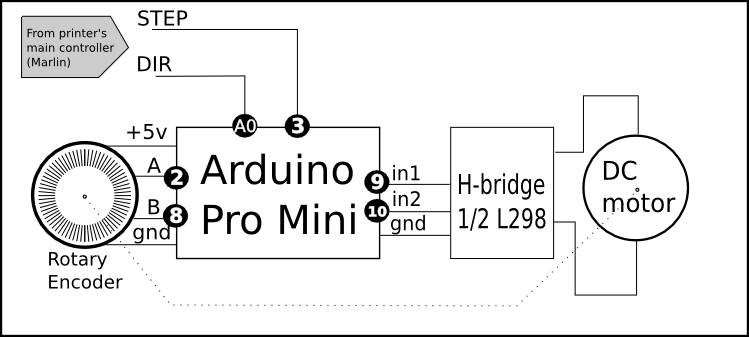
This project uses and Arduino (or similar) to create a closed-loop position control for a DC motor to act as a replacement of a stepper motor and its drive electronics. In order to be compatible with stepper logic controller accepts two inputs STEP and DIRECTION so an external trajectory controller can operate the motor as it would do with a stepper.
This code depends on the excellent Arduino PID library by Brett Beauregard: https://github.com/br3ttb/Arduino-PID-Library/
For easy configuration of PID parameters, serial port communication is used when adjusting them. PID values can be stored in EEPROM.
Servostrap project and Michael Ball's work sparked my curiosity to go create a simple solution for anyone to use.
I want to thank Brook Drum for his support on this project that started in here: https://www.youmagine.com/designs/dc-motor-closed-loop-control-software
Thanks to Mauro Manco for providing a NodeMCU. Now there is a version than can work with a ESP12E module, with support to accept commands over Wifi. Please note EEPROM storage code will not work in this platform :-(
Thanks to Robert Klauco for contributing the version for ATtiny85.
Allain Pelletier kindly provided the virtual end-stop feature code.
AMS provided free samples of magnetic encoder. Now the AS5600 encoder is supported for 12-bit/revolution resolution.
It is possible to detect endstops without the use of switches. If seeking an endstop upon reset is not necessary, this option can be commented out within setup(). It moves the motor in the negative direction at a lesser power level until an obstacle makes the error go up. This is the new endstop and a Zero offset can be added. Pin 4 is asserted if the position is now Zero or negative. Pin 4 is reset if the the position is positive. If the option A is active, the status of the home pin can be seen.
Two articles about the project were written for Circut Cellar Magazine and it is now freely available in the their website: https://circuitcellar.com/research-design-hub/projects/stepper-motor-emulator-part-1/ and https://circuitcellar.com/research-design-hub/projects/stepper-motor-emulator-part-2/
A video of hard homing can be seen https://youtu.be/kTUaKS-4Spc
While an H-bridge is needed, there are many different choices out there, like L298, A4950, Monster Motor Shield, BTS7960, etc
Depending om your intended application the way the DC motor is control thrugh the H-bridge can be Sign-Magnitude drive http://modularcircuits.tantosonline.com/blog/articles/h-bridge-secrets/sign-magnitude-drive/ or Lock Anti-Phase drive http://www.modularcircuits.com/blog/articles/h-bridge-secrets/lock-anti-phase-drive/ though I have focus on the former, the latter may be preferred when braking action is important (like when a robot has to go downhill).
Available serial commands: (lines end with CRLF or LF)
P123.34 sets proportional term to 123.34
I123.34 sets integral term to 123.34
D123.34 sets derivative term to 123.34
? prints out current encoder, output and setpoint values
X123 sets the target destination for the motor to 123 encoder pulses
T will start a sequence of random destinations (between 0 and 2000) every 3 seconds. T again will disable that
Q will print out the current values of P, I and D parameters
W will store current values of P, I and D parameters into EEPROM
H will print this help message again
A will toggle on/off showing regulator status every second
L will execute homing
Written in Processing it allows you to see graphically the PID response to a step input while you can tune it by pressing capital P, I and D keys to increase values or p, i and d to lower them. Please have a look at this videos https://www.youtube.com/watch?v=uXnDwojRb1g and https://youtu.be/fusr9eTceEo
I reckon the evolution of this project is to offload motion profile generation off from main processor. In order to do that firmware needs to be able to achieve motion in a controlled way (which is key for joint axis movement). The first and simpler idea is to use a trapezoidal motion pattern.
New commands have been added for this feature:
F<max_velocity>
@<acceleration>
Y<destination>
The latter is to perform the actual movement to an absolute destination, measured in encoder counts, using a trapezoidal speed motion pattern. No optimization effort in the math has yet been done.
You may want to check Paul's fork using Bluepill for handling three motors: https://github.com/paukstelis/dcservo

