 |
❤️❤️❤️ |  |
Stargate is an open source data gateway that sits between your app and your databases. Stargate brings together an API platform and data request coordination code into one OSS project. Stargate abstracts Cassandra-specific concepts entirely from app developers and supports different API options, removing barriers of entry for new software developers. Watch this introduction video about Stargate to get excited about!
Stargate offers the following right out of the box when it got GA'd on December 09, 2020:
- JSON API: Save and search schemaless JSON documents
- REST API: Serve a RESTful API from any Cassandra database
- GraphQL API: Serve a GraphQL API from any Cassandra database
- CQL API: Use the native Cassandra Query Language to access your data in Cassandra
NOTE: This page provides you with information for interacting with DataStax Astra™ DevOps & Data APIs to perform a wide variety of operations. This is in continuation to my first blog covering Getting Started with DataStax Astra™ and accessing data using REST & GraphQL APIs.
Astra provides the following features out of the box,
- 5 Gig Free-Forever Tier: Launch a database in the cloud with a few clicks, no credit card required
- No Operations: Eliminate the overhead to install, operate, and scale Cassandra
- Powerful APIs: Out-of-the-box REST and GraphQL endpoints and browser based CQL shell
- Cloud-Native: Powered by our open-source Kubernetes Operator for Cassandra
- Zero Lock-In: Deploy on AWS or GCP or Azure and keep compatibility with open-source Cassandra
- Global Scale: Put your data where you need it without compromising performance, availability or accessibility
Try Stargate which is available out of the box in DataStax Astra™ now!
## Useful Links
* [Try for free!](https://astra.datastax.com/register)
* [Migrate your application(s) to Astra](https://www.datastax.com/blog/2020/07/take-flight-live-and-free-migration-your-apache-cassandra-apps)
| Try Astra™ For Free | Jump start with sample apps | Migrate Your Application(s) to Astra™ |
|---|---|---|
| https://astra.datastax.com/register | https://docs.astra.datastax.com/docs/sample-apps | https://www.datastax.com/blog/2020/07/take-flight-live-and-free-migration-your-apache-cassandra-apps |
See all these in a video by clicking here!
Today's agenda is to demonstrate how to hook up Stargate with DataStax Enterprise™ (DSE) using:
- Docker
- Stand-alone
- Download the included
start_stargate_dse68_cluster.shscript andstargatedse68.ymlDocker compose file to your local machine - Grant execute access by running
chmod +x start_stargate_dse68_cluster.shcommand - Make sure Docker is running. Get Docker and install, as applicable
- Run
./start_stargate_dse68_cluster.sh
You should notice output as below. Your authToken will be different from below output,
$ ./start_stargate_dse68_cluster.sh
Starting DSE 6.8...
Creating network "stargate-dse68_backend" with the default driver
Creating backend-1 ... done

Starting Stargate...
backend-1 is up-to-date
Creating stargate ... done
Sleeping for 60 seconds...

Waiting for Stargate to start up...
{"authToken":"7fad80fc-c4a0-4054-b367-1eff9b68c22b"}
Done!
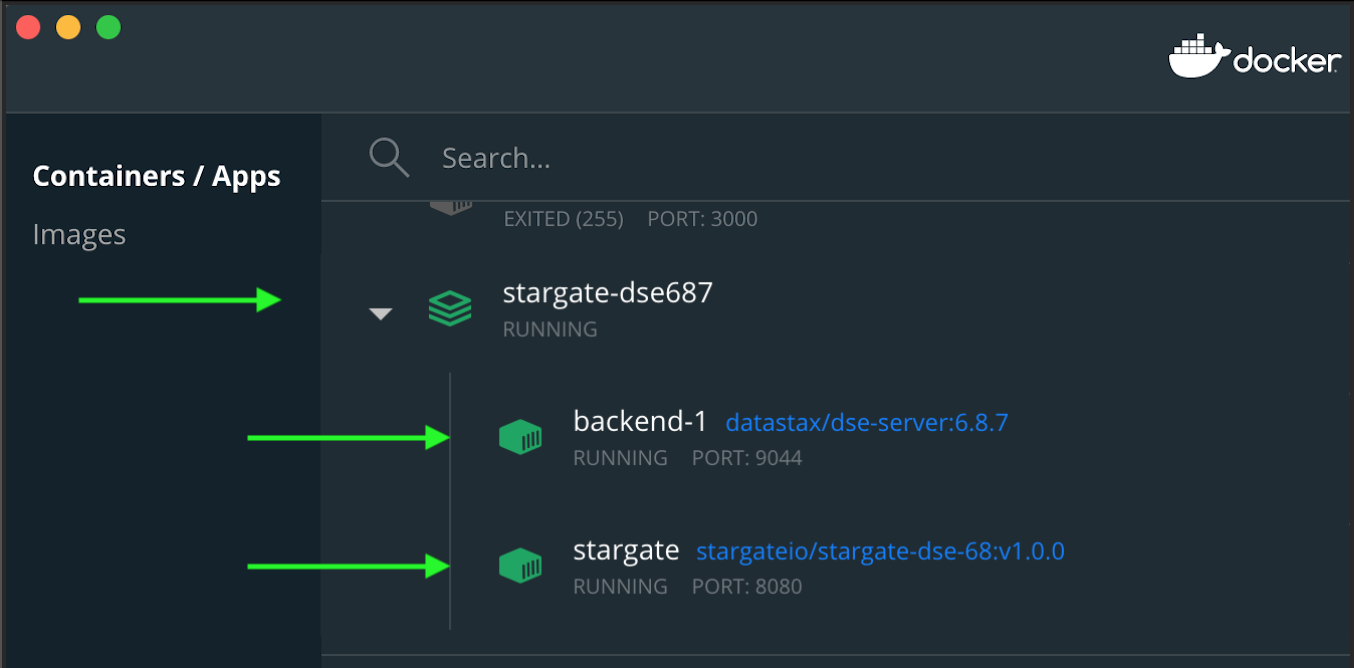
Your Docker dashboard will appear as below (versions will be different),
Now we can get into cqlsh by executing docker exec -it backend-1 cqlsh and you should see output like below,
$ docker exec -it backend-1 cqlsh
Connected to backend at 127.0.0.1:9042.
[cqlsh 6.8.0 | DSE 6.8.11 | CQL spec 3.4.5 | DSE protocol v2]
Use HELP for help.
cqlsh>
Other helpful commands to inspect both Stargate (stargate) & DSE 6.8.11 (backend-1) container logs are,
docker-compose --file stargatedse68.yml logs -f stargatedocker-compose --file stargatedse68.yml logs -f backend-1
You might want to stop the Docker containers once the work is completed by executing docker stop stargate backend-1 as it is resource intensive.
That's all voila!! ✨ You've successfully hooked up Stargate with DataStax Enterprise™ (DSE) using Docker!
- Tip 1: One could visit the Swagger UI and leverage the Try it out by navigating to http://localhost:8082/swagger-ui/#/
- Tip 2: One could visit the GraphQL playground and leverage the same by navigating to http://localhost:8080/playground
- Download DSE
6.8.11tarball either using cURL or from downloads.datastax.com/#enterprise website - Download Stargate jars
stargate-jars.zipfrom https://github.com/stargate/stargate/releases/download/v1.0.18/stargate-jars.zip
Define a custom logging location as applicable or else use the default logging locations,
mkdir -p <path_to>/dse-6.8.11/logsEdit the <path_to>/dse-6.8.11/bin/dse-env.sh file by adding the following to specify custom logging location or else DSE process will fail to start,
export CASSANDRA_LOG_DIR="<path_to>/dse-6.8.11/logs"Make adjustments to cassandra.yaml file as applicable to modify the default locations. See resources section at the bottom of this post for references. I'm going to change my cluster name (cluster_name property value at cassandra.yaml file) to stargate for this demonstration.
Start up the DSE process by running <path_to>/dse-6.8.11/bin/dse cassandra command and wait until you see a similar informational logging line,
...
INFO  [DSE main thread] 2020-12-11 20:39:35,312  DseDaemon.java:818 - DSE startup complete.
Verify by running <path_to>/dse-6.8.11/bin/cqlsh command which will display an output similar to below,
$ cqlsh
Connected to stargate at 127.0.0.1:9042.
[cqlsh 5.0.1 | DSE 6.8.11 | CQL spec 3.4.5 | DSE protocol v2]
Use HELP for help.
cqlsh>
Now, it is time to start the Stargate by running the below command,
stargate-jars/starctl --cluster-name stargate --cluster-seed 127.0.0.1 --dse --dc dc1 --rack rack2 --listen 127.0.0.2 --cluster-version 6.8This will break and the startup will fail unless I am able to provision an additional loopback address for running Stargate at 127.0.0.2.
No sweat 😅. Our Stargate developers from DataStax have provided directions for us to get going. Refer to resources section at the bottom of this post on how to achieve that.
I am going to pick the pre-built Docker image route as opposed to adding an additional loopback by following the below steps:
$ docker pull stargateio/stargate-dse-68:v1.0.18
v1.0.18: Pulling from stargateio/stargate-dse-68
Digest: sha256:3fd3d40eccd03ebf9f28934d5cc3340e7fdabddc3ddc052d09b2ced5e30bc64b
Status: Image is up to date for stargateio/stargate-dse-68:v1.0.18
docker.io/stargateio/stargate-dse-68:v1.0.18
Now let's start Stargate by running the following command,
docker run --name stargate1 -d stargateio/stargate-dse-68:v1.0.18 --cluster-name stargate --cluster-seed 127.0.0.1 --cluster-version 6.8 --listen 127.0.0.2 --dse --dc dc1 --rack rack2- Docker image for Stargate and a DSE 6.8 backend
- Docker image for DataStax Enterprise™
- Installing DataStax Enterprise 6.8 using the binary tarball
- Starting and Stopping DataStax Enterprise as a stand-alone process
- Changing DSE logging location
- Default file locations for DSE tarball installation
- Stargate
startctlcommand reference - Stargate Dev Guide for running locally
- Stargate Quickstart APIs
