This repository contains:
- Ledger Nano S/X Cosmos app
- Specs / Documentation
- C++ unit tests
- Zemu tests
The Cosmos app is already available in Ledger Live. Our preferred and recommended hardware wallet!
- Open Ledger Live and go to Settings (gear icon on the right):
- Enable developer mode (last option):
- Now go back to manager and search for Cosmos:
Please:
- Do not use in production
- Do not use a Ledger device with funds for development purposes.
- Have a separate and marked device that is used ONLY for development and testing
Tip:
- In releases, you will find a precompiled test app. If you are just curious, you can run
zxtool.shand avoid building.
-
Be sure you checkout submodules too:
git submodule update --init --recursive -
Install Docker CE
- Instructions can be found here: https://docs.docker.com/install/
-
We only officially support Ubuntu. Install the following packages:
sudo apt update && apt-get -y install build-essential git wget cmake \ libssl-dev libgmp-dev autoconf libtool -
Install
node > v13.0. We typically recommend usingn -
You will need python 3 and then run
make deps
-
This project requires Ledger firmware 1.6
- The current repository keeps track of Ledger's SDK but it is possible to override it by changing the git submodule.
Warning: Some IDEs may not use the same python interpreter or virtual enviroment as the one you used when running pip.
If you see conan is not found, check that you installed the package in the same interpreter as the one that launches cmake.
We like clion or vscode but let's have some reproducible command line steps
-
Building the app itself
If you installed the what is described above, just run:
make
-
Running rust tests (x64)
If you installed the what is described above, just run:
make rust_test
-
Running C/C++ tests (x64)
If you installed the what is described above, just run:
make cpp_test
-
Running device emulation+integration tests!!
Use Zemu! Explained below!
What is Zemu?? Great you asked!! As part of this project, we are making public a beta version of our internal testing+emulation framework for Ledger apps.
Npm Package here: https://www.npmjs.com/package/@zondax/zemu
Repo here: https://github.com/Zondax/zemu
Let's go! First install everything:
At this moment, if you change the app you will need to run
makebefore running the test again.
make zemu_installThen you can run JS tests:
make zemu_testTo run a single specific test:
At the moment, the recommendation is to run from the IDE. Remember to run
makeif you change the app.
You can use vscode or clion to debug the app. We recommend using CLion but we provide a vscode (unsupported) configuration too.
If you are using CLion, you need to a configuration file in your home directory: $HOME/.gdbinit with the following content:
set auto-load local-gdbinit on
add-auto-load-safe-path /
There are a few things to take into account when enabling Ledger App debugging:
- Once you enable the local .gdbinit that is located in your project workspace. You will break local Rust debugging in your host. The reason is that debugging unit tests will use the same
.gdbinitconfiguration that sets the environment to ARM. We are looking at some possible fixes. For now, if you want to debug unit tests instead of the ledger app, you need to comment out the lines in.gdbinit
-
Build your app
make
-
Define your debug scenario
Open
tests/zemu/tools/debug.mjsand look for the line:/// TIP you can use zemu commands here to take the app ...
You can adjust this code to get the emulator to trigger a breakpoint in your app:
- send clicks
- send APDUs, etc
-
Launch the emulator in debug mode
If you didnt install Zemu yet (previous section), then run
make zemu_installmake zemu_debug
The emulator will launch and immediately stop. You should see a black window
-
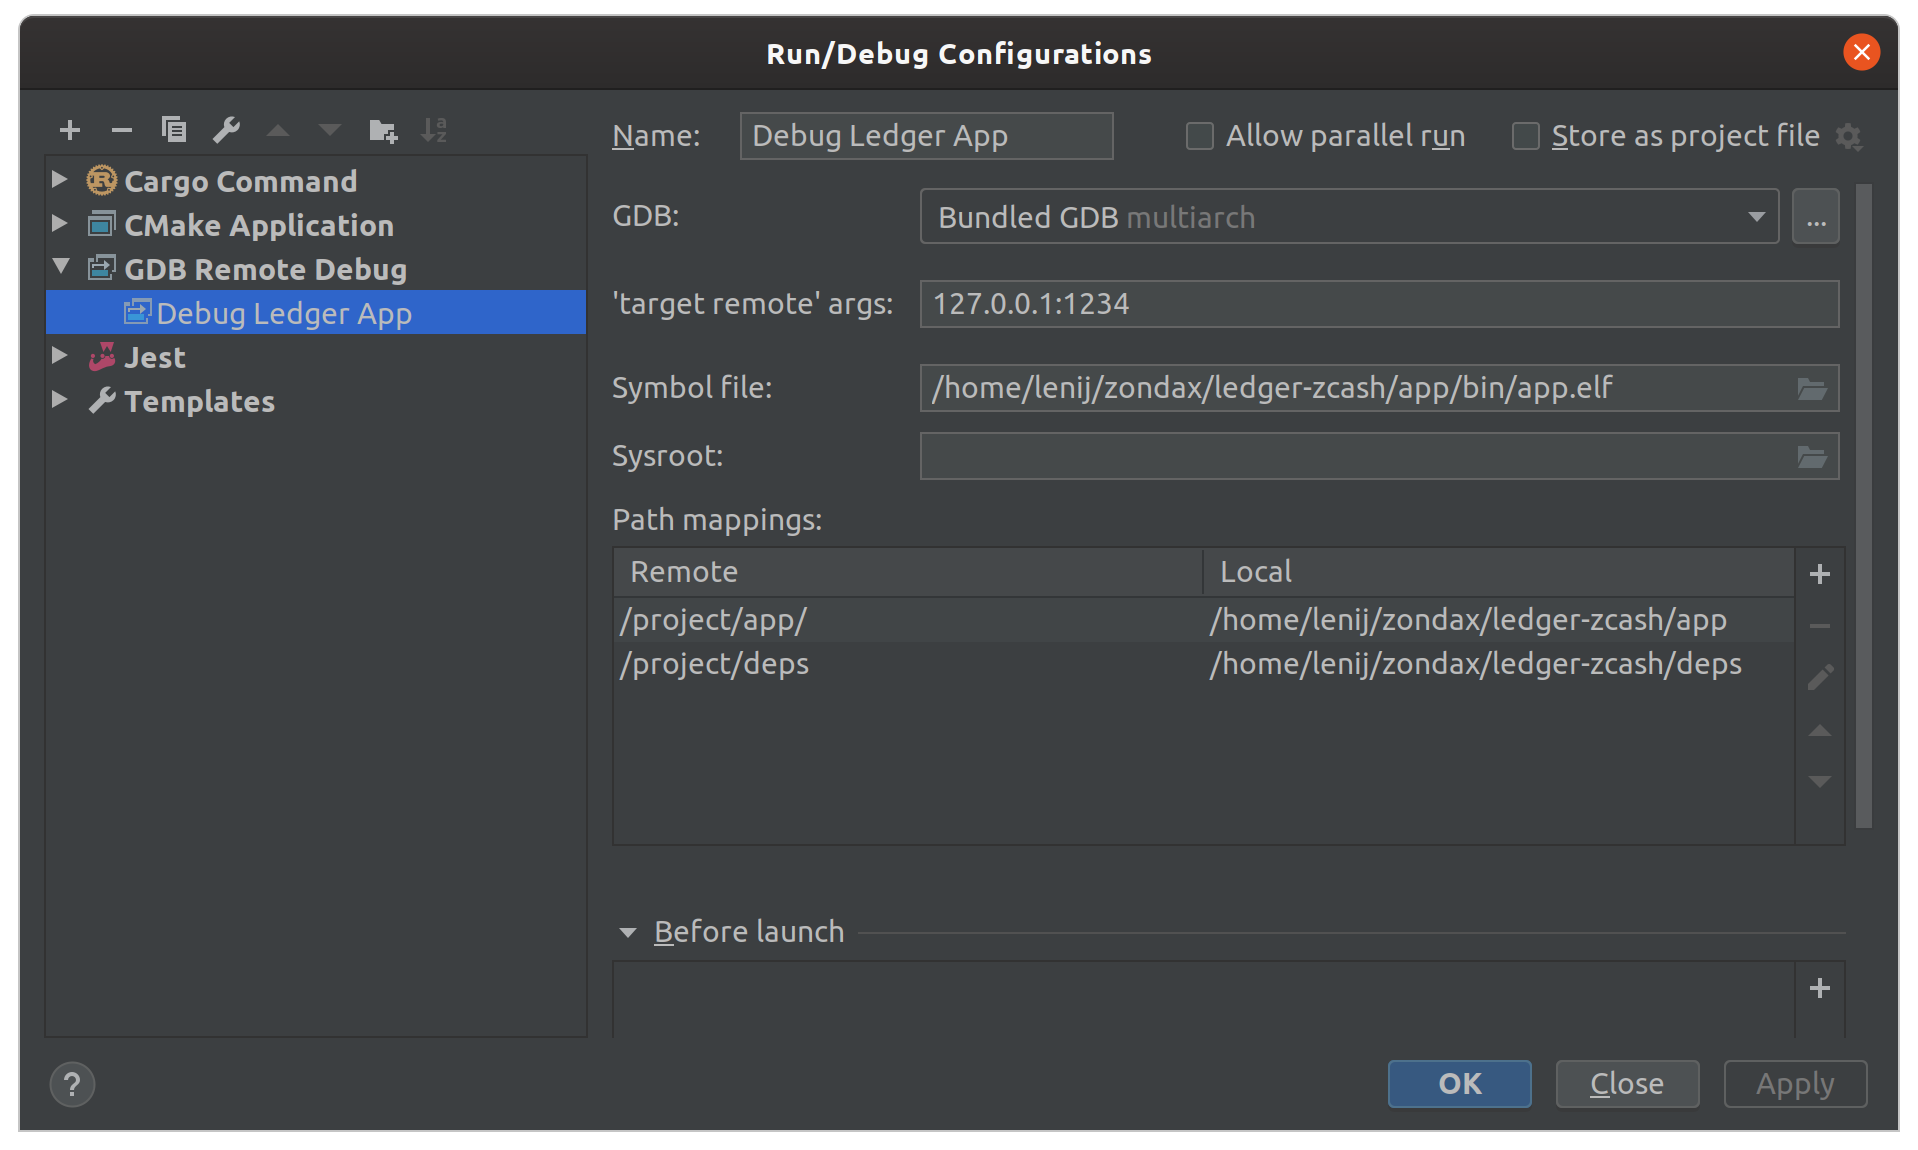
Configure Clion debugger
Your configuration should look similar to this:
Check that the path mappings are correct
-
Start CLion debugger
You will hit a breakpoint in main. Add breakpoints in other places and continue.
Enjoy :)
You can use an emulated device for development. This is only required if you are using a physical device
Please do not use a Ledger device with funds for development purposes.
Have a separate and marked device that is used ONLY for development and testing
There are a few additional steps that increase reproducibility and simplify development:
1 - Ensure your device works in your OS
-
In Linux hosts it might be necessary to adjust udev rules, etc.
Refer to Ledger documentation: https://support.ledger.com/hc/en-us/articles/115005165269-Fix-connection-issues
2 - Set a test mnemonic
Many of our integration tests expect the device to be configured with a known test mnemonic.
-
Plug your device while pressing the right button
-
Your device will show "Recovery" in the screen
-
Double click
-
Run
make dev_init. This will take about 2 minutes. The device will be initialized to:PIN: 5555 Mnemonic: equip will roof matter pink blind book anxiety banner elbow sun young
3 - Add a development certificate
-
Plug your device while pressing the right button
-
Your device will show "Recovery" in the screen
-
Click both buttons at the same time
-
Enter your pin if necessary
-
Run
make dev_ca. The device will receive a development certificate to avoid constant manual confirmations.
The Makefile will build the firmware in a docker container and leave the binary in the correct directory.
-
Build
make # Builds the app -
Upload to a device The following command will upload the application to the ledger. Warning: The application will be deleted before uploading.
make load # Builds and loads the app to the device


