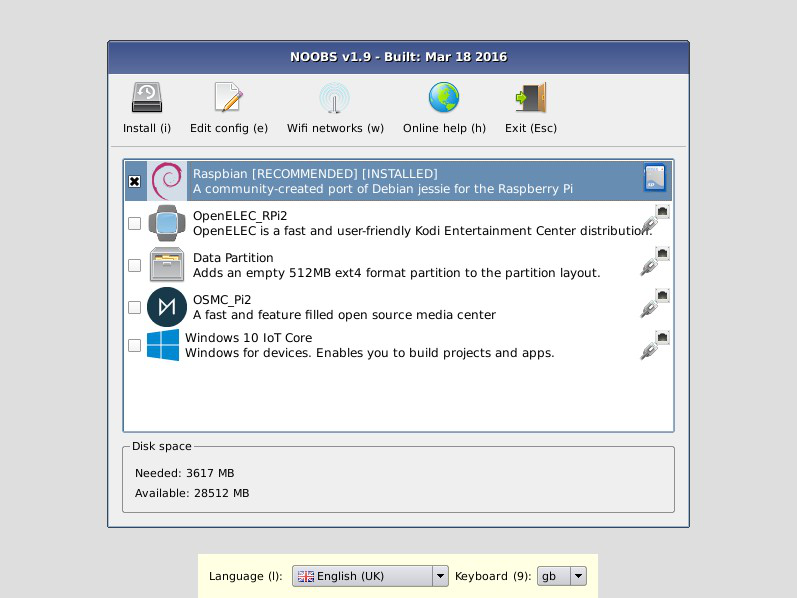
NOOBS is designed to make it easy to select and install operating systems for the Raspberry Pi without having to worry about manually imaging your SD card.
The latest official release of NOOBS can be downloaded from https://downloads.raspberrypi.org/NOOBS_latest
For information on previous releases and version changelists, visit https://github.com/raspberrypi/noobs/releases
*NOTE: The list of OSes in this image is indicative only. It will vary according to your Raspberry Pi model and the availability of OSes on our remote download repository.
On first boot NOOBS will repartition your SD card and allow you to select which OSes you want to install from a list. This OS list is automatically generated from both locally available OSes (i.e. those contained in the /os directory on disk) or those available from our remote repository (network connection required).
Only the latest version of each OS will ever be displayed meaning that you can be sure that you have installed the most up-to-date release of your selected OS.
On any subsequent boot you can then press the SHIFT key to enter the NOOBS interface and easily reinstall your choice of OSes.
The NOOBS interface provides the following functionality:
- Install: Installs the selected OSes onto your SD card. Changing this selection erases all OSes currently installed.
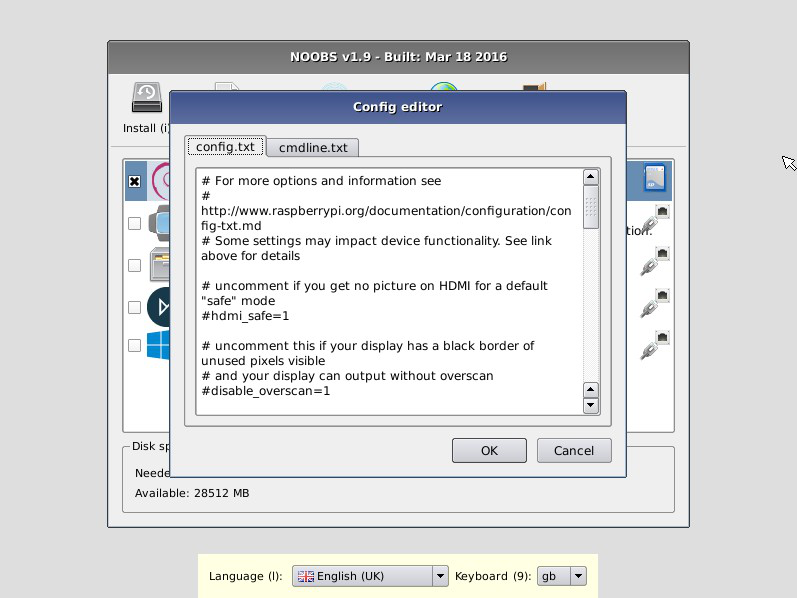
- Edit Config: Opens a text editor allowing the cmdline and config for the selected installed OS to be edited.
- Online Help: [Networking Required] Open a browser that displays the Raspberry Pi Help page ( https://www.raspberrypi.org/help/ ), allowing people to quickly access help and troubleshooting.
- Exit: Quits NOOBS and reboots the Pi into the OS boot menu.
- Language Selection: Allows you to select the language to be displayed.
- Keyboard Layout Selection: Allows you to select the keyboard layout to be used.
- Display Mode Selection: By default, NOOBS will output over HDMI at your display's preferred resolution, even if no HDMI display is connected. If you do not see any output on your HDMI display or are using the composite output, press 1, 2, 3 or 4 on your keyboard to select HDMI preferred mode, HDMI safe mode, composite PAL mode or composite NTSC mode respectively.
Note that all user settings (language, keyboard layout, display mode) will persist between reboots and will also be automatically passed to the installed OSes. This means that if you can see the NOOBS interface on your display device then you should be able to see the OS CLI/GUI when it boots too!
Raspberry Pi 4 Model B: display must be connected to HDMI port closest to power jack.
To set up a blank SD card with NOOBS:
- Format an SD card as FAT. See the instructions given below.
- Your SD card will need to be at least 16GB for Raspberry Pi OS Full, or at least 8GB for all other installs.
- Consider using NOOBS-Lite with an internet connection if you want to leave more space for operating systems.
- Download and extract the files from the NOOBS zip file. (Windows built-in zip features may have trouble with this file. If so, use another program such as 7zip.)
- Copy the extracted files onto the SD card that you just formatted so that these files are at the root directory of the SD card. Please note that in some cases it may extract the files into a folder; if this is the case, then please copy across the files from inside the folder rather than the folder itself.
On first boot the "RECOVERY" FAT partition will be automatically resized to a minimum and a list of OSes that are available to install will be displayed.
NOOBS is available in 2 formats:
NOOBS Fullincludes the installation files for Raspberry Pi OS Full and LibreELEC only.NOOBS-Litedoes not include any Operating Systems at all.
Please note that RISC OS cannot be installed by the NOOBS Full version due to the amount of space taken up by the included Operating Systems.
If you want to install RISC OS, use NOOBS-Lite instead, or change the included operating systems.
Both versions of NOOBS allow additional Operating Systems to be downloaded from our remote repository. To do this, the Raspberry Pi must be connected to a wired network, or it can connect over Wifi using the Raspberry Pi USB wifi dongle or the Raspberry Pi 3 Model B built-in wifi.
Once connected, the Pi will only show a list of Operating Systems that are appropriate to your Pi Model. If you want to see ALL available OSes, edit the recovery.cmdline file in the root NOOBS directory and append showall to the arguments list.
If a wired ethernet cable is plugged into the Pi before NOOBS starts, NOOBS will connect via DHCP to our remote download repository and present a list of available Operating Systems that are available for installation.
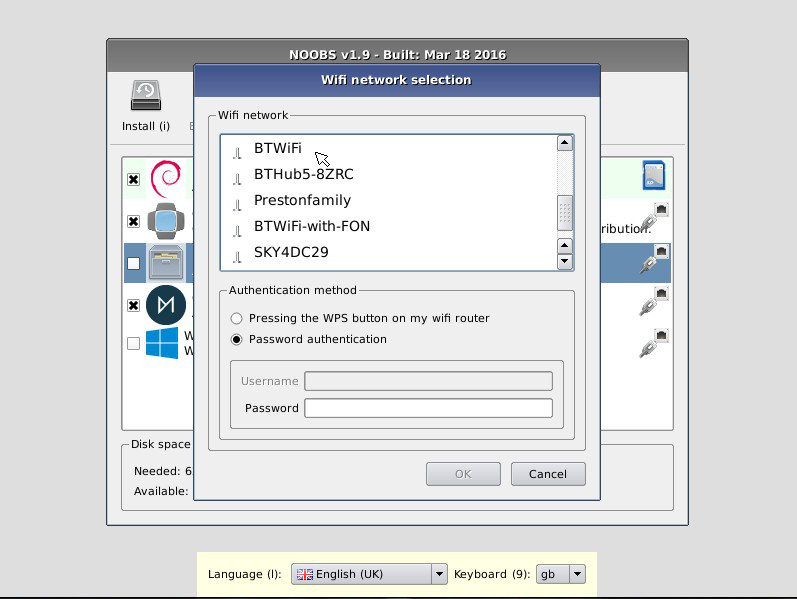
If you have the official Raspberry Pi USB wifi Dongle, or are using the Raspberry Pi 3 Model B with built-in wifi, the wifi icon on the NOOBS toolbar will be available. Click on this to select your Wifi SSID network and enter the wifi password.
For Windows users, we recommend formatting your SD card using the SD Association's Formatting Tool, which can be downloaded from https://www.sdcard.org/downloads/formatter_4/ You will need to set "FORMAT SIZE ADJUSTMENT" option to "ON" in the "Options" menu to ensure that the entire SD card volume is formatted - not just a single partition. With the latest SD Association Formatting Tool (V5.0) that option has been removed and is now the default. For more detailed and beginner-friendly formatting instructions, please refer to https://www.raspberrypi.org/quick-start-guide
The SD Association's Formatting Tool is also available for Mac users although the default OSX Disk Utility is also capable of formatting the entire disk (select the SD card volume and choose "Erase" with "MS-DOS" format).
For Linux users we recommend gparted (or the command line version parted). (Update: Norman Dunbar has written up the following formatting instructions for Linux users: http://qdosmsq.dunbar-it.co.uk/blog/2013/06/noobs-for-raspberry-pi/ )
===
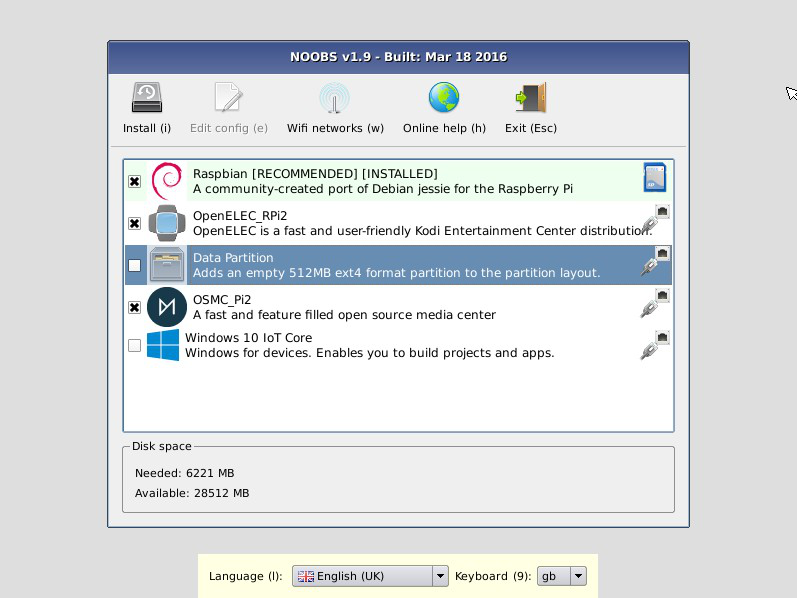
Simply select the checkbox next to each OS you want to install using either a mouse or keyboard (arrow keys to traverse the list, enter to toggle the selected OS's checkbox), then click the "Install" icon (or press "i" on your keyboard) to install the selection. The icons shown on the right of the list indicate whether the OS is being installed from the SD card (SD card icon) or from the online OS repository (Ethernet icon).
*NOTE: The list of OSes in this image is indicative only. It will vary according to your Raspberry Pi model and the availability of OSes on our remote download repository.
The built-in Arora web browser allows you to easily get help via the Raspberry Pi Forums (wired network connection required).
The built-in config file editor allows you to edit the config file of the OS currently highlighted in the OS list. This allows you to easily add license keys to different OS installs through the same interface.
Note that the output mode selected by the user through pressing one of number keys 1 to 4 (for HDMI preferred, HDMI VGA, Composite PAL and Composite NTSC respectively), will be automatically set in the config.txt files of your installed OSes. This means that you shouldn't have to worry about manually changing your display settings to get your installed OS to display correctly on your display device.
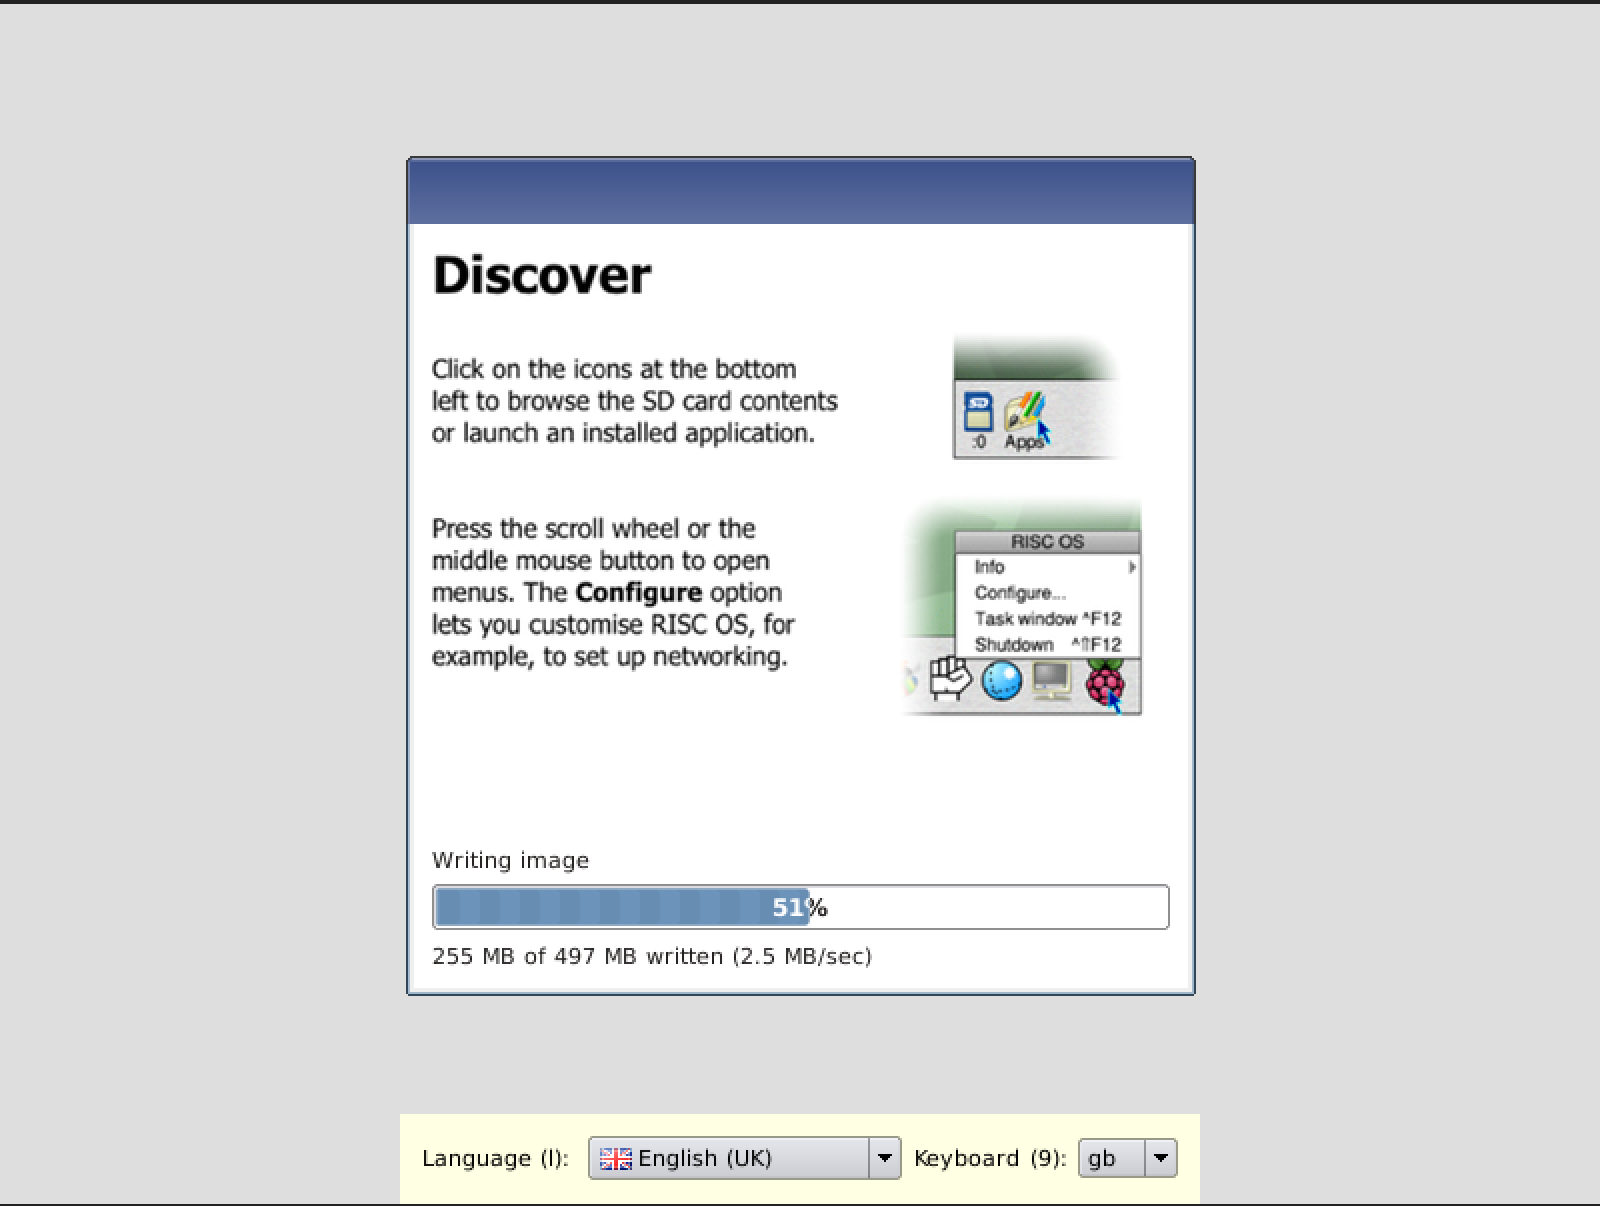
An installer slideshow guides you through your first steps with each OS while it installs.
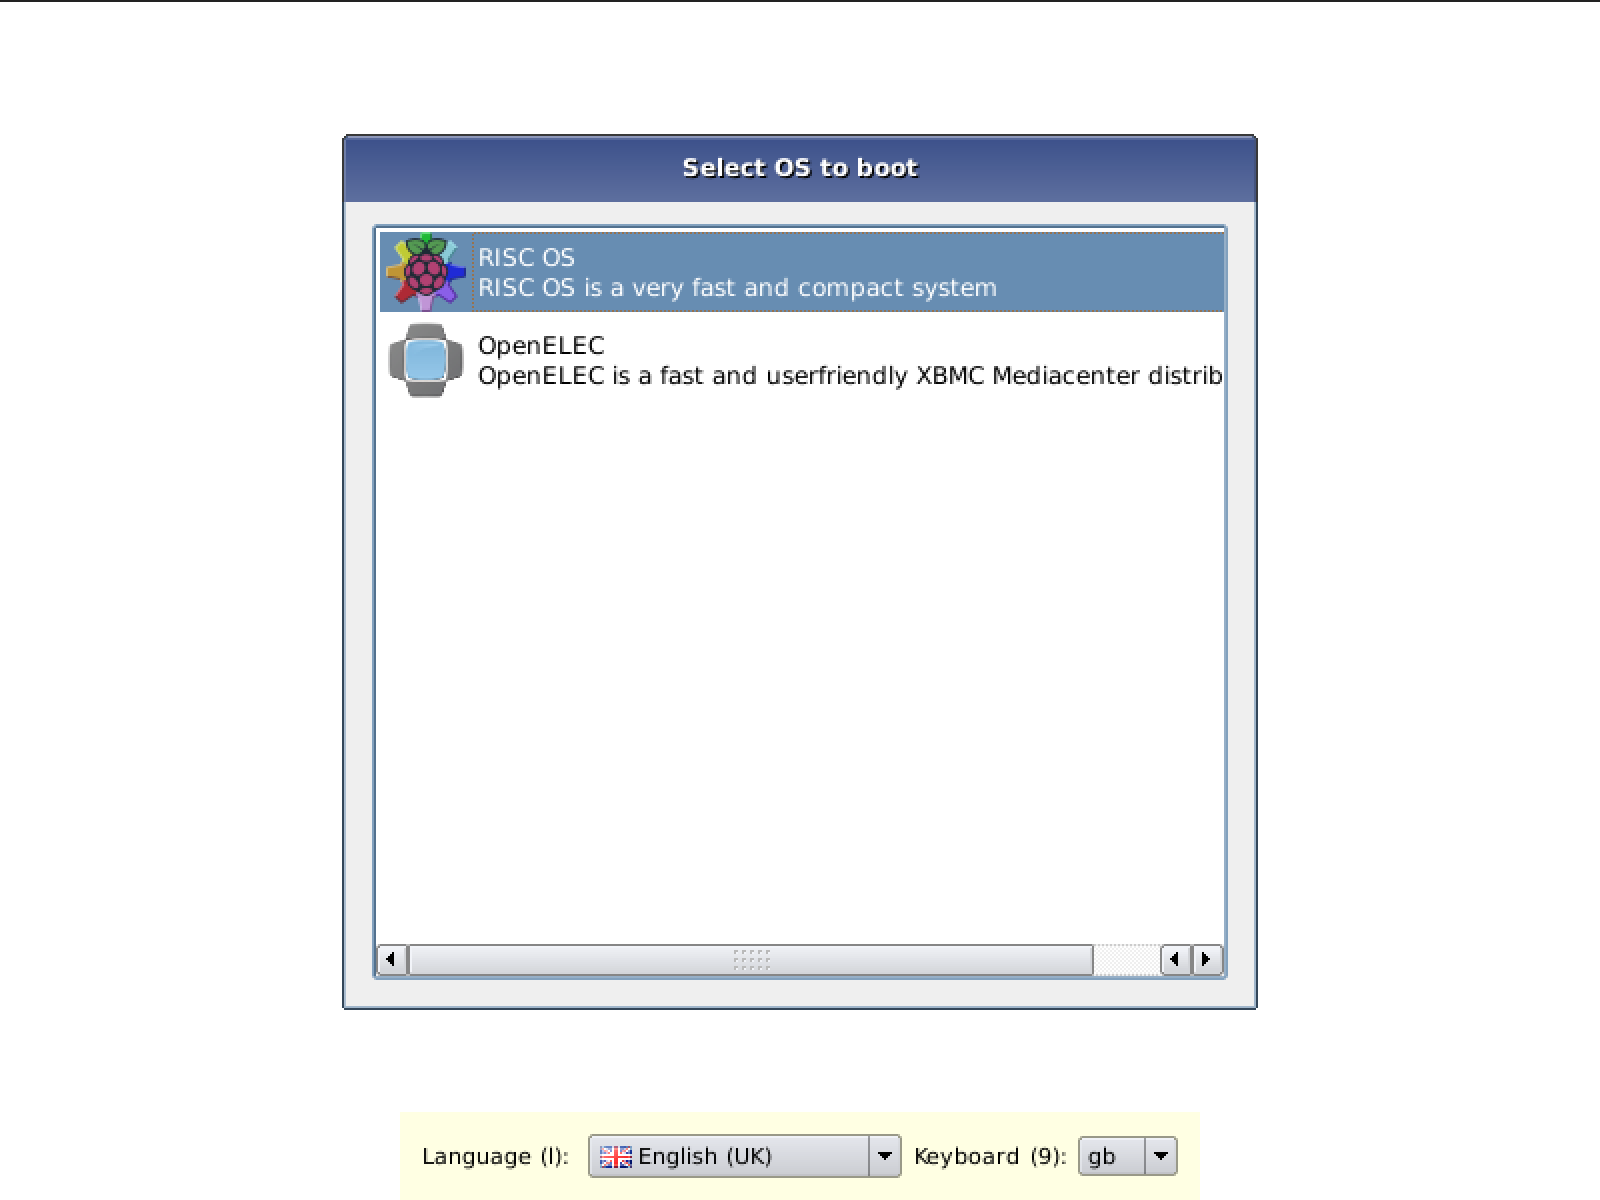
After multiple OSes have been installed, you can select which OS to boot through this selection window that is automatically displayed. NOOBS will remember your choice and boot this OS by default unless a different option has been selected within 10 seconds.
Note that if only one OS is installed then the boot selector will not be displayed and the OS will be automatically booted.
==
Even if you are using your Pi without a display, you can still use NOOBS to easily install an OS of your choice. To set up NOOBS to automatically and silently (i.e. without requiring any user input) install a specific OS, follow these steps:
-
Copy the OS folder for the OS you want to install into the
/osdir (or alternatively delete all other OSes contained in the/osdir so that only your chosen OS remains. -
If the OS you want to automatically install has multiple flavours available, edit the
flavours.jsonfile so that it only contains the flavour entry that you want to install. -
Edit the
recovery.cmdlinefile in the root NOOBS directory and appendsilentinstallto the arguments list.
When you now boot your Pi using an SD card containing the modified version of NOOBS that you just created, it will automatically install the OS you chose and boot into it after the installation has finished.
If you already know your WiFi details, you can preconfigure NOOBS to use it straight away. Put a copy of your wpa_supplicant.conf file on the NOOBS root partition and NOOBS will read it and store it in its settings for all future uses.
There are two main use cases for which you may want to create a custom version of one of the standard OS releases that is suitable for installation via NOOBS:
- If you are a teacher wanting to easily deploy a custom OS release containing pre-defined set of packages and files onto a number of SD cards (e.g. to provision a class set of Raspberry Pi's or quickly restore a Raspberry Pi back to custom "factory" settings).
- If you want to be able to back up your existing installed packages and files so that any future OS re-install does not force you back to a clean install.
The following steps allow you to create a modified copy of one of the standard OS releases that contains your custom files, packages and settings.
-
Download a base version of NOOBS from https://downloads.raspberrypi.org/NOOBS_latest
-
Extract the NOOBS zipfile
-
Navigate to the
osdirectory -
Create a copy of the folder containing the OS release that you want to modify and rename it with a custom name.
-
Edit the following fields in the
os.jsonfile contained in the folder that you just created -
"name" - replace the name of the base OS with the name of your custom OS version
-
"description" - replace the description of the standard OS install with one for your custom OS version
-
[Optional] Rename or replace the existing
<OS>.pngicon file with one matching the name of your custom OS version -
[Optional] Replace the PNG image files in the
slidesandslides_vgadirectory with your own custom installer slides -
Edit the following fields in the
partitions.jsonfile contained in the folder that you just created -
"partition_size_nominal" - replace the numerical value with the size of the paritions in your custom OS version
-
"uncompressed_tarball_size" - replace the numerical value with the size of your filesystem tarballs when uncompressed
-
Replace the
.tar.xzroot and boot filesystem tarballs with copies created from your custom OS version (these instructions assume you're only using a single OS at a time with NOOBS - they won't work if you're running multiple OSes from a single SD card). The name of these tarballs needs to match the labels given inpartitions.json. -
To create the root tarball you will need to run
bsdtar --numeric-owner --format gnutar --one-file-system -cpf <label>.tar .from within the root filesystem of your custom OS version. You should then compress the resulting tarball withxz -9 -e <label>.tar. -
To create the boot tarball you will need to run
bsdtar --numeric-owner --format gnutar -cpf <label>.tar .at the root directory of the boot partition of your custom OS version. You should then compress the resulting tarball withxz -9 -e <label>.tar.
Edit the recovery.cmdline file in the root NOOBS directory and append the following arguments where relevant:
lang=<two-letter language code>(e.g.lang=deorlang=en)keyboard=<two-letter layout code>(e.g.keyboard=deorkeyboard=us)display=<display mode number>(e.g.display=1ordisplay=3)partition=<partition_number>(e.g.partition=6)showall(shows all available OSes regardless of your Raspberry Pi model)
Note that these defaults will be overwritten by any changes made in the GUI to these settings.
After you have installed your chosen OSes, add the following file to the root directory of NOOBS to force the indicated partition to be booted at power-on.
-
Add a text file named
autoboot.txtto the root directory of NOOBS. -
Add
boot_partition=<partition number>to the file and save it to disk.
This will also prevent the splashscreen from being displayed at boot. The partition number can be found by running sudo fdisk -l the partition will be one of the FAT32 partitions /dev/mmcblk0p6 would be partition 6. Note that once an autoboot.txt file is present, there's then no way to force the NOOBS GUI to display, until you delete (or rename) the autoboot.txt file.
If NOOBS detects you are using the Raspberry Pi Touch Display, it will enable the following functionality:
- A tap on the raspberry logo in the centre of the touchscreen can activate NOOBS, as well as holding the shift key down.
- A tap on the touchscreen will simulate a mouse click
- A longpress on the touchscreen will simulate a mouse double-click.
===
Try pressing shift only when the grey splashscreen is displayed rather than holding it from boot up.
To boot into a basic busybox shell rather than launching the NOOBS GUI, you can either:
-
Append
rescueshellto the argument list in therecovery.cmdlinefile which is found in the root NOOBS directory. -
Insert a physical jumper between pins 5 & 6 of GPIO header P1. If you have external hardware or an addon board connected to the GPIO header, you may find that pin 5 is being pulled low and accidentally triggering "Safe Mode". To prevent this you can append
disablesafemodeto the argument list in therecovery.cmdlinefile which is found in the root NOOBS directory.
To force Recovery Mode to be entered on boot and to show the NOOBS interface, you normally press the SHIFT key during bootup. If you don't have a keyboard or the SHIFT keypress isn't being detected, you should complete the following steps to force the NOOBS interface to be displayed on boot:
- Append
gpiotriggerenableto the argument list in therecovery.cmdlinefile which is found in the root NOOBS directory. - Reboot
To force Recovery Mode being entered on boot, connect GPIO pin 3 on header P1 to GND (pin 25). If GPIO pin 3 remains unconnected then it will boot through to the installed OS as normal.
Alternatively, if you are unable to use either the GPIO or keyboard to trigger entering Recovery Mode, you can:
- Append
forcetriggerto the argument list in therecovery.cmdlinefile which is found in the root NOOBS directory. - Reboot
Note that with this option enabled, the Recovery Mode will be displayed every time you boot from your NOOBS card (until you edit recovery.cmdline again).
In some rare cases, you may find that NOOBS incorrectly detects a SHIFT keypress from your keyboard regardless of the presence of user input. In such cases it may be helpful to disable using the keyboard to trigger Recovery Mode being entered.
To prevent a SHIFT keypress from entering Recovery Mode on boot (maybe you have a problematic keyboard which is erroneously triggering every time you boot), you can:
- Append
keyboardtriggerdisableto the argument list in therecovery.cmdlinefile which is found in the root NOOBS directory. - Reboot
By default, NOOBS will output over HDMI at your display’s preferred resolution, even if no HDMI display is connected. If you do not see any output on your HDMI display or are using the composite output, press 1, 2, 3 or 4 on your keyboard to select HDMI preferred mode, HDMI safe mode, composite PAL mode or composite NTSC mode respectively.
If you don't have a keyboard, you can still change the display mode used by NOOBS through editing the recovery.cmdline file in the root NOOBS directory prior to first boot and appending the following argument:
display=<display mode number>(e.g.display=1ordisplay=3)
===
Note that this will require a minimum of 6GB free disk space.
On Ubuntu:
sudo apt install build-essential rsync texinfo libncurses-dev whois unzip bc qt4-linguist-tools
./BUILDME.sh
Buildroot will then build the software and all dependencies, putting the result in the output directory.
Buildroot by default compiles multiple files in parallel, depending on the number of CPU cores you have.
If your build machine does have a quad core CPU, but relatively little RAM, you may want to lower the number to prevent swapping:
cd buildroot ; make menuconfig- "Build options" -> "Number of jobs to run simultaneously"
If your build machine also has some QT5 components, it is useful to export QT_SELECT=4 before building to ensure the QT4 component versions are selected.
In order to setup an SD card with a newly built version of NOOBS, you will need to:
- Format an SD card that is 16GB or greater in size as FAT32
- Replace the
/osdirectory in/outputwith the copy contained in the release version of NOOBS (see above for download links) - Copy the files in the
/outputdirectory onto the SD card
To add extra packages: cd buildroot ; make menuconfig
Recovery software packaging is in: buildroot/package/recovery
Kernel configuration used: buildroot/kernelconfig-recovery.armv6 and kernelconfig-recovery.armv7
Main differences with bcmrpi_defconfig:
CONFIG_BLK_DEV_INITRD=y- initramfs supportCONFIG_INPUT_EVDEV=y- evdev support built-inCONFIG_USB_HID=y- usb HID driver built-in- All modules disabled.
- (This has changed significantly from v1.5 to use a squashfs)
Source is in the recovery folder.
Be aware that user interface screens will appear larger in Qt Creator then when deployed on the Pi, can
raise font sizes 2 points to compensate.
Several constants can be changed in config.h
Wrap code that calls Qt Embedded specific classes (such as QWSServer) between
#ifdef Q_WS_QWSand
#endifso that the project also compiles and can be tested under standard Qt.
References:
https://qt-project.org/doc/qt-4.8/i18n-source-translation.html
https://qt-project.org/doc/qt-4.8/linguist-manual.html
To set up a git pre-commit hook to automatically update the translation files, run the following commands in the project root:
chmod +x pre-commit-translation-update-hook.shcp pre-commit-translation-update-hook.sh .git/hooks/pre-commit
To add a new translation:
- Add to
recovery/recovery.prothe following:TRANSLATIONS += translation_<languagecode>.ts - Run
lupdate recovery/recovery.prowhich extracts strings from the source code and generates/updates the .ts files. - The .ts can then be sent to the translator, opened in Qt Linguist and filled in.
- Add a line for the .ts file in to
recovery/icons.qrc, but substitute .ts extension with .qm . This file contains a list of resource files that will be embedded into the application's executable during build. - Add a flag icon for your language from http://www.famfamfam.com/lab/icons/flags/ flag icon collection or if it
doesn't have the one you need, you may use some other small png icon for it. Copy the icon file to the
recovery/iconsfolder and add a line for it intorecovery/icons.qrcas well.
Copyright (c) 2013, Raspberry Pi All rights reserved.
Redistribution and use in source and binary forms, with or without modification, are permitted provided that the following conditions are met:
Redistributions of source code must retain the above copyright notice, this list of conditions and the following disclaimer. Redistributions in binary form must reproduce the above copyright notice, this list of conditions and the following disclaimer in the documentation and/or other materials provided with the distribution. Neither the name of the Raspberry Pi Foundation nor the names of its contributors may be used to endorse or promote products derived from this software without specific prior written permission. THIS SOFTWARE IS PROVIDED BY THE COPYRIGHT HOLDERS AND CONTRIBUTORS "AS IS" AND ANY EXPRESS OR IMPLIED WARRANTIES, INCLUDING, BUT NOT LIMITED TO, THE IMPLIED WARRANTIES OF MERCHANTABILITY AND FITNESS FOR A PARTICULAR PURPOSE ARE DISCLAIMED. IN NO EVENT SHALL THE COPYRIGHT HOLDER OR CONTRIBUTORS BE LIABLE FOR ANY DIRECT, INDIRECT, INCIDENTAL, SPECIAL, EXEMPLARY, OR CONSEQUENTIAL DAMAGES (INCLUDING, BUT NOT LIMITED TO, PROCUREMENT OF SUBSTITUTE GOODS OR SERVICES; LOSS OF USE, DATA, OR PROFITS; OR BUSINESS INTERRUPTION) HOWEVER CAUSED AND ON ANY THEORY OF LIABILITY, WHETHER IN CONTRACT, STRICT LIABILITY, OR TORT (INCLUDING NEGLIGENCE OR OTHERWISE) ARISING IN ANY WAY OUT OF THE USE OF THIS SOFTWARE, EVEN IF ADVISED OF THE POSSIBILITY OF SUCH DAMAGE.
Recovery software directly links to:
- Qt libraries, available under LGPL and commercial license.
Currently used icon sets:
- https://www.fatcow.com/free-icons - Creative commons Attribution license
- http://www.famfamfam.com/lab/icons/flags - "These flag icons are available for free use for any purpose with no requirement for attribution."
- http://www.oxygen-icons.org/ - Available under Creative Common Attribution-ShareAlike 3.0 and LGPL license
Licenses of utility software built by buildroot:
Type cd buildroot ; make legal-info to generate a list, which will be available under output/legal-info.
