| lab | ||||
|---|---|---|---|---|
|
Time to complete: 120 minutes
This module helps learners prepare their lab environments for the modules that follow. Please run through these instructions prior to starting Module 1.
- Module 0 - Lab environment setup with NO pre-installed virtual machine
- An Azure Account with the ability to create an Azure Synapse Workspace
Time to complete: 3 minutes
In Azure, you must register specific resource providers on your subscription before you can deploy services such as Synapse Analytics and Azure Databricks.
-
Log in to the Azure portal (https://portal.azure.com).
-
In the search bar on top of the page, type
subscriptionsand select Subscriptions in the results. -
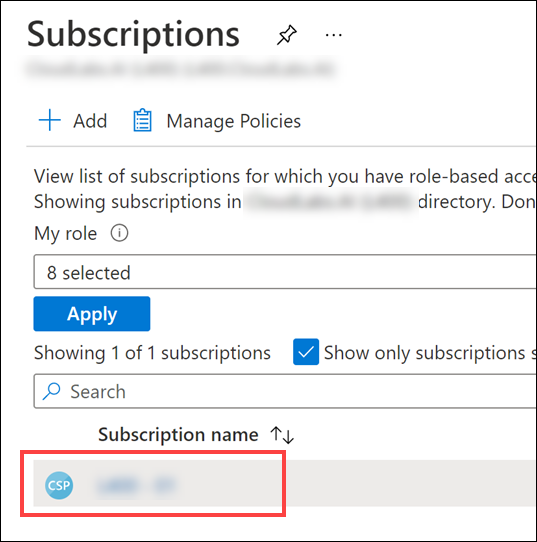
Select the Azure subscription you will use for your lab environment.
-
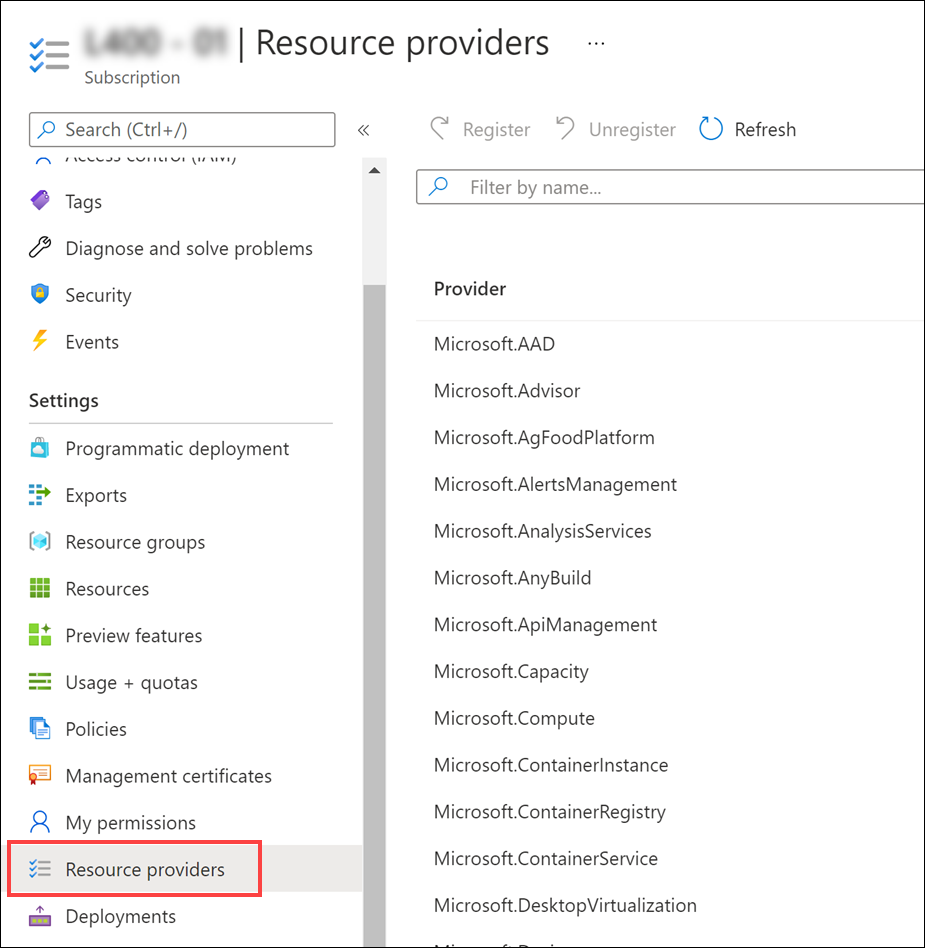
Select Resource providers in the left-hand menu.
-
In the filter, type
databricksto view the Microsoft.Databricks provider. Make sure the status is set to Registered.If it is not registered, select the Microsoft.Databricks resource provider, then select Register.
-
In the filter, type
synapseto view the Microsoft.Synapse provider. Make sure the status is set to Registered.If it is not registered, select the Microsoft.Synapse resource provider, then select Register.
-
In the filter, type
sqlto view the Microsoft.Sql provider. Make sure the status is set to Registered.If it is not registered, select the Microsoft.Sql resource provider, then select Register.
-
In the filter, type
documentto view the Microsoft.DocumentDB provider. Make sure the status is set to Registered.If it is not registered, select the Microsoft.DocumentDB resource provider, then select Register.
-
In the filter, type
streamto view the Microsoft.StreamAnalytics provider. Make sure the status is set to Registered.If it is not registered, select the Microsoft.StreamAnalytics resource provider, then select Register.
-
In the filter, type
eventto view the Microsoft.EventHub provider. Make sure the status is set to Registered.If it is not registered, select the Microsoft.EventHub resource provider, then select Register.
-
In the filter, type
keyvaultto view the Microsoft.KeyVault provider. Make sure the status is set to Registered.If it is not registered, select the Microsoft.KeyVault resource provider, then select Register.
-
In the filter, type
storageto view the Microsoft.Storage provider. Make sure the status is set to Registered.If it is not registered, select the Microsoft.Storage resource provider, then select Register.
-
In the filter, type
computeto view the Microsoft.Compute provider. Make sure the status is set to Registered.If it is not registered, select the Microsoft.Compute resource provider, then select Register.
-
Log into the Azure Portal using your Azure credentials.
-
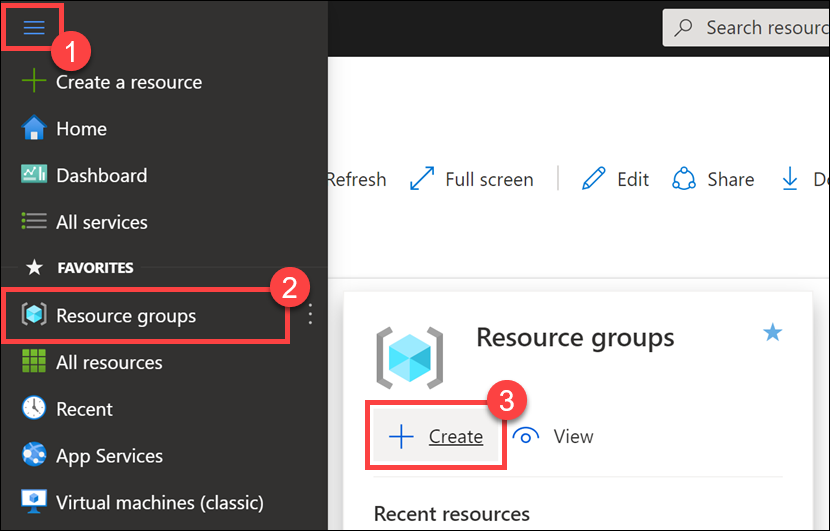
On the Azure Portal home screen, select the Menu button on the top-left corner (1). Hover over Resource groups (2), then select + Create (3).
-
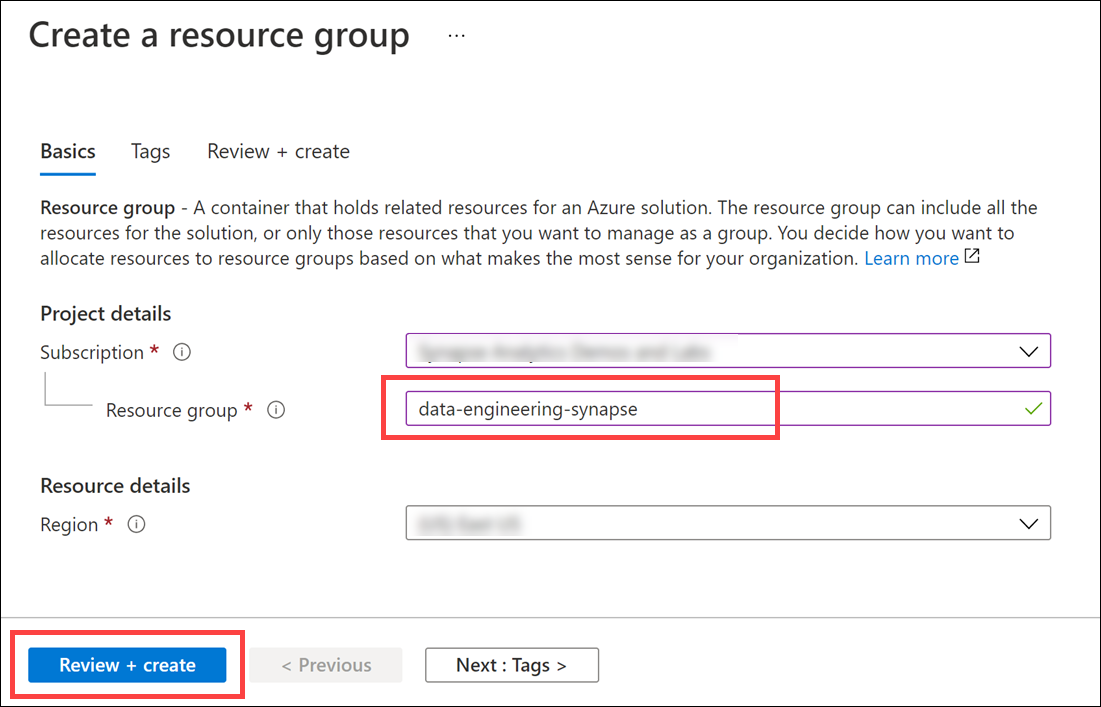
On the Create a resource group screen, select your desired Subscription and Region. For Resource group, enter
data-engineering-synapse(make sure the name is unique), then select the Review + Create button. Copy the resource group name and save it in Notepad or similar for later reference. -
Select the Create button once validation has passed.
Important: Take note of the exact resource group name you provided for the steps that follow.
We highly recommend executing the PowerShell scripts on an Azure Virtual Machine instead of from your local machine. Doing so eliminates issues due to pre-existing dependencies and more importantly, network/bandwidth-related issues while executing the scripts.
-
In the Azure portal, type in "virtual machines" in the top search menu and then select Virtual machines from the results.
-
Select + Add on the Virtual machines page and then select the Virtual machine option.
-
In the Basics tab, complete the following:
Field Value Subscription select the appropriate subscription Resource group select data-engineering-synapse(the name of the resource group you created in the previous task)Virtual machine name data-engineering-lab-vm(or unique name if not available)Region select the resource group's location Availability options select No infrastructure redundancy requiredImage select Windows 10 Pro, Version 20H2 - Gen1(or newer)Azure Spot instance set to UncheckedSize select Standard_D8s_v3Username select labuserPassword enter a password you will remember Public inbound ports select Allow selected portsSelect inbound ports select RDP (3389)Licensing select the option to confirm that you have an eligible Windows 10 license with multi-tenant hosting rights. -
Select Review + create. On the review screen, select Create. After the deployment completes, select Go to resource to go to the virtual machine.
-
Select Connect from the actions menu and choose RDP.
-
On the Connect tab, select Download RDP File.
-
Open the RDP file and select Connect to access the virtual machine. When prompted for credentials, enter
labuserfor the username and the password you chose.Click Yes to connect despite security certificate errors when prompted.
-
Install Power BI Desktop on the VM.
Time to complete: 6 minutes
The below ARM template deploys several Azure resources for the labs, including Azure Synapse Analytics, Azure Databricks, storage accounts, Event Hubs, Stream Analytics, Key Vault, Azure Cosmos DB, etc.
-
Deploy the workspace through the following Azure ARM template (select the button below):
-
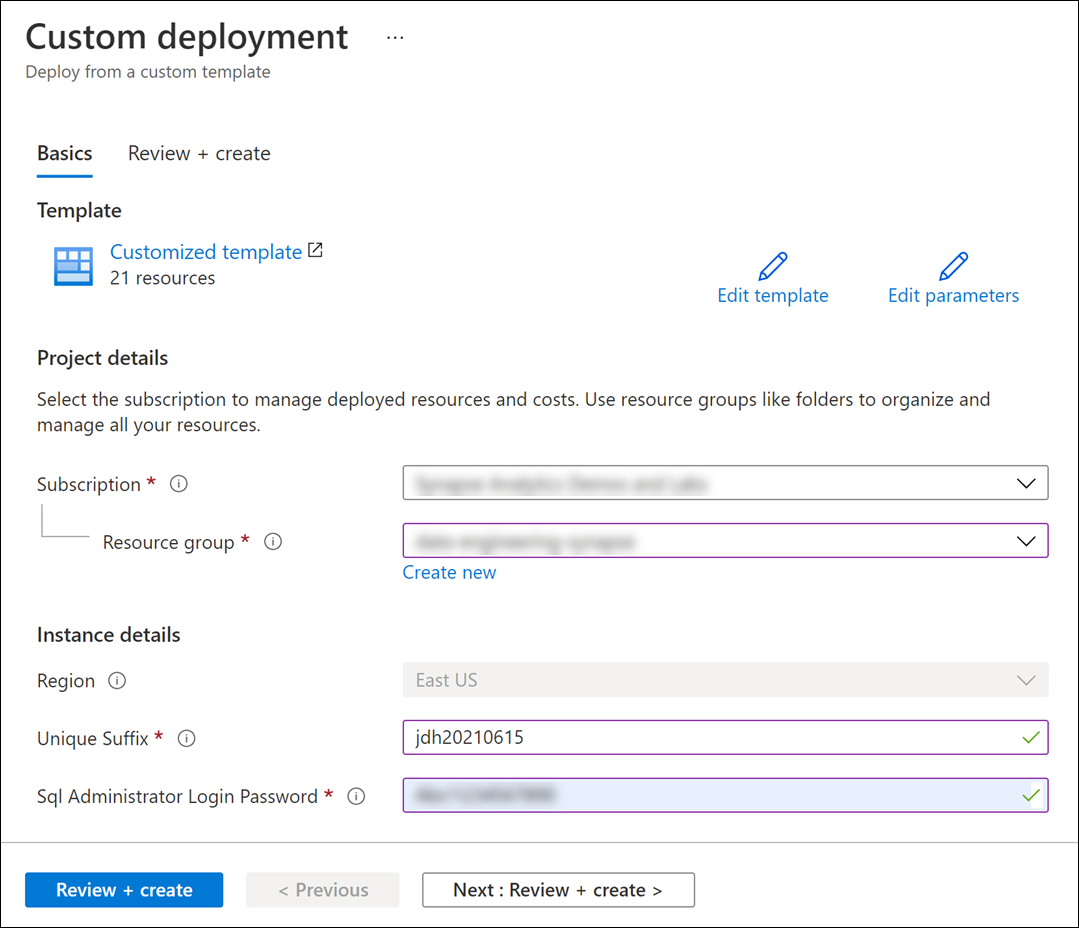
On the Custom deployment form fill in the fields described below.
-
Subscription: Select your desired subscription for the deployment.
-
Resource group: Select the resource group you previously created.
-
Region: The region where your Azure Synapse environment will be created.
Important: The
Regionfield under 'Parameters' will list the Azure regions where Azure Synapse Analytics is available as of November 2020. This will help you find a region where the service is available without being limited to where the resource group is defined. -
Unique Suffix: This unique suffix will be used naming resources that will created as part of your deployment, such as your initials followed by the current date in YYYYMMDD format (ex.
jdh20210615). Make sure you follow correct Azure Resource naming conventions. -
SQL Administrator Login Password: Provide a strong password for the SQLPool that will be created as part of your deployment. Visit here to read about password rules in place. Your password will be needed during the next steps. Make sure you have your password noted and secured.
-
-
Select the Review + create button, then Create. The provisioning of your deployment resources will take approximately 6 minutes.
During workspace creation, the portal displays the Submitting deployment for Azure Databricks tile on the right side. You may need to scroll right on your dashboard to see the tile. There is also a progress bar displayed near the top of the screen. You can watch either area for progress.
Note: You may experience a deployment step failing in regards to Role Assignment. This error may safely be ignored.
The entire script will take about 15 minutes to complete. Major steps include:
- Configure Synapse resources
- Download all data sets and files into the data lake (~5 mins)
- Execute the Cosmos DB pipeline (~10 mins)
Install these pre-requisites on your deployment VM before continuing.
- Install VC Redist: https://aka.ms/vs/15/release/vc_redist.x64.exe
- Install MS ODBC Driver 17 for SQL Server: https://www.microsoft.com/download/confirmation.aspx?id=56567
- Install SQL CMD x64: https://go.microsoft.com/fwlink/?linkid=2082790
- Install Microsoft Online Services Sign-In Assistant for IT Professionals RTW: https://www.microsoft.com/download/details.aspx?id=28177
- Install Git client accepting all the default options in the setup.
- Windows PowerShell
Perform all of the steps below from your deployment VM:
-
Open a PowerShell Window as an administrator, run the following command to download the artifacts
mkdir c:\dp203

cd c:\dp203

git clone https://github.com/ctesta-oneillmsft/xyz data-engineering-ilt-deployment
-
Install Azure PowerShell module
Open Windows PowerShell as an Administrator on your desktop and execute the following:
if (Get-Module -Name AzureRM -ListAvailable) {
    Write-Warning -Message 'Az module not installed. Having both the AzureRM and Az modules installed at the same time is not supported.'
    Uninstall-AzureRm -ea SilentlyContinue
    Install-Module -Name Az -AllowClobber -Scope CurrentUser
} else {
    Install-Module -Name Az -AllowClobber -Scope CurrentUser
}
[!Note]: You may be prompted to install NuGet providers, and receive a prompt that you are installing the module from an untrusted repository. Select Yes in both instances to proceed with the setup
-
Install
Az.CosmosDBmoduleInstall-Module -Name Az.CosmosDB -AllowClobber
[!Note]: If you receive a prompt that you are installing the module from an untrusted repository, select Yes to All to proceed with the setup.
-
Install
sqlservermoduleInstall-Module -Name SqlServer -AllowClobber
-
Install Azure CLI
Invoke-WebRequest -Uri https://aka.ms/installazurecliwindows -OutFile .\AzureCLI.msi; Start-Process msiexec.exe -Wait -ArgumentList '/I AzureCLI.msi /quiet'; rm .\AzureCLI.msi
IMPORTANT
- Once the last command has completed, close the Windows PowerShell window so you can import the newly installed Az.CosmosDB cmdlet.
Time to complete: 15 minutes
Perform all of the steps below from your deployment VM:
-
Important step: Go back to the Azure portal to make sure the ARM template deployment has completed. If it has not, these scripts will fail. Wait until the deployment successfully completes.
-
Open Windows PowerShell as an Administrator and execute the following to set the
PSGalleryas a trusted repository:Set-PSRepository -Name "PSGallery" -InstallationPolicy Trusted
-
Execute the following to set the execution policy to Unrestricted so you can run the local PowerShell script file:
Set-ExecutionPolicy Unrestricted[!Note]: If you receive a prompt that you are installing the module from an untrusted repository, select Yes to All to proceed with the setup.
-
Execute the following to import the
Az.CosmosDBmodule:Import-Module Az.CosmosDB -
Change directories to the root of this repo within your local file system.
cd C:\dp203\data-engineering-ilt-deployment\AllFiles\00\artifacts\environment-setup\automation\
-
Execute the following and sign in to your Microsoft user account when prompted:
Connect-AzAccount[!WARNING]: You may receive the message "TenantId 'xxxxxx-xxxx-xxxx-xxxx' contains more than one active subscription. The first one will be selected for further use. You can ignore this at this point. When you execute the environment setup, you will choose the subscription in which you deployed the environment resources.
-
Execute the following and sign in to your Microsoft user account when prompted.
az login
If you receive the following error, and have already closed and re-opened the PowerShell window, you need to restart your computer and restart the steps in this task:
The term 'az' is not recognized as the name of a cmdlet, function, script file, or operable program. -
Execute
.\01-environment-setup.ps1-
You will be prompted to setup your Azure PowerShell and Azure CLI context.
-
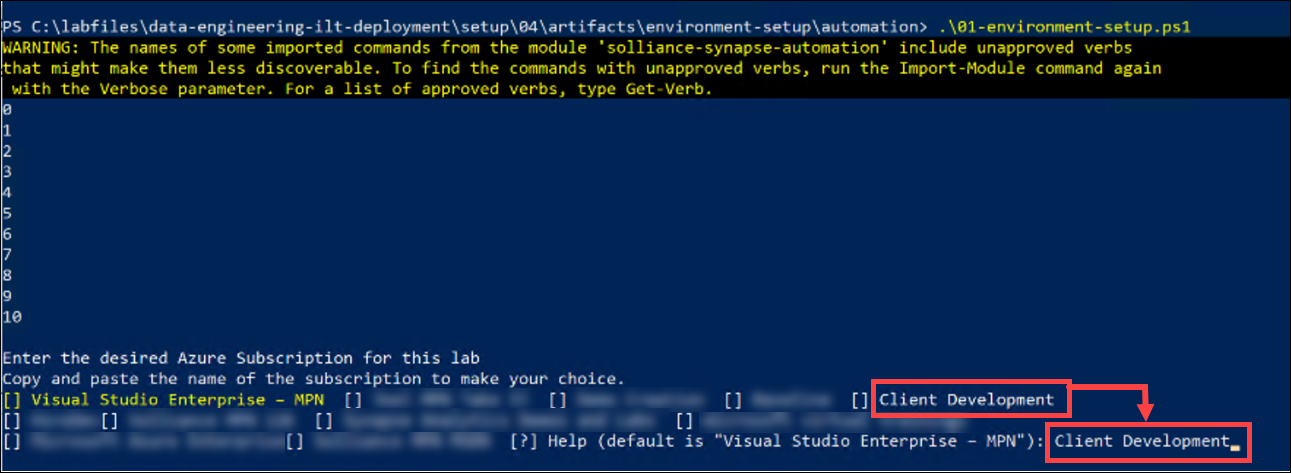
If you have more than one Azure Subscription, you will be prompted to enter the name of your desired Azure Subscription. You can copy and paste the value from the list to select one. For example:
-
Enter the name of the resource group you created at the beginning of the environment setup (such as
data-engineering-synapse). This will make sure automation runs against the correct environment you provisioned in Azure.NOTE This script will take about 15-20 minutes to complete.
-
Time to complete: 5 minutes
-
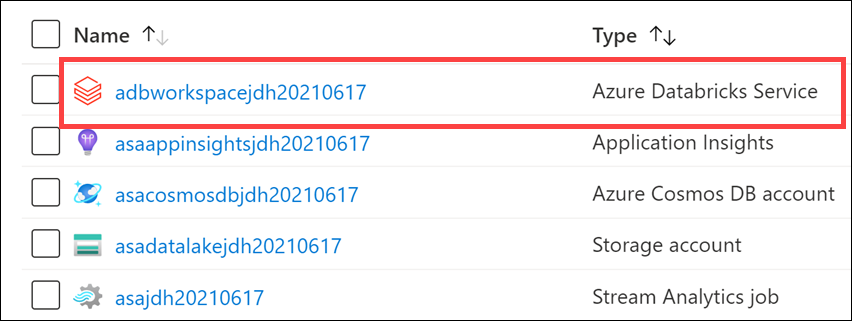
While the PowerShell script executes, go back to the Azure portal. Navigate to your Azure resource group for this lab, then select the Azure Databricks workspace.
-
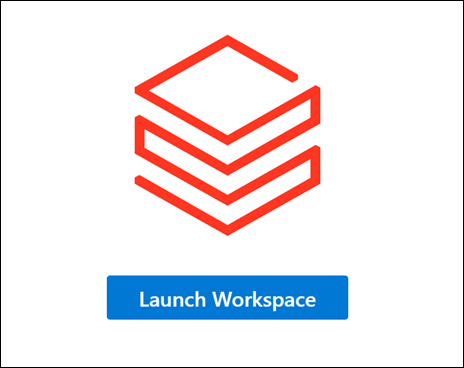
Select Launch Workspace to open your Databricks workspace in a new tab.
-
In the left-hand menu of your Databricks workspace, select Compute.
-
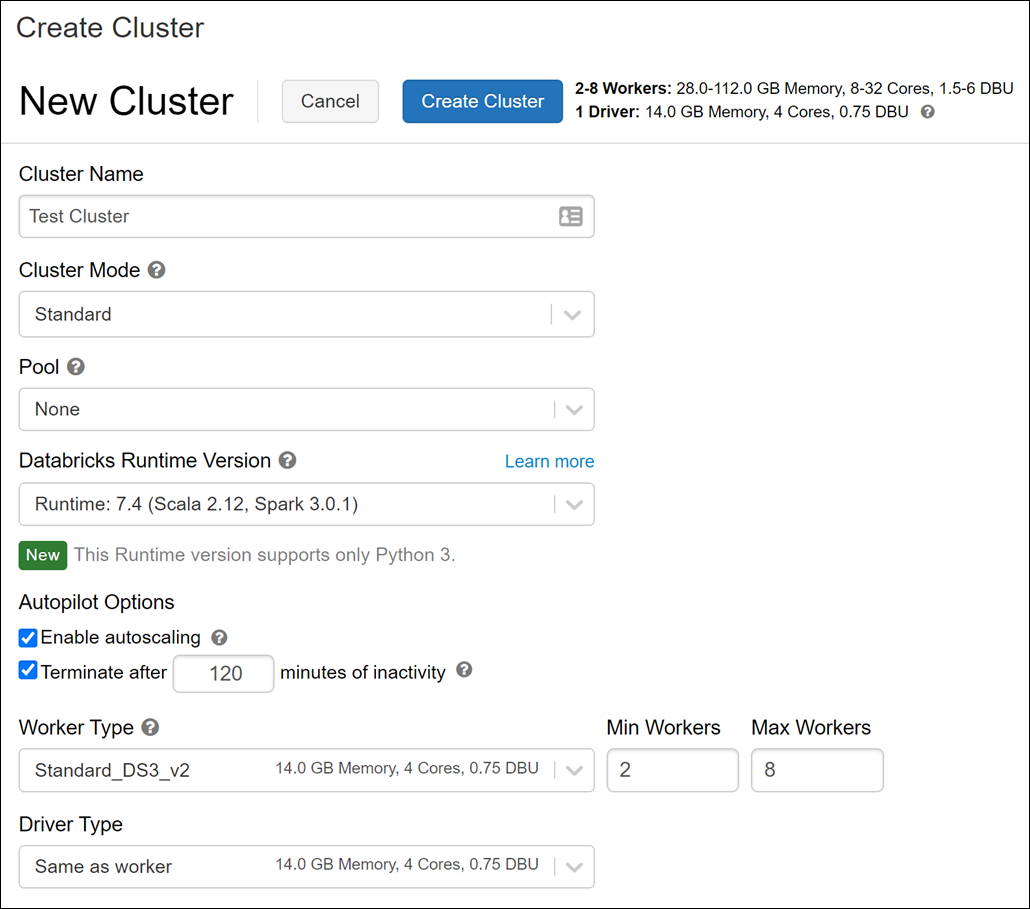
Select Create Cluster to add a new cluster.
-
Enter a name for your cluster, such as
Test Cluster. -
Select the Databricks RuntimeVersion. We recommend the latest runtime and Scala 2.12.
-
Select the default values for the cluster configuration.
-
Check Spot instances to optimize costs.
-
Select Create Cluster.

