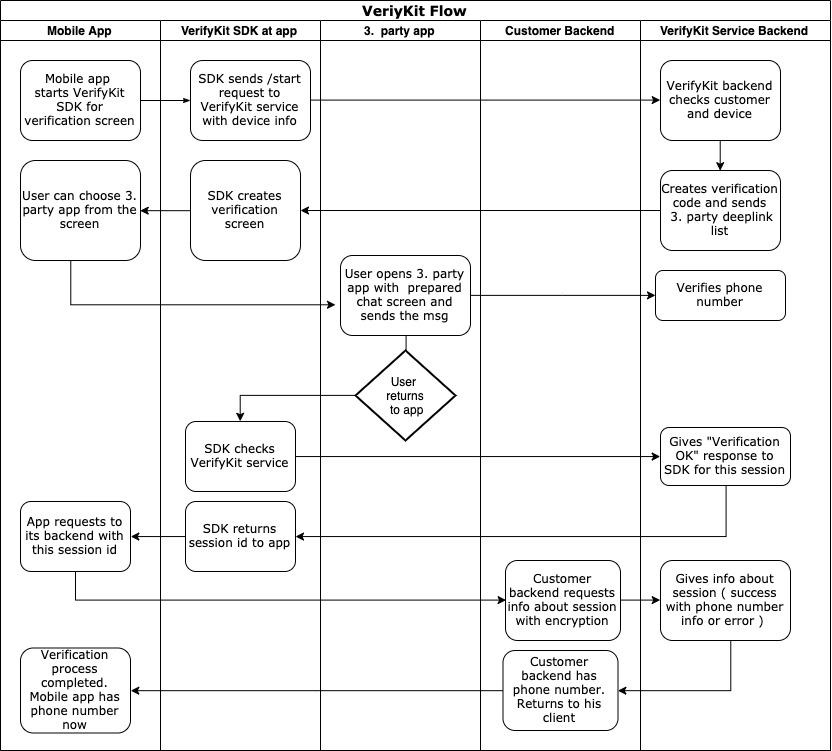
VerifyKit is the next gen phone number validation system. Users can easily verify their phone numbers without the need of entering phone number or a pin code.
- Register your app at https://www.verifykit.com and get your client keys and server key.
- Add VerifyKit SDK to your app
- Configure and start VerifyKit SDK
- When verification is complete, send
sessionIdwhich VeriyfKit SDK gives you to your backend service - At your server side, get user's phone number from VerifyKit service wtih
serverKeyandsessionId. You can check Backend Integration
ServerKey is used for getting info from VerifyKit service.
Please keep ServerKey safe. Do not include it in your client's code base.
- Xcode 12.0+
- iOS 11.0+
You can install framework via CocoaPods.
pod 'VerifyKit'To successfully use the framework, you need to add VerifyKitKey and VerifyKitSecret to your plist file. This step is mandatory.
To open a third party messaging app from your application, you need to add their url schemes to LSApplicationQueriesSchemes key in your plist file. After iOS14, to open Associated Domain URLS in a device which uses a different default browser then Safari, you also need to add https as url scheme.
Open your Info.plist as source code and insert the following XML snippet into the body of your file just before the final </dict> element.
<key>VerifyKitKey</key>
<string>{your-verifykit-key}</string>
<key>VerifyKitSecret</key>
<string>{your-verifykit-secret-key}</string>
<key>LSApplicationQueriesSchemes</key>
<array>
  <string>whatsapp</string>
  <string>telegram</string>
  <string>viber</string>
  <string>https</string>
</array>
After a successful validation with a third party messaging app, the user needs to return to main app. If your application has an Associated Domain, we can add a deeplink to our message for easy and quick redirect.
If you support Associated Domains, please fill out Deeplink field at VerifyKit portal with your domain.
If you don't support Associated Domains, you can enter a custom link with your application's url scheme to Deeplink field, like yourapp://welcome. However, some messaging apps doesn't recognize url schemes as clickable links, so quick redirect may not work in this scenario.
import VerifyKit


let kit = VerifyKit()
let viewController = kit.viewControllerForLogin()
self.present(viewController, animated: true, completion: nil)
You can get the result via VerifyKitDelegate protocol.
viewController.kitDelegate = self

extension ViewController: VerifyKitDelegate {

    func didSuccess(with sessionCode: String) {
        print("VerifyKitDelegate didSuccess with sessionCode:\(sessionCode)")
    }

    func didFail(with error: VerifyKitError) {
        print("VerifyKitDelegate didFail with error:\(error)")
    }
}
VerifyKit only dismisses viewControllerForLogin() automatically when didSuccess delegate is called.
To give user a chance to try other validation methods or to start again, viewControllerForLogin() doesn't get dismissed on didFail. If you want to dismiss it on some specific error type, you can do that manually.
There may be a case when user chooses a third party messaging app for validation, sends a message, but doesn't return to main app and kills it. In that case, that user is verified with VerifyKit but the main app doesn't know it yet.
To fix this, we have a method to check interrupted session status. Using this method is optional and up to you.
VerifyKit will handle the interrupted verification even if you don't implement this method.
VerifyKit.checkInterruptedSession { [weak self] sessionCode in
  guard let sessionCode = sessionCode else {
    // Start VerifyKit flow or do what your app needs
    return
  }

  // You have an interrupted sessionCode from last time.
  // Tell your API.
  print("sessionCode \(sessionCode)")
}let options = VerifyKitOptions(logActive: true)
let kit = VerifyKit(options: options)You can change the settings declared in VerifyKitOptions struct.
public struct VerifyKitOptions {
    var environment: VerifyKitEnvironment = .debug // default
    var logActive: Bool = true // default
    var theme: VerifyKitTheme = VerifyKitTheme()
}

public enum VerifyKitEnvironment {

    /// Stage environment for debug
    case debug

    /// Production environment for distribution
    case release
}

public struct VerifyKitTheme {
    public var appName: String = "VerifyKit"  // default
    public var statusBarStyle: UIStatusBarStyle = .default  // default
    public var navigationBarBackgroundColor: UIColor = UIColor(red: 0.969, green: 0.969, blue: 0.969, alpha: 1.0)  // default
    public var navigationBarForegroundColor: UIColor = .black  // default
    public var showCloseButton: Bool = true // default
}This product includes software(CyrptoSwift) developed by Marcin Krzyzanowski.
Before your app release, please change the VerifyKitEnvironment to 'release' instead of 'debug'.
Depending on the language you use in your backend service, you can use one of the following options.
You can use our php-sdk like this;
$vfk = new \VerifyKit\VerifyKit($serverKey);

/** @var \VerifyKit\Entity\Response $result */
$result = $vfk->getResult($sessionId);

if ($result->isSuccess()) {
    echo "Phone number : " . $result->getPhoneNumber() .
        ", Validation Type : " . $result->getValidationType() .
        ", Validation Date : " . $result->getValidationDate()->format('Y-m-d H:i:s') . PHP_EOL;
} else {
    echo "Error message : " . $result->getErrorMessage() . ", error code : " . $result->getErrorCode() . PHP_EOL;
}
You can use our python-sdk like this;
from VerifyKit import Verify

verify = Verify(server_key="{SERVER-KEY}")
verify.validation(session_id='{SESSION-ID}')

if verify.is_valid:
    #Validation success.
    print(verify.response())

elif verify.is_valid == False:
    #Validation fail.
    print(verify.response())
Or you can use curl request like this;
curl --location --request POST 'https://api.verifykit.com/v1.0/result' \
--header 'X-Vfk-Server-Key:{SERVER-KEY}' \
--header 'Content-Type: application/json' \
--form 'sessionId={{SESSION-ID}}’If you have any questions or requests, feel free to create an issue.
VerifyKit is owned and maintained by VerifyKit DevTeam.
The MIT License
Copyright (c) 2019-2020 VerifyKit. http://verifykit.com
Permission is hereby granted, free of charge, to any person obtaining a copy of this software and associated documentation files (the "Software"), to deal in the Software without restriction, including without limitation the rights to use, copy, modify, merge, publish, distribute, sublicense, and/or sell copies of the Software, and to permit persons to whom the Software is furnished to do so, subject to the following conditions:
The above copyright notice and this permission notice shall be included in all copies or substantial portions of the Software.
THE SOFTWARE IS PROVIDED "AS IS", WITHOUT WARRANTY OF ANY KIND, EXPRESS OR IMPLIED, INCLUDING BUT NOT LIMITED TO THE WARRANTIES OF MERCHANTABILITY, FITNESS FOR A PARTICULAR PURPOSE AND NONINFRINGEMENT. IN NO EVENT SHALL THE AUTHORS OR COPYRIGHT HOLDERS BE LIABLE FOR ANY CLAIM, DAMAGES OR OTHER LIABILITY, WHETHER IN AN ACTION OF CONTRACT, TORT OR OTHERWISE, ARISING FROM, OUT OF OR IN CONNECTION WITH THE SOFTWARE OR THE USE OR OTHER DEALINGS IN THE SOFTWARE.


