单元测试
1. 测试名词
2. 单元测试相关方法论
2.1. 优缺点分析
2.2. TDD 测试驱动开发
2.3. 相关资料
3. Junit测试
3.1. 基本注解
3.2. spring相关测试
3.3. 参考资料
4. testNG
4.1. 基本介绍
4.2. spring相关的使用
4.3. 相关资料
5. Mockito
6. BDDMockito
- 单元测试:单元测试(模块测试)是开发者编写的一小段代码,用于检验被测代码的一个很小的、很明确的功能是否正确。
- 集成测试:集成测试(也叫组装测试,联合测试)是单元测试的逻辑扩展。它最简单的形式是:把两个已经测试过的单元组合成一个组件,测试它们之间的接口。
- 黑盒测试:被测程序看成是一个无法打开的黑盒,而工作人员在不考虑任何程序内部结构和特性的条件下,根据需求规格说明书设计测试实例,并检查程序的功能是否能够按照规范说明准确无误的运行。
- 白盒测试:借助程序内部的逻辑和相关信息,通过检测内部动作是否按照设计规格说明书的设定进行,检查每一条通路能否正常工作。白盒测试是从程序结构方面出发对测试用例进行设计。其主要用于检查各个逻辑结构是否合理,对应的模块独立路径是否正常以及内部结构是否有效。
- 冒烟测试:是在软件开发过程中的一种针对软件版本包的快速基本功能验证策略,并非对软件版本包的深入测试,是针对软件版本包进行详细测试之前的预测试,执行冒烟测试的主要目的是快速验证软件基本功能是否有缺陷。
- 回归测试:指修改了旧代码后,重新进行测试以确认修改没有引入新的错误或导致其他代码产生错误。自动回归测试将大幅降低系统测试、维护升级等阶段的成本。
- 金丝雀测试:在金丝雀测试中,金丝雀是一小群体验最新软件更新的用户,他们的反馈可帮助开发团队决定是否应向所有用户提供新版本,或者更改应快速回滚,方法的名字来自过去在煤矿中用作有毒气体探测器的金丝雀鸟。 。金丝雀测试、金丝雀释放和金丝雀部署概念类似。
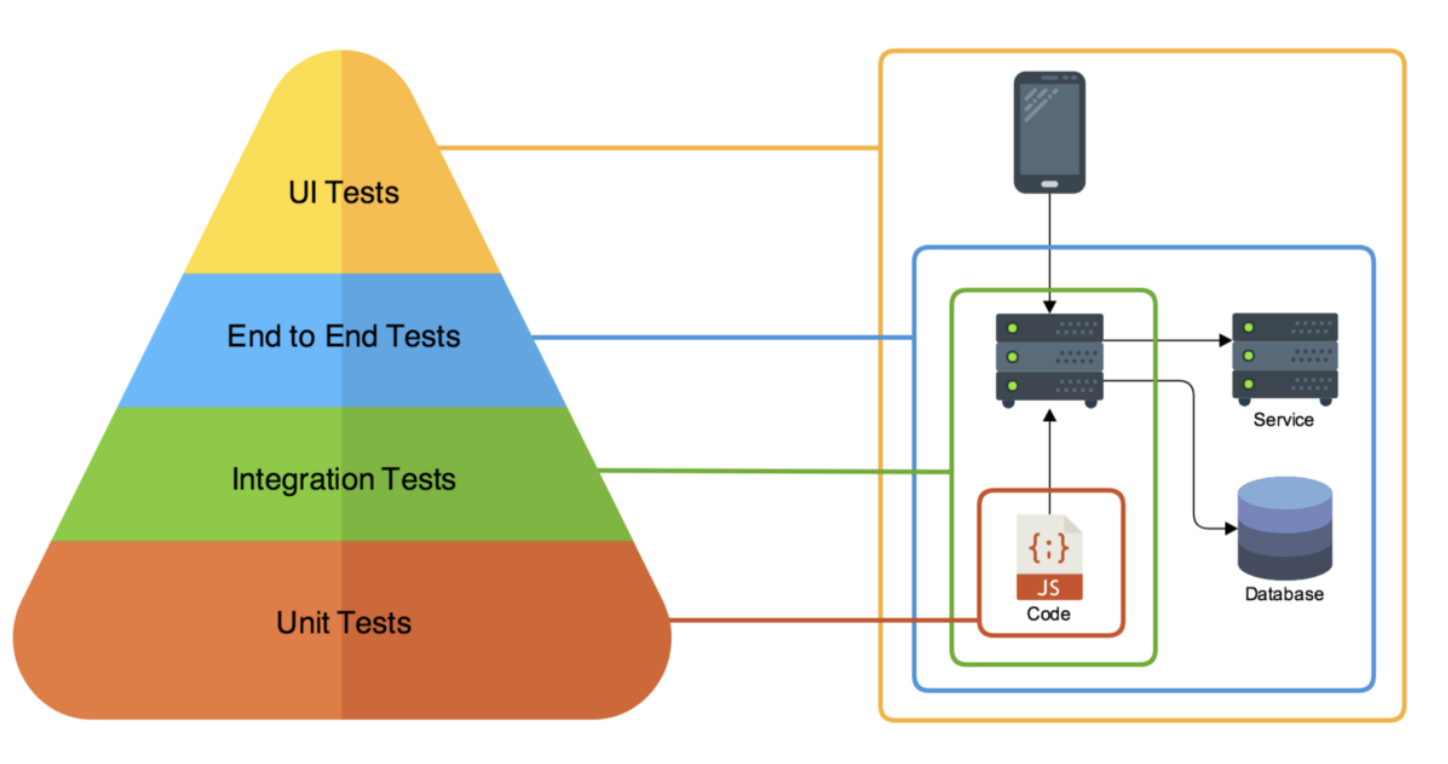
测试金字塔里的单元测试:
优点:
- 开发人员:
- 尽早发现缺陷,降低开发投入成本。开发人员可以快速验证他们所写代码,及早地发现代码中的问题。
- 新人融入。通过让新入职员工结合文档和运行单元测试,可以更快了解代码逻辑。
- 利于重构。通过单元测试,开发可以放心的修改重构代码,减少改代码时心理负担,提高重构的成功率。因为重构的代码通过单元测试,说明与原有逻辑一致。
- 改善设计。越是良好设计的代码,越容易编写单元测试,如果发现单测代码非常难写,一般表明被测试的代码包含了太多的依赖或职责,需要反思代码的合理性,进而推进代码设计的优化,形成正向循环。
- 其他方面;
- 单元测试触发快,每次项目构建可以触发run单元测试,保证每次发布修改不影响先前代码。
- 单元测试可以集成到代码合并流程里。在代码合并到发布分支之后,通过运行单元测试,保证分支代码的正确性再合并到master。
-
一般的流程是这样的:保护好“master”分支,不允许开发人员向该分支提交代码,而是让他们把代码提交到其他分支上。在将代码合并到 master 分支的时候,GitHub 要求先通过状态检查。Jenkins、CircleCI 和 TravisCI 都提供了状态检查钩子(hook),它们会从分支上获取代码并运行单元测试。如果通过了,就允许合并代码,否则就不允许。
-
缺点:
- 开发的工作量变大。开发人员除了功能代码的开发外,还需要编写单元测试代码。
- 系统维护的工作量变大。随着项目复杂,代码量越来越大,单元测试的代码量也会越来越大。开发人员在维护系统代码的时候,也需要维护单元测试代码,加大开发人员的工作量。
TDD = TFD + Refactoring (TFD -- Test First Development)
TDD是测试驱动开发(Test-Driven Development)的英文简称,是敏捷开发中的一项核心实践和技术,也是一种设计方法论。
TDD的基本思路就是通过测试来推动整个开发的进行,要求开发人员在开发具体的功能代码之前,先编写方法对应的测试用例。
问题解释: TDD开发应该达到100%的单元测试覆盖率?
- TDD开发,首先就要保证单元测试的速度。如果单元测试包括了全部的数据库测试、redis缓存测试、ES等中间件功能的测试,那么在测试过程中就需要启动嵌入式的数据库等的中间件,导致整体的单元测试速度变慢。
- 单元测试代码应该着重于测试逻辑代码,对于DAO、外部接口使用mock的形式进行测试,才能保证单元测试的速度。
- 中间件功能的测试,不仅启动的时间慢,而且会耗费开发人员过多的精力到相关的测试中。 因此,TDD保证100%的单元测试覆盖率是不对的。满足逻辑代码100%覆盖即可,剩余的数据获取及中间件功能交互应留到集成测试中进行。
参考资料:
JUnit是一个Java编程语言编写的单元测试框架。需要区分的是Junit的版本,在Junit5中做了很多的改变。以下主要基于Junit4进行的说明。
//@BeforeClass 使用此注解的方法在测试类被调用之前执行
//@AfterClass 使用此注解的方法在测试类被调用结束退出之前执行
//一个类中有多少个@Test注解方法,以下对应注解方法就被调用多少次
//@Before 在每个@Test调用之前执行
//@After 在每个@Test调用之后执行
//@Test 使用此注解的方法为一个单元测试用例,一个测试类中可多次声明,每个注解为@Test只执行一次
//@Ignore 暂不执行的测试用例,会被JUnit4忽略执行


@Slf4j
public class JunitDemo {

    @BeforeClass
    public static void beforeClass() {
        log.info("this is beforeClass method");
    }

    @Before
    public void setUp() {
        log.info("this is before method");
    }


    @Test
    public void testDemo() {
        log.info("hello junit world~");
    }


    @Test(expected = ArithmeticException.class)
    public void testException() {
        log.info(String.valueOf(123123/0));
    }

    @Test(timeout = 2000)
    public void testTimeout() throws InterruptedException {
        TimeUnit.SECONDS.sleep(1);
    }

    @Ignore
    public void testIgnore(){
        log.info("this is ignore method");
    }

    @After
    public void finish() {
        log.info("this is after method");
    }

    @AfterClass
    public static void afterClass(){
        log.info("this is afterClass method");
    }
}启动spring容器相关注解
@SpringBootTest注解: 告诉Spring Boot查找一个主要的配置类(例如,一个带有@SpringBootApplication的类),并使用该类来启动Spring应用程序上下文。
- webEnvironment=RANDOM_PORT: 使用webEnvironment = RANDOM_PORT可以使用随机端口启动服务器(用于避免测试环境中的冲突),并使用@LocalServerPort注入端口。
@AutoConfigureMockMvc: 使用Spring的MockMvc,并通过在测试用例上使用@AutoConfigureMockMvc注释,要求为测试用力注入该代码MockMvc代码。
@WebMvcTest : 在测试中,Spring Boot仅实例化了Web层,而不是整个上下文。 在具有多个控制器的应用程序中,甚至可以使用例如@WebMvcTest(HomeController.class)来仅请求实例化一个。
可以加快整个applicaiton的启动速度,因为该注解只指定扫描了部分annotation
@Runwith(SpringRunner.class): 说明了改测试用例要在什么环境下进行测试,在Junit4中需要将@RunWith(SpringRunner.class)添加到测试中,否则注释将被忽略。如果使用的是JUnit 5,则无需添加等效的@ExtendWith( SpringExtension.class)(如@SpringBootTest)和其他@…Test注释已使用它进行注释。
-
@ExtendWith( SpringExtension.class) 暂时未研究,主要是@Runwith的拓展类提供能力的增强,应用于Junit5中。
@MockBean:可用于为ApplicationContext中的bean定义Mockito模拟
@DirtiesContext:Spring @DirtiesContext从与测试关联的上下文缓存中删除脏的ApplicationContext
测试用例demo
@AutoConfigureMockMvc
@ActiveProfiles(profiles = "test")
@SpringBootTest(classes = UnitTestApplication.class,
        webEnvironment = SpringBootTest.WebEnvironment.RANDOM_PORT)
@RunWith(SpringRunner.class)
public class JunitSpringTestDemo {

    @LocalServerPort
    private int port;

    @Autowired
    private UnitTestService unitTestService;

    @MockBean
    private TransactionTemplate transactionTemplate;

    @Before
    public void setUp() {

    }

    @Autowired
    private TestRestTemplate restTemplate;

    @Test
    public void greetingShouldReturnDefaultMessage() throws Exception {
        String forObject = this.restTemplate.getForObject("http://localhost:" + port + "/learning/unit/one", String.class);
        System.out.println(forObject);
    }

    @Autowired
    private MockMvc mockMvc;

    @Test
    public void shouldReturnDefaultMessage() throws Exception {
        this.mockMvc.perform(get("/unit/one"))
                .andDo(print())
                .andExpect(status().isOk())
                .andExpect(content().string(containsString("one")));
    }

    @Test
    public void testTemplate() {
        String s = unitTestService.testJdbcTemplate();
        Assert.assertEquals("return result should be bbb", "bbb", s);
    }
}- spring boot 单元测试官网文档全说明
- spring test guides
- baeldung spring-boot test
- spring boot Test Auto-configuration Annotations
TestNG不是一个JUnit扩展。它的灵感来源于JUnit。它的目的是优于JUnit的,尤其是当测试集成的类 -与UnitTest比较
使用套件,指定某几个test中的group 为一个套件。在IDEA中直接运行xml文件,可以执行套件的测试。
<!DOCTYPE suite SYSTEM "https://testng.org/testng-1.0.dtd" >
<suite name="testng-demo">
    <test name="testGroup1">
        <parameter name="dbconfig" value="db.properties!~" />
        <parameter name="poolsize" value="10" />
        <groups>
            <run>
                <include name="group1"/>
            </run>
        </groups>
        <classes>
            <class name="TestNGDemo"/>
        </classes>
    </test>

    <test name="testGroup2">
        <groups>
            <run>
                <include name="group2"/>
            </run>
        </groups>
        <classes>
            <class name="TestNGDemo"/>
        </classes>
    </test>
</suite>- 基本注解使用的demo
@Slf4j
public class TestNGDemo {

    @BeforeSuite(groups = "group1")
    public void testBeforeSuite() {
        log.info("testBeforeSuite()");
    }

    @AfterSuite(groups = "group1")
    public void testAfterSuite() {
        log.info("testAfterSuite()");
    }

    @BeforeClass
    public void setup(){
        log.info("this is beforeClass");
    }

    @AfterClass
    public void shutdown(){
        log.info("this is AfterClass");
    }

    @BeforeMethod
    public void testBeforeMethod(){
        log.info("this is beforeMethod");
    }

    @AfterMethod
    public void testAfterMethod(){
        log.info("this is afterMethod");
    }

    @BeforeGroups("group1")
    public void setupGroup1() {
        log.info("setupGroup1()");
    }

    @AfterGroups("group1")
    public void cleanGroup1() {
        log.info("cleanGroup1()");
    }


    @Test(groups = "group1")
    public void test1() {
        log.info("this is test1");
    }

    @Test(groups = "group1", expectedExceptions = ArithmeticException.class)
    public void testException() {
        log.info("this is test2");
        int i = 1 / 0;
        log.info("After division the value of i is :"+ i);
    }

    @Test(enabled = false)
    public void testIgnoreTestcase() {
        log.info("~~~~~~~~~~~~~~~~~ignore ");
    }

    @Test(groups = "group2", timeOut = 5000) // time in mulliseconds
    public void testThisShouldPass() throws InterruptedException {
        Thread.sleep(4000);
    }

    @Test(groups = "group1", dependsOnMethods = "test1")
    public void testDependOn() {
        log.info("this is dependOnMethod~");
    }

    @Test(groups = "group1")
    @Parameters({ "dbconfig", "poolsize" })
    public void createConnection(String dbconfig, int poolsize) {
        log.info("this is parameter Test, parameter is: {}, {}", dbconfig, poolsize);
    }

    @Test(groups = "group2", dataProvider = "addDataProvider")
    public void testDataProvider( String data) {
        log.info("this is testDataProvider, test data: {}",data);
    }

    @DataProvider
    public Iterator<Object> addDataProvider() {
        List<Object> list = Lists.newArrayList();
        list.add("123");
        list.add(("123wesdf"));
        return list.iterator();
    }
}通过extends AbstractTestNGSpringContextTests提供一个测试使用的spring 上下文,类似于Junit4中@RunWith(SpringExtend)
AbstractTestNGSpringContextTests is an abstract base test class that integrates the Spring TestContext Framework with explicit ApplicationContext testing support in a TestNG environment. When you extend AbstractTestNGSpringContextTests, you can access a protected applicationContext instance variable that you can use to perform explicit bean lookups or to test the state of the context as a whole.
Mockito 主要用来辅助编写测试用例的。比如在微服务中的跨服务调用,在单个服务的单元测试中跨服务调用是不可能成功的,因为另外一个服务未启动,这是用就要使用mock 的方式,模拟服务请求返回的情形。
- 以下为一个demo,在Mockito最常用的都是spy一个实例,在该实例调用某种方法是Mock回预期的结果。
@Slf4j
@AutoConfigureMockMvc
@ActiveProfiles(profiles = "test")
@SpringBootTest(classes = UnitTestApplication.class,
        webEnvironment = SpringBootTest.WebEnvironment.RANDOM_PORT)
@RunWith(SpringRunner.class)
public class MockitoTestDemo {

    @Autowired
    private UnitTestService unitTestService;

    @Test
    public void test() {
        UnitTestService spy = Mockito.spy(unitTestService);
        Mockito.when(spy.testSql()).thenReturn("fadsfasdfasdf");
        String result = spy.testSql();
        log.info(result);   // return fadsfasdfasdf

        Mockito.when(spy.testParameter(Mockito.anyInt(),
                        Mockito.anyString(),
                        Mockito.any(),
                        Mockito.anyList(),
                        Mockito.anyMap()))
                .thenReturn("mock success");

        String res = spy.testParameter(1, "sddf", BigDecimal.ZERO, new ArrayList<>(), new HashMap<>());
        log.info(res);
    }
}
相关资料:
BDDMockito对比Mockito可以使用BDDMockito为各种Mockito方法提供BDD别名,代码看起来更易理解。
结合Testng的注解@BeforeClass,可以在一个测试用例类中直接把需要Mock的类方法及预期的返回值,设置好
-
Junit4中@BeforeClass,要求方法体内要为静态的。
-
BDDMockito 对于Mock类提供更为简便的表达
-
testng中对于@MockBean 需要配合使用
@TestExecutionListeners(MockitoTestExecutionListener.class)
@Slf4j
@ActiveProfiles(profiles = "test")
@SpringBootTest(classes = UnitTestApplication.class,
        webEnvironment = SpringBootTest.WebEnvironment.RANDOM_PORT)
@TestExecutionListeners(MockitoTestExecutionListener.class)
public class BDDMockitoTestDemo extends AbstractTestNGSpringContextTests {

    @MockBean
    UnitInterface unitInterface;

    @BeforeClass
    public void setup() {
        given(unitInterface.register(anyString())).willReturn("register success");
        given(unitInterface.calculate(anyDouble())).willThrow(new IllegalArgumentException());
    }

    @Test(expectedExceptions = IllegalArgumentException.class)
    public void test(){
        BigDecimal calculate = unitInterface.calculate(123.112d);
        log.info(String.valueOf(calculate));
    }
}
