如果帮到您请给个 star ✨✨✨,您的 star 是我最大的鼓励!
| 分类 | P | R | mAP0.5 |
|---|---|---|---|
| 总体 | 0.884 | 0.899 | 0.888 |
| 人体 | 0.846 | 0.893 | 0.877 |
| 头 | 0.889 | 0.883 | 0.871 |
| 安全帽 | 0.917 | 0.921 | 0.917 |
对应的权重文件:百度云,提取码: b981
| 分类 | P | R | mAP0.5 |
|---|---|---|---|
| 总体 | 0.886 | 0.915 | 0.901 |
| 人体 | 0.844 | 0.906 | 0.887 |
| 头 | 0.9 | 0.911 | 0.9 |
| 安全帽 | 0.913 | 0.929 | 0.916 |
对应的权重文件:百度云,提取码: psst
| 分类 | P | R | mAP0.5 |
|---|---|---|---|
| 总体 | 0.892 | 0.919 | 0.906 |
| 人体 | 0.856 | 0.914 | 0.897 |
| 头 | 0.893 | 0.913 | 0.901 |
| 安全帽 | 0.927 | 0.929 | 0.919 |
对应的权重文件:百度云,提取码: a66e
首先确保自己的环境:
pip install -i https://pypi.douban.com/simple/ --trusted-host=pypi.douban.com/simple -r requirements.txt
修改文件 data/custom_data.yaml
# 训练集和验证集的 labels 和 image 文件的位置
train: ./score/images/train
val: ./score/images/val

# number of classes
nc: 3

# class names
names: ['person', 'head', 'helmet']
生成的 .txt 文件放置的名字是图片的名字,放置在 label 文件夹中,例如:
./score/images/train/00001.jpg  # image
./score/labels/train/00001.txt  # label
生成的 .txt 例子:
1 0.1830000086920336 0.1396396430209279 0.13400000636465847 0.15915916301310062
1 0.5240000248886645 0.29129129834473133 0.0800000037997961 0.16816817224025726
1 0.6060000287834555 0.29579580295830965 0.08400000398978591 0.1771771814674139
1 0.6760000321082771 0.25375375989824533 0.10000000474974513 0.21321321837604046
0 0.39300001866649836 0.2552552614361048 0.17800000845454633 0.2822822891175747
0 0.7200000341981649 0.5570570705458522 0.25200001196935773 0.4294294398277998
0 0.7720000366680324 0.2567567629739642 0.1520000072196126 0.23123123683035374
图片放在:./score/images/train 标签放在:./score/labels/train
标签.txt 文件放置的名字是图片的名字,放置在 label 文件夹中,例如:
./score/labels/train/00001.txt 例子: 类别 X1 Y1 X2 Y2 1 0.1830000086920336 0.1396396430209279 0.13400000636465847 0.15915916301310062 1 0.5240000248886645 0.29129129834473133 0.0800000037997961 0.16816817224025726 1 0.6060000287834555 0.29579580295830965 0.08400000398978591 0.1771771814674139 1 0.6760000321082771 0.25375375989824533 0.10000000474974513 0.21321321837604046 0 0.39300001866649836 0.2552552614361048 0.17800000845454633 0.2822822891175747 0 0.7200000341981649 0.5570570705458522 0.25200001196935773 0.4294294398277998 0 0.7720000366680324 0.2567567629739642 0.1520000072196126 0.23123123683035374
这里选择了 yolov5s 模型进行训练,权重也是基于 yolov5s.pt 来训练
python train.py --img 640 --batch 16 --epochs 10 --data ./data/custom_data.yaml --cfg ./models/custom_yolov5.yaml --weights ./weights/yolov5s.pt侦测图片会保存在 ./inferenct/output/ 文件夹下
运行命令:
python detect.py --source   0  # webcam
                            file.jpg  # image
                            file.mp4  # video
                            path/  # directory
                            path/*.jpg  # glob
                            rtsp://170.93.143.139/rtplive/470011e600ef003a004ee33696235daa  # rtsp stream
                            http://112.50.243.8/PLTV/88888888/224/3221225900/1.m3u8  # http stream
例如使用我的 s 权重检测图片,可以运行以下命令,侦测图片会保存在 ./inferenct/output/ 文件夹下
python detect.py --source 图片路径 --weights ./weights/helmet_head_person_s.pt侦测图片会保存在 ./inferenct/output/ 文件夹下
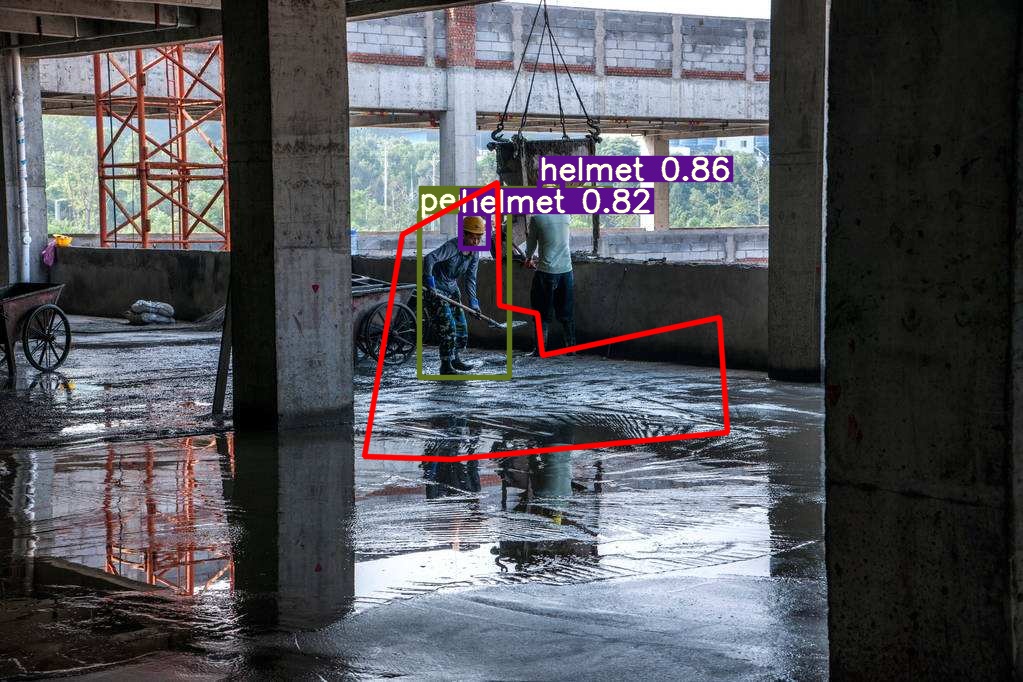
运行命令:
python area_detect.py --source ./area_dangerous --weights ./weights/helmet_head_person_s.pt如果帮到您请给个 star ✨✨✨,您的 star 是我最大的鼓励!


