Most computation runs on PC or laptop, and send command to the robot through wifi. You can test it in gazebo simulation without building real robot.
- ROS-kinetic(for Ubuntu 16) or ROS-melodic(for Ubuntu 18)
sudo apt install gazebo7 libgazebo7-dev -y(for Ubuntu 16) orsudo apt install gazebo9 libgazebo9-dev -y(for Ubuntu 18)
I use ROS-melodic and gazebo9 on Ubuntu 18.04. I think it's compatible with ROS-kinetic.
mkdir ~/catkin_ws/src -p
cd ~/catkin_ws/src
git clone https://github.com/hyansuper/spotmicro.git
cd ..
catkin_make
This is optional, only if you have built the physical robot; otherwise you can just test the robot in simulation.
Flash onto SD card the Ubiquity Robotics image(my test is the 2019-02-19 version), and set up the system as instructed, then log into Raspberry pi
sudo apt-get install libi2c-dev -y
cd ~/catkin_ws/src
git clone --branch rpi https://github.com/hyansuper/spotmicro.git
cd ..
catkin_make
chmod +x src/spotmicro/pi_ros_remote.sh
roslaunch spotmicro bringup.launch mode:=[rviz/sim/pi] gait:=[walk/discontinuous]
rostopic pub -r 3 /cmd_vel [tab][tab]
... x: 0.02 ...
to launch it in RViz animation(the default), gazebo simulation or bring up the real robot. With gazebo simulation, you have to manually place the robot to origin(see README.txt in the motion_control folder).
To bring up the real robot, you may need to customize spotmicro/pi_ros_remote.sh file on Raspberry pi and spotmicro/spotmicro/launch/machine.launch file on your PC.
I implemented two gaits. The walk gait looks more natrual, while discontinuous gait is more stable.
/cmd_vel: control angular and linear velocity just like the turtlesim program./cmd_pose: control the pose(RPY and body heigt) of the body.
You can run the following to control the robot with a Logitech F710 gamepad. The gamepad node will publish msg to the above topics(see README.md in the spotmicro_teleop folder).
roslaunch spotmicro_teleop gamepad.launch
Also, some parameters about the gait can be dynamically reconfigured
rosrun rqt_reconfigure rqt_reconfigure
/servo_pwm: the Int32MultiArray msg has a data field, specifying the board, channel and PWM signal for each servo. you can subcribe to this topic and send PWM signal to each servo using ESP32 or Raspberry Pi as controller. The default update rate is 30 hz.
The following is the pseudo code for the controller:
for(i=0; i<msg.data.size(); i+=3):
	board = msg.data[i]
	channel = msg.data[i+1]
	pwm_value = msg.data[i+2]
	pwm.set_address(board)
	pwm.set_pwm(channel, 0, pwm_value)
The servo_driver node of the servo_driver pkg in the rpi branch is an implementation of the above controller.
See instructions on Thingivers by KDY0523.
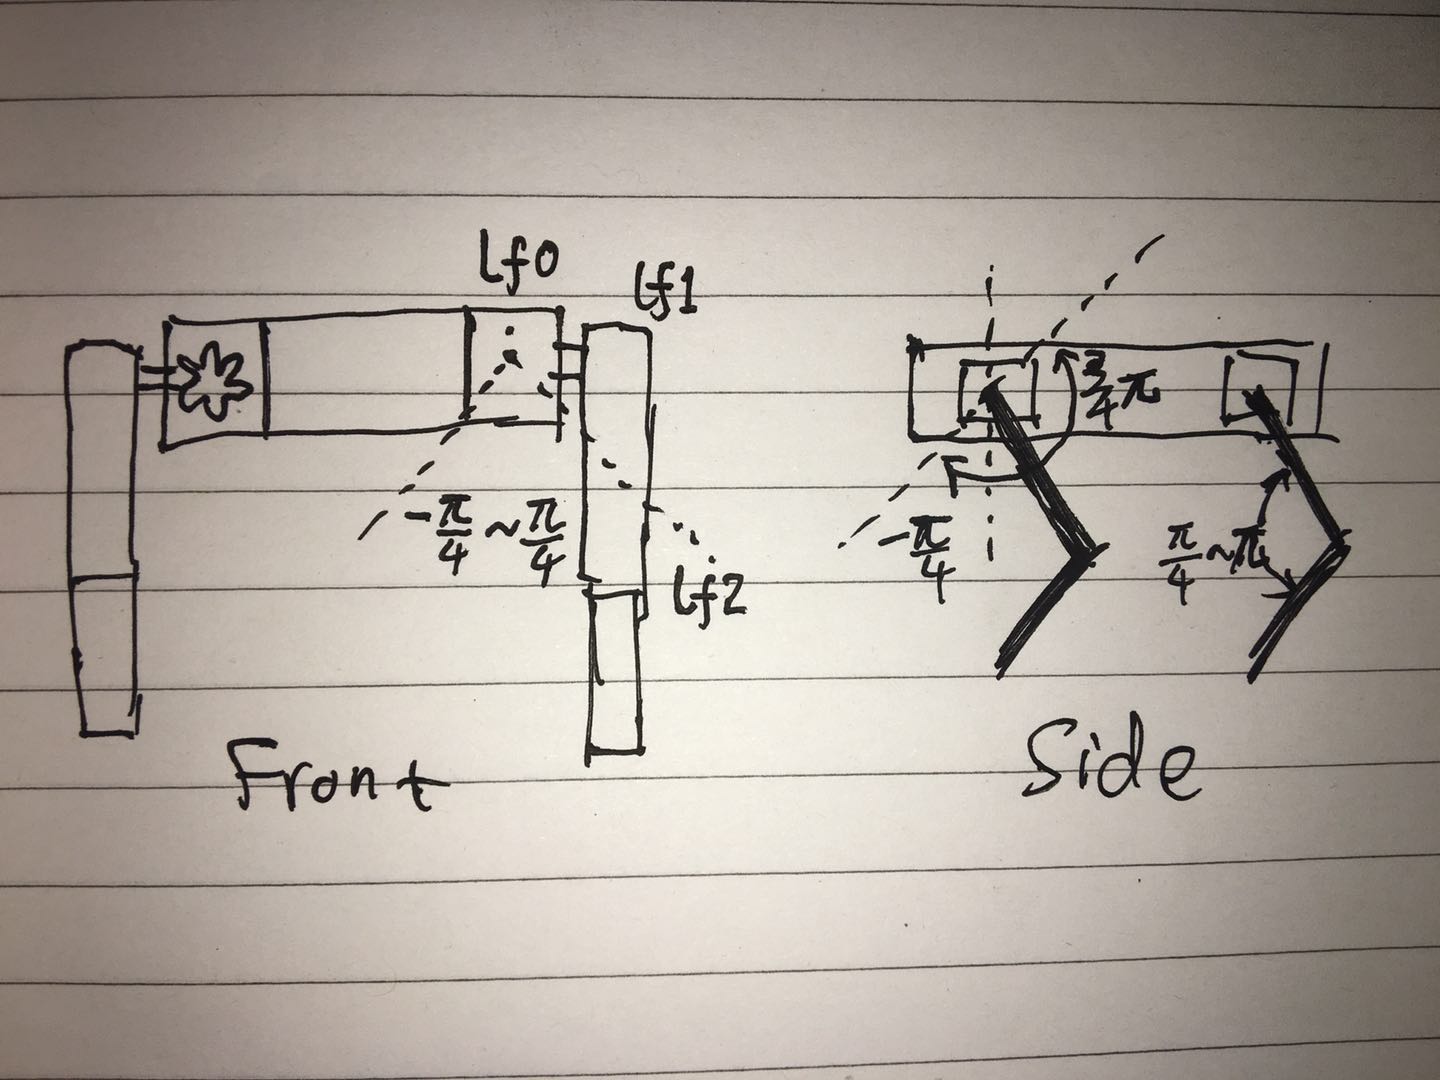
I use 180 degree 996R servos. You need install the servos so that their rotation workspace is within the range as following:

roslaunch spotmicro config_servo.launch
In the config_servo_gui window, for each servo, pwm_start and pwm_end is mapped to min_pos(angle lower limit) and max_pos(angle upper limit).
- set for each servo which servo controller board and which channel it's connected to.
- check the checkbox to enable the lf0 servo(the first servo of the left font leg), adjust
pwm_startandpwm_endfield until you see fit. when you are done configuring one servo, you can test it by typing in the angle field(radian) and hit Enter(not the Enter on numpad) to see if the servo goes to the desired position. - then continue configuring all the other servos.
when you are done configuring servos, run the following to save your configuration before closing the config_servo_gui window!
rosparam dump ~/catkin_ws/src/spotmicro/spotmicro/config/servo_config.yaml /servo_pwm_controller/servo_config
- The walking gait looks good on simulation, but does not perform well on real robot. The main reason I think is the robot is not rigid enough. The shoulder(or pelvis) has the weakest point. (I don't mean that I am able to design/remix a better model than the original)
- The 996R servos works but they may not be powerful or accurate enough. the maker of SpotMicro, KDY0523, has updated the design and use more powerful servos.
Deok-yeon Kim creator of SpotMicro