Python MineOS App Market Server Reimplementation
Python re-implementation of the server side of the MineOS App Market
Ensure Python 3 is installed on your computer, and use pip to install this project with the command listed below:
pip install git+https://github.com/CoolCat467/MineOS-Market-Server.gitRun the server:
mineos_market_serverGo to URL http://<IP_of_host>:3004
On default, the web server is hosted on port 3004.
This can be changed in the configuration file (more info below)
If you need to stop the server, use Ctrl+C to shut it down cleanly.
Important Note: If you don't enable SSL support, login credentials are sent to server in clear text!
To use the server with the official app market client, you will need to modify the official app market client's code to point to where you are hosting this server from, instead of the official servers.
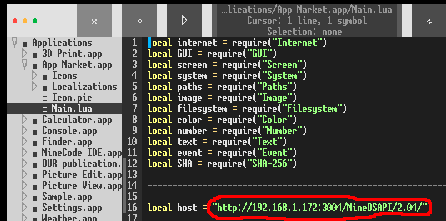
To do this, use the built-in MineCode IDE application, go to
Applications > App Market.app > Main.lua, and at the time of writing
at least close by the top of the file you should see a line saying something like
local host = "http://mineos.buttex.ru/MineOSAPI/2.04/"You will need to change this to the address of the server, for example:
local host = "http://localhost:3004/MineOSAPI/2.04/"If you enable SSL support, you can make it https instead of http!
If you are hosting the server locally, you will need to allow opencomputers to access "private" IP addresses.
Edit your opencomputers configuration file (usually located at .minecraft/config/opencomputers/settings.conf),
and close to line 675 or so you need to change deny private to allow private,
otherwise you will encounter the "Address is not allowed" issue.
Because this is a fresh, squeaky clean version of the app market. So fresh that the client
crashes because of a bug in the way zero publications are handled on the overview screen.
If you would like to use a backup of the records from the original server, simply replace
the files from the backups directory at the root of this repository in the server's records
folder. Make sure the server is not running when you replace the files, as records are stored in-memory
and written back to the records folder on shutdown to reduce latency. Record folder location given below.
Configuration file locations follow the XDG Base Directory Specification.
Main configuration file lives at $XDG_CONFIG_HOME/mineos_market_webserver/config.toml, or $HOME/.config/mineos_market_webserver/config.toml if unset.
In the main configuration file you can change things like what port(s)
the webserver is hosted on, hypercorn configuration, and enabling
SSL support!
Database records live in $XDG_DATA_HOME/mineos_market_webserver/records/, or $HOME/.local/share/mineos_market_webserver/records/ if unset.
ids.jsonis for remembering what the next ID for publications and reviews should be.login.jsonis for remembering login token -> username associations that expire after some time.messages.jsonis for remembering messages sent between users.publications.jsonis for remembering publication data.reviews.jsonis for remembering reviews on publications and votes on reviews.users.jsonis for remembering user data. Passwords are hashed with sha3_256.
If you would like to enable SSL support, it's a bit tricky but it's doable, successfully tested in production, and completely free!
- Make sure your internet router is set to have the machine running the webserver to have a static ip address. This does not need to be a publicly accessible ip address.
- Create a free account with duckdns
- Add a domain with a name of your choice and set the ip to the static ip address of the machine running the webserver.
- Install certbot on the machine running the webserver.
(https://certbot.eff.org/instructions)
When it asks
software, tell themother. For my installation, I ended up installing it with pip. - Install the certbot duckdns plugin for certbot
- Either run certbot from duckdns plugin's README or run /scripts/cert_create.sh with your details.
- Setup autorenewal from certbot wiki or look at /scripts/cert_renew.sh
- Uncomment SSL lines in the webserver configuration file (see section above) and edit as needed for your particular setup.


