The description of the coursework may be updated from time to time to add clarifications or fix mistakes. We encourage you to regularly check this repository for changes.
- Part 1 (parser): Friday, 4 February 2022 at 5pm, weight = 20%
- Part 2 (ast builder + semantic analyser): Friday, 25 February 2022 at 5pm, weight = 20%
- Part 3 (code generator): Friday, 18 March 2022, at 5pm, weight = 20%
- Part 4 (register allocator): Friday 8 April 2022, at 5pm, weight = 20%
- Part 5 (advanced topic): Friday 29 April 2022, at 5pm, weight = 20%
Specific instructions for each part can be found above by clicking on the part name.
As a reminder, this project is conducted individually. Cheating is a serious offense and all suspected cases will be reported to the faculty. We will run a plagiarism detection software that will check your code for similarities with submissions from other students form this year, and past years!
This software is able to identify similarities at a structural level. Adding whitespaces, renaming variables or moving pieces of code around will not defeat the detection software. So please refrain from the temptation of copying code from other sources; all the code in your repository should be written by you, and you alone.
Finally, you are also responsible for making sure that your code is not shared with anyone else (even after you are done with this course). If similar code is found between two (or more) students, we will not try to figure out who copied on who and will report all students involved.
We automatically run a series of test programs using your compiler about twice a day. You can keep track of your progress and see how many tests pass/fail using the scoreboard (link will be available on the course website). The scoreboard is provided as a best effort service, do not rely on it as it may come down unexpectedly:no guarantees are offered.
If you use CS department lab machines, all the software requires to develop your compiler should be already installed. If you wish to develop using your own machine, you will need to ensure that you have the following software installed. Just note that we officially only offer support for Linux, and in particular Ubuntu, the system installed on the CS lab machines. However, we will do our best to help you out in case you encounter any trouble setting your machine, via the ED discussion forum.
Note that if you are using Linux (e.g. Ubuntu, Fedora, OpenSuse, ...), the software should be directly available from your distribution package manager and you don't need to manually install it.
You can test if you already have Java development kit installed by typing:
javac -version
If this returns a version equals to, or higher than 11, then you are good to go. Otherwise, follow the link below for instructions on how to install manually the JDK 11 (feel free to install any newer version if you wish to):
In this course, we will use Apache Ant as the build system. Again, if you are using a CS lab machine, this software should already be installed. If you are using your machine, you can test if the software is there by typing:
ant -version
Any recent-enough (i.e. less than 5 years old) version should do. In case Ant is not installed on your system, you can install it manually following these instructions:
To test if git is already installed on your machine, type:
git --version
If this is not the case, you can follow this link with instructions on how to install git:
The marking will be done using an automated test suite on a Linux machine using Java 11.
Please note that you are not allowed to modify the Main.java file which is the main entry point to the compiler.
The Main.java will be replaced by our own when we run the automarker.
Also make sure that the build script provided remains unchanged so that your project can be built on our machine.
Furthermore, the use of any external libraries is forbidden.
In case of doubt, ask us on the online forum.
For all parts of the coursework, the marking will be a function of the number of successful tests as shown in the scoreboard and a series of hidden tests.
2/3 (66.6%) of the mark will be determined by the scoreboard tests and 1/3 (33.3%) will be determined by the hidden tests. You will get 1 point for each passing test, and -1 for each failing test (only for the lexer, parser and semantic analysis components). Then, the mark is calculated by dividing the number of points achieved by the number of tests. The hidden tests are marked independently from the visible ones.
Although we do not mark you on the tests you will create for testing your own compiler, we do ask you to add all the tests you used into the tests folder of your repository.
If we find students that do not have any tests (or very few), and they managed to pass most of our tests, this will raise suspicion that this might be a case of academic misconduct.
Also make sure that you do not share your tests as they should be written by yourself alone (we will run plagiarism detection software on all the code, including the tests, that are in your repository).
First, we will need you fill up this form
in order for us to register you for the automarking.
If you are not registered, we won't be able to mark you.
Also please make sure to keep comp520-coursework-w2022 as your repository name, otherwise the automarer will fail and you will receive a zero.
We will rely on gitlab and it is mandatory to use it for this coursework. GitLab is an online repository that can be used with the git control revision system. The CS department runs a GitLab hosting service, and all students should be able to access it with their CS account.
Important: do not share your code and repository with anyone and keep your source code secret. If we identify that two students have identical portion of code, both will be considered to have cheated.
We are going to be using the Git revision control system during the course. If you use your own machine then make sure to install Git.
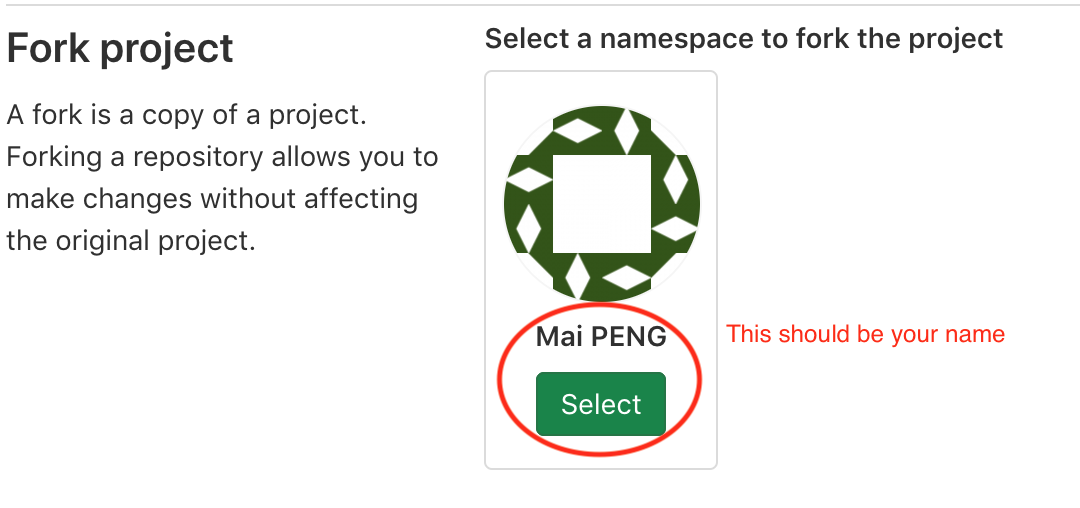
You will need to have your own copy of the project's repository. In order to fork this repository, click the fork button:
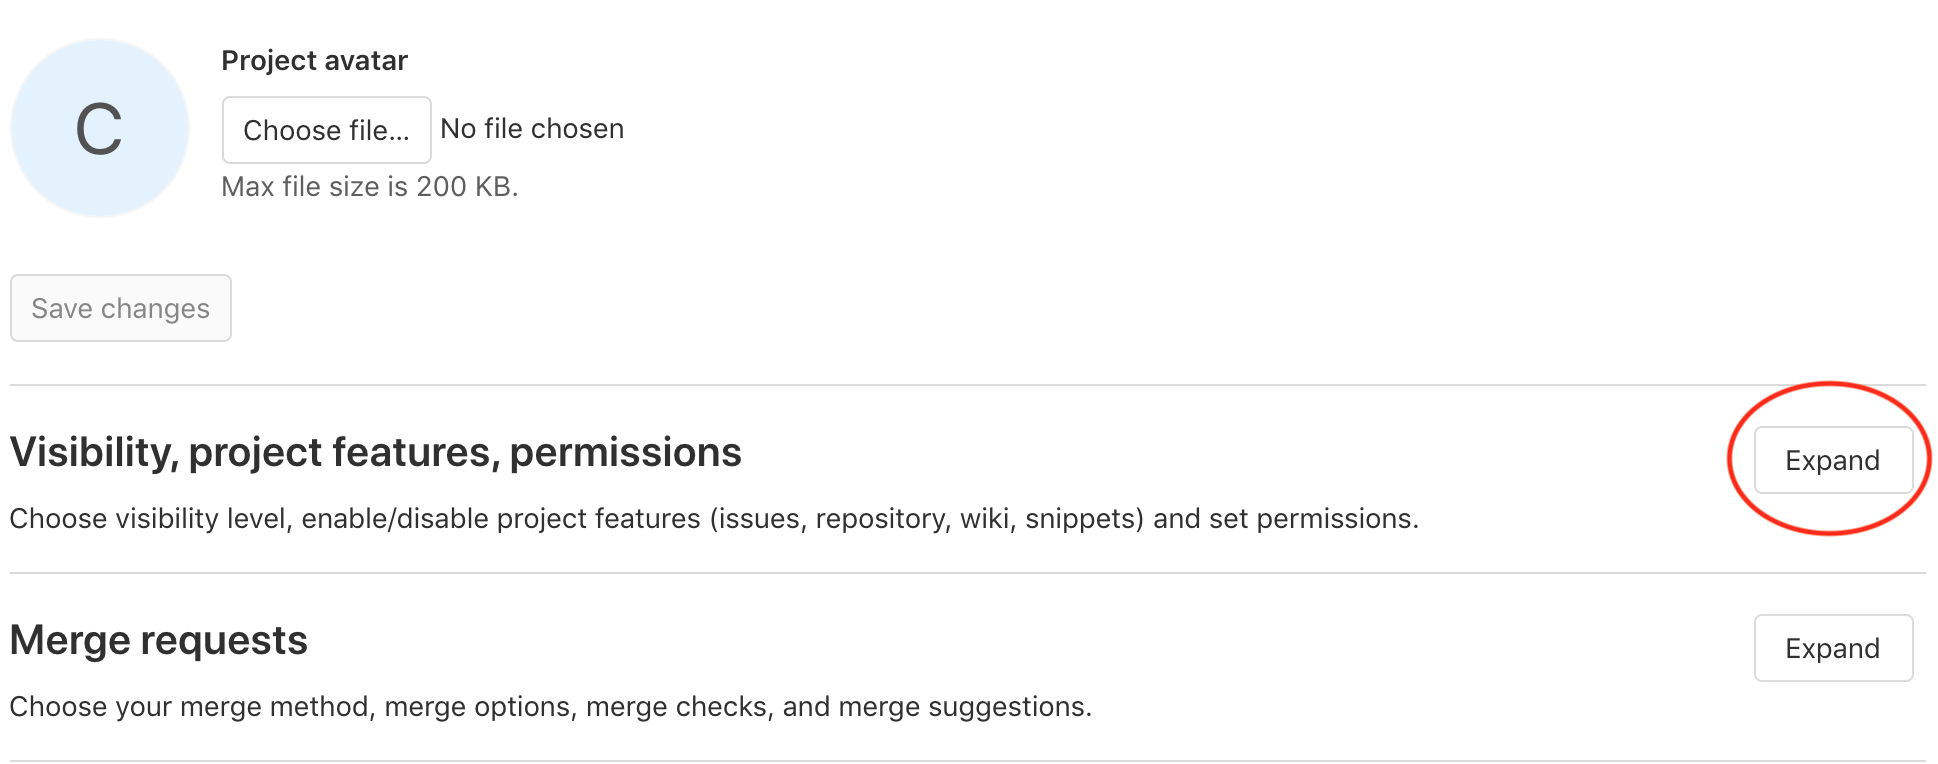
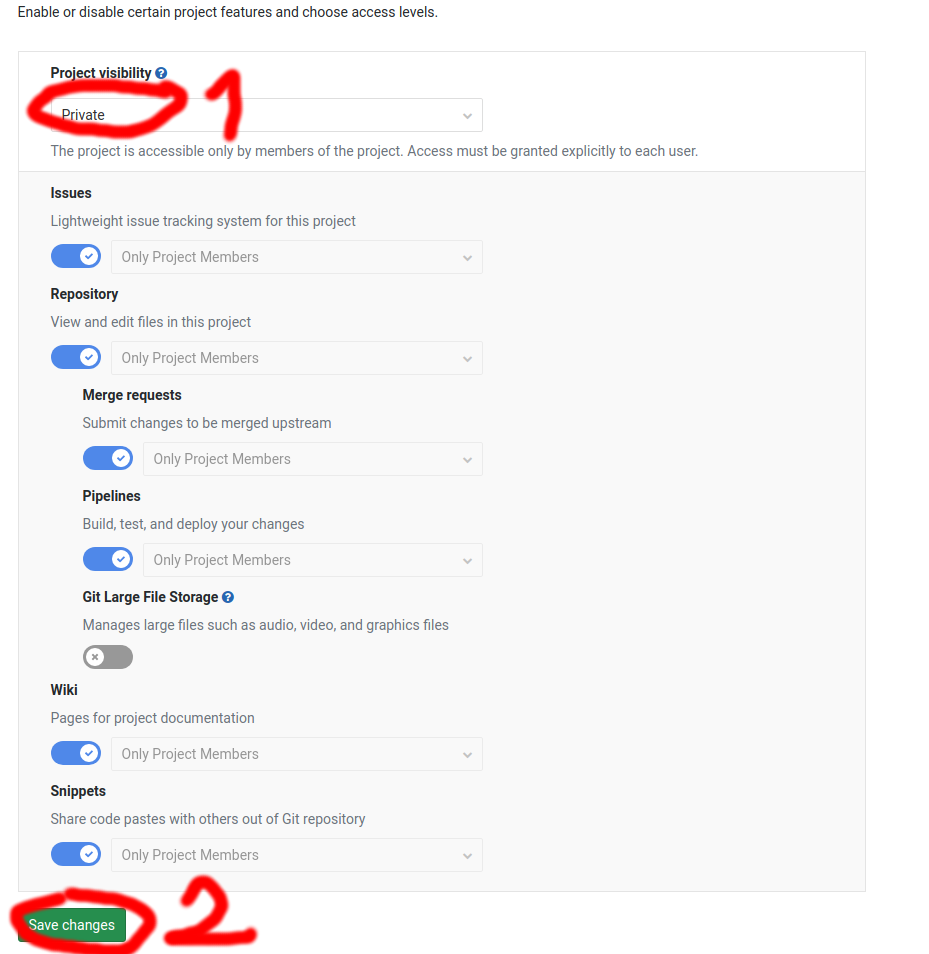
Then, make the repository private
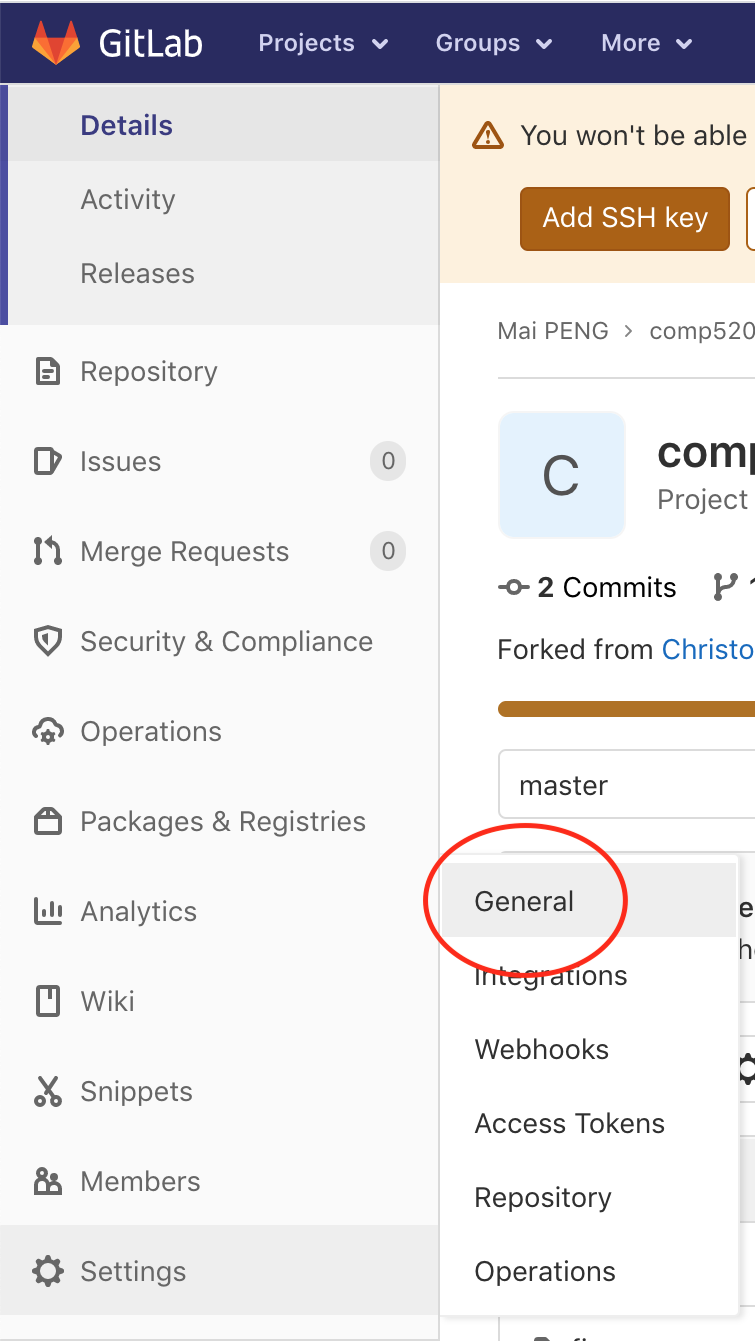
Now, grant access to the teaching staff (note that the Members submenu is now found under Project information):
You should grant the following users Reporter access:
- Christophe DUBACH (username: cdubach)
- Shakiba Bolbolian Khah MAI (username: sbolbo)
- Jonathan VAN DER CRUYSSE (username: jvande50)
Next, you will have to clone the forked repository to your local machine. You can clone the repository using either HTTPS or SSH. Using SSH is more secure, but requires uploading a private key to GitLab. HTTPS is less secure but simpler as it only requires you to enter your CS account username and password. If in doubt, HTTPS is sufficient.
In order to clone the repository via SSH you should ensure that you've uploaded a private key to GitLab, launch a terminal, and type:
$ git clone [email protected]:XXXXXXXX/comp520-coursework-w2022.git
where XXXXXXXX is your CS gitlab account id.
In order to clone the repository via HTTPS you should launch a terminal and type:
$ git clone https://gitlab.cs.mcgill.ca/XXXXXXXX/comp520-coursework-w2022.git
where XXXXXXX is your CS gitlab account id as above, and you should be prompted to type in your CS gitlab account id and password.
You can choose to use any development environment for your project, such as IntelliJ, Eclipse, Emacs, Vim or your favourite text editor. Choose whichever you are confident with. However, we highly recommend using IntelliJ Idea since you will benefit from features such as the debugger, and the project is already setup to be used with IntelliJ.
IntelliJ is available on the CS lab machines. To launch it on the CS machines, open a terminal and simply type:
idea
If you wish to install IntelliJ on your own machine, you can download the latest copy of the free community edition here:
- Community edition of IntelliJ.
To import the project with IntelliJ, after it opens select "Import Project" and select the root directory of your project. On the following screen, ensure that the "Create project from existing sources" option is selected. You will then be presented with a series of screens. Just keep selecting "Next" without modifying any options. If you are asked whether to overwrite an existing .iml file, select the overwrite option.
To confirm that the project is setup correctly, you can try to run the Main.java file directly from the idea. To do so, right click the Main file in the src directory. In the context menu, select the "Run Main.main()" option. The program should now have run successfully
In order to build the project you must have Ant installed, which is installed already on the CS lab machines.
Your local copy of the repository contains an Ant build file (build.xml).
Please do not modify this file as our automatic marker will replace it with our own.
You can build the project from the commandline by typing:
$ ant build
This command outputs your compiler in a directory called bin within the project structure.
Thereafter, you can run your compiler from the commandline by typing:
$ java -cp bin Main
The parameter cp instructs the Java Runtime to include the local directory bin when it looks for class files.
It is important to ensure that you can compile and run your compiler from the command line since this is how the auto-marker will performed its task.
You can find a series of tests in the tests folder.
To run the lexer on one of them, you can type:
$ java -cp bin Main -lexer tests/fibonacci.c dummy.out
Which should produce the following output:
Lexing error: unrecognised character (#) at 1:0
INVALID
Lexing error: unrecognised character (i) at 1:1
INVALID
Lexing error: unrecognised character (n) at 1:2
INVALID
Lexing error: unrecognised character (c) at 1:3
INVALID
...
Lexing error: unrecognised character (}) at 34:2
INVALID
Lexing error: unrecognised character (}) at 35:0
INVALID
Lexing: failed (331 errors)
You can clean the bin directory by typing:
$ ant clean
This command effectively deletes the bin directory.
Since we are using an automated marking mechnism (based on how many progams can run successfully through your compiler), it is important to understand how git works. If you want to benefit from the nightly automatic marking feedback, please ensure that you push all your changes daily onto your GitLab centralised repository.
We suggest you follow the excelent tutorial from atlassian on how to use git. In particular you will need to understand the following basic meachnisms:
We have setup the build.xml in a way that should allow you to use unit testing easily.
You should be able to add a src/test directory (that is, a directory named test right inside the src directory) and have these files ignored by ant (and thus ignored by the automarker). The purpose of this directory is for you to be able to add unit tests to verify your code. Files in this directory will be permitted to use any external libraries, but please ensure that no part of the compiler itself uses any external libraries as this is not allowed. Note that unit tests are strictly optional and will not be evaluated, but are highly recommended! When writing compilers, having a good automated test suite is worth its weight in gold.
Furthermore, do not modify the build.xml file yourself. The automarker will replace this file when it runs to ensure that your compiler builds without any external dependencies (or if you did modify your build.xml, be aware that it will be replaced by the automarker with the orignal one).
If you wish to, you are allowed to use Scala instead of Java for implementing your compiler. However, we strongly encourage you to stick with Java if you are not already familiar with Scala. In particular, you will not benefit from the starter code we give you and may have to rewrite a portion of it in Scala.
Note that we only support Scala version 2.11.12.
If the automarker detect the presence of a build.sbt file in the root folder, it will compile your sources with SBT (sbt compile).
Note that to ensure that you are not using any third party libraries, we will replace the build.sbt with our own version whose content is:
scalaVersion := "2.11.12"

javacOptions ++= Seq(
  "-source", "11",
  "-target", "11"
)

compileOrder := CompileOrder.Mixed

Compile / scalaSource := baseDirectory.value / "src/scala/"
Compile / javaSource := baseDirectory.value / "src/java/"

import scala.sys.process._

lazy val cleanupTask = taskKey[Unit]("Now we will pretend we are Ant")

import scala.sys.process._

cleanupTask := ("rm -fr ./bin" #&& "cp -r ./target/scala-2.11/classes ./bin" !!)

compile in Compile := Def.taskDyn {
  val result = (compile in Compile).value
  Def.task {
    val _ = cleanupTask.value
    result
  }
}.value
As you can see, you should, therefore, place your scala sources into the src/scala folder.
If you have a Main.java file in your source at the expected location, our automarker will replace it with our own version which is identical to the one we gave you originally, and will compile it! So if you wish to have a Main.scala source file as your main entry point, you should make sure to remove Main.java from your repo. Otherwise you will end up with two Main classes and nothing will work with the automarker.
To run your compiler, the automarker uses the following command:
java -cp bin/:PATH_TO/scala-compiler-2.11.12.jar:PATH_TO/scala-library-2.11.12.jar:PATH_TO/scala-reflect-2.11.12.jar Main


