CodeHarvester efficiently aggregates code and text from files for streamlined AI analysis, simplifying data compilation for prompts.
To begin, clone the repository to your local machine:
git clone https://github.com/EsteveSegura/CodeHarvester.git
cd CodeHarvesterInstall the necessary dependencies to ensure CodeHarvester runs smoothly:
pip install -r requirements.txtTo use CodeHarvester from the command line, navigate to the CodeHarvester directory and execute the following command:
python3 src/main.py <ROOT_DIRECTORY> --extensions <FILE_EXTENSIONS> --exclude-dirs <DIRECTORIES_TO_EXCLUDE> --exclude-files <FILES_TO_EXCLUDE><ROOT_DIRECTORY>: The starting point for the directory traversal.--extensions: Specify file extensions to include in the aggregation (e.g., py, js, txt).--exclude-dirs: List directories you wish to exclude from the traversal.--exclude-files: Specify individual files to be omitted from the aggregation.--include-files: Specify individual files to be aggregated (cannot be used with --exclude-dirs, --exclude-files).--output: Specify output file path and name. If not specified, the output will be printed to the console.--gui: Launch a server to display the output in a web interface.
To run CodeHarvester in GUI mode, add the --gui flag to the command:
python3 src/main.py <ROOT_DIRECTORY> --guiNavigate to http://localhost:5043 in your web browser to interact with the application.
To compile CodeHarvester into a standalone binary for easy distribution, use PyInstaller:
pyinstaller main.spec
# The binary will be located in the `dist` directory-
Compile the binary:
pyinstaller main.spec
-
Create a directory to store the binary:
Navigate to the
distdirectory and move themaindirectory to a desired location, for example:mkdir "C:\Program Files\CodeHarvester" move dist\main "C:\Program Files\CodeHarvester"
-
Add the directory to your PATH:
- Open the Start Search, type in "env", and select "Edit the system environment variables".
- In the System Properties window, click on the "Environment Variables" button.
- In the Environment Variables window, find the "Path" variable in the "System variables" section and select it. Click on the "Edit" button.
- In the Edit Environment Variable window, click on "New" and add the path to the directory where you moved
main.exe. For example,C:\Program Files\CodeHarvester. - Click "OK" to close all the windows.
Now, you can run codeharvester from any path in the terminal by simply typing:
codeharvester-
Compile the binary:
pyinstaller main.spec
-
Create a directory to store the binary:
sudo mkdir -p /usr/local/codeharvester sudo cp -r ./dist/main/* /usr/local/codeharvester/ -
Create a script to run the binary:
sudo tee /usr/local/bin/codeharvester <<'EOF'
#!/bin/bash
/usr/local/codeharvester/main "$@"
EOF
-
Give execution permissions to the script:
sudo chmod +x /usr/local/bin/codeharvester
Now, you can run codeharvester from any path in the terminal by simply typing:
codeharvester-
Remove the directory from your PATH:
- Open the Start Search, type in "env", and select "Edit the system environment variables".
- In the System Properties window, click on the "Environment Variables" button.
- In the Environment Variables window, find the "Path" variable in the "System variables" section and select it. Click on the "Edit" button.
- In the Edit Environment Variable window, select the path to the directory where you moved
main.exe(e.g.,C:\Program Files\CodeHarvester) and click on "Delete". - Click "OK" to close all the windows.
-
Delete the directory containing
main.exe:rmdir /S /Q "C:\Program Files\CodeHarvester"
-
Remove the binary:
sudo rm /usr/local/bin/codeharvester
-
Delete the directory containing the binary:
sudo rm -r /usr/local/codeharvester
-
Remove the binary:
sudo rm /usr/local/bin/codeharvester
-
Delete the directory containing the binary:
sudo rm -r /usr/local/codeharvester
This guide provides detailed steps for compiling, installing, and uninstalling codeharvester on Windows, Linux, and macOS. By following these steps, you can ensure that the software is correctly set up and can be easily removed if necessary.
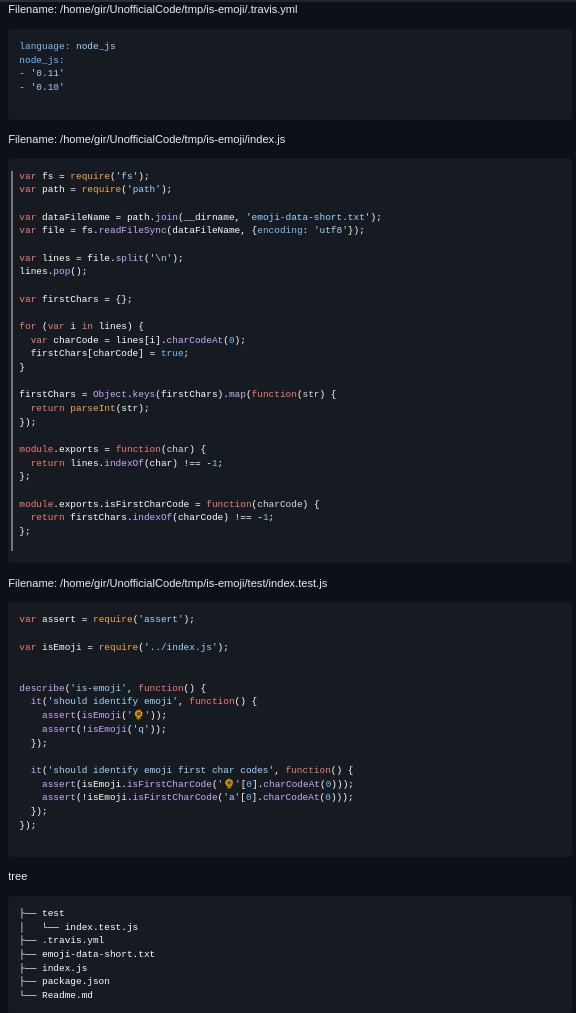
Running the command:
python3 src/main.py /home/root/code/tmp/is-emoji --extensions js yml --exclude-dirs .gitThe output consists of all files present in the root folder "is-emoji", except for the .git folder and including all files with .js .yml extension.
To run the end-to-end tests, use:
python3 test/e2e.pyFor quick tasks, you might use terminal commands like find and tree:
Aggregate files:
find /path/to/directory -name '*.py' -print0 | xargs -0 cat > combined_files.txtGenerate a directory tree:
tree /path/to/directory
