This repository holds the sample application and CI/CD infrastructure definition for illustrating Git in Software Development.
This repository provides a sample application which is build on the CI/CD infrastructure to illustrate the relation of Git Branches, Versions and CI/CD.
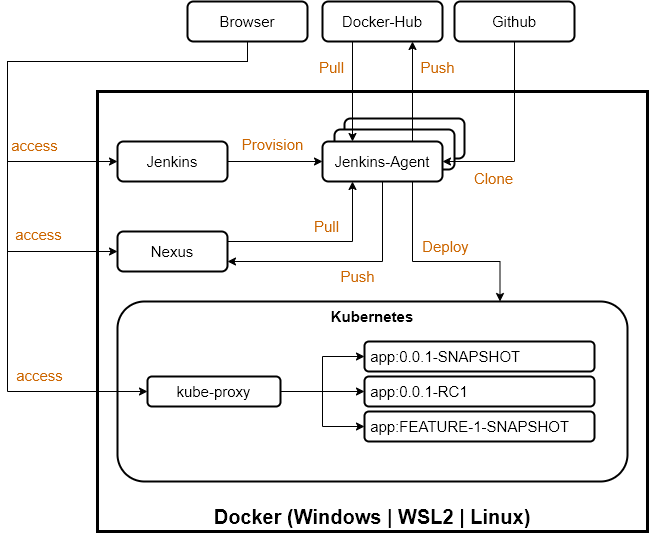
This repository holds the sample application and CI/CD infrastructure definition used for illustrating the relation of Git Branches, Versions and CI/CD in action. The infrastructure consists of the following services and platforms.
-
Docker
-
Kubernetes
-
Jenkins CI/CD
-
Jenkins Docker JNLP Agent
-
Nexus Repsoitory Manager
You will need a Docker Hub account where the built Container Images are pushed to during the builds.
You will need a Github account and a personal access token for your user which is used to clone the repository.
Install Docker Desktop for Windows and ensure that
-
the daemon is exposed via
tcp://localhost:2375, -
that the
Cdrive is shared -
and that
Kubernetesis started.
|
Important
|
Docker Desktop for Windows will create the Kubernetes configuration file ~/.kube/config which you will need to provide as a secret file.
|
Install Docker as described here.
|
Important
|
If you start a docker container and get the error message cgroups: cannot find cgroup mount destination: unknown..
Apply the temporary fix as described here
|
sudo mkdir /sys/fs/cgroup/systemd
sudo mount -t cgroup -o none,name=systemd cgroup /sys/fs/cgroup/systemd
Install kind as described here.
# With a custom configuration to bind the api server to '0.0.0.0:6443'
kind create cluster --config ./kind.yml|
Important
|
kind will install Kubernetes in Docker and create the Kubernetes configuration file ~/.kube/config which you will need to provide as a secret file.
Be aware that the config file will define the server as https://0.0.0.0:6443 whereby you will have to change the IP to the Docker Gateway IP.
|
|
Tip
|
I have implemented an Ansible bundle for setting up my WSL2 instance which you can use to setup a Debian WSL2 distro. The bundle will already take case about the systemd mount issue for you. |
Create the following secret files which are used in the docker/docker-compose.yml file. The content of the files is the secret value.
-
docker/secrets/kubeConfig.txt
The base64 encoded Kubernetes config file.
Ensure that only the configuration of the intended cluster is contained and the server address is properly set -
docker/secrets/nexusPassword.txt
The nexus password -
docker/secrets/dockerHubPassword.txt
The Docker Hub password of your user -
docker/secrets/githubAccessToken.txt
The Github personal access token of your user -
docker/secrets/jenkinsAdminPassword.txt
The Jenkins administrator password
The following environment variables needs to be defined for docker-compose. The simplest way to provide them is to create a .env file in the ./docker directory.
-
DOCKER_HOST_URI
The Docker Host URI in the form oftcp://<HOST>:<PORT> -
JNLP_JENKINS_URL
The Jenkins URL used by the jnlp docker agent in the form ofhttp://<HOST>:<PORT>; -
JNLP_NEXUS_URL
The Nexus URL used by the builds within a jnlp docker agent in the form ofhttp://<HOST>:<PORT>; -
RUN_AS
Defines with which use the jenkins container shall run. Eitherrootorjenkins -
JENKINS_PORT
The port Jenkins is exposed to -
GITHUB_USERNAME
Your github username -
NEXUS_PORT
The port Nexus shall be exposed to -
DOCKER_HUB_REGISTRY_REPOSITORY
The docker Hub repository name -
DOCKER_HUB_USERNAME
The docker Hub username -
KUBERNETES_URL
The api url of your Kubernetes cluster -
JENKINS_AGENT_IMAGE_TAG
Either you use my buildcchet/jenkins-inbound-agent-custom:1.0available on Docker Hub or you build it yourself (agent/Dockerfile) and make it available to your Docker environment
|
Important
|
With Docker Desktop for Windows set the environment varibales to:DOCKER_HOST_URI=tcp://host.docker.internal:2375RUN_AS=rootJNLP_JENKIS_URL=http://host.docker.internal:<JENKINS_PORT>JNLP_NEXUS_URL=http://host.docker.internal:<NEXUS_PORT>KUBERNETES_URL=https://kubernetes.docker.internal:6443With WSL2 or with a native Linux OS set the environment variables to: DOCKER_HOST_URI=tcp://<DOCKER_GATEWAY_IP>:2375RUN_AS=jenkinsJNLP_JENKIS_URL=http://<DOCKER_GATEWAY_IP>:<JENKINS_PORT>JNLP_NEXUS_URL=http://<DOCKER_GATEWAY_IP>:<NEXUS_PORT>KUBERNETES_URL=https://<DOCKER_GATEWAY_IP>:6443See here why. You can retrieve the DOCKER_GATEWAY_IP via docker network inspect bridge
|
Example configuration files are located at doc/examples/.
-
Environment settings WSL - Linux
The.envfile for WSL 2 and Linux environments -
Environment settings Docker Desktop for Windows
The.envfile for Windows environments -
Kubernetes Config
The Kubernetes Configuration file
-
Install the dashboard
kubectl apply -f https://raw.githubusercontent.com/kubernetes/dashboard/v2.0.1/aio/deploy/recommended.yaml -
Start the
kube-proxy
kubectl proxy -
List the secrets in the
kubernetes-dashbaordnamespace
kubectl get secret -n kubernetes-dashboard -
Get the secret token from the service account name like
kubernetes-dashboard-token-xxxxx
kubectl describe secret kubernetes-dashboard-token-xxxxx -n kubernetes-dashboard -
Go to
localhost:8001/api/v1/namespaces/kubernetes-dashboard/services/https:kubernetes-dashboard:/proxy/and login with the retrieved token
|
Important
|
If you start the Kubernetes Proxy from within a WSL 2 instance, then you need to add the parameter --address 0.0.0.0, otherwise you won’t be able to access it from the Windows host.
|
-
Go to
./docker/ -
Execute
docker-compose build -
Execute
docker-compose up -d -
Execute
docker-compose exec nexus cat /opt/sonatype/sonatype-work/nexus3/admin.passwordto get the generated admin password -
Login with
admin:<INITIAL_PASSWORD> -
Follow the wizard and define the new admin password
NEXUS_PASSWORD -
Login with
admin:<JENKINS_ADMIN_PASSWORD> -
Got to the build job and see how they went
-
Go to
http://localhost:<NEXUS_PORT>/#browse/browseand see the pushed snapshot/release artifacts, which have a different version depending on the branch they have been build from -
Go to
https://hub.docker.com/repository/docker/<DOCKER_HUB_REGISTRY_REPOSITORY>/microservice-quarkusand see the pushed images, which have a different tag depending on the branch they have been build from -
Go to
http://localhost:8001/api/v1/namespaces/kubernetes-dashboard/services/https:kubernetes-dashboard:/proxy/and login with the Kubernetes Secret token and see if the deployments were successful.
|
Important
|
The first time your defined NEXUS_PASSWORD was most likely invalid, because you haven’t changed it before the builds started. Just trigger all of the builds and it will work
|
