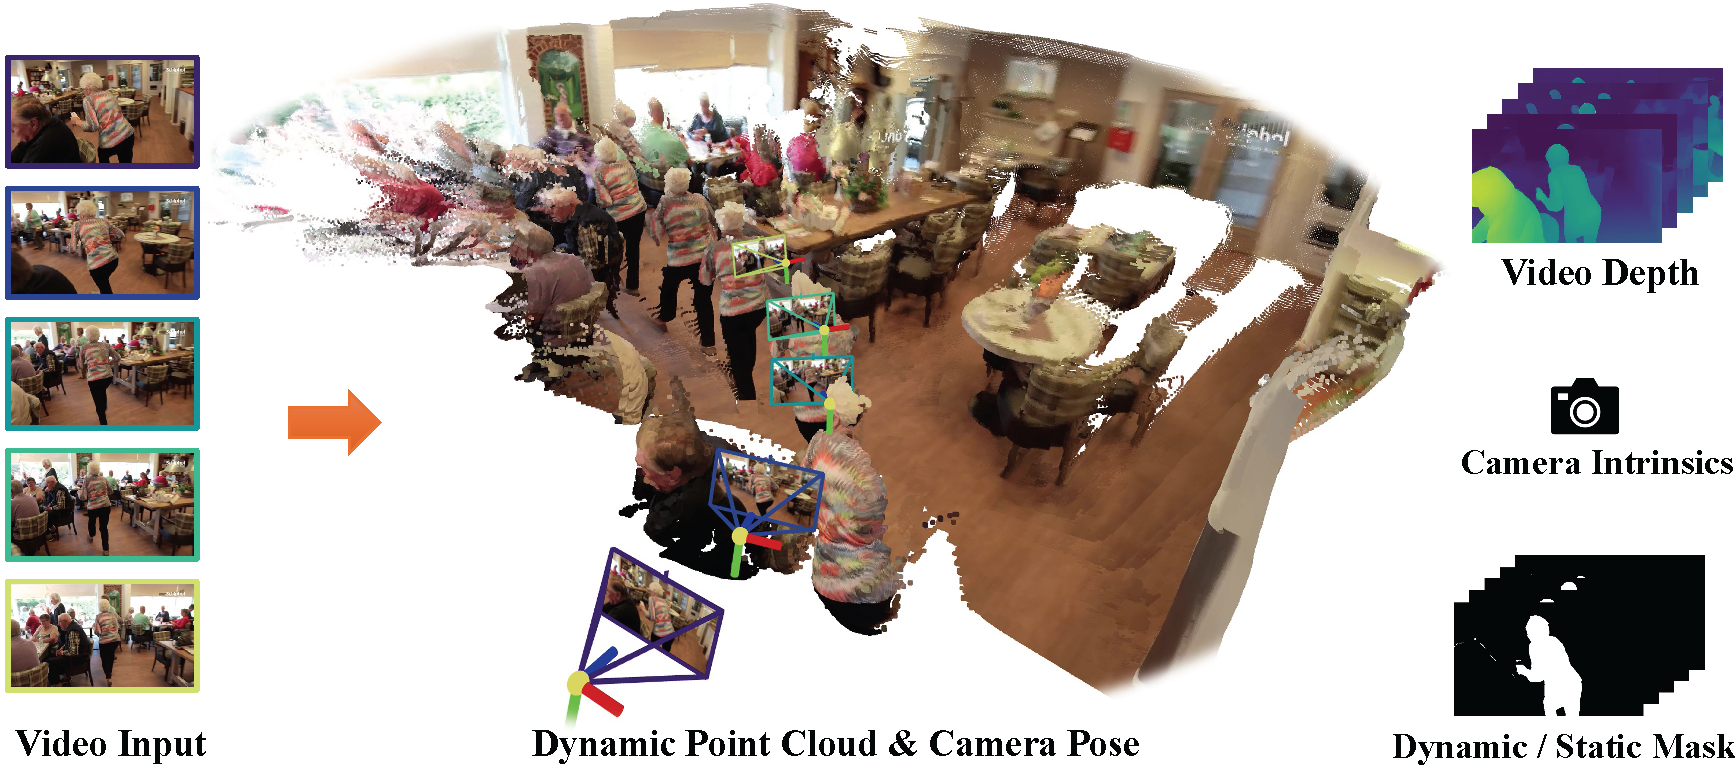
MonST3R processes a dynamic video to produce a time-varying dynamic point cloud, along with per-frame camera poses and intrinsics, in a predominantly feed-forward manner. This representation then enables the efficient computation of downstream tasks, such as video depth estimation and dynamic/static scene segmentation.
This repository is the official implementation of the paper:
MonST3R: A Simple Approach for Estimating Geometry in the Presence of Motion Junyi Zhang, Charles Herrmann+, Junhwa Hur, Varun Jampani, Trevor Darrell, Forrester Cole, Deqing Sun*, Ming-Hsuan Yang* Arxiv, 2024. [Project Page] [Paper] [Interactive Results🔥]
- Release model weights on Google Drive and Hugging Face (10/07)
- Release inference code for global optimization (10/18)
- Release 4D visualization code (10/18)
- Release training code & dataset preparation (10/19)
- Release evaluation code (10/20)
- Memory efficient optimization v1 (12/25): a non-batchified version of the global optimization, slower but less memory usage
- Real-time reconstruction mode
- Gradio Demo
- Clone MonST3R.
git clone --recursive https://github.com/junyi42/monst3r
cd monst3r
## if you have already cloned monst3r:
# git submodule update --init --recursive- Create the environment, here we show an example using conda.
conda create -n monst3r python=3.11 cmake=3.14.0
conda activate monst3r
conda install pytorch torchvision pytorch-cuda=12.1 -c pytorch -c nvidia  # use the correct version of cuda for your system
pip install -r requirements.txt
# Optional: you can also install additional packages to:
# - training
# - evaluation on camera pose
# - dataset preparation
pip install -r requirements_optional.txt- Optional, install 4d visualization tool,
viser.
pip install -e viser- Optional, compile the cuda kernels for RoPE (as in CroCo v2).
# DUST3R relies on RoPE positional embeddings for which you can compile some cuda kernels for faster runtime.
cd croco/models/curope/
python setup.py build_ext --inplace
cd ../../../We currently provide fine-tuned model weights for MonST3R, which can be downloaded on Google Drive or via Hugging Face.
To download the weights of MonST3R and optical flow models, run the following commands:
# download the weights
cd data
bash download_ckpt.sh
cd ..To run the inference code, you can use the following command:
python demo.py # launch GUI, input can be a folder or a video
# use memory efficient optimization: --not_batchify
The results will be saved in the demo_tmp/{Sequence Name} (by default is demo_tmp/NULL) folder for future visualization.
You can also run the inference code in a non-interactive mode:
python demo.py --input demo_data/lady-running --output_dir demo_tmp --seq_name lady-running
# use video as input: --input demo_data/lady-running.mp4 --num_frames 65
# use memory efficient optimization: --not_batchify
Update (12/15): Using the non-batchified version of the global optimization, the memory usage has been reduced. Now, it only requires ~23G VRAM to inference on a 65-frames 16:9 video. It is now slower, but we are welcome to any PRs to improve the memory-speed trade-off, e.g., using a window-wise optimization in function
forward_non_batchify()instead of edge-wise.
Currently, it takes about 33G VRAM to run the inference code on a 16:9 video of 65 frames. Use less frames or disable the
flow_losscould reduce the memory usage. We are welcome to any PRs to improve the memory efficiency (one reasonable way is to implement window-wise optimzation inoptimizer.py).
To visualize the interactive 4D results, you can use the following command:
python viser/visualizer_monst3r.py --data demo_tmp/lady-running
# to remove the floaters of foreground: --init_conf --fg_conf_thre 1.0 (thre can be adjusted)We provide here an example of joint dense reconstruction and camera pose estimation on the DAVIS dataset.
First, download the dataset:
cd data; python download_davis.py; cd ..Then, run the evaluation script:
CUDA_VISIBLE_DEVICES=0 torchrun --nproc_per_node=1 --master_port=29604 launch.py --mode=eval_pose  \
    --pretrained="checkpoints/MonST3R_PO-TA-S-W_ViTLarge_BaseDecoder_512_dpt.pth"   \
    --eval_dataset=davis --output_dir="results/davis_joint"
    # To use the ground truth dynamic mask for davis, add: --use_gt_mask
You could then use the viser to visualize the results:
python viser/visualizer_monst3r.py --data results/davis_joint/bear
# if the dynamic mask is noisy, one could visualize per-frame pointcloud by adding: --no_mask
For the complete scripts to evaluate the camera pose / video depth / single-frame depth estimation on the Sintel, Bonn, KITTI, NYU-v2, TUM-dynamics, ScanNet, and DAVIS datasets. Please refer to the evaluation_script.md for more details.
Please refer to the prepare_training.md for preparing the pretrained models and training/testing datasets.
Then, you can train the model using the following command:
CUDA_VISIBLE_DEVICES=0,1 torchrun --nproc_per_node=2 --master_port=29604 launch.py  --mode=train \
    --train_dataset="10_000 @ PointOdysseyDUSt3R(dset='train', z_far=80, dataset_location='data/point_odyssey', S=2, aug_crop=16, resolution=[(512, 288), (512, 384), (512, 336)], transform=ColorJitter, strides=[1,2,3,4,5,6,7,8,9], dist_type='linear_1_2', aug_focal=0.9)+ 5_000 @ TarTanAirDUSt3R(dset='Hard', z_far=80, dataset_location='data/tartanair', S=2, aug_crop=16, resolution=[(512, 288), (512, 384), (512, 336)], transform=ColorJitter, strides=[1,2,3,4,5,6,7,8,9], dist_type='linear_1_2', aug_focal=0.9)+ 1_000 @ SpringDUSt3R(dset='train', z_far=80, dataset_location='data/spring', S=2, aug_crop=16, resolution=[(512, 288), (512, 384), (512, 336)], transform=ColorJitter, strides=[1,2,3,4,5,6,7,8,9], dist_type='linear_1_2', aug_focal=0.9)+ 4_000 @ Waymo(ROOT='data/waymo_processed', pairs_npz_name='waymo_pairs_video.npz', aug_crop=16, resolution=[(512, 288), (512, 384), (512, 336)], transform=ColorJitter, aug_focal=0.9)"   \
    --test_dataset="1000 @ PointOdysseyDUSt3R(dset='test', z_far=80, dataset_location='data/point_odyssey', S=2, strides=[1,2,3,4,5,6,7,8,9], resolution=[(512, 288)], seed=777)+ 1000 @ SintelDUSt3R(dset='final', z_far=80, S=2, strides=[1,2,3,4,5,6,7,8,9], resolution=[(512, 224)], seed=777)"   \
    --train_criterion="ConfLoss(Regr3D(L21, norm_mode='avg_dis'), alpha=0.2)"  \
    --test_criterion="Regr3D_ScaleShiftInv(L21, gt_scale=True)"   \
    --pretrained="checkpoints/DUSt3R_ViTLarge_BaseDecoder_512_dpt.pth"   \
    --lr=0.00005 --min_lr=1e-06 --warmup_epochs=3 --epochs=50 --batch_size=4 --accum_iter=4  \
    --save_freq=3 --keep_freq=5 --eval_freq=1  \
--output_dir="results/MonST3R_PO-TA-S-W_ViTLarge_BaseDecoder_512_dpt"If you find our work useful, please cite:
@article{zhang2024monst3r,
  author    = {Zhang, Junyi and Herrmann, Charles and Hur, Junhwa and Jampani, Varun and Darrell, Trevor and Cole, Forrester and Sun, Deqing and Yang, Ming-Hsuan},
  title     = {MonST3R: A Simple Approach for Estimating Geometry in the Presence of Motion},
  journal   = {arXiv preprint arxiv:2410.03825},
  year      = {2024}
}Our code is based on DUSt3R and CasualSAM, our camera pose estimation evaluation script is based on LEAP-VO, and our visualization code is based on Viser. We thank the authors for their excellent work!
