In this assignment, you will use TDD methodolgy to create several modules for computing various mathematical sequences. The modules will then be grouped into a hierarchical package structure with a top-level package name of numseq. This assignment has a set of tests already written for you, contained in the tests folder. You do not need to modify or create your own tests.
For this assignment, you will not be running your code directly from python. You will be using the unittest framework, which will import your numseq package and run your functions as part of its test suite. Therefore, your numseq modules should not contain any print() statements, and your modules should not execute any of their own functions. That is, don't invoke any of your own functions from within your modules. If you do, the unittest framework may run into problems when it tries to import your package for testing.
Create a package folder named numseq with the structure shown below.
Packages allow us to organize and group modules (or python files). Python requires a specific structure for package definitions. The directory name is the name of the package used in an import statement (e.g., import package_name). The submodules can be access as attributes of the package, as in package_name.submodule_name. In the example below, if you wanted to access functions contained in the geo module, you would use numseq.geo as your package path.
├── numseq
│   ├── __init__.py
│   ├── fib.py
│   ├── geo.py
│   ├── prime.py
__init__.py
The
__init__.pyfile is a special placeholder file that designates a directory as a "python package". This prevents directories with a common name, such as 'string', from unintentionally hiding valid modules that occur later on the module search path. In the simplest case,__init__.pycan just be an empty file, but it can also execute initialization code for the package or set the__all__variable. For more about the special__init__.pyfile, see Python Packages
Within the numseq package, create a module named fib.py. Within the fib module, define a single function, fib(n), that returns the nth Fibonacci number. The first 10 terms of the Fibonacci sequence are
[0, 1, 1, 2, 3, 5, 8, 13, 21, 34 ...]
Make sure that your fib(n) function correctly handles values of n <= 0. If you choose to implement fib(n) as a recursive function, your code will have problems if it does not handle valus of n <= 0.
Within the numseq package, create a module named geo.py. Within this geo module, define 3 functions:
-
square(n): Returns the nth term of the numbers that can be arranged into square geometric shapes[1, 4, 9, 16, 25 ... ] -
triangle(n): Returns the nth term of the numbers that can be arranged in triangular geometric shapes[1, 3, 6, 10, 15, 21, 28, 36, 45, 55 ... ] -
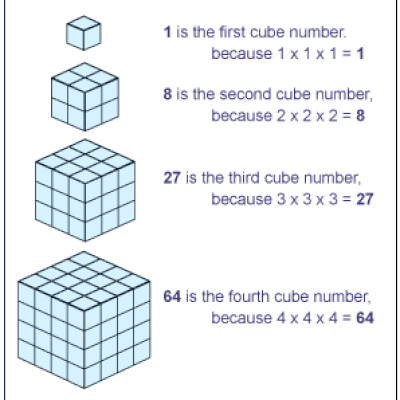
cube(n): Returns the nth term of the numbers that can be arranged as symmetric cube shapes[1, 8, 27, 64 ...]
Finally, create a module named prime.py within the numseq package. Define the following functions:
primes(n): Returns a list of all prime numbers less than nis_prime(m): Returns a boolean indicating whethermis a prime number
- NOTE: The tests are provided in this assignment. You do not have to modify any of the tests or move test files or folders, even if they have some "TODOs" inside. Those comments are for our curriculum devs!
- Try out the VS Code built-in test discovery feature to run and debug individual tests. Please read this article to enable this feature in your VS Code. You can view the test output in the OUTPUT tab of your integrated terminal window by selecting the "Python Test Log" dropdown.
- Alternately, you can run the tests from the command line. To discover and run all tests:
% python -m unittest discover
- To run only one test (in this case, the
primetest):
% python -m unittest test_numseq.TestNumseq.test_prime
-
Performance timing tests: These tests are included in the test suite, but your solution is not required to pass these timing performance tests. Consider them to be "stretch goals" to see if you can write a performant algorithm.
-
Your solution should pass all of the non timing-related tests, including the docstring tests.
- Fork this repository into your own personal GitHub account.
- Clone your own repo to your local development machine.
- Create a separate branch named
devand checkout the branch. - Commit your changes, then
git pushthe branch back to your own GitHub account. - From your own GitHub repo, create a pull request (PR) from your
devbranch back to your own master. - Copy/Paste the URL link to your PR as your assignment submission.
- Your grader will post code review comments inline within your pull request in your GitHub account. Be sure to respond to any comments and make requested changes. RESUBMIT a new link to your PR after making changes. This is the code review iteration cycle.


