Making a visual novel using Ren'Py
Ren'py is a game engine that have its own scripting language built especially for visual novels. Ren'py is built on Python and Pygame. You can run your own python or pygame code within the engine.
Ren'py can create binary executables for Windows, Mac OS, Linux, Chrome OS, iOS, and Android.
Visual Novels are a genre of video games similar to choose-your-own-adventure books. It is uncommon to have popular Visual Novels adapted as an anime. Ren'py have many games created and sold online. Two of my personal favorites Ren'py game are Long Live the Queen and Doki Doki Literature Club (WARNING: Doki Doki Literature Club is not suitable for children or those who are easily disturbed).
-
Download Ren'py from https://www.renpy.org/
-
If you do not have an IDE that is capable of turning tabs into spaces, I recommend getting and installing notepad2. Most IDEs have this feature, so check your IDE's manual.
-
Open Ren'py. Wait for it to run. It takes a while to start up. We need to setup your IDE with the following steps:
a. Click preferences
b. Change Text Editor to "System Editor"
c. Click return to get out of the preferences screen
-
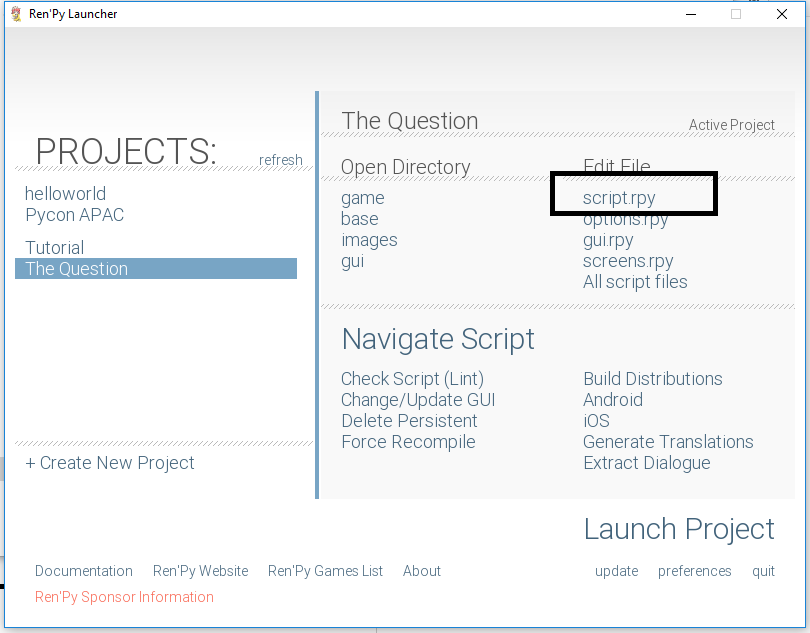
Next, we need to associate the .rpy extension to your IDE. Click on "script.rpy".
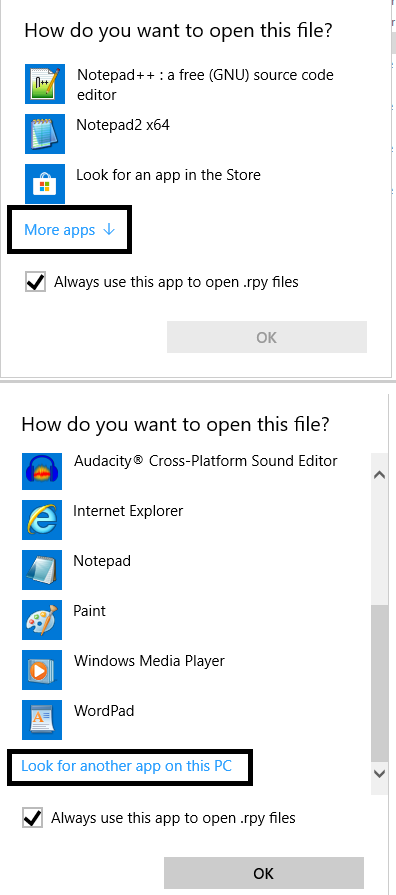
On Windows, you should get a dialog for setting the program to run when .rpy files are opened. Find your IDE. If you can't find your IDE, expand the dialog box and navigate to your IDE's executable.
- Click on "script.rpy" again. It should open up your IDE.
Alternatively, you can open "script.rpy" manually via your IDE's open file feature.
- Click on Create New Project. If this is the first time you created a Ren'py project, it will ask you where you would want to put your project files. Select a directory.
- For project name, call it "PyCon APAC". Just select the default resolution and choose a color scheme you like. You can change these properties later in options.rpy.
- Make sure that "PyCon APAC" is highlighted on the projects list. Click on "script.rpy"
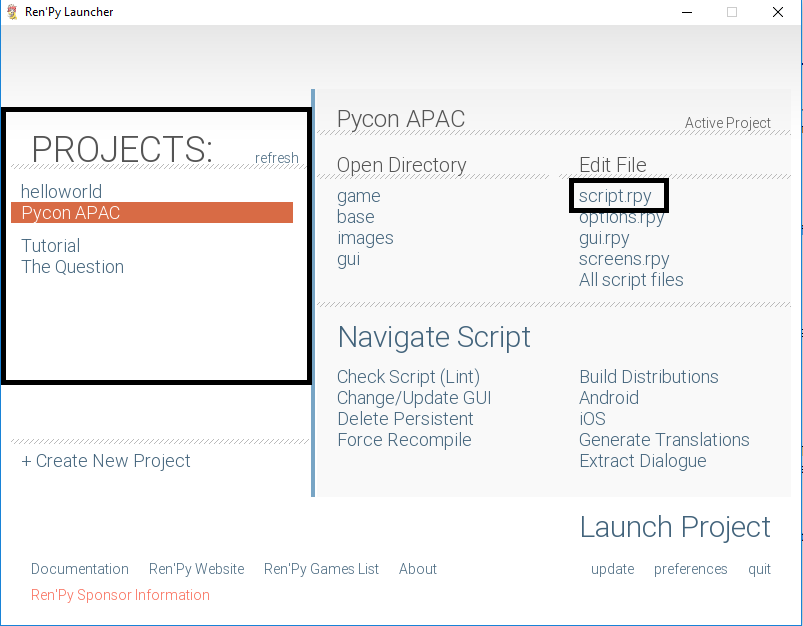
- Select all the text in "script.rpy". Delete them all. We will not be using this for our first visual novel
- Type in the following:
label start:
    "Hello World"
    return
- Run the project. Take note that indentation in Ren'py uses space and not tabs.
| Line | Explanation |
|---|---|
| label start: | this is the entry point for the visual novel |
| "Hello World" | it should be obvious, but try to explain to yourself what this line does |
| return | this exits the game |
- Once you understand the above code, make this modification:
label start:
    "Your name" "Hello World"
    return
Change "Your name" to your real/fake name. Try to explain to yourself the effect of what we have added.
Explanation:
"Hello World" by itself shows the narrator speaking the words (traditionally, in visual novels, an unnamed voice comes from the narrator). By adding a string to the left side, we can have a character speak the words.
- It can be inconvenient to hardcode the names of your characters. What if we have a large ren'py script and need to change the name for one of our characters?
In Ren'py, we can make variables:
define me = Character("Your name")

label start:
    me "Hello World"
    return
Like variables in programming, you can name your variables with anything you want.
- Ren'py can help you quickly see changes in your code.
define me = Character("Your name")

label start:
    me "I am happy"
    return
Run the above program. Now, while the game is still running, go back to the editor and do the following modifications:
define me = Character("Your name")

label start:
    me "I am shocked"
    return
Go back to the running program. No surprise, the text still reads "I am happy".
Now, press Shift+R. This should reload the script and change the text. This is how you reload your game, so you can immediately see the changes.
define me = Character("Your name")

label start:
    me "I am shocked"
    me "What is that?"
    return
Run the above program. In visual novels, to go to the next dialogue, either press any key or click on the screen. To go back to the previous dialogue, press PgUp or mouse scroll up.
- We should be making a video game. We need pictures of our characters and the place where they are. Let's start with the location.
define me = Character("Your name")

label start:
    scene bg black
    with fade

    me "I am shocked"
    me "What is that?"
    return
Run the above program. "scene adds a background called black. "with fade" is a command to transition from one scene to the other. There are other examples of transitions that you can look at the online manual
- But what about the characters?
define me = Character("Your name")

label start:
    scene bg black
    with fade

    show firstname sad
    me "I am shocked"
    me "What is that?"
    return
Add the line above but change "firstname" to your own first name (small letters, no space).
The show command is how you present a character to the player. The syntax is "show ". You might notice that the character is a blank paper doll. This is the default image for characters in ren'py.
Tip: When making games, one of the excuses I hear is that people need to have the BEST art before doing work on the game. This default paper doll image can be used while your game script is being developed.
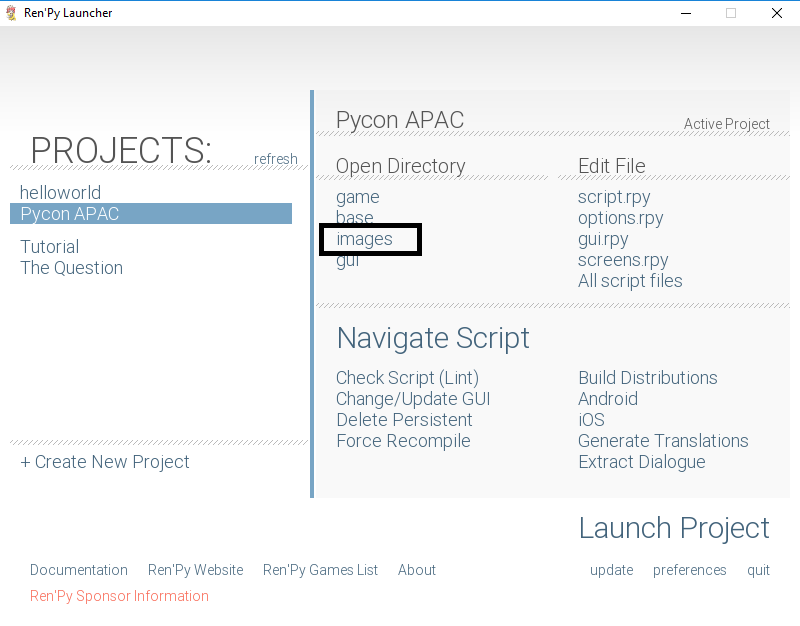
- Time to add some real images, instead of placeholders. Go back to the projects selection and click on the images directory.
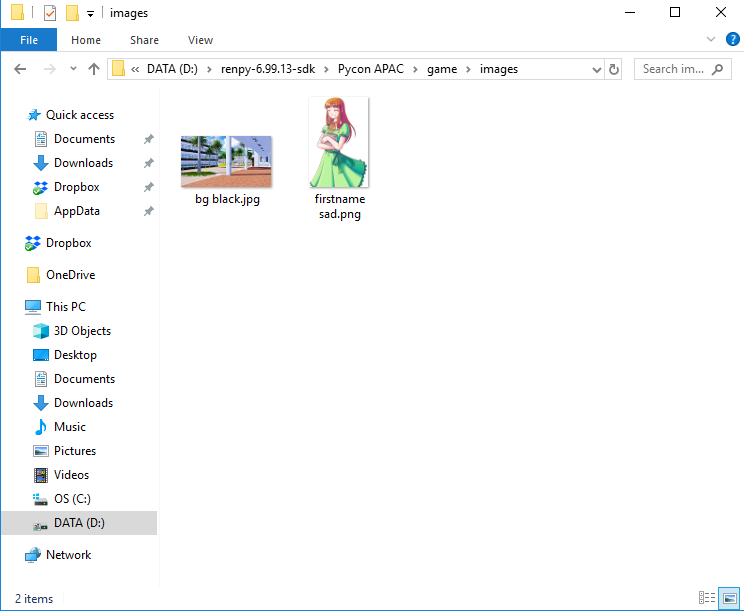
Go to the Internet and find images for one background and one character. Save the two images in the image directory (you can use png, jpg or jpeg) and name them "bg black" and "firstname sad" (again, use your own first name).
Run the game. If nothing went wrong, you should be able to see both images.
Try to explain to yourself how scene and show works with images.
- You might have noticed that the character image is at the bottom of the screen. We can change the position with the "at" keyword:
define me = Character("Your name")

label start:
    scene bg black
    with fade

    show firstname sad at top
    me "I am shocked"
    me "What is that?"
    return
There are other locations that can be used such as center and truecenter. You can check them out in the manual.
- Let's add a new character
define me = Character("Your name")

label start:
    scene bg black
    with fade

    show firstname sad at top
    me "I am shocked"
    me "What is that?"

    show villain at left
    with moveinright

    "villain" "BWAHAHAHA"
    return
Based on what you've learned, try to explain to yourself the newly added lines. Explaining things to yourself is helpful when learning something new
- Now let's add a decision for the player:
define me = Character("Your name")

label start:
    scene bg black
    with fade

    show firstname sad at top
    me "I am shocked"
    me "What is that?"

    show villain at left
    with moveinright

    "villain" "BWAHAHAHA"

    menu:
        "What should you do?"
        "Dodge":
            jump dodge_ending
        "Don't Dodge":
            jump bad_ending

label dodge_ending:
    "Good ending"
    return

label bad_ending:
    "Bad ending"
    return
"menu" is the keyword to add user interactivity. "jump" will bring the user to the label somewhere in the script. Remember that "return" exits the program.
- Hiding characters and adding special effect
define me = Character("Your name")

label start:
    scene bg black
    with fade

    show firstname sad at top
    me "I am shocked"
    me "What is that?"

    show villain at left
    with moveinright

    "villain" "BWAHAHAHA"

    menu:
        "What should you do?"
        "Dodge":
            jump dodge_ending
        "Don't Dodge":
            jump bad_ending

label dodge_ending:
    hide villain
    with dissolve
    "I am just your imagination"
    return

label bad_ending:
    show villain punching
    hide firstname
    with vpunch
    "UWAAAHHHH"
    return
You can change the emotion of a character by just doing another "show" command. Notice that the position of the character stays the same.
Finally, the "hide" command will remove a character from the screen. vpunch should be a nice surprise for you.
- For your next project, I suggest starting with a simple 3-act story. The 3 acts will be the introduction, the conflict, and the resolution.
- Decide of your story genre. It can be romance, horror, action, or anything you want. Tip: romance is one of the easier genres to write.
- Next think of 3 locations/settings for each act.
- The first act will be the introduction of 3 characters: the hero, the villain, and the supporting character (or second love interest in most romance stories)
- The second act will be the conflict. Make the story on how the conflict happens
- The final act will be all about the resolution. How should the story end? What decisions will lead to the different endings?
- Run The Question. This is a simple visual novel to demonstrate how to make a simple game. You can look into the source code and learn how they made the game.
- Run the Tutorial project. It contains a lot of code examples including how to play movies, add minigames using pygame, inputs from other players, different transitions, and custom animation.
- You can look for examples of transitions and positions in the Tutorial project and in the documentation manual (found at the bottom-left of Ren'Py)
- Ren'py exclusive use spaces for indentation, not tabs. It will complain if you used tabs. Your IDE should have an option to convert tabs into spaces.
Good luck and I hope to play your visual novel someday.


