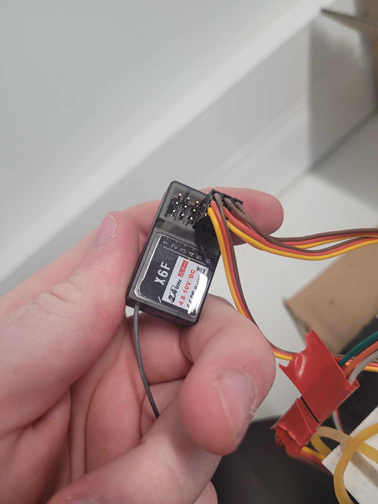
https://rc-shop-messmann.de/AMXRock-RCX8P-Scale-Crawler-Pick-Up-18-RTR-orange
https://components101.com/sensors/mpu6050-module
In this description you find a guide how to get your setup ready to build a new image to it.
First of all we need to download the arduino IDE, this can be downloaded from here:
https://www.arduino.cc/en/software
When you have done the downloading of the IDE, you need. Now you need to download an extra extension for the Arduino IDE, its found in the link below.
https://www.pjrc.com/teensy/td_download.html
The main part of downloading the extension is to insert the link to the json file under File > Preferences - The Json link is here https://www.pjrc.com/teensy/package_teensy_index.json. When you click OK the IDE will automatically download the package.
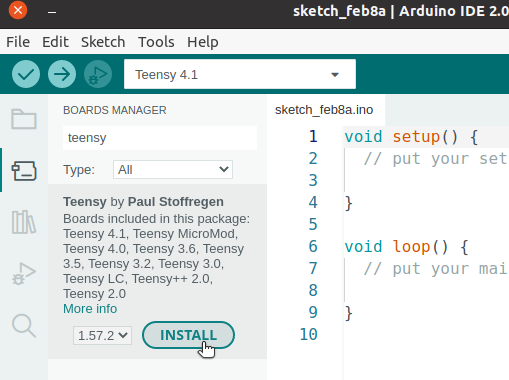
Now you have the make your IDE ready to flash a image to your Teensy FlightController. In the course we have been using a Teensy 3.2, so you have to select this as board. If you go to the Board Manager you can type in teensy, and download the Teensy boards. (See screenshot below).
When you downloaded this package you should be able to select Teensy 3.2 / 3.1.
The SWIGX_RCFC_MPU6050_Teensy32.ino file have som imports from a few different libaries. Some of the imports we need to manually download ourself with the Libary Manager inside the Arduino IDE. The following package you need to download before you will be able to compile the code.
| Package Name | Version |
|---|---|
| MAVLink | 2.0.4 |
| PWMServo | 2.1.0 |
| MadgwickAHRS | 1.2.0 |
| FastIMU | 1.2.6 |
After downloading all the packages you should now be click on the checkmark(Verify) in left corner. You will receive alot of errors when compiling, but don't worry. If a little windows popus up with this image, it is ready. Then simply just follow the guide, and press the button on the Teensy to program the new code.
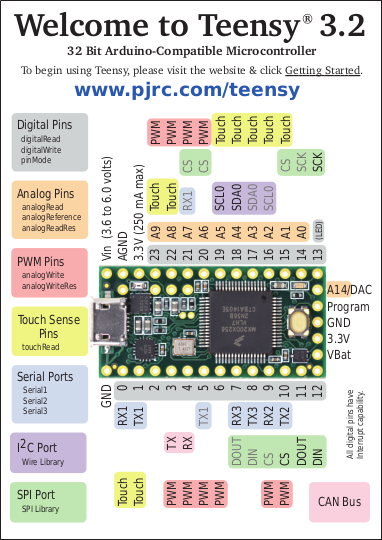
Here is a small description about the Teensy 3.2, and some important pins we are using to connect to AIR Unit(RPI4) and the Accelerometer(https://components101.com/sensors/mpu6050-module).
Below you see a picture of the Teensy FlightController with pins connected and names associated to it.
Below you will see the how the Fanatac steering wheel/buttons is connected to the OpenHD channels which connetcs to the Teensy FlightController channels in the code.
| OpenHD - Channels | Fanatec reference | PWM Range | Initial value | Description |
|---|---|---|---|---|
| 1 | Steering wheel | 1000-2000 | 1500 (Middle of the steering) | If you turn the wheel 1.5 rotation to left or right you will reach max/min. |
| 2 | Clutch | 1000-2000 | 2000 | |
| 3 | Throttle | 1000-2000 | 2000 | |
| 6 | Brake | 1000-2000 | 2000 | |
| 9 | Minus-button | 1000-2000 | 2000 | |
| 10 | Eye-button | 1000-2000 | 2000 | |
| 11 | !-button | 1000-2000 | 2000 | |
| 12 | Plus-button | 1000-2000 | 2000 | |
| 13 | Upshifter | 1000-2000 | 2000 | |
| 14 | Downshifter | 1000-2000 | 2000 | |
| 15 | Arrow-down-button | 1000-2000 | 2000 | |
| 16 | Button-1 | 1000-2000 | 2000 | See notes about differential |
| 17 | Button-4 | 1000-2000 | 2000 | |
| 18 | Button-3 | 1000-2000 | 2000 |
The above channels is visualized in the code below which you can find in the Github code.
//FANATEC wheel and pedals
ch1 = ov_chs.chan1_raw; //steering
ch2 = ov_chs.chan2_raw; //clutch
ch3 = ov_chs.chan3_raw; //throttle
ch6 = ov_chs.chan6_raw; //brake
ch9 = ov_chs.chan9_raw; //- button
ch10 = ov_chs.chan10_raw; //eye button
ch11 = ov_chs.chan11_raw; //! button
ch12 = ov_chs.chan12_raw; //+ button
ch13 = ov_chs.chan13_raw; //R flap (Upshifter)
ch14 = ov_chs.chan14_raw; //L flap (Downshifter)
ch15 = ov_chs.chan15_raw; //Arrow down button
ch16 = ov_chs.chan16_raw; //Button 1 - Used for middle differential
ch17 = ov_chs.chan17_raw; //Button 4 - Used for back differential
ch18 = ov_chs.chan18_raw; //Button 3 - Used for front differential
So for example the code block below shows that we uses ov_chs.chan3_raw directly into the map function, write the correct speed to our myservoesc, which is our speed. The range is as above from 1000 to 2000 in PWM, and the max value is 130, and min is 90 which is idle.
if (gear == 1)
{
    // NEW SPEEDER
    int speed = map(ov_chs.chan3_raw, 1000, 2000, 130, 90);
    myservoesc.write(speed);
}
We implemented a way to control when the car goes forward or backwards. This is a very simple implementation, and could be improved. But the thing is that you can control the gears by the upshifter and downshifter to change if the car should go forwards or backwards. Please notice that int backSpeed = map(ov_chs.chan3_raw, 1000, 2000, 70, 90); mapping function is different from the forwards mapping function. Their idle is identical with the value of 90, but the max value is lower than idle, which means it goes backwards.
//Upshifter
if(ch13 < 1500){
    if(gear < 1){
    gear++;
    }
}

//Downshifter
if(ch14 < 1500){
    if(gear > -1){
    gear--;
    }
}


if (gear == 1)
{
    // NEW SPEEDER
    int speed = map(ov_chs.chan3_raw, 1000, 2000, 130, 90);
    myservoesc.write(speed);
}

else if (gear == -1)
{
    // NEW REVERSE SPEED
    int backSpeed = map(ov_chs.chan3_raw, 1000, 2000, 70, 90);
    myservoesc.write(backSpeed);
}The car has three differentials: front, rear, and center. The front and rear differentials are responsible for managing individual wheel speeds, which is essential for smooth cornering. The center differential, distributes power between the front and rear axles.
Locking the front and rear differentials can improve traction on slippery surfaces by forcing both wheels on each axle to rotate at the same speed. This can be helpful in off-road situations or when dealing with challenging weather conditions.
While the code for the differentials are here in this repository, the physical parts are missing. On the car the differential needs to be connected to the controller, so it can get power and a pvm signal.
 This is the differential controller.
While using the RC car it is very important to check if the battery has enough power to properly power the air unit along with the flight controller. This can be checked on QOpenHD while the air unit is connected. The batteries have a short lifetime, and even though we can connect to the air unit, if the power is too low, then the flight controller won't work properly. This can be mitigated by connecting a powersupply (other than the battery) directly to the air unit. The battery can then be used to power only the flight controller, the camera and the accelerometer.
The UI in QOpenHD doesn't always display correct data. For instance, sometimes the flight controller appeared as disconnected, while in reality, it was connected. We found, that as long as the air unit displays "Found 1" (for the flight controller) under status in QOpenHD, then the flight controller is connected, even though the status of the flight controller appears as disconnected. (INSERT PICTURE OF THIS)
As mentioned above the battery has a short usage time. While debugging the battery, we found, that if you measure the voltage of the battery without load, it appears as working fine. However, when the battery is under load, we found that the voltage probably dropped quickly to an insufficient value. However, we couldn't make a concrete conclusion due to limited measuring equipment.
It is important that you communicate with the air unit on a frequency with low activity. If another group is using an air unit on the same frequency, then the ground station might connect to the wrong air unit. This can be hard to detect, if their air unit is the same Raspberry Pi model as yours.
The RC setup is kinda janky. There are a lot of intertwined wires. Due to this a lot of hardware problems can occur, such as electrical noise/disturbance and loose connections. Make sure that you have a clear overview of which wire does what, and that they are connected properly. It is also important to check, that the wires are made correctly, so they actually function as expected.
The flight controller must be up and running when the air unit is booted. Otherwise the air unit might not be able to find the flight controller.
Below we see the screen from the system status, here we see it says NOT FOUND, and this means that the Air unit has no connection to the Flight Controller.

This image is more correct, because we can see it says FOUND:1. To the right we that the Flight Controller is alive, but if this side turns gray, don't worry, the flight Controller should still be working.
The documentation of the RC car does not include information about the servo motor. Therefore, in order to find the right mappings between the raw channel data and the data send to the motor, we had to do a lot of trial and error with different values.
One of the main problems we where experincing with the car was uneven steering. The car would turn more to the right than the left. Therefore we undervent extensive debugging with an analog discovery 2 to research which offset would solve this issue. Firstly we tested with the normal remote controller, because the issue didn't appear when using this. We then tested with the steering wheel and tried to match the PWM signal with the PWM signal obsevered with the remote controller.
Here we analyzed a lot of different PWM signals with different steering-trims. We observed unexptected behavior during this testing, and was unable to find the exact pattern of what was happening. Therefore we changed tactics and researched the myservo.attach() function. We found a different setup for this, with other parameters. The parameters: myservo.attach(5,544,2400); made it work. The steering has now been improved to work as expected with the wheel. Furthermore we implemented a way to adjust the steering trim with + and - buttons if needed for calibration.


