✔️ Protocol Agnostic - Currently supporting HTTP, HTTPS, HTTP/2. Other protocols are on the way.
✔️ Scenario-Based - Create your flow in a JSON file. Without a line of code!
✔️ Different Load Types - Test your system's limits across different load types.
ddosify is available via Docker, Homebrew Tap, and downloadable pre-compiled binaries from the releases page for macOS, Linux and Windows.
docker run -it --rm ddosify/ddosifybrew install ddosify/tap/ddosify- For arm architectures change
ddosify_amd64toddosify_arm64orddosify_armv6. - Superuser privilege is required.
# For Redhat based (Fedora, CentOS, RHEL, etc.)
rpm -i https://github.com/ddosify/ddosify/releases/latest/download/ddosify_amd64.rpm

# For Debian based (Ubuntu, Linux Mint, etc.)
wget https://github.com/ddosify/ddosify/releases/latest/download/ddosify_amd64.deb
dpkg -i ddosify_amd64.deb

# For Alpine
wget https://github.com/ddosify/ddosify/releases/latest/download/ddosify_amd64.apk
apk add --allow-untrusted ddosify_amd64.apk

# For Arch Linux
git clone https://aur.archlinux.org/ddosify.git
cd ddosify
makepkg -sri
Windows exe from the releases page
- Download *.zip file for your architecture. For example download ddosify version vx.x.x with amd64 architecture: ddosify_x.x.x.zip_windows_amd64
- Unzip
ddosify_x.x.x_windows_amd64.zip - Open Powershell or CMD (Command Prompt) and change directory to unzipped folder:
ddosify_x.x.x_windows_amd64 - Run ddosify:
.\ddosify.exe -t target_site.com- The script requires root or sudo privileges to move ddosify binary to
/usr/local/bin. - The script attempts to detect your operating system (macOS or Linux) and architecture (arm64, x86, amd64) to download the appropriate binary from the releases page.
- By default, the script installs the latest version of
ddosify. - If you have problems, check common issues
- Required packages:
curlandsudo
curl -sSfL https://raw.githubusercontent.com/ddosify/ddosify/master/scripts/install.sh | shgo install -v go.ddosify.com/ddosify@latestThis section aims to show you how to use Ddosify without deep dive into its details easily.
-
ddosify -t target_site.comThe above command runs a load test with the default value that is 100 requests in 10 seconds.
-
ddosify -t target_site.com -n 1000 -d 20 -p HTTPS -m PUT -T 7 -P http://proxy_server.com:80Ddosify sends a total of 1000 PUT requests to https://target_site.com over proxy http://proxy_server.com:80 in 20 seconds with a timeout of 7 seconds per request.
-
ddosify -t target_site.com -o stdout-json | jq .avg_durationDdosify outputs the result in JSON format. Then
jq(or any other command-line JSON processor) fetches theavg_duration. The rest depends on your CI/CD flow logic. -
ddosify -config config_examples/config.jsonDdosify first sends HTTP/2 POST request to https://test_site1.com/endpoint_1 using basic auth credentials test_user:12345 over proxy http://proxy_host.com:proxy_port and with a timeout of 3 seconds. Once the response is received, HTTPS GET request will be sent to https://test_site1.com/endpoint_2 along with the payload included in config_examples/payload.txt file with a timeout of 2 seconds. This flow will be repeated 20 times in 5 seconds and response will be written to stdout.
You can configure your load test by the CLI options or a config file. Config file supports more features than the CLI. For example, you can't create a scenario-based load test with CLI options.
ddosify [FLAG]Flag |
Description | Type | Default | Required? |
|---|---|---|---|---|
-t |
Target website URL. Example: https://ddosify.com | string |
- | Yes |
-n |
Total request count | int |
100 |
No |
-d |
Test duration in seconds. | int |
10 |
No |
-p |
Protocol of the request. Supported protocols are HTTP, HTTPS. HTTP/2 support is only available by using a config file as described. More protocols will be added. | string |
HTTPS |
No |
-m |
Request method. Available methods for HTTP(s) are GET, POST, PUT, DELETE, HEAD, PATCH, OPTIONS | string |
GET |
No |
-b |
The payload of the network packet. AKA body for the HTTP. | string |
- | No |
-a |
Basic authentication. Usage: -a username:password |
string |
- | No |
-h |
Headers of the request. You can provide multiple headers with multiple -h flag. |
string |
- | No |
-T |
Timeout of the request in seconds. | int |
5 |
No |
-P |
Proxy address as host:port. -P http://user:pass@proxy_host.com:port' |
string |
- | No |
-o |
Test result output destination. Supported outputs are [stdout, stdout-json] Other output types will be added. | string |
stdout |
No |
-l |
Type of the load test. Ddosify supports 3 load types. | string |
linear |
No |
-config |
Config File of the load test. | string |
- | No |
-version |
Prints version, git commit, built date (utc), go information and quit | - | - | No |
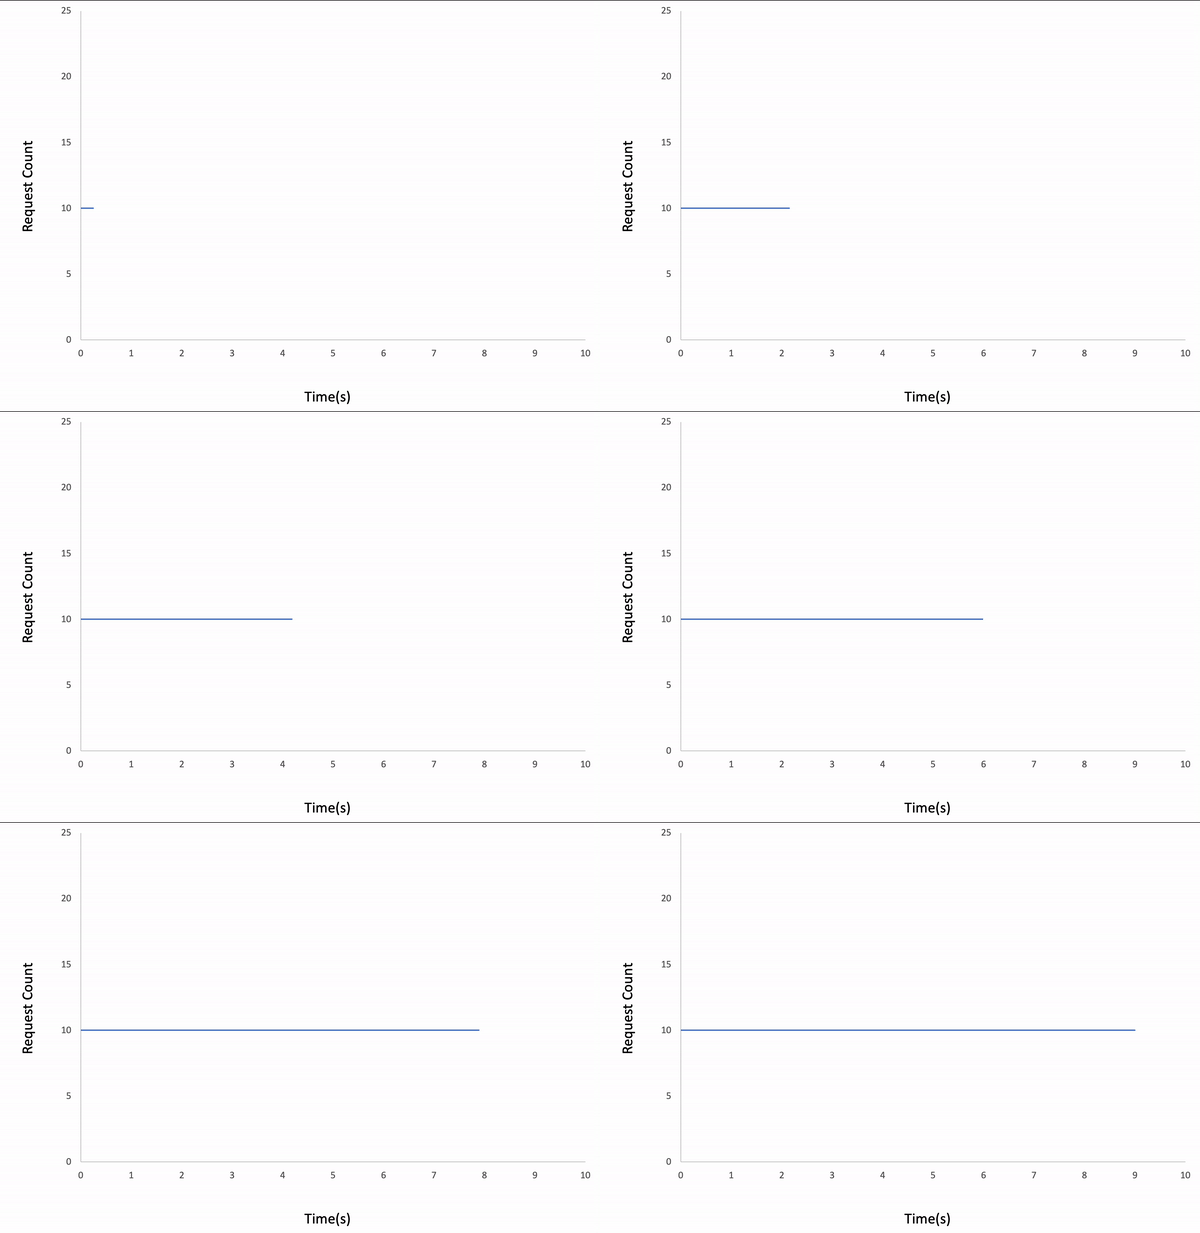
ddosify -t target_site.com -l linearResult:
Note: If the request count is too low for the given duration, the test might be finished earlier than you expect.
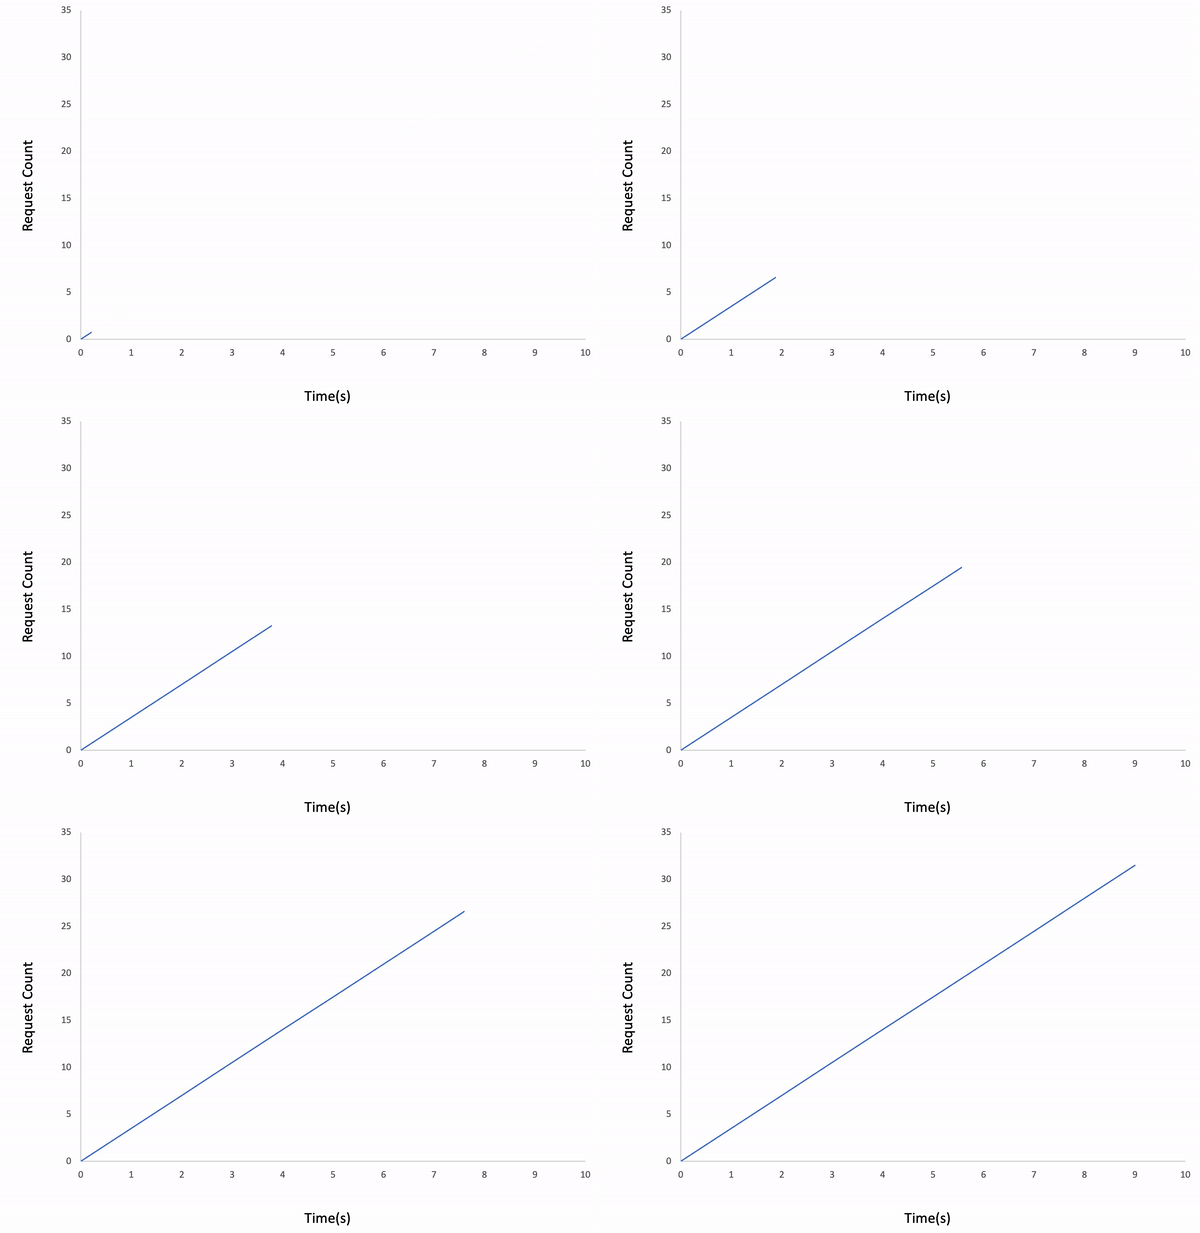
ddosify -t target_site.com -l incrementalResult:
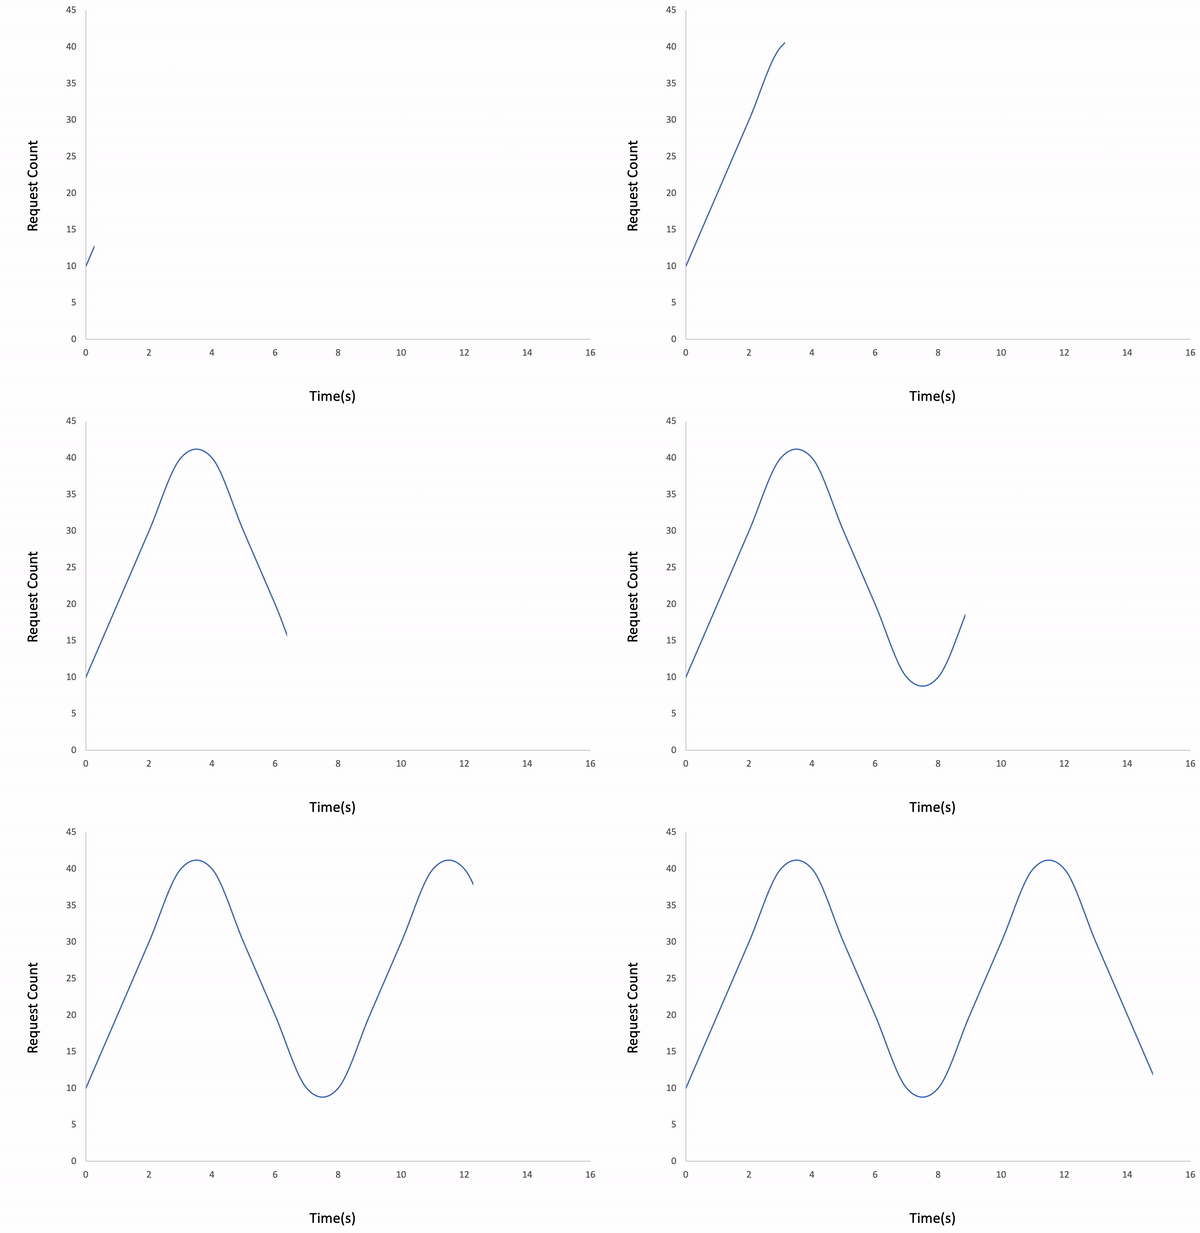
ddosify -t target_site.com -l wavedResult:
Config file lets you use all capabilities of Ddosify.
The features you can use by config file;
- Scenario creation
- Custom load type creation
- Payload from a file
- Multipart/form-data payload
- Extra connection configuration, like keep-alive enable/disable logic
- HTTP2 support
Usage;
ddosify -config <json_config_path>
There is an example config file at config_examples/config.json. This file contains all of the parameters you can use. Details of each parameter;
-
request_countoptionalThis is the equivalent of the
-nflag. The difference is that if you have multiple steps in your scenario, this value represents the iteration count of the steps. -
load_typeoptionalThis is the equivalent of the
-lflag. -
durationoptionalThis is the equivalent of the
-dflag. -
manual_loadoptionalIf you are looking for creating your own custom load type, you can use this feature. The example below says that Ddosify will run the scenario 5 times, 10 times, and 20 times, respectively along with the provided durations.
request_countanddurationwill be auto-filled by Ddosify according tomanual_loadconfiguration. In this example,request_countwill be 35 and thedurationwill be 18 seconds. Alsomanual_loadoverridesload_typeif you provide both of them. As a result, you don't need to provide these 3 parameters when usingmanual_load."manual_load": [ {"duration": 5, "count": 5}, {"duration": 6, "count": 10}, {"duration": 7, "count": 20} ]
-
proxyoptionalThis is the equivalent of the
-Pflag. -
outputoptionalThis is the equivalent of the
-oflag. -
stepsmandatoryThis parameter lets you create your scenario. Ddosify runs the provided steps, respectively. For the given example file step id: 2 will be executed immediately after the response of step id: 1 is received. The order of the execution is the same as the order of the steps in the config file.
Details of each parameter for a step;
-
idmandatoryEach step must have a unique integer id.
-
urlmandatoryThis is the equivalent of the
-tflag. -
Name of the step.
-
protocoloptionalThis is the equivalent of the
-pflag. -
methodoptionalThis is the equivalent of the
-mflag. -
headersoptionalList of headers with key:value format.
-
payloadoptionalThis is the equivalent of the
-bflag. -
payload_fileoptionalIf you need a long payload, we suggest using this parameter instead of
payload. -
Use this for
multipart/form-dataContent-Type.Accepts list of
form-fieldobjects, structured as below;{ "name": [field-name], "value": [field-value|file-path|url], "type": <text|file>, // Default "text" "src": <local|remote> // Default "local" }Example: Sending form name-value pairs;
"payload_multipart": [
    {
        "name": "[field-name]",
        "value": "[field-value]"
    }
]
Example: Sending form name-value pairs and a local file;
"payload_multipart": [
    {
        "name": "[field-name]",
        "value": "[field-value]",
    },
    {
        "name": "[field-name]",
        "value": "./test.png",
        "type": "file"
    }
]
Example: Sending form name-value pairs and a local file and a remote file;
"payload_multipart": [
    {
        "name": "[field-name]",
        "value": "[field-value]",
    },
    {
        "name": "[field-name]",
        "value": "./test.png",
        "type": "file"
    },
    {
        "name": "[field-name]",
        "value": "http://test.com/test.png",
        "type": "file",
        "src": "remote"
    }
]
Note: Ddosify adds
Content-Type: multipart/form-data; boundary=[generated-boundary-value]header to the request when usingpayload_multipart. -
timeoutoptionalThis is the equivalent of the
-Tflag. -
Sleep duration(ms) before executing the next step. Can be an exact duration or a range.
Example: Sleep 1000ms after step-1;
"steps": [
    {
        "id": 1,
        "url": "target.com/endpoint1",
        "sleep": "1000"
    },
    {
        "id": 2,
        "url": "target.com/endpoint2",
    }
]
Example: Sleep between 300ms-500ms after step-1;
"steps": [
    {
        "id": 1,
        "url": "target.com/endpoint1",
        "sleep": "300-500"
    },
    {
        "id": 2,
        "url": "target.com/endpoint2",
    }
]
-
authoptionalBasic authentication.
"auth": {
    "username": "test_user",
    "password": "12345"
}
-
othersoptionalThis parameter accepts dynamic key: value pairs to configure connection details of the protocol in use.
"others": {
    "keep-alive": true,              // Default false
    "disable-compression": false,    // Default true
    "h2": true,                      // Enables HTTP/2. Default false.
    "disable-redirect": true         // Default false
}
-
"ddosify" can’t be opened because Apple cannot check it for malicious software.
- Open
/usr/local/bin - Right click
ddosifyand select Open - Select Open
- Close the opened terminal
You can join our Discord Server for issues, feature requests, feedbacks or anything else.
This repository includes the single-node version of the Ddosify Loader. Ddosify Cloud will be available soon. It will support multi-location based distributed load testing and more features.
Join the waitlist: https://ddosify.com
Licensed under the AGPLv3: https://www.gnu.org/licenses/agpl-3.0.html


