This project will demonstrate the implementation of LEMP stack on AWS EC2 server.
LEMP refers to a collection of open-source software that is commonly used together to serve web applications. The term LEMP is an acronym that represents the configuration of a Linux operating system with an nginx (pronounced engine-x, hence the E in the acronym) web server, with site data stored in a MySQL database and dynamic content processed by PHP.
This project will give you a better understanding of what the LEMP stack is and how to implement it on Amazon Web Services (AWS). AWS is the biggest Cloud service provider, and it offers a free tier account that we will be able to utilize for our project. For the purpose of this project, we will be employing EC2 (Elastic Compute Cloud) service.
In order to complete this project, we need to begin by setting up an AWS account and a virtual server with Ubuntu Server OS.
Step 1: Create free AWS account. Once you have created your AWS account, navigate to the login page and type in your credentials.

Step 2: After signing-in to your AWS account, navigate to the top-right corner of your screen and select your preferred region. This should be the closest region to your physical location.

Step 3: Proceed to the search bar and type in EC2. Select the EC2 service that appears on top.

Step 4: Click on the orange 'Launch Instances' button that appeears on the top right side of your screen.

Step 5: Choose the Ubuntu Server 20.04 LTS (HVM) as the Amazon Machine Image (AMI) from the list of AMIs provided.

Step 6: Select t2.micro as the instance type and click REVIEW AND LAUNCH.

Step 7: and then on the next page choose LAUNCH.

Step 8: There will be a window asking you to create a key pair. Select the 'Create a new key pair' option from the drop down menu and then select "Download". Make sure you know the location the file was downloaded to and don't lose the .pem file. You will need this file in order to connect into your server from your local PC. After you downloaded the key pair, check the box for the acknowledgement, and then click on "Launch Instances".

Step 9: You've successfully launched an EC2 instance!

Click on 'View Instances' to see your EC2 instance.

Step 1: On your local Linux machine, change your working directory to the location where your downloaded key pair .pem file exists. And use the 'ls' command to check if the file exists in that folder.

Step 2: Use the following commang to change the premissions for the private key file (.pem), otherwise you can get an error 'Bad permissions'.

Step 3: Get your public IP address from your instance.

Step 4: Connect to your EC2 instance by running the following command.

When connected, your ip-address will be shown on your terminal.

NGINX (pronounced "engine X", stylized as NGINX, nginx or NginX, is open source software for web serving, reverse proxying, caching, load balancing, media streaming, and more. It started out as a web server designed for maximum performance and stability. In addition to its HTTP server capabilities, NGINX can also function as a proxy server for email (IMAP, POP3, and SMTP) and a reverse proxy and load balancer for HTTP, TCP, and UDP servers.
Step 1: Start off by updating your server’s package index.

Step 2: Next, you can use the following command to get Nginx installed.

You will be prompted to confirm your installation enter Y using your keyboard.

Step 3: To verify that your installation was successful and Nginx is now running on your Ubuntu server run the follwing command on your terminal.

The result should look like this if your installation is working perfectly.

If it is green and running, then you did everything correctly - you have just launched your first Web Server in the Clouds!
Step 4: Before we can receive any traffic by our Web Server, we need to open TCP port 80 which is the default port that web browsers use to access web pages on the Internet. We have TCP port 22 open by default on our EC2 machine to access it via SSH, so we need to add a rule to EC2 configuration to open inbound connection through port 80:
Open your AWS Management Console and Click on your EC2 instance. Click on the 'Security' tab.
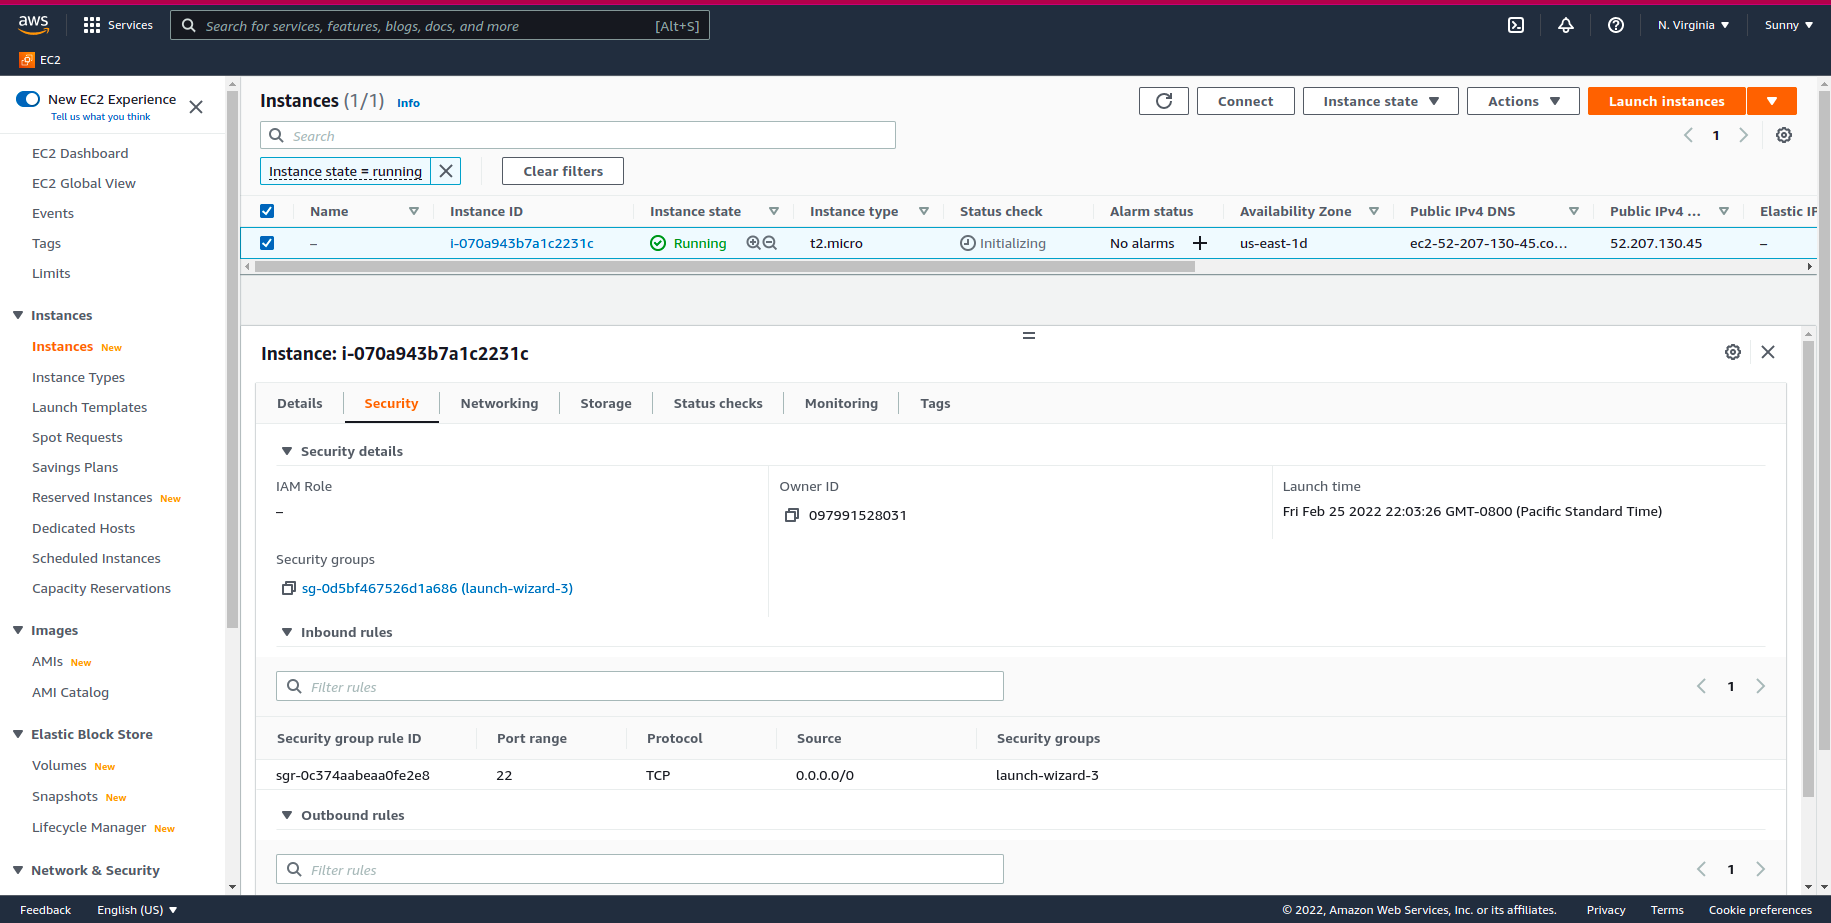
Step 5: Click on the link under the 'Securty Groups'. You will open a page similar to this one.

Next, click on 'Edit Inbound Rules' box found on the bottom right side of your screen.
Step 6: Click on 'Add Rule' and add the HTTP, TCP port 80 and allow source from anywhere by using 0.0.0.0


Step 7: Our server is running and we can access it locally and from the Internet (Source 0.0.0.0/0 means 'from any IP address'). First, let us try to check how we can access it locally on our Ubuntu shell, run 'curl http://localhost:80' command.


Step 8: Now it is time for us to test how our Nginx server can respond to requests from the Internet. Open a web browser of your choice and try to access following url 'http://Public-IP-Address:80' Replace the 'Public-IP-Address' with the public IP address of you AWS EC2 server. You should be able to see this page displayed on your screen.

Your web server is now correctly installed and accessible through your firewall.
Now that we have your Nginx server up and running, you need to install a Database Management System (DBMS) to be able to store and manage data for your site in a relational database. MySQL is a popular relational database management system used within PHP environments.
Step 1: Use ‘apt’ to acquire and install this software.

Hit the Y key and ENTER when this prompt appears on your screen.

Step 2: Next, run security script to remove insecure default settings and lock down access to your database system. Start the interactive script by running:

This will ask if you want to configure the VALIDATE PASSWORD PLUGIN. Answer Y for yes, or any other key to continue without enabling. I recommend not enabling this plugin for now and proceed by pressing N or any other key on your keyboard to go to the next step.


Your server will next ask you to select and confirm a password for the MySQL root user (The database root user is an administrative user with full privileges over the database system.)
Step 3: By default, a MySQL installation has an anonymous user, allowing anyone to log into MySQL without having to have a user account created for them. You should remove this by typing 'Y' for each prompt that follows.

Step 4: check whether you can log in to the MySQL console.

To exit MySQL console, run:

Your MySQL server is now installed and secured. Next, we will install PHP, the final component in the LEMP stack.
You have Nginx installed to serve your content and MySQL installed to store and manage your data. Now you can install PHP to process code and generate dynamic content for the web server.
PHP is a script on the server-side used for the creation of Static or Dynamic Web sites or Web applications. PHP is a pre-processor for hypertext, which used to stand for home pages. The software used to build web applications is an open-source, server-side scripting language. We say a program designed for automated work by writing a script-based language (code lines). It is suitable for the output and construction of dynamic web pages for web applications, e-commerce applications, and database applications.
Let's begin the installation.
To start with, run these two commands at once on your terminal.

Confirm Y for Yes when the prompt appears.

You now have your PHP components installed. Next, you will configure Nginx to use them.
In this project, we will set up a domain called 'projectLEMP', but you can replace this with any domain of your choice.
Step 1:
On Ubuntu 20.04, Nginx has one server block enabled by default and is configured to serve documents out of a directory at /var/www/html. While this works well for a single site, it can become difficult to manage if you are hosting multiple sites. Instead of modifying /var/www/html, we’ll create a directory structure within /var/www for the your_domain website, leaving /var/www/html in place as the default directory to be served if a client request does not match any other sites.
Create the directory for projectLEMP using 'mkdir' command

Step 2: Next, assign ownership of the directory.

Step 3: Open a new configuration file in Nginx’s sites-available directory using your preferred command-line editor. For this project we will use nano.

This will create a new blank file where you can write the following configurations.

Once you are done editing enter ctrl+X the press the Y key followed by the Enter key to exit the nano editor.
Step 4: Activate your configuration by linking to the config file from Nginx’s sites-enabled directory.

Step 5: Test your configuration for syntax errors by running the following command.

You should see something like this on your screen.

Step 6: We also need to disable default Nginx host that is currently configured to listen on port 80.

Step 7: Reload Nginx to apply the changes.

Step 8: Congratulations! Your new website is now active!!! But the web root /var/www/projectLEMP is still empty. Create an index.html file in that location so that we can test that your new server block works as expected.

Step 9: Now go to your browser and try to open your website URL using IP address. You should see a screen similar to this one on your browser.

Your LEMP stack is now completely set up. Good job!!!
You can test it to validate that Nginx can correctly handle .php files off to your PHP processor. You can do this by creating a test PHP file in your document root. Open a new file called info.php within your document root in your text editor.

This will open a blank file. Add the following text, which is valid PHP code, inside the file.

Once you are done editing enter ctrl+X the press the Y key followed by the Enter key to exit the nano editor.
You can now access this page in your web browser by visiting the domain name or public IP address you’ve set up in your Nginx configuration file, followed by /info.php:

After checking the relevant information about your PHP server through that page, it’s best to remove the file you created as it contains sensitive information about your PHP environment -and your Ubuntu server.

You can always regenerate this file if you need it later.
Let's create a test database (DB) with simple “To do list” and configure access to it, so the Nginx website would be able to query data from the DB and display it. We will create a database named example_database and a user named example_user, but you can replace these names with different values.
Step 1: connect to the MySQL console using the 'root' account.

Step 2: To create a new database, run the following command from your MySQL console.

Step 3: create a new user and grant him/her full privileges on the database you have just created.

Step 4: Give this user permission over the database.

Step 5: Exit from the MySQL console and Test if the new user has the proper permissions by logging in to the MySQL console again using the custom user credentials.

This will prompt you for the password used when creating the user.

Step 6: After logging in to the MySQL console, confirm that you have access to the database.

This will give you the following output.

Step 7: Next, we’ll go ahead and create a test table named todo_list. Run the following statement from your MySQL console.

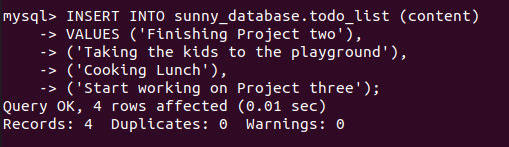
Step 8: Insert a few rows of content in the test table. And repeat the next command a few times, using different VALUES.
Step 9: Exit the MySQL console after confirming that the data was successfully saved to your table.

Now you can create a PHP script that will connect to MySQL and query for your content.
Create a new PHP file in your custom web root directory using nano.


Save and close the file when you are done editing.
You can now access this page in your web browser by visiting the domain name or public IP address configured for your website, followed by /todo_list.php. If you see a page like this, showing the content you’ve inserted in your test table, your PHP environment is ready to connect and interact with your MySQL server.

Congratulations! You have successfully built a flexible foundation for serving PHP websites and applications to your visitors, using Nginx as web server and MySQL as database management system.
This brings us to the end of this project.