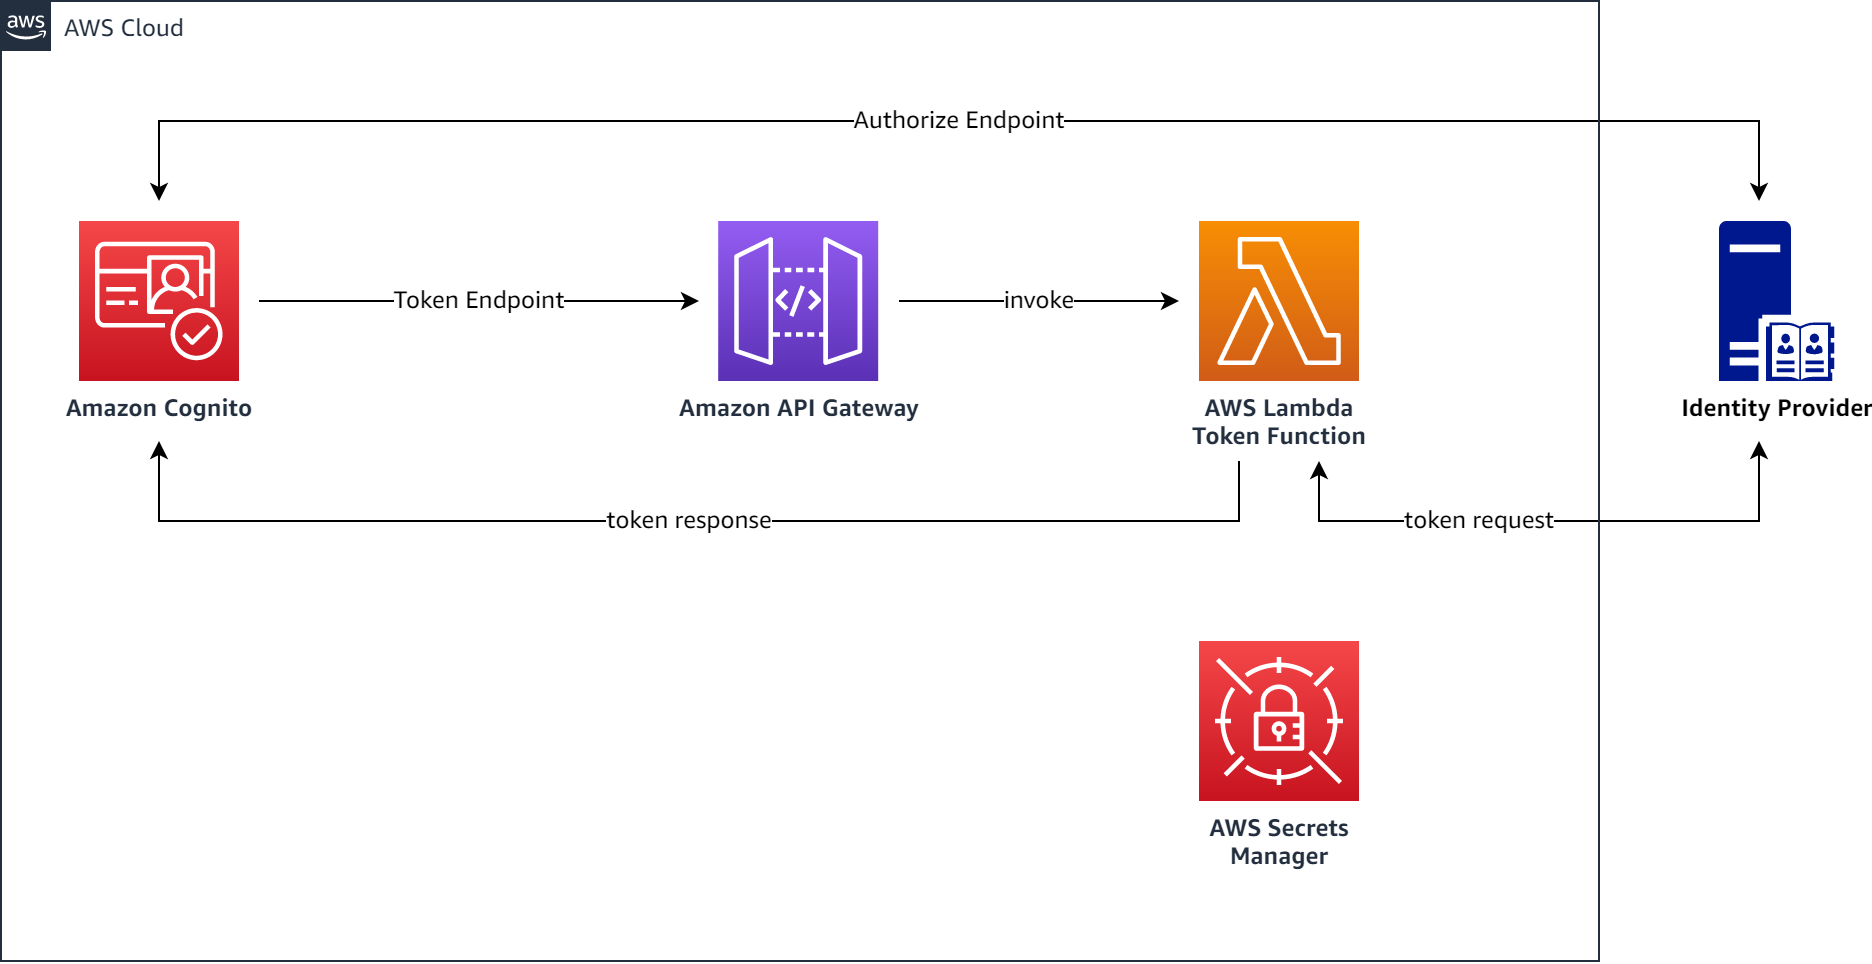
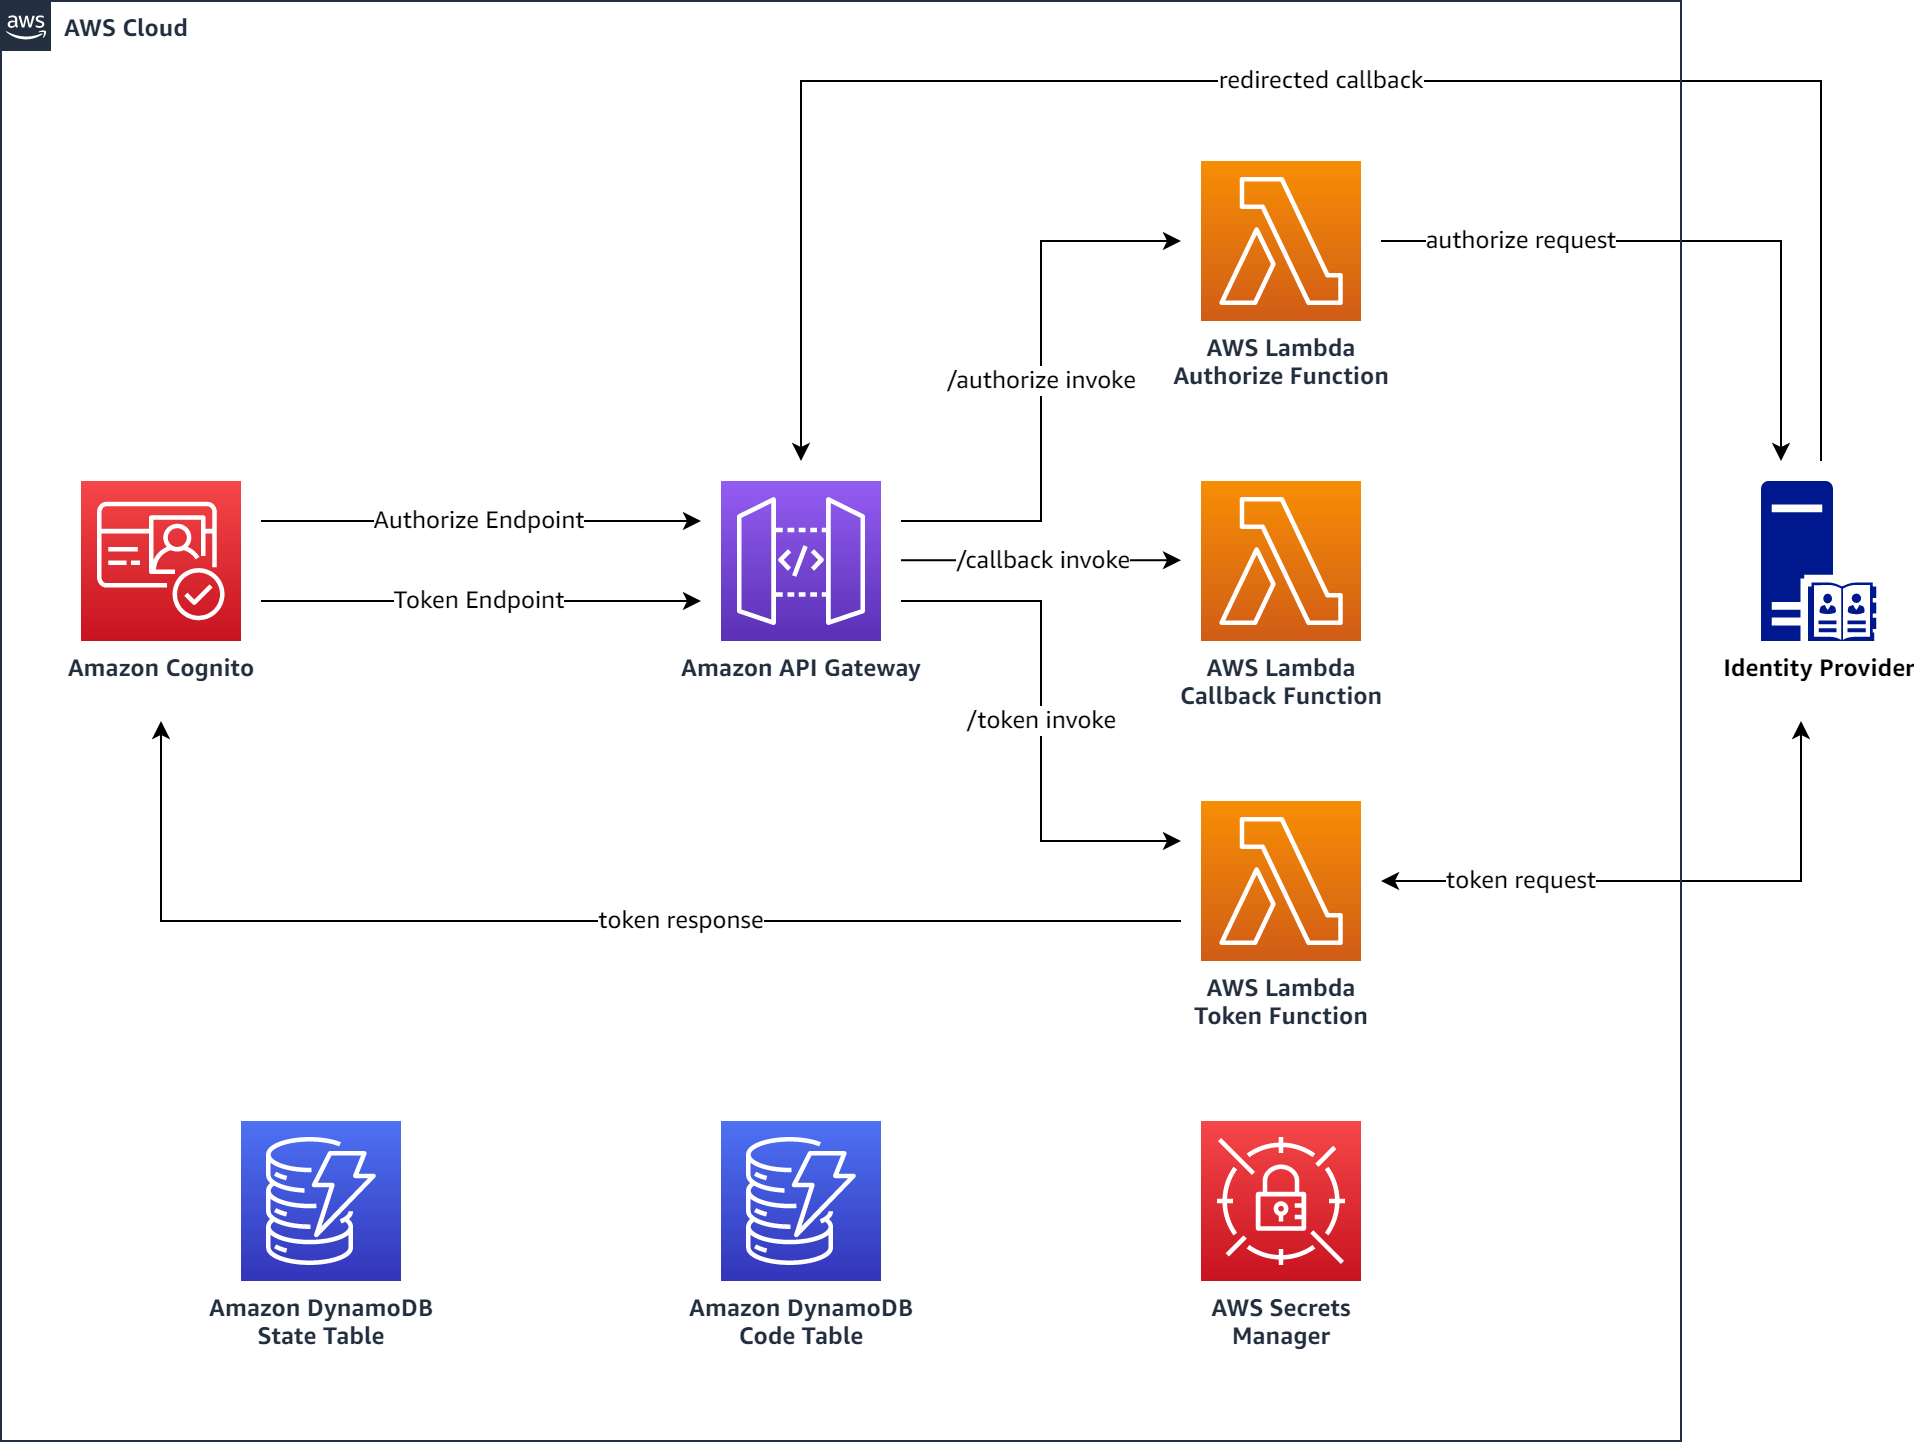
This sample shows how to deploy a proxy between an Amazon Cognito User Pool and a 3rd party OIDC identity provider. It specifically focuses on two use-cases that might be requirements of the IdP you want to integrate with:
- use a private key JWT instead of a client secret for client authentication
- leverage a Proof Key for Code Exchange (PKCE), which extends the authentication code flow
This repository contains the building blocks for all communication between a Cognito User Pool and a 3rd party OIDC IdP to add PKCE and Private Key JWT functionality. The main components are defined as:
- Lambda Function code in Python for handling authorize, callback and token requests in the lambda directory
- two CDK stacks - one with PKCE, one without. You can toggle the use of PKCE in the context file (see "Deployment" section)
This repository does not contain a front-end application to integrate with the Cognito User Pool. The provisioned resources work without any frontend application but if you want to use it in an end-to-end example, you can:
- use your existing application - just retrieve the User Pool details from the console or the CLI after you deployed the stack and configure your own application accordingly
- check out this repo for a single page application with react and Cognito.
- this blog for a high-level overview of the concept and use-case
- simplified request flow for private key JWT
- detailed flow docs for more insights into the request flow
This project uses Python 3.10 with virtualenv.
First, from the root of this repo, create a virtualenv:
$ python -m venv .venv
After the virtualenv is created, you can use the following step to activate your virtualenv.
$ source .venv/bin/activate
Once the virtualenv is activated, you can install the required dependencies.
(.venv) $ pip install -r requirements.txt
- use CDK 2.76+ - how to install CDK
- set up your local environment (see above)
- set up your IdP - here is an example with Okta
- have an AWS account ready with sufficient permissions to deploy the resources of the stack
Copy the cdk.context.template file to a new file called cdk.context.json and fill in the required information. This holds all configuration items necessary for integrating Cognito with your IdP through the proxy. You can find an example with Okta endpoints here, under "Retrieve OIDC endpoints".
Note: PKCE is set to "false" by default. Make sure to set it to true, if you need it.
(.venv) $ cp cdk.context.template cdk.context.json
Install the required layer files before deployment. The Lambda function to handle token requests has a 3rd party python library depenency, which requires this layer.
(.venv) $ pip install -r ./lambda/token/requirements.txt --target ./layers/token/python --only-binary=":all:" --platform manylinux2014_x86_64
After setting all parameters in cdk.context.json and installing the layer files, you can go on and deploy the stack
(.venv) $ cdk deploy
or if you use a aws cli profile:
(.venv) $ cdk deploy --profile YOURPROFILE
After successful deployment, retrieve ApiGwCallbackEndpoint (if you use PKCE) and the CognitoIdpResponseUri from the output section and share them as allowed redirect / callback URLs in your IdPs application configuration.
You have three options to generate a key pair for this sample:
-
OPTION: Some identity providers allow you to create a private / public key pair when configuring the application. E.g. in Okta, see "Integrate a key pair"
-
OPTION: You can create a key pair with the
generate-keys.pyscript in thescriptsfolder of this repo (make sure to have installed all dependencies from therequirements.txt)
(.venv) $ python ./scripts/generate-keys.py
This creates two json files in ./local: private-key.json and the derived public-key.json.
- OPTION: Create your own private / public key pair and convert it to JWK format with a library or cli tool of your choice. The generated private key should look like this:
{
	"d":"Mz3EZSSe...",
	"dp":"FIZyTNP9...",
	"dq":"wUSOQSYb...",
	"e":"AQAB",
	"kid":"5e5354ac-...",
	"kty":"RSA",
	"n":"dx-0HVhw...",
	"p":"kSAg-2HF...",
	"q":"tZL8Z7Uy-...",
	"qi":"ZCTDhS6s..."
}
The stack deploys an empty secret in Secrets Manager that you need to populate with your private key. Retrieve the ARN of the empty secret in AWS Secrets Manager from the CDK or CloudFormation Stack output section:

With that, upload the key - if you used the script to generate the key pair, run the following command with the correct ARN. Make sure to specify the AWS CLI profile if you use one by adding --profile YOURPROFILE:
$ SECRET_ARN=YOURSECRETARN

$ aws secretsmanager put-secret-value \
--secret-id $SECRET_ARN \
--secret-string file://./local/private_key.json
If you used another option, either point the --secret-string file://... to where you stored the private key or paste your private key in-line:
$ SECRET_ARN=YOURSECRETARN

$ aws secretsmanager put-secret-value \
--secret-id $SECRET_ARN \
--secret-string "{\"d\":\"Mz3EZSSe...\",\"dp\":\"FIZyTNP9...\",\"e\":\"..."...}"
If you did not go with option 1 to create the keys, you need to head to the application configuration of your IdP and upload the public key.
First make sure, the key is in JWK format. It should look like this and needs to have the same kid as the private key:
{
	"e": "AQAB",
	"kid": "5e5354ac-...",
	"kty": "RSA",
	"n": "7GO7iOM6..."
}
To upload it, see here, under "Integrate a key pair" for an example in Okta.
It is recommended to rotate the private key regularly. How often, is dependent on your own requirements. There are different ways to approach key rotation in this case but all have one important detail in common: You must only rotate the private key once you have shared the associated public key with your IdP.
The steps to rotate should follow this order of operations:
- create a new private / public key pair with a new "kid"
- upload the new public key to your IdP
- upload the new private key to secrets manager
- IMPORTANT: delete the old public key from the IdP
To remove all resources from your AWS account, run the following command:
$ cdk destroy
Make sure to also remove the application integration on the IdP side.

