[Paper] [Project Page]
Guy Ohayon, Tomer Michaeli, Michael Elad
Technion—Israel Institute of Technology
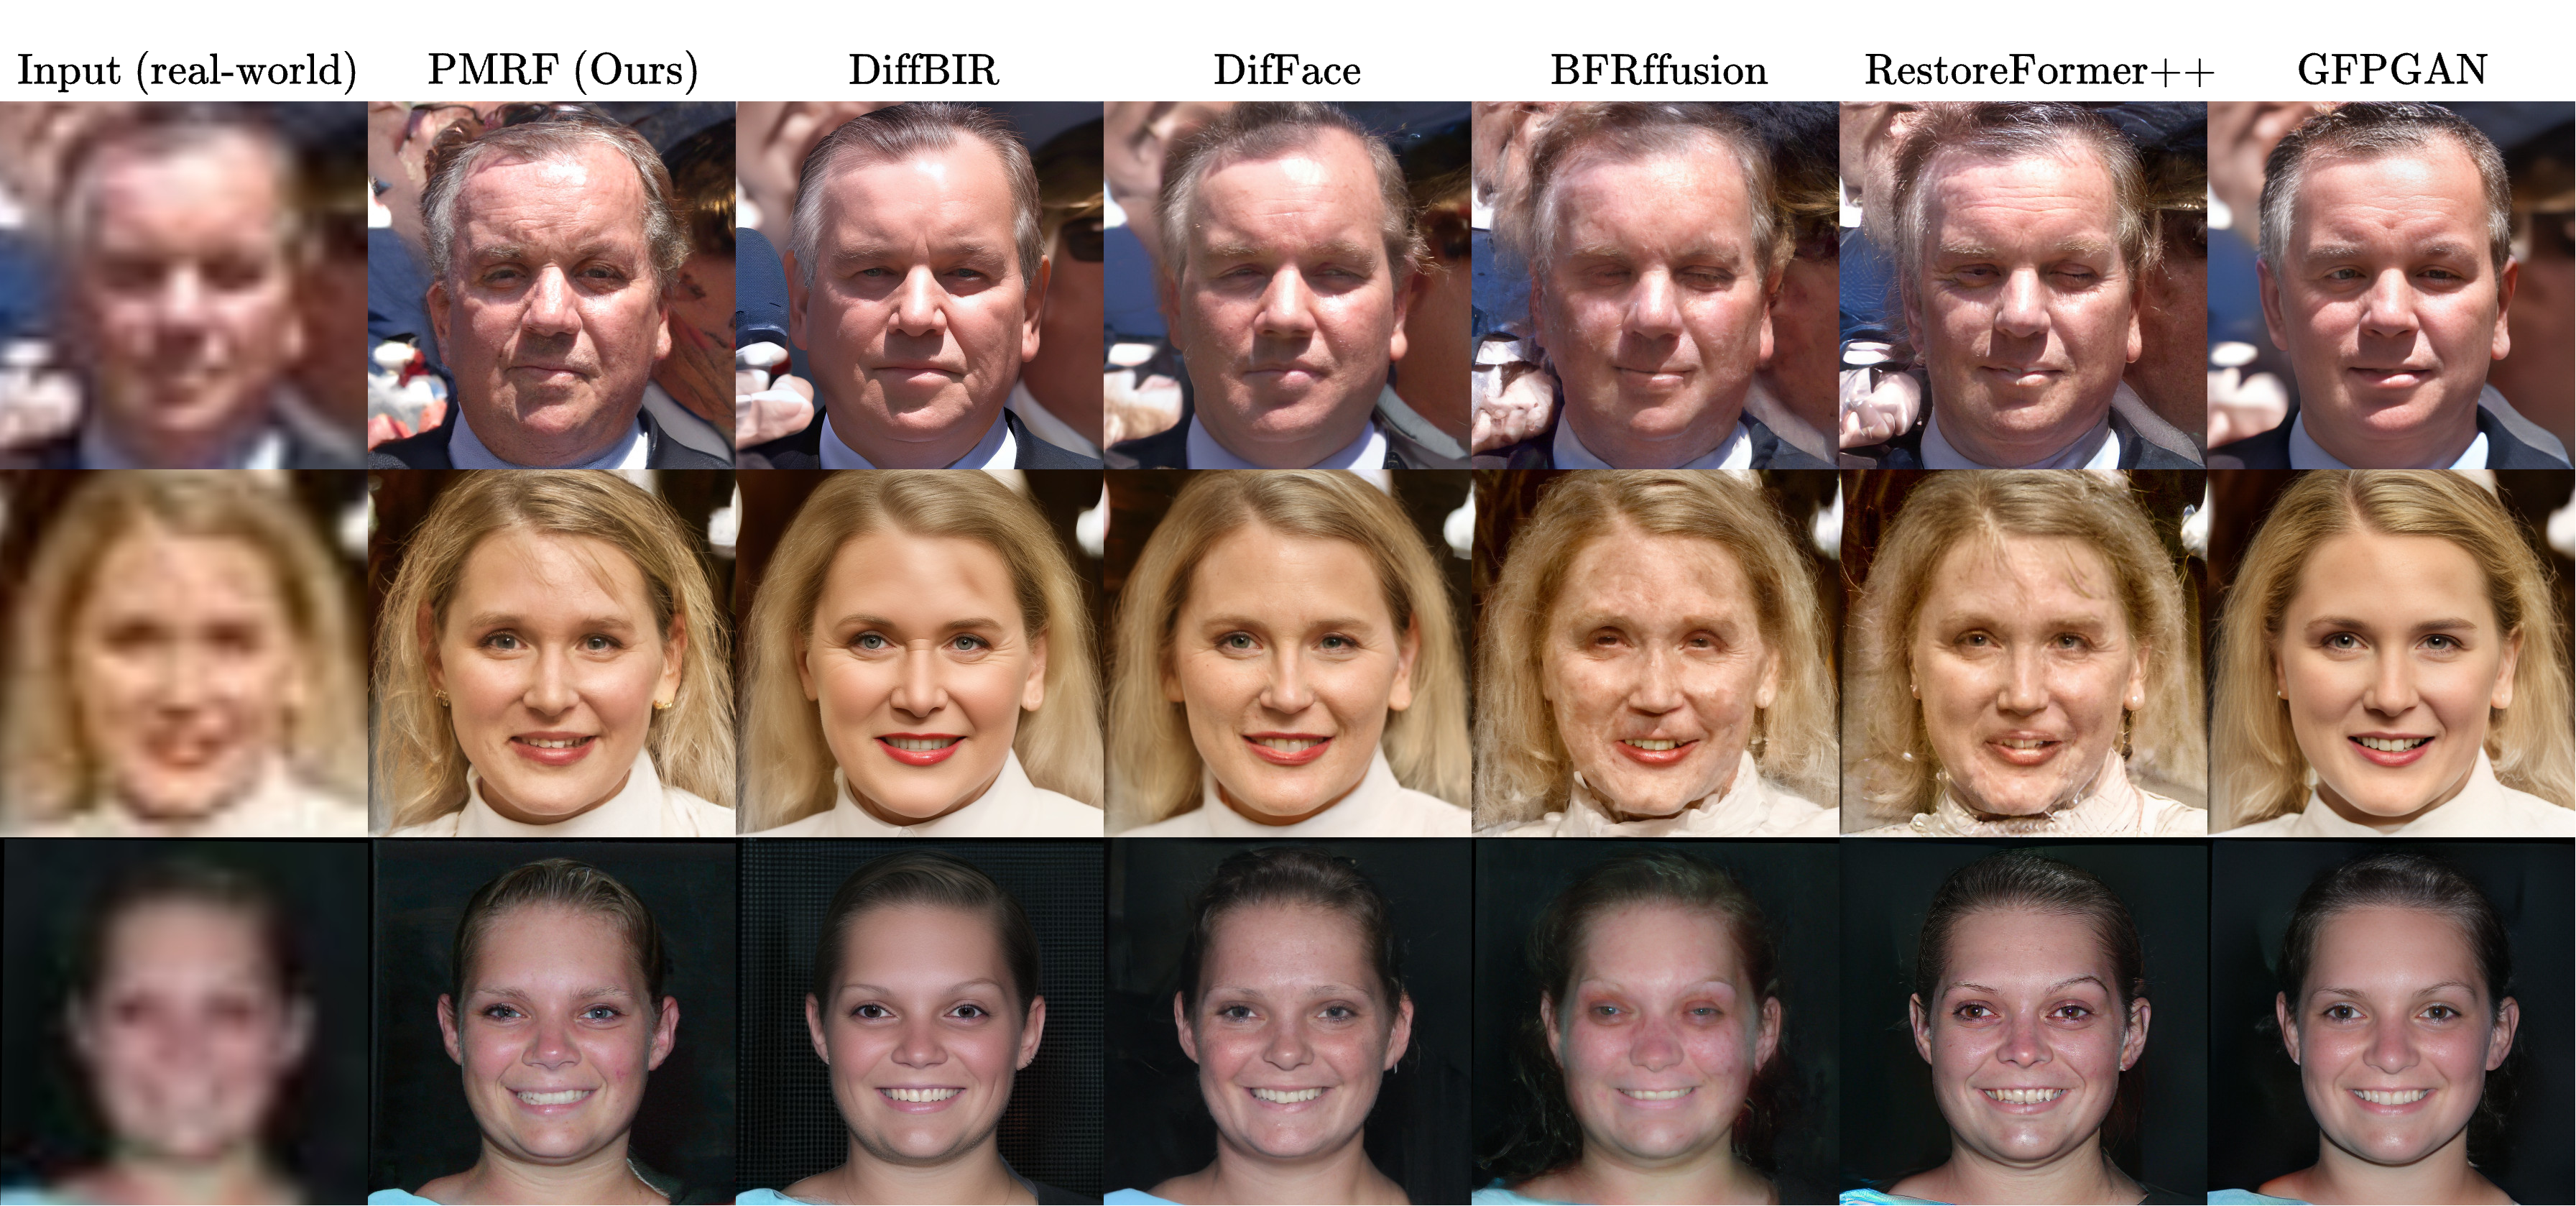
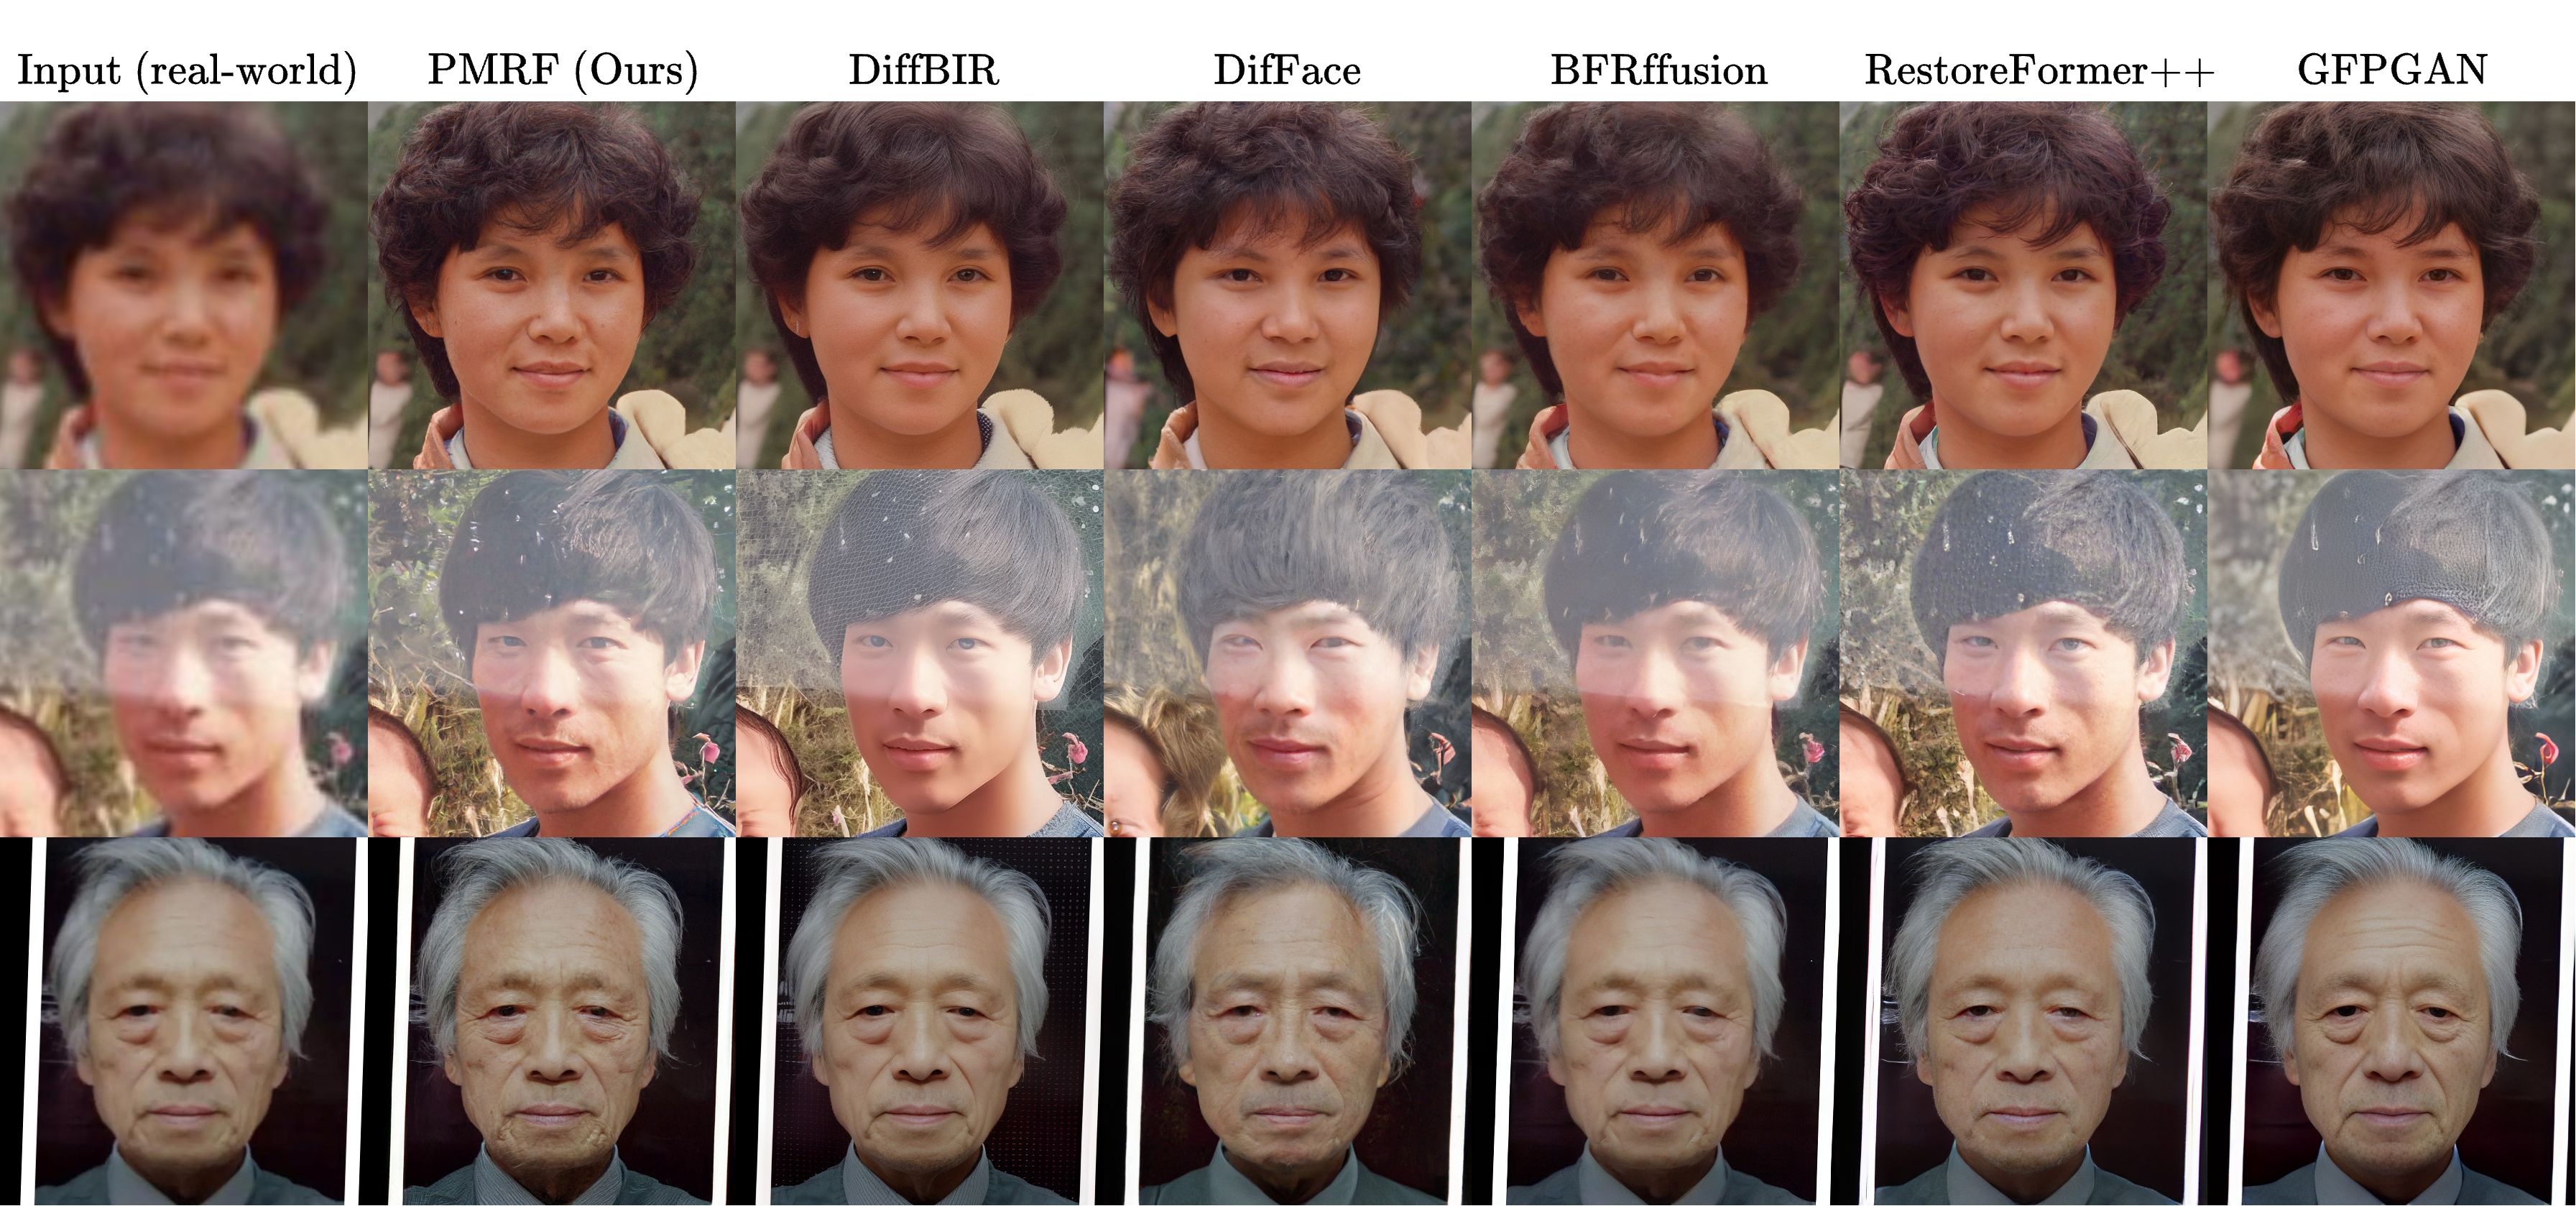
Posterior-Mean Rectified Flow (PMRF) is a novel photo-realistic image restoration algorithm: It approximates the optimal estimator that minimizes the MSE under a constraint of perfect perceptual index, namely where the distribution of the reconstructed images is equal to that of the ground-truth ones.
Red, blue and green indicate the best, the second best and the third best scores, respectively.

We created a conda environment by running the following commands, exactly in the following order (these are also given in the install.sh file):
conda create -n pmrf python=3.10
conda activate pmrf
conda install pytorch==2.3.1 torchvision==0.18.1 torchaudio==2.3.1 pytorch-cuda=11.8 -c pytorch -c nvidia
conda install lightning==2.3.3 -c conda-forge
pip install opencv-python==4.10.0.84 timm==1.0.8 wandb==0.17.5 lovely-tensors==0.1.16 torch-fidelity==0.3.0 einops==0.8.0 dctorch==0.1.2 torch-ema==0.3
pip install natten==0.17.1+torch230cu118 -f https://shi-labs.com/natten/wheels
pip install nvidia-cuda-nvcc-cu11
pip install basicsr==1.4.2
pip install git+https://github.com/toshas/torch-fidelity.git
pip install lpips==0.1.4
pip install piq==0.8.0
pip install huggingface_hub==0.24.5
- Note that the package
nattenis required for the HDiT architecture used by PMRF. Make sure to replacenatten==0.17.1+torch230cu118with the correct CUDA version installed on your system. Check out https://shi-labs.com/natten/ for the available versions. - We installed
nvidia-cuda-nvcc-cu11because otherwisetorch.compilegot hanging for some reason.torch.compilemay work in your system without this package. In any case, if you wish to do so, you may simply skip this package and/or remove all thetorch.compilelines from our code. - Due to some issue in the
basicsrpackage, you will need to modify one of the files in this package. Open/path/to/env/pmrf/lib/python3.10/site-packages/basicsr/data/degradations.py, where/path/to/envis the path where your conda installed thepmrfenvironment. Then, change the line
from torchvision.transforms.functional_tensor import rgb_to_grayscale
to
from torchvision.transforms.functional import rgb_to_grayscale
We provide our blind face image restoration model checkpoint in Hugging Face and in Google Drive. The checkpoints for section 5.2 in the paper (the controlled experiments) can be downloaded from Google Drive. Please keep the same folder structure as provided in Google Drive:
checkpoints/
├── blind_face_restoration_pmrf.ckpt    # Checkpoint of our blind face image restoration model.
├── swinir_restoration512_L1.pth    # Checkpoint of the SwinIR model trained by DifFace
├── controlled_experiments/     # Checkpoints for the controlled experiments
│   ├── colorization_gaussian_noise_025/
│   │   ├── pmrf/
│   │   │   └── epoch=999-step=273000.ckpt
│   │   ├── mmse/
│   │   │   └── epoch=999-step=273000.ckpt
.   .   .
.   .   .
.   .   .
To evaluate the landmark distance (LMD in the paper) and the identity metric (Deg in the paper), you will also need to download the resnet18_110.pth and alignment_WFLW_4HG.pth checkpoints from the Google Drive of VQFR. Place these checkpoints in the evaluation/metrics_ckpt/ folder.
- Download WebPhoto-Test, LFW-Test, and CelebA-Test (HQ and LQ) from https://xinntao.github.io/projects/gfpgan.
- Download WIDER-Test from https://shangchenzhou.com/projects/CodeFormer/.
- Put these data sets wherever you want in your system.
To quickly use our model, we provide a Hugging Face checkpoint which is automatically downloaded. Simply run
python inference.py \
--ckpt_path ohayonguy/PMRF_blind_face_image_restoration \
--ckpt_path_is_huggingface \
--lq_data_path /path/to/lq/images \
--output_dir /path/to/results/dir \
--batch_size 64 \
--num_flow_steps 25
Please alter --num_flow_steps as you wish (this is the hyper-parameter K in our paper)
You may also provide a local model checkpoint (e.g., if you train your own PMRF model, or if you wish to use our Google Drive checkpoint instead of the Hugging Face one). Simply run
python inference.py \
--ckpt_path ./checkpoints/blind_face_restoration_pmrf.ckpt \
--lq_data_path /path/to/lq/images \
--output_dir /path/to/results/dir \
--batch_size 64 \
--num_flow_steps 25
- We downloaded the
resnet18_110.pthandalignment_WFLW_4HG.pthcheckpoints from the Google Drive of VQFR, and put these in the folderevaluation/metrics_ckpt/. To evaluate the results on CelebA-Test, run:
cd evaluation
python compute_metrics_blind.py \
--parent_ffhq_512_path /path/to/parent/of/ffhq512 \
--rec_path /path/to/celeba-512-test/restored/images \
--gt_path /path/to/celeba-512-test/ground-truth/images
To evaluate the results on the real-world data sets, run:
cd evaluation
python compute_metrics_blind.py \
--parent_ffhq_512_path /path/to/parent/of/ffhq512 \
--rec_path /path/to/real-world/restored/images \
--mmse_rec_path /path/to/mmse/restored/images
The --mmse_rec_path argument is optional, and allows you to compute IndRMSE, as an indicator of the true RMSE for real-world degraded images.
Note that the MMSE reconstructions are saved automatically when you run inference.py, since the MMSE model
is also in the PMRF checkpoint.
In the folder scripts/ we provide the training scripts we used for blind face image restoration and for training
the baseline models as well. If you want to run a script, you need to execute it in the root folder
(where train.py is located). To train the model, you will need the FFHQ data set.
We downloaded the original FFHQ 1024x1024 data set and down-sampled the images to size 512x512 using bi-cubic down-sampling.
- Copy the
train_pmrf.shfile (located inscripts/train/blind_face_restoration) to the root folder. - Adjust the arguments
--train_data_rootand--val_data_rootaccording to the location of the training and validation data in your system. - The SwinIR model which was trained by DifFace is provided in the
checkpoints/folder. We downloaded it via
wget https://github.com/zsyOAOA/DifFace/releases/download/V1.0/swinir_restoration512_L1.pth
- Adjust the argument
--mmse_model_ckpt_pathto the path of the SwinIR model. - Adjust the arguments
--num_gpusand--num_workersaccording to your system. - Run the script
train_pmrf.shto train our model.
We provide training and evaluation codes for the controlled experiments in our paper, where we compare PMRF with the following baseline methods:
- Flow conditioned on Y: A rectified flow model which is conditioned on the input measurement, and learns to flow from pure noise to the ground-truth data distribution.
- Flow conditioned on the posterior mean predictor: A rectified flow model which is conditioned on the posterior mean prediction, and learns to flow from pure noise to the ground-truth data distribution.
- Flow from Y: A rectified flow model which flows from the degraded measurement to the ground-truth data distribution.
- Posterior mean predictor: A model which is trained to minimize the MSE loss.
We provide checkpoints for quick evaluation of PMRF and all the baseline methods.
- The evaluation is conducted on CelebA-Test images of size 256x256. To acquire such images, we downloaded the CelebA-Test (HQ) images from GFPGAN, and down-sampled them to 256x256 using bi-cubic down-sampling.
- Adjust
--test_data_rootintest.shto the path of the CelebA-Test 256x256 images, and adjust--degradationand--ckpt_pathto the type of degradation you wish to assess and the corresponding model checkpoint. - Run
test.sh.
We automatically save the reconstructed outputs, the degraded measurements, as well as the samples from the source distribution (the images from which the ODE solver begins).
After running test.sh, you may evaluate the results via :
cd evaluation
python compute_metrics_controlled_experiments.py \
--parent_ffhq_256_path /path/to/parent/of/ffhq256 \
--rec_path /path/to/restored/images \
--gt_path /path/to/celeba-256-test/ground-truth/images
- We trained our models on FFHQ 256x256. To acquire such images, with down-sampled the original FFHQ 1024x1024 images using bi-cubic down-sampling.
- The training scripts of PMRF and each of these baseline models are provided in the
scripts/train/controlled_experiments/folder. - To run each of these scripts, you need to copy it to the root folder where
train.pyis located. All you need to do is adjust the--degradation,--source_noise_std,--train_data_rootand--val_data_rootarguments in each script. For denoising, we used--source_noise_std 0.025, and for the rest of the tasks we used--source_noise_std 0.1. - To run the
train_pmrf.shandtrain_posterior_conditioned_on_mmse_model.shscripts, you first need to train the MMSE model viatrain_mmse.sh. Then, adjust the--mmse_model_ckpt_pathargument according to the path of the MMSE model final checkpoint.
@article{ohayon2024pmrf,
  author    = {Guy Ohayon and Tomer Michaeli and Michael Elad},
  title     = {Posterior-Mean Rectified Flow: Towards Minimum MSE Photo-Realistic Image Restoration},
  journal   = {arXiv preprint arXiv:2410.00418},
  year      = {2024},
  url       = {https://arxiv.org/abs/2410.00418}
}
This project is released under the MIT license. We borrow codes from BasicSR, VQFR, DifFace, k-diffusion, and SwinIR. We thank the authors of such repositories for their useful implementations.
If you have any questions or inquiries, please feel free to contact me.


