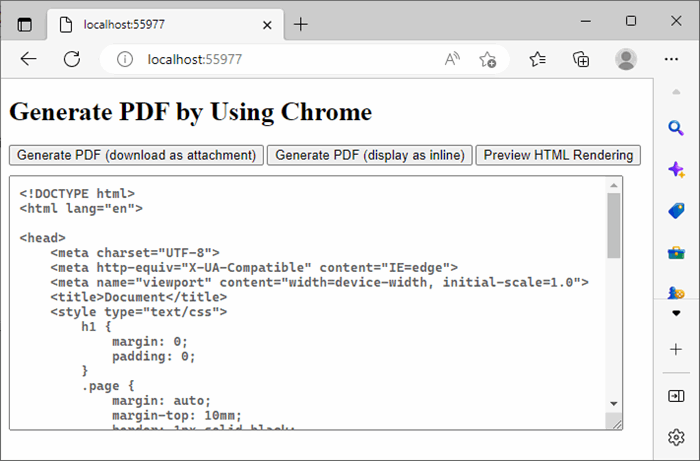
Convert HTML to PDF with Chrome in ASP.NET WebForms
Live Demo: http://html-pdf.adriancs.com
*Note: Using Microsoft Edge as PDF Generator is better than Chrome.exe. Read More: https://github.com/adriancs2/HTML-PDF-Edge
There are some drawbacks for using Chrome.exe as HTML to PDF converter.
The main drawback is the permission to execute an EXE. Due to security issues, web hosting environments will prohibit the direct execution of an EXE.
If you try to run this at local IIS, you have to set the identity of Application Pool to "LocalSystem" to allow the pool to run external EXE.
Therefore, although it is still possible to run Chrome.exe over a web server, it's highly not recommended to do so. That's why using Edge is a very good alternative compared to "Chrome.exe".
Read more about Using Microsoft Edge to Convert HTML to PDF
Chrome has a built-in function for generating PDF for a HTML page.
According to the info that I gathered during doing this research, all chromium based web browser works the same way, but I haven't tested this yet for other chromium based web browser.
Here's the basic command line for running the Chrome.exe to generate PDF with arguments/switches:
chrome.exe

// arguments:
--headless
--disable-gpu
--run-all-compositor-stages-before-draw
--print-to-pdf="{filePath}"
{url}
Full command line example:
C:\Program Files\Google\Chrome\Application\chrome.exe --headless --disable-gpu --run-all-compositor-stages-before-draw --print-to-pdf="D:\test\web_pdf\pdf_chrome\temp\pdf\345555635.pdf" http://localhost:55977/temp/pdf/345555635.html
Based on this, I have written a simple C# class library to automate the execution of this process.
You can now generate the PDF in 1 simple line.
This will transmit PDF as attachment for download:
pdf.GeneratePdfAttachment(html, "file.pdf");
and this will open up the PDF in browser:
pdf.GeneratePdfInline(html);
and... yupe, it's done. Just like that.
Okay, let's dive into some of the important details.
There are a few necessary CSS that you have to include in the HTML page in order for this to work properly.
- Set page margin to 0 (zero)
- Set paper size
- Wrap all content within a "div" with fixed width and margin
- Use CSS of page-break-always to split between pages.
- All fonts must already installed or hosted in your website
- URL links for images, external css stylesheet reference must include the root path.
1. Set page margin to 0 (zero)
@page {
    margin: 0;
}
The purpose of doing this is to hide the header and footer:
2. Set paper size
Example 1:
@page {
    margin: 0;
    size: A4 portrait;
}
Example 2:
@page {
    margin: 0;
    size: letter landscape;
}
Example 3: custom size (inch) *width then height
@page {
    margin: 0;
    size: 4in 6in;
}
Example 4: custom size (cm) *width then height
@page {
    margin: 0;
    size: 14cm 14cm;
}
For more options/info on the CSS of @page, you may refer:
https://developer.mozilla.org/en-US/docs/Web/CSS/@page/size
3. Wrap all content within a DIV with fixed width and margin
Example:
<div class="page">
    <h1>Page 1</h1>
    <img src="/pdf.jpg" style="width: 100%; height: auto;" />
    <!-- The rest of the body content -->
</div>
Style the "div" with class "page" (act as the main block/wrapper/container). Since the page has zero margin, we need to manually specified the top margin in CSS:
CSS
.page {
    width: 18cm;
    margin: auto;
    margin-top: 10mm;
}
The width has to be specified.
The "margin: auto" will align the div block at center horizontally.
"margin-top: 10mm", will provide space between the main block and the edge of the paper at top section.
4. Use CSS of "page-break-always" to split between pages.
To split pages, use a "div" and style with CSS of "page-break-after".
page-break-after: always
Example:
<div class="page">
    <h1>Page 1</h1>
    <img src="/pdf.jpg" style="width: 100%; height: auto;" />
</div>

<div style="page-break-after: always"></div>

<div class="page">
    <h1>Page 2</h1>
    <img src="/pdf.jpg" style="width: 100%; height: auto;" />
</div>

<div style="page-break-after: always"></div>

<div class="page">
    <h1>Page 3</h1>
    <img src="/pdf.jpg" style="width: 100%; height: auto;" />
</div>
5. All fonts must already installed or hosted in your website
The font rendering might not be working properly if the fonts are hosted at 3rd party's server, for example: Google Fonts. Try install the fonts into your server Windows OS or host the fonts within your website.
6. URL links for images, external css stylesheet reference must include the root path.
For example, the following img tag might not be rendered properly. The image has the potential to be missing in the final rendered PDF output.
<img src="logo.png" />
In stead, include the root path like this:
<img src="/logo.png" />
or
<img src="/images/logo.png" />
<!DOCTYPE html>
<html lang="en">

<head>
    <meta charset="UTF-8">
    <meta http-equiv="X-UA-Compatible" content="IE=edge">
    <meta name="viewport" content="width=device-width, initial-scale=1.0">
    <title>Document</title>
    <style type="text/css">
        h1 {
            margin: 0;
            padding: 0;
        }
        .page {
            margin: auto;
            margin-top: 10mm;
            border: 1px solid black;
            width: 18cm;
            height: 27cm;
        }

        @page {
            margin: 0;
            size: A4 portrait;
        }
    </style>
</head>

<body>

    <div class="page">
        <h1>Page 1</h1>
        <img src="/pdf.jpg" style="width: 100%; height: auto;" />
    </div>

    <div style="page-break-after: always"></div>

    <div class="page">
        <h1>Page 2</h1>
        <img src="/pdf.jpg" style="width: 100%; height: auto;" />
    </div>

    <div style="page-break-after: always"></div>

    <div class="page">
        <h1>Page 3</h1>
        <img src="/pdf.jpg" style="width: 100%; height: auto;" />
    </div>

</body>

</html>
For the details of how the C# code works in behind, you can continue to read the following article at
adriancs.com or


