Docker is a platform for developers and sysadmins to develop, deploy, and run applications with containers. The use of Linux containers to deploy applications is called Containerization. Containers are not new, but their use for easily deploying applications is.
Containerization is increasingly popular because containers are:
- Flexible: Even the most complex applications can be containerized.
- Lightweight: Containers leverage and share the host kernel.
- Interchangeable: You can deploy updates and upgrades on-the-fly.
- Portable: You can build locally, deploy to the cloud, and run anywhere.
- Scalable: You can increase and automatically distribute container replicas.
- Stackable: You can stack services vertically and on-the-fly.
A container is launched by running an image. An image is an executable package that includes everything needed to run an application--the code, a runtime, libraries, environment variables, and configuration files. A container is a runtime instance of an image--what the image becomes in memory when executed (that is, an image with state, or a user process).
A container runs natively on Linux and shares the kernel of the host machine with other containers. It runs a discrete process, taking no more memory than any other executable, making it lightweight.
A virtual machine (VM) runs a full-blown “guest” operating system with virtual access to host resources through a hypervisor. In general, VMs provide an environment with more resources than most applications need.


The Internet of Things (IoT) is a system of interrelated computing devices, mechanical and digital machines, objects, animals or people that are provided with unique identifiers and the ability to transfer data over a network without requiring human-to-human or human-to-computer interaction.
IoT provides businesses and people better insight into and control over the 99 percent of objects and environments that remain beyond the reach of the internet. And by doing so, IoT allows businesses and people to be more connected to the world around them and to do more meaningful, higher-level work.

Containers are well-positioned to address some of the main challenges that developers face when deploying software to IoT devices:
- Minimal hardware resources: Many IoT devices lack powerful computing and memory resources. Their ability to process software updates is therefore limited. Containers can help on this front because installing a new container image does not require much computing power. An IoT device needs simply to download an image, put it wherever it’s going to live and remove the old image. Configuration processing is minimal.
- Geographic distribution: In some use cases, IoT devices are spread across a large geographic area. Delivering software to them from a single central repository may not work well. With Docker, it’s easy to spin up image registries in multiple locations to serve the entire network well.
- Limited or sporadic network access: Despite the implications of the term “internet of things,” not all devices on the internet of things are well-connected to the internet. They may have limited network bandwidth, or be online only occasionally. Docker can help to deliver software updates under these circumstances because when container images are updated, Docker downloads only the parts of the image that have changed.
- Widely varying device environments: The software that runs on an IoT device could be almost anything. The diversity of software configurations on IoT devices would normally make application installation difficult, because applications would have to be configured for each type of environment if installed via traditional methods. With containers, however, the operating system version and other software variables are much less important. As long as the device runs some kind of Linux distribution and has a container runtime, you can install a containerized application on it without special configuration.
- Download the required os from https://www.raspberrypi.org/downloads/ (Here I am using Raspbian Buster)
- Format the SD card as FAT format
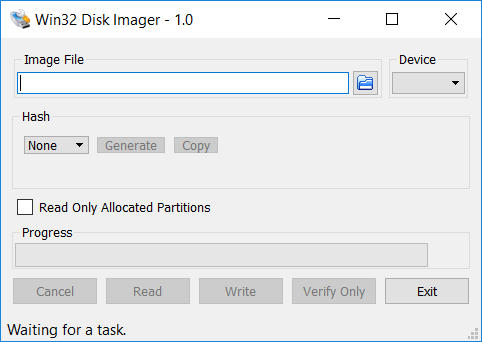
- Write Image to SD Card. You can use Win32DiskImager/Etcher to do this.

-
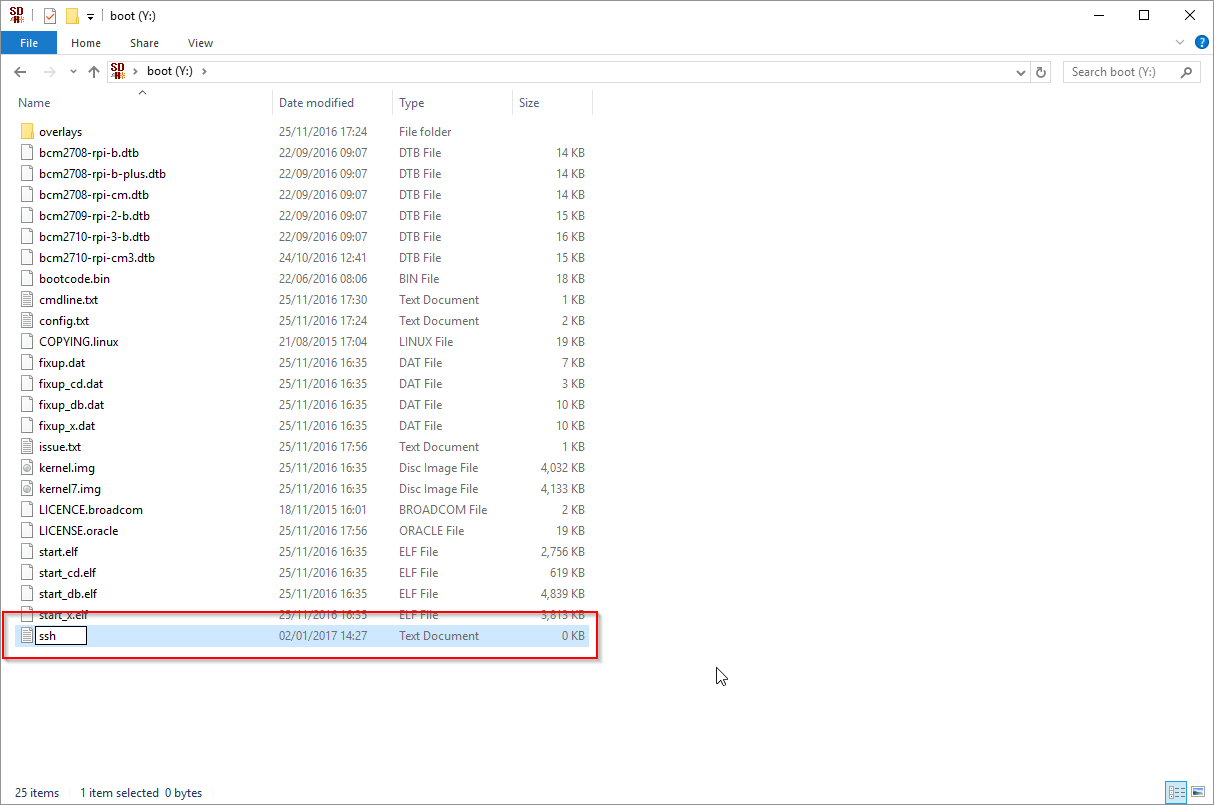
Add “SSH” File to the SD Card Root
Enable SSH by placing a file named “ssh” (without any extension) onto the boot partition of the SD card:
- Put the SD card in Raspi and connect it to laptop via ethernet cable
- Install advanced IP Scanner
- open Command prompt and type :
ipconfig
under ethernet , we can find default gateway.
copy that to Advanced IP Scanner and search

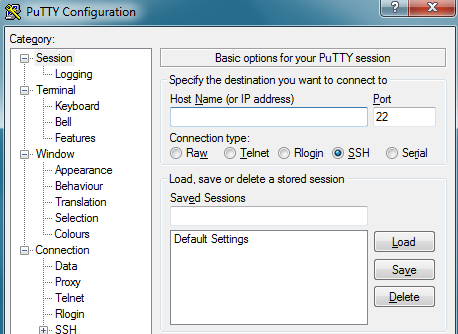
- install and open Putty
In hostname field , eneter the IP address of raspi which we found from Advanced IP Scanner.
The default credentials are:
username: pi
password: raspberry
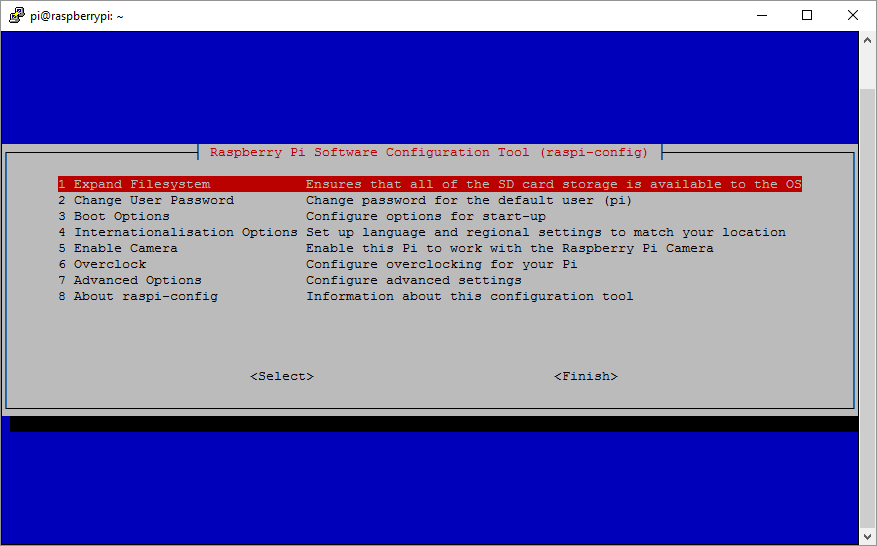
- Configure your pi You can now configure your Pi via
sudo raspi-config
if we want GUI of the OS in the raspi , we need to enable VNC server in raspi-config Navigate to Interfacing Options and enable VNC on your main system , download and launch VNC Viewer connect to the raspi from vnc viewer

-
we can connect to raspi even without ethernet cable if the wifi option is enabled and configured to the hotspot
-
We can even enable wifi by creating a file wpa_supplicant.conf
 ```
   {
       country=IN
       ctrl_interface=DIR=/var/run/wpa_supplicant GROUP=netdev
       update_config=1
       network={
       ssid="NETWORK-NAME"
       psk="NETWORK-PASSWORD"
   }
```
-
-
Instead of Advanced IP Scanner , we can just use
ping raspberrypi.localto find out the IP address of the raspi
- open the terminal and switch from pi to root user
sudo su
- Enter this command to install docker.
curl -sSL https://get.docker.com/ | sh
Here -L means location, -s means silent and -S means show error.
- Else we can add “pi” user to “docker” group using the following command –
sudo usermod -aG docker pi
- docker info
root@raspberrypi:/home/pi# docker info
Client:
 Debug Mode: false

Server:
 Containers: 1
  Running: 0
  Paused: 0
  Stopped: 1
 Images: 1
 Server Version: 19.03.1
 Storage Driver: overlay2
  Backing Filesystem: extfs
  Supports d_type: true
  Native Overlay Diff: true
 Logging Driver: json-file
 Cgroup Driver: cgroupfs
 Plugins:
  Volume: local
  Network: bridge host ipvlan macvlan null overlay
  Log: awslogs fluentd gcplogs gelf journald json-file local logentries splunk syslog
 Swarm: inactive
 Runtimes: runc
 Default Runtime: runc
 Init Binary: docker-init
 containerd version: 894b81a4b802e4eb2a91d1ce216b8817763c29fb
 runc version: 425e105d5a03fabd737a126ad93d62a9eeede87f
 init version: fec3683
 Security Options:
  seccomp
   Profile: default
 Kernel Version: 4.19.66-v7+
 Operating System: Raspbian GNU/Linux 10 (buster)
 OSType: linux
 Architecture: armv7l
 CPUs: 4
 Total Memory: 926.1MiB
 Name: raspberrypi
 ID: NSJC:PO6K:TXUT:N5N2:SZQU:2VCX:2PIL:HU3J:3KPD:JUKA:HLJV:JZKD
 Docker Root Dir: /var/lib/docker
 Debug Mode: false
 Registry: https://index.docker.io/v1/
 Labels:
 Experimental: false
 Insecure Registries:
  127.0.0.0/8
 Live Restore Enabled: false

WARNING: No swap limit support
WARNING: No cpu cfs quota support
WARNING: No cpu cfs period support
root@raspberrypi:/home/pi# docker run -d -p 80:80 nginx
8b52c1192b38d127cf8793c83d17b0c2f22f5dc42e7302dd2ffaba74d814c1be


root@raspberrypi:/home/pi# curl localhost:80
<!DOCTYPE html>
<html>
<head>
<title>Welcome to nginx!</title>
<style>
    body {
        width: 35em;
        margin: 0 auto;
        font-family: Tahoma, Verdana, Arial, sans-serif;
    }
</style>
</head>
<body>
<h1>Welcome to nginx!</h1>
<p>If you see this page, the nginx web server is successfully installed and
working. Further configuration is required.</p>

<p>For online documentation and support please refer to
<a href="http://nginx.org/">nginx.org</a>.<br/>
Commercial support is available at
<a href="http://nginx.com/">nginx.com</a>.</p>

<p><em>Thank you for using nginx.</em></p>
</body>
</html>
root@raspberrypi:/home/pi# systemctl status docker
● docker.service - Docker Application Container Engine
   Loaded: loaded (/lib/systemd/system/docker.service; enabled; vendor preset: enabled)
   Active: active (running) since Mon 2019-09-09 22:38:12 IST; 1h 58min ago
     Docs: https://docs.docker.com
 Main PID: 438 (dockerd)
    Tasks: 22
   Memory: 94.0M
   CGroup: /system.slice/docker.service
           ├─ 438 /usr/bin/dockerd -H fd:// --containerd=/run/containerd/containerd.sock
           └─1863 /usr/bin/docker-proxy -proto tcp -host-ip 0.0.0.0 -host-port 80 -container-ip 172.17.0.2 -container

Sep 09 22:37:56 raspberrypi dockerd[438]: time="2019-09-09T22:37:56.709551954+05:30" level=warning msg="Your kernel d
Sep 09 22:37:56 raspberrypi dockerd[438]: time="2019-09-09T22:37:56.709643776+05:30" level=warning msg="Your kernel d
Sep 09 22:37:56 raspberrypi dockerd[438]: time="2019-09-09T22:37:56.709734662+05:30" level=warning msg="Your kernel d
Sep 09 22:37:56 raspberrypi dockerd[438]: time="2019-09-09T22:37:56.713169089+05:30" level=info msg="Loading containe
Sep 09 22:38:07 raspberrypi dockerd[438]: time="2019-09-09T22:38:07.020645127+05:30" level=info msg="Default bridge (
Sep 09 22:38:09 raspberrypi dockerd[438]: time="2019-09-09T22:38:09.057648876+05:30" level=info msg="Loading containe
Sep 09 22:38:11 raspberrypi dockerd[438]: time="2019-09-09T22:38:11.851176219+05:30" level=info msg="Docker daemon" c
Sep 09 22:38:11 raspberrypi dockerd[438]: time="2019-09-09T22:38:11.868887156+05:30" level=info msg="Daemon has compl
Sep 09 22:38:12 raspberrypi systemd[1]: Started Docker Application Container Engine.
Sep 09 22:38:12 raspberrypi dockerd[438]: time="2019-09-09T22:38:12.958539447+05:30" level=info msg="API listen on /v
root@raspberrypi:/home/pi#
root@raspberrypi:/home/pi# cat /proc/cpuinfo | grep model
model name      : ARMv7 Processor rev 4 (v7l)
model name      : ARMv7 Processor rev 4 (v7l)
model name      : ARMv7 Processor rev 4 (v7l)
model name      : ARMv7 Processor rev 4 (v7l)
or
root@raspberrypi:/home/pi# cat /etc/os-release
PRETTY_NAME="Raspbian GNU/Linux 10 (buster)"
NAME="Raspbian GNU/Linux"
VERSION_ID="10"
VERSION="10 (buster)"
VERSION_CODENAME=buster
ID=raspbian
ID_LIKE=debian
HOME_URL="http://www.raspbian.org/"
SUPPORT_URL="http://www.raspbian.org/RaspbianForums"
BUG_REPORT_URL="http://www.raspbian.org/RaspbianBugs"
root@raspberrypi:/home/pi#
Lets create a folder Docker_test and write the python script to blink the led on pin 8.
root@raspberrypi:/home/pi# mkdir docker_test
root@raspberrypi:/home/pi# cd docker_test/
root@raspberrypi:/home/pi/docker_test# vi led_blink.py
led_blink.py
import RPi.GPIO
import time
# configure th pin 8
GPIO.setmode(GPIO.BOARD)
GPIO.setmode(8,GPIO.OUT)
GPIO.setwarnings(False)

# Blink interval
blink_interval = .5 # time in seconds

# blink loop

while True:
    GPIO.output(8,True)
    time.sleep(blink_interval)

    GPIO.output(8,False)
    time.sleep(blink_interval)

    # release
GPIO.cleanup()
Create a dockerfile
create a 'Dockerfile' in docker_test folder
vi Dockerfile
Enter the follwing in the dockerfile
# Python Base Image from https://hub.docker.com/r/arm32v7/python/
FROM arm32v7/python:3.7-slim-buster

# Copy the Python Script to blink LED
COPY led_blink.py ./

# Intall the rpi.gpio python module
RUN pip install --no-cache-dir rpi.gpio

# Trigger Python script
CMD ["python3", "./led_blink.py"]
Create Docker Image from Dockerfile
Create Docker Image with the image name as “docker_blinker” and tag as “v1” using the following command –
docker build -t "docker_blinker:v1" .
result:
root@raspberrypi:/home/pi/docker_test# docker build -t "docker_blinker:v1" .
Sending build context to Docker daemon  3.072kB
Step 1/5 : FROM arm32v7/python:3.8.0b4-buster
 ---> d99c39ea3ed1
Step 2/5 : COPY led_blink.py ./
 ---> Using cache
 ---> 53c43529c8a2
Step 3/5 : RUN apt-get install gcc
 ---> Running in 677b2bf89913
Reading package lists...
Building dependency tree...
Reading state information...
gcc is already the newest version (4:8.3.0-1).
0 upgraded, 0 newly installed, 0 to remove and 0 not upgraded.
Removing intermediate container 677b2bf89913
 ---> 3c85d4cc66c2
Step 4/5 : RUN pip install --no-cache-dir rpi.gpio
 ---> Running in 45ba7047ad3b
Collecting rpi.gpio
  Downloading https://files.pythonhosted.org/packages/cb/88/d3817eb11fc77a8d9a63abeab8fe303266b1e3b85e2952238f0da43fed4e/RPi.GPIO-0.7.0.tar.gz
Building wheels for collected packages: rpi.gpio
  Building wheel for rpi.gpio (setup.py): started
  Building wheel for rpi.gpio (setup.py): finished with status 'done'
  Created wheel for rpi.gpio: filename=RPi.GPIO-0.7.0-cp38-cp38-linux_armv7l.whl size=67631 sha256=6be9ab49f2bca3d5686cb3c1a241e50032939c25aaf42d55fb9afc8e862c97eb
  Stored in directory: /tmp/pip-ephem-wheel-cache-dv2qht_x/wheels/ec/11/7f/aa6fe56010104b49197ebbd697418affe12e05d42213f3e0ca
Successfully built rpi.gpio
Installing collected packages: rpi.gpio
Successfully installed rpi.gpio-0.7.0
Removing intermediate container 45ba7047ad3b
 ---> 956b947edf6c
Step 5/5 : CMD ["python3", "./led_blink.py"]
 ---> Running in e466aa3b3c9f
Removing intermediate container e466aa3b3c9f
 ---> 44420644edfe
Successfully built 44420644edfe
Successfully tagged docker_blinker:v1
Once the command execution gets completed you should be able to list the image on your Raspberry Pi using the following command –
docker image ls

We have to use “docker container run” command with either the “--privileged” option or by specifying the Linux GPIO Device (“/dev/gpiomem“) using the “–device” option.
You can use one of the following commands to run the Docker Container
docker container run --device /dev/gpiomem -d docker_blinker:v1
or
docker container run --privileged -d docker_blinker:v1