


Auth0 is an authentication broker that supports social identity providers as well as enterprise identity providers such as Active Directory, LDAP, Google Apps and Salesforce.
react-native-lock-android is a wrapper around Lock.Android so it can be used from an Android React Native application
- React Native 0.16
- Android API 16+
Run npm install --save react-native-lock-android to add the package to your app's dependencies.
Then include the com.auth0.android:lock-react library in your android project.
Add the dependency in the build.gradle file of the android project:
compile 'com.auth0.android:lock-react:+'You must also add the LockReactPackage to the ReactInstanceManager in the onCreate method of the MainActivity.
public class MainActivity extends Activity implements DefaultHardwareBackBtnHandler {
    ...
    @Override
    protected void onCreate(Bundle savedInstanceState) {
        super.onCreate(savedInstanceState);
        ...
        mReactInstanceManager = ReactInstanceManager.builder()
                /* ... */
                .addPackage(new LockReactPackage())
                /* ... */
                .build();
        ...
    }
    ...
}
Finally you need to declare the Lock activities in your AndroidManifest.xml file.
<!--Auth0 Lock-->
<activity
  android:name="com.auth0.lock.LockActivity"
  android:theme="@style/Lock.Theme"
  android:screenOrientation="portrait"
  android:launchMode="singleTask">
</activity>
<!--Auth0 Lock End-->
<!--Auth0 Lock Embedded WebView-->
<activity
    android:name="com.auth0.identity.web.WebViewActivity"
    android:theme="@style/Lock.Theme">
</activity>
<!--Auth0 Lock Embedded WebView End-->
<!--Auth0 Lock Passwordless-->
<activity
    android:name="com.auth0.lock.passwordless.LockPasswordlessActivity"
    android:theme="@style/Lock.Theme"
    android:screenOrientation="portrait"
    android:launchMode="singleTask">
</activity>
<activity
    android:name="com.auth0.lock.passwordless.CountryCodeActivity"
    android:theme="@style/Lock.Theme">
</activity>
<!--Auth0 Lock Passwordless End-->
For more information and configuration options you should see the Lock.Android docs
If you need Facebook or Google+ native authentication please continue reading to learn how to configure them. Otherwise please go directly to usage
To allow native logins using other Android apps, e.g: Google+, Facebook, etc, you need to explicitly add them by calling addIdentityProvider in your LockReactPackage instance before adding it to the ReactInstanceManager.
public class MainActivity extends Activity implements DefaultHardwareBackBtnHandler {
    ...
    @Override
    protected void onCreate(Bundle savedInstanceState) {
        super.onCreate(savedInstanceState);
        ...
        LockReactPackage lockReactPackage = new LockReactPackage();

        /* If you would like to add native integrations, add them here */
        lockReactPackage.addIdentityProvider(Strategies.Facebook, new FacebookIdentityProvider(this));
        lockReactPackage.addIdentityProvider(Strategies.GooglePlus, new GooglePlusIdentityProvider(this));

        mReactInstanceManager = ReactInstanceManager.builder()
                /* ... */
                .addPackage(lockReactPackage)
                /* ... */
                .build();
        ...
    }
    ...
}
Each native integration requires it's own configuration. If you added some of them please follow the corresponding instructions.
Lock uses the native Facebook SDK to obtain the user's access token so you'll need to configure it using your Facebook App info. If you don't have one, please create a Facebook Application in Facebook Dev Site. Remember to register the package name and hash of your android application.
Once you have your Facebook App, you need to enable and configure the connection in Facebook's Connection settings on your Auth0 account. You need to set up your FB app id and secret.
Then add Lock Facebook's dependency to your build.gradle
compile 'com.auth0.android:lock-facebook:2.3.+'Finally in your project's AndroidManifest.xml add the following entries inside the <application> tag:
<activity android:name="com.facebook.FacebookActivity"
          android:configChanges="keyboard|keyboardHidden|screenLayout|screenSize|orientation"
          android:theme="@android:style/Theme.Translucent.NoTitleBar"
          android:label="@string/app_name" />
<meta-data android:name="com.facebook.sdk.ApplicationId" android:value="@string/facebook_app_id"/>
The value @string/facebook_app_id is your Facebook Application ID that you can get from Facebook Dev Site after you create your Facebook Application. You could just add this value to your strings.xml like this:
<string name="facebook_app_id">YOUR_FB_APP_ID_GOES_HERE</string>For more information on how to configure this, please check Facebook Getting Started Guide.
For more information and configuration options you should see the Lock-Facebook.Android docs
First you'll need to register your application in Google+, to do it follow the instructions in Step 1 of this guide.
You also need to enable the connection in your Auth0 dashboard.
Then add Lock GooglePlus' dependency to your build.gradle
compile 'com.auth0.android:lock-googleplus:2.3.+'Finally in your project's AndroidManifest.xml add the following entries:
<uses-permission android:name="android.permission.GET_ACCOUNTS" />
<uses-permission android:name="android.permission.USE_CREDENTIALS" />
<meta-data android:name="com.google.android.gms.version" android:value="@integer/google_play_services_version" />
For more information and configuration options you should see the Lock-GooglePlus.Android docs
Let's require react-native-lock-android module:
var Auth0Lock = require('react-native-lock-android');And initialize it with your Auth0 credentials that you can get from our dashboard
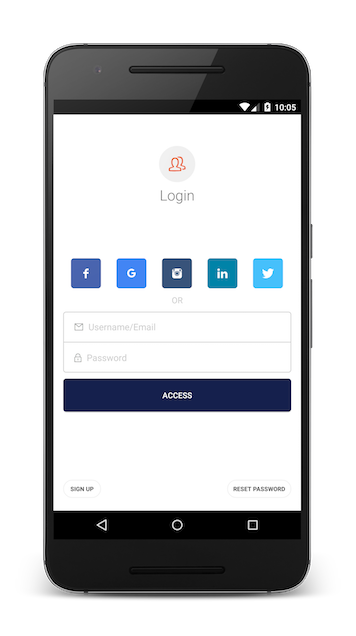
var lock = new Auth0Lock({clientId: "YOUR_CLIENT_ID", domain: "YOUR_DOMAIN"});lock.show({}, (err, profile, token) => {
console.log('Logged in!');
});And you'll see our native login screen
In order to be able to authenticate the user, your Auth0 account must have the SMS connection enabled and configured in your dashboard
lock.show({
  connections: ["sms"]
}, (err, profile, token) => {
  console.log('Logged in!');
});
And you'll see SMS Passwordless login screen

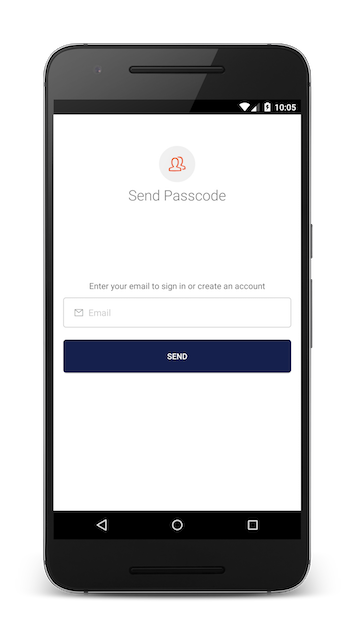
In order to be able to authenticate the user, your Auth0 account must have the Email connection enabled and configured in your dashboard
lock.show({
  connections: ["email"]
}, (err, profile, token) => {
  console.log('Logged in!');
});
And you'll see Email Passwordless login screen
####.show(options, callback)
Show Lock's authentication screen as a modal screen using the connections configured for your applications or the ones specified in the options parameter. This is the list of valid options:
- closable (
boolean): If Lock screen can be dismissed. Default isfalse. - connections (
[string]): List of enabled connections to use for authentication. Must be enabled in your app's dashboard first. If you leave it empty, Lock will use all the enabled connections. - useMagicLink (
boolean): When using a passwordless connection, activate this option to send a Magic/App link instead of the code. Default isfalse. - authParams (
object): Object with the parameters to be sent to the Authentication API, e.g.scope.
The callback will have the error if anything went wrong or after a successful authentication, it will yield the user's profile info and tokens.
If you observe an error like this when trying to run the project:
Error: duplicate files during packaging of APK /<PATH>/android/app/build/outputs/apk/app-debug-unaligned.apk
  Path in archive: META-INF/NOTICE
  Origin 1: /<PATH>/.gradle/caches/modules-2/files-2.1/com.fasterxml.jackson.core/jackson-databind/2.4.1/f07c773f7b3a03c3801d405cadbdc93f7548e321/jackson-databind-2.4.1.jar
  Origin 2: /<PATH>/.gradle/caches/modules-2/files-2.1/com.fasterxml.jackson.core/jackson-core/2.4.1/b130bcfb5a9c410c3cbd2e0adec9437e69a39e2c/jackson-core-2.4.1.jar
You can ignore those files in your build.gradle:
  android {
    packagingOptions {
      exclude 'META-INF/NOTICE'
    }
  }
:app:packageDebug FAILED
You must follow the advice and ignore the files adding the following to the build.gradle of the app module, inside the android section:
packagingOptions {
    exclude 'META-INF/LICENSE'
    exclude 'META-INF/NOTICE'
}
If you have found a bug or if you have a feature request, please report them at this repository issues section. Please do not report security vulnerabilities on the public GitHub issue tracker. The Responsible Disclosure Program details the procedure for disclosing security issues.
Auth0 helps you to:
- Add authentication with multiple authentication sources, either social like Google, Facebook, Microsoft Account, LinkedIn, GitHub, Twitter, Box, Salesforce, amont others, or enterprise identity systems like Windows Azure AD, Google Apps, Active Directory, ADFS or any SAML Identity Provider.
- Add authentication through more traditional username/password databases.
- Add support for linking different user accounts with the same user.
- Support for generating signed Json Web Tokens to call your APIs and flow the user identity securely.
- Analytics of how, when and where users are logging in.
- Pull data from other sources and add it to the user profile, through JavaScript rules.
- Go to Auth0 and click Sign Up.
- Use Google, GitHub or Microsoft Account to login.
Auth0
react-native-lock-android is available under the MIT license. See the LICENSE file for more info.