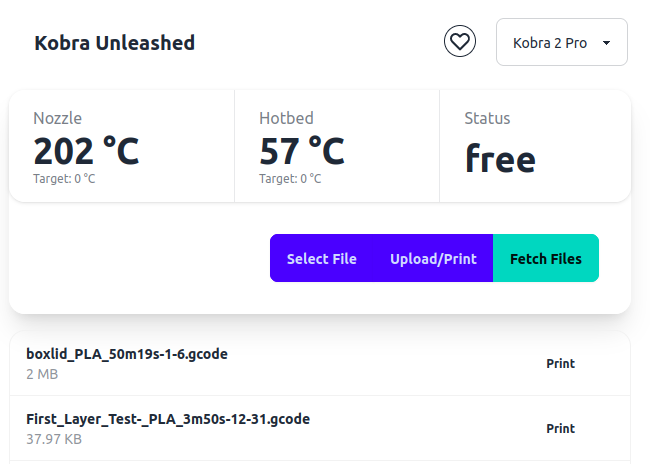
Since the Kobra 2 Pro/Plus/Max do not have a webinterface built-in, I decided to create one myself. This is the result.
These printers sadly feature a closed source firmware, so it isn't easily possible to extend the existing firmware. Using another firmware is theoretically possible but difficult, since a lot of modifications would be needed to make it work.
This webinterface uses the interface of the firmware that is designed to be used with the proprietary app of the manufacturer. This interface is not documented and not officially supported. All controls and information used in the webinterface are the result of reverse engineering.
- Root shell access to your Printer
- Refer to the guide in this Readme
- A Linux Server
- E.g. a Raspberry Pi or other Homeserver in your local network
- Can be a rented VPS
- Make sure to restrict access to the web interface when exposing it to the internet
- Technical Prerequisites:
- Reachable by IPv4 from the printer
- Port 8883 has to be opened for MQTT(S)
- Another port of your choice for the Webinterface
- Clone this repository
git clone https://github.com/anjomro/kobra-unleashed.git
- Generate a self signed ca and certificates for the printer and MQTT Server
- Use the script
certs/generate_certs.shfor that - You can just skip with enter through the fields about the certificate details, they are not checked
- Use the script
- Backup the existing certificates on the printer
- They are located in
/user/ - You can use
cp -r /user /root/user_backupto save the previous certificates
- They are located in
- Replace the certificates on the printer with the generated ones
- You need to copy the following files:
certs/ca.pemto/user/ca.crtcerts/client.pemto/user/client.crtcerts/client.keyto/user/client.key
- You need to copy the following files:
- Backup the app on the printer
- It is located in
/app/app - You can use
cp -r /app/app /root/app_backupto save the previous app
- It is located in
- Replace the address the printer connects to with one you control
- My printer connects to
mqtt-universe.anycubic.com- This may change depending on the configured region?
- Other addresses found in the printer are the following:
mqtt-universe-test.anycubic.commqtt-test.anycubic.commqtt.anycubic.com
- Select a hostname that has exactly the same length as the original one
- You could use sslip.io to get a name for your IP
- Attention: Your router might have
rebind protectionwhich prevents it from resolving external hostnames to local IPs. - Example:
mqtt-universe.anycubic.com- 26 characterspaddi.192.168.0.1.sslip.io- 26 characters
- Replace the address in the app binary & replace stock app
< /app/app sed 's/mqtt-universe.anycubic.com/paddi.192.168.0.1.sslip.io/g' > /app/mod_appchmod 755 /app/mod_appmv /app/mod_app /app/app
- My printer connects to
- Reboot the printer for the changes to take effect
reboot
- Make sure you have Docker installed.
- See the official guide for that.
- Copy the repo and the certs to your server
- Configure your server root url in the
docker-compose.yml- This is where you would access the server from.
- If you're running the server in your local network the address might look like this: (Remember to change the IP to the IP of the device running the kobra-unleashed server)
ROOT_URL=http://192.168.0.100:5000
- Make sure the printer can reach this address, else uploading files won't work
- This is where you would access the server from.
- Start the containers
docker-compose up -d
- Using the default configuration, the webinterface should be reachable at
http://<your-server-ip>:5000- If you can't access it, make sure the port is open in your firewall
- Also make sure port 8883 is open in order for the printer to connect to the MQTT Server
- You can test MQTT Connectivity (and read the communication with your printer) using MQTTX
- You may need to restart your printer again after your MQTT Server is running to establish the connection
- If everything went according to plan, the printer should now appear in the dropdown of the webinterface.
