![]()
Git and run in 15 minutes
- This introduction to Git only covers what's absolutely necessary to get you up and running
- You are here because you want to use a version control system (VCS) to help manage your solo and/or team-based projects
- We will use Git graphical user interface (GUI) and GitHub to perform basic operations; advanced material is not covered here
- 0. Requirements
- 1. Installation
- 2. New Repository
- 3. Clone Repository
- 4. Setup Connection
- 5. Adding Changes
- 6. Committing Changes
- 7. Pushing Changes
- 8. Typical Workflow
- 9. Epilogue
- This tutorial was developed on Microsoft Windows 10
- You are using two platforms hand-in-hand:
- Git graphical user interface (GUI) downloaded on your computer
- GitHub website accessed through web browser
- You can also perform this tutorial on MacOS or Linux
- We will use Git GUI to interface with GitHub's Website
- Download the "64-bit Git for Windows Portable" version here (tutorial is using v2.23.0, 64 bit): https://git-scm.com/downloads/

- Run the downloaded file and have it extract to your desktop

- Open Windows File Explorer and navigate to where you extracted PortableGit, navigate to "
..\PortableGit\cmd\git-gui.exe" and run it - Keep this program up while you move on to the GitHub website

- You must sign up for a free account with GitHub at www.github.com and sign in.

After downloading and installing Git GUI and registering for a GitHub account, you should be able to setup your Git credentials within the next 5 minutes.
- We will create a new repository and initialize it to begin using the repos (short for repository)
- After you log in, click on the green "New" button:

- Give your repos a name (e.g. "TEST"), click on "Initialize this repository with a README" (this is important), and then click the green "Create repository" button.

- After your new repos is created, click on the green "Clone or download" button on the top right and copy the information you see here under "Clone with SSH", e.g.
[email protected]:atet/TEST.git

- We just created the repository on GitHub's website, let's clone that repository so it also exists on your local computer
- Go back to the Git GUI program and select "Clone Existing Repository"

- Paste the information from GitHub to "Source Location", e.g.
[email protected]:atet/TEST.git - Choose a "Target Directory" for where the files will go locally, e.g. filepath to your desktop, then manually add the name of the new folder to be created but does not yet exist, e.g. "
/TEST"- Git GUI will not let you use a directory that already exists, a new directory must be created here

- Once you click "Clone" button, Git GUI will download the repos you just made on GitHub to your local target directory

- Once the repos is cloned, a copy of your GitHub repos exists locally on your computer
- Below is what your working environment on Git GUI will look like

After cloning your repository, you must set up your Git GUI and GitHub website account to securely communicate with each other
- Go to
Edit→Options... - On the left-hand side, enter your GitHub website username and email address associated with your account
- Click
Save

- Go to
Help→Show SSH Key - Click on
Generate KeythenCopy To Clipboard- NOTE: Your key will be a difference sequence of characters than below

- Click on the top-right profile picture and select
Settings - Click on
SSH and GPG keyson left-hand side - Click on green
New SSH keybutton on top-right - Give this new key a
Title - Paste your public Git GUI key into the text box
- Click on
Add SSH key

Adding will list out all the changes (new/deleted/modified files) that were made to the local repository
- Here, we will just make a simple change to the
README.mdfile:- Navigate to where you cloned the
TESTrepos - Right-click and open
README.mdfile in Notepad - Type out "
HELLO WORLD!" at the bottom and save
- Navigate to where you cloned the

Addthese changes to your record of changes:- In the Git GUI, click on
Rescanand our addition of "HELLO WORLD!" in theREADME.mdfile will be shown in the top-right window pane
- In the Git GUI, click on

- Click on
Stage Changedand the changes you have made will beadded to the list on the bottom-left

Committing will organize and document the various changes made as a single group
- Add a message relating to the changes you just made, e.g.
"Added "HELLO WORLD!" to README.md." - Click on
Commit - You will not see any changes on GitHub at this point yet

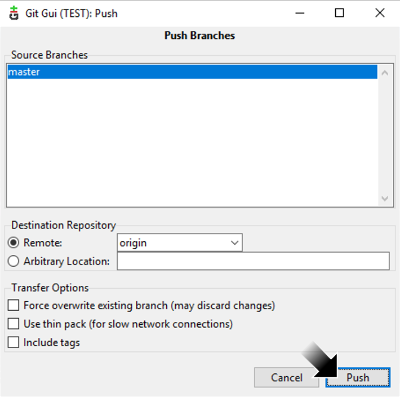
Pushing will send all commits to be incorporated to the master repository on GitHub
- Click on
Pushin lower-right window pane - In the popup window that comes up, click on
Pushagain
- Another popup window will display the status of your
pushof local changes to the master on GitHub.- If you setup your connection correctly on Step 4, there will not be any errors here
- Click on
Close

- You will now see all your
commits on GitHub

- You can think of each repos as all the content that comprises a single project
- All file additions, modifications, and/or deletions in this project will be tracked
- Identify breakpoints in a project and organize your efforts (and commits) around them:
- "Initial commit of project framework including X, Y, and Z."
- "Implemented backend code to allow users to sort GUI results table."
- "Fixed login bug #2 that caused QA's 'Unknown User' error."
- Once you start getting used to the version control workflow, you'll notice it's mostly just
add→commit→push
- Anyone can incorporate Git into their development workflow and immediately gain benefits:
- Redundancy and Backup: Copies of your files will exist in multiple locations (on the GitHub platform, your computer, collaborators, etc.)
- Versioning: Revert to any previous version of your repos
- This was a quick introduction, but Git can be more powerful (and complex):
- Branching: Collaborators can work on their own branch without affecting anyone else's and submit changes for review
- Command Line Access: Quickly
add→commit→pushthrough a terminal instead of website drag-dropping or GUI button-pushing
| Issue | Solution |
|---|---|
| GitHub won't let me push a large file I've added and committed | GitHub will not allow a single file to be larger than 100 MB unless you enable LFS |
| I erased a large file but GitHub still thinks it's in my repos | Even if you remove the file, once commited, it exists in your Git history. Follow these instructions to reset the HEAD (https://stackoverflow.com/a/54846502):$ git status$ git reset HEAD~<HOWEVER MANY COMMITS YOU ARE AHEAD>$ git add . && git commit -m "" && git push -u origin master |
| GitHub is showing that my commits are "unverified" | Make sure you set up commit signature verification: https://docs.github.com/en/authentication/managing-commit-signature-verification/about-commit-signature-verification |
| I have a subdirectory that I'd like to "split" out to its own new repository, how can I do it? | You can "subtree split": https://medium.com/@jeevansathisocial/extract-subdirectory-from-git-repository-without-losing-history-3de8aed359a4 |
| I want to copy my repository into another repository with a different name but retain history | Clone the repository you want to copy, then push to new repository (https://stackoverflow.com/a/26485128):$ git clone https://github.com/<USER>/<OLD_REPO>$ cd <OLD_REPO>$ git push https://github.com/<USER>/<NEW_REPO> <OLD_BRANCH>:<NEW_BRANCH> |
| I made an error in my commit message, can I go back and edit it? | Yes, if it's the immediate previous commit:$ git commit --amend<MAKE EDITS IN FILE, SAVE, AND EXIT>$ git push -f |
| Title | Link |
|---|---|
| Git Concepts | https://git-scm.com/book/en/v1/Getting-Started-Git-Basics |
| GitHub's Web-GUI Introduction | https://guides.github.com/activities/hello-world/ |
| Git Commands Cheat Sheet | https://github.github.com/training-kit/downloads/github-git-cheat-sheet.pdf |
- Git and GitHub are two different systems that work together:
- GitHub provides the cloud hosting for your repos
- Git is the language that can communicate with the remote repos
- GitHub is a popular service provider, but there are many others that can be accessed with the same Git workflow:
| Company | Service | Website |
|---|---|---|
| Microsoft | GitHub | www.github.com |
| Atlassian | Bitbucket | www.bitbucket.org |
| GitLab, Inc. | GitLab | www.gitlab.com |
Copyright © 2019-∞ Athit Kao, Terms and Conditions