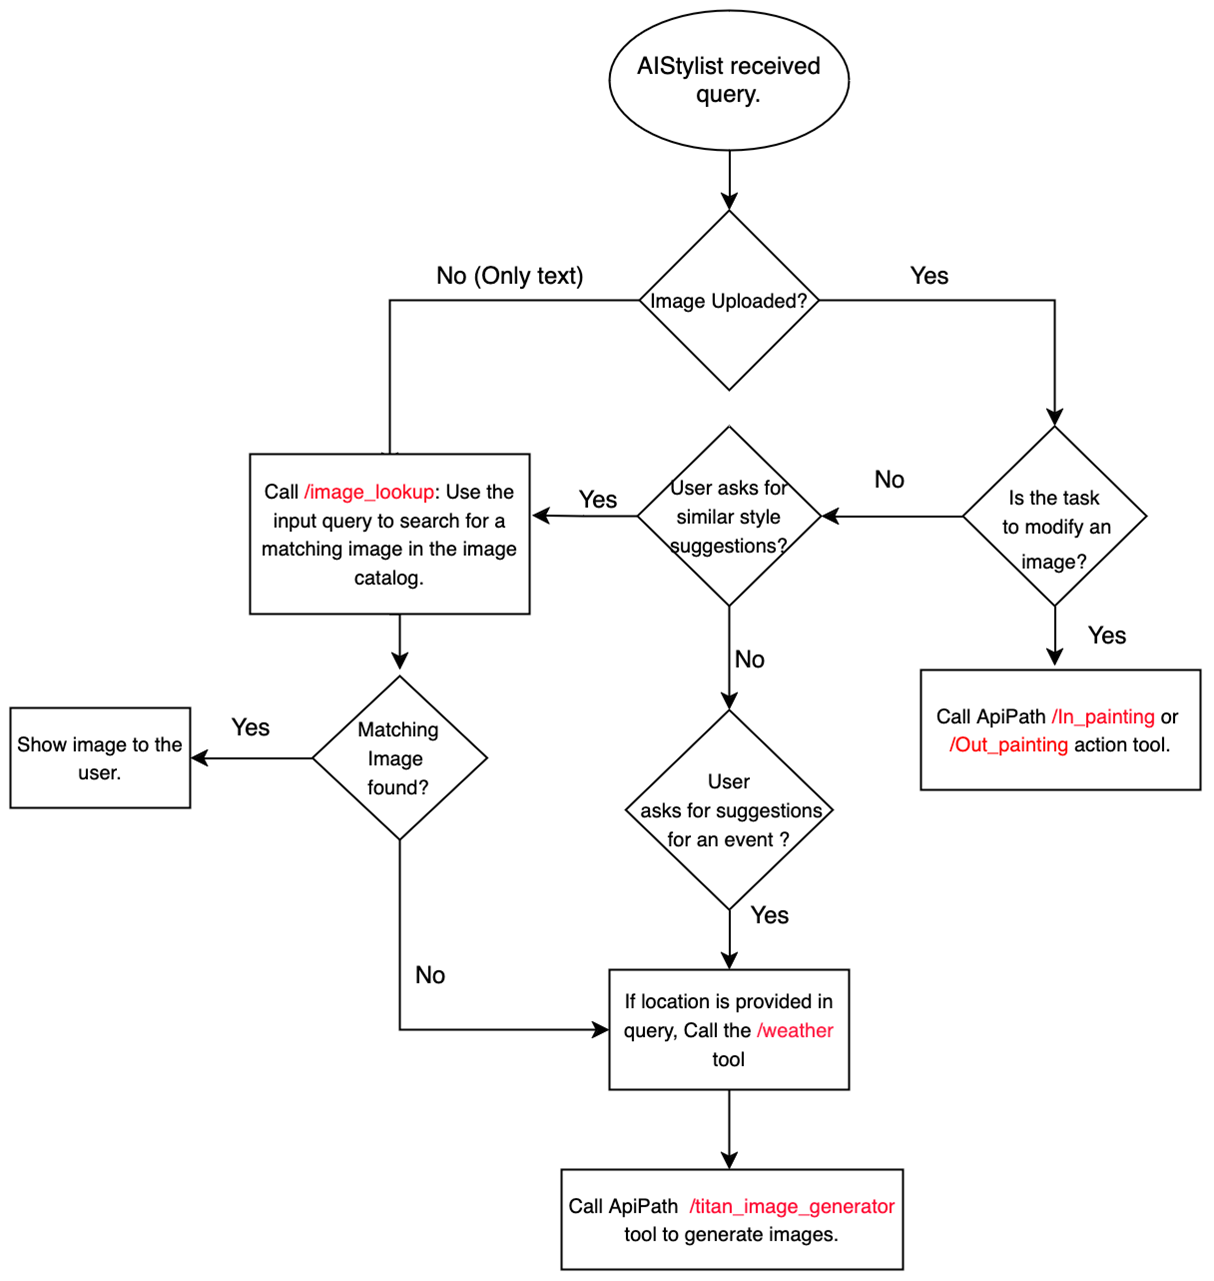
This project is a fashion assistant agent built with Amazon Titan models and Agents for Amazon Bedrock, aimed at providing users with personalized fashion advice and experience.
- Image-to-Image or Text-to-Image Search: Allows users to search for products from the catalog that are similar to styles they like.
- Text-to-Image Generation: If the desired style is not available in the database, it can generate customized images based on the user's query.
- Weather API Integration: By fetching weather information from the location mentioned in the user's prompt, the agent can suggest appropriate outfits for the occasion.
- Outpainting: Users can upload an image and request to change the background, allowing them to visualize their preferred styles in different settings.
- Inpainting: Enables users to modify specific clothing items in an uploaded image, such as changing the design or color.
- An active AWS account and IAM role (with permissions for Bedrock, Lambda, and S3)
- Access to Anthropic Claude-3 Sonnet, Amazon Titan Image Generator, and Titan Multi-modal Embedding models enabled
- Prepare required datasets (e.g., fashion images from Kaggle)
- Install required Python libraries (e.g., Streamlit)
- It is recommended to install Node.js and npm using the Node Version Manager (nvm). Follow the installation instructions from the official GitHub repository: https://github.com/nvm-sh/nvm
-
macOS:
- Install Node.js and npm using a package manager like Homebrew:
brew install node
- Install Node.js and npm using a package manager like Homebrew:
-
Windows:
- Download and install the latest LTS version of Node.js from the official website: https://nodejs.org/en/download/
-
Linux:
- Follow the instructions from the official Node.js website for your Linux distribution: https://nodejs.org/en/download/package-manager/
- Install the AWS CDK using npm:
npm install -g aws-cdk
- Install Python requirements:
pip install -r requirements.txt
-
Change directory into the project directory
-
In
config.ymladd the "opensearch_arns" i.e. IAM role(s) that would be used to access the Opensearch Collection. -
Synthesize the CloudFormation template:
cdk synth
-
Deploy the CDK stack and capture outputs:
cdk deploy --outputs-file variables.json
-
(Optional) Cleanup and delete resources: To delete the deployed resources and the CloudFormation stack, run:
cdk destroy
To use the image lookup feature, run the opensearch_ingest.ipynb notebook to create a vector store. It uses the Titan Multi-modal Embedding model to embed and ingest the image embeddings to OpenSearch Serverless.
The config.yml file in the cdk directory contains several variables that you need to set for the FashionAgent to work correctly.
-
schema_name: This is the name of the schema file used to define the agent API. It is typically set to"FashionAgent_Schema.json". -
foundation_model: This is the Anthropic model that will be used as the base for the FashionAgent. The default value is"anthropic.claude-3-sonnet-20240229-v1:0". -
agent_name: This is the name of the FashionAgent. The default value is"FashionAgent". -
bucket_name: This is the name of the S3 bucket that will be used to store images. If left blank, it will default to"fashion-agent-{account}-{region}", where{account}is your AWS account ID, and{region}is the AWS region you are deploying to. -
embeddingSize: This is the size of the embeddings that will be stored in the OpenSearch index. The default value is"1024". The size of Titan multimodal emebeddings. -
opensearch.deploy: This is a boolean value that determines whether the OpenSearch deployment should be included in the CDK deployment or not. The default value isTrue. -
opensearch.opensearch_index_name: This is the name of the OpenSearch index that will be created. The default value is"images-index". -
opensearch.opensearch_collection_name: This is the name of the OpenSearch collection that will be created within the index. The default value is"fashion-image-collection". -
opensearch.opensearch_arns: This is a list of AWS Identity and Access Management (IAM) role ARNs that will be granted access to the OpenSearch collection. You need to replace the default value with your own IAM role ARN.
To find your IAM role ARN, you can use the AWS CLI:
-
Install the AWS CLI if you haven't already done so. Follow the instructions in the AWS CLI documentation.
-
Run the following command to get your IAM role:
aws sts get-caller-identity -
Replace the default value in the
opensearch_arnslist with your role ARN.
Granting your IAM role access to the OpenSearch collection allows you to write embeddings to OpenSearch from your application.
-
Run the following command run the streamlit demo UI:
streamlit run frontend/app.py -
A web browser will open the Demo UI
To avoid unnecessary costs, make sure to delete the resources used in this solution using cdk destroy
