This repository explains how I run my smart TV setup EarlGreyTV.
Tip
I wrote a blog post about this too. And recorded a quick YouTube video.
Summary: I use a Linux-running laptop (which I spilled tea on) to render a browser in constant fullscreen. I then have a homepage with a smart TV-like look. The "apps" are simply links to websites.
Warning: This is mostly a collection of my notes. I haven't tested if these steps work perfectly on a fresh install. You should be able to debug things yourself if anything goes wrong.
I encourage you to customize this as much as possible. Please make it your perfect setup, not mine.
The main "homepage" of EarlGreyTV is the earlgreytv.html file found in config_files/home/tv/earlgreytv/. This is where you tweak the homepage appearance and, importantly, configure the "apps".
In this repo, I have my own example with my apps. Maybe I'm paranoid, but I'm too scared of copyright to have logo files hosted here. I made this script so you can download them yourself:
# Download the logos in the logos.txt file
# E.g Netflix logo
./download_logos.sh
Now you should be able to open the HTML file in a browser. e.g.:
firefox config_files/home/tv/earlgreytv/earlgreytv.html
The apps are defined in the JavaScript portion of the earlgreytv.html file. Specify your app name, URL, and logo (which should exist in the images/ folder).
const APPS = [
  { name: "App name", url: "https://example.org", image: "app.png" },
  /* ... */
]
Tip: You can add a shortcut icon in the top-right corner by specifying shortcut: true.
Get yourself something you can use as a screen for your setup. Ideally, it should be as dumb as possible - simply showing the output of the computer you plug into it.
I couldn't find a dumb TV, so I got a smart TV and used settings to dumb it down a bit.
I got a SAMSUNG 55" 4K UHD LED TV TU55CU7105KXXC (3840x2160), and connected it with HDMI.
I did this setting change:
- > All Settings
- > General & Privacy
- > Start Screen Options
- "Autorun Last App"
My HDMI connection is considered an "App".
Side note: Some TVs have hidden menus that can allow you to dumb them down even more, example. The regular settings seemed to work okay for me, though.
You need a computer to power your setup. An old used laptop is perfect.
I used a 5-year-old Lenovo laptop with a broken keyboard (because I spilled Earl Grey tea into it).
Since this setup is a regular desktop setup disguised as a smart TV, you need something to be your mouse. You also need a keyboard too (although maybe you can trigger an on-screen keyboard).
I chose the WECHIP W3 2.4G 3-i-1 2.4G Air Mouse. It uses a small gyroscope as input for the mouse and has a small keyboard on the back. It's good but a bit flimsy.
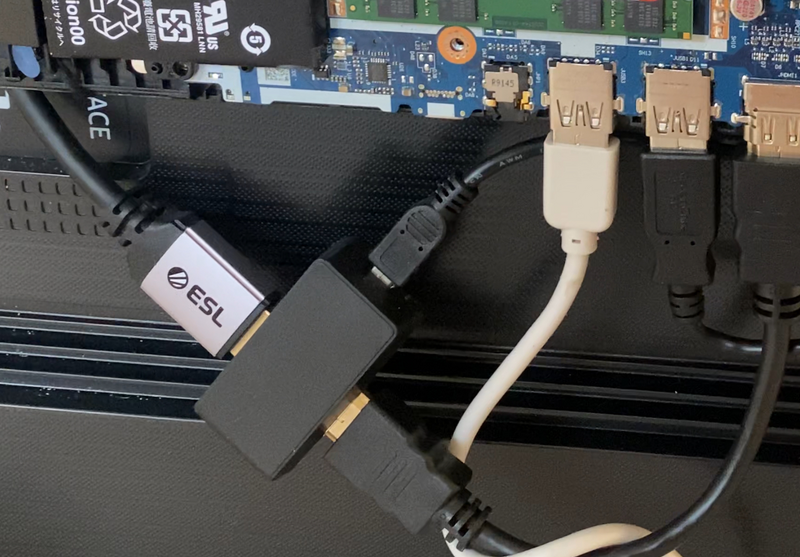
I use CEC to allow my computer to suspend my TV. I need an adapter because the laptop doesn't support the CEC protocol itself.
I use the Pulse Eight USB-CEC Adapter.
For your mouse, you'll likely get a very small USB receiver, example. Depending on where you place your laptop, you might need to extend the receiver.
I use a generic USB extender, example.
I went with Debian Linux. I named my user tv.
I chose Sway. I needed something I could easily configure with a config file and that would be highly minimal.
In retrospect, maybe regular i3 would have been better. The automation tools that exist for the X Window System are more documented.
Run:
sudo apt install sway -yThen log out of GNOME and log into Sway.
These are the packages I could gather from my notes. There may be a couple I forgot, and some that are not needed.
sudo apt install rsync pulseaudio pulseaudio-utils playerctl pamixer xdotool ydotool input-util xbindkeys wtype udev cec-utils -yThe next steps depend on an SSH connection to your TV. I recommend adding your TV computer to your ~/.ssh/config. This is how I connect to my TV:
ssh tvTip: Sway Commands Over SSH:
Interacting with Sway over SSH might give you an error like this: swaymsg/main.c:419] Unable to retrieve socket path.
This is my fix:
export SWAYSOCK=$(find /run/user/1000/ -name "sway-ipc.1000*.sock" -print -quit)
# Now you should be able to e.g. reload Sway:
swaymsg reloadYou likely need some extra zoom on the website you visit. How much depends on how big your screen is. 200% looks good on my TV.
Navigate to about:preferences.
Set "Default zoom" to 200%.
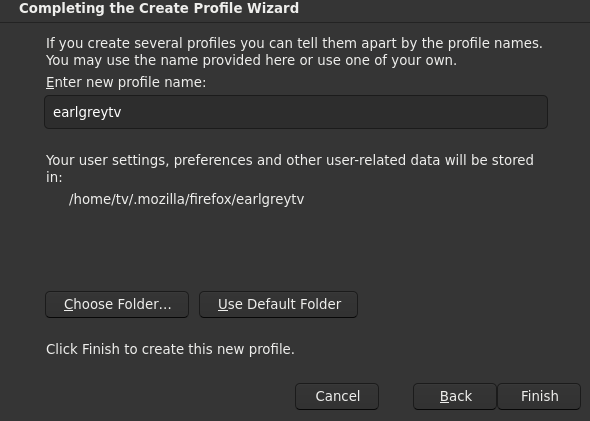
The profile is used for a predictable path to place a config file.
Navigate to about:profiles.
Make sure to click "Choose Folder..." and set it to /home/tv/.mozilla/firefox/earlgreytv.
"Default Profile" should be set to "Yes"
Navigate to about:preferences#home.
For the homepage, pick "Custom URLs...". Then set it to file:///home/tv/earlgreytv/earlgreytv.html.
Navigate to about:config, and set toolkit.legacyUserProfileCustomizations.stylesheets to true.
This will indicate on the cursor if the page is loading.
Navigate to about:config, and set ui.use_activity_cursor to true.
Run ./sync.sh in this directory, to sync files needed for the EarlgreyTV setup.
# Make sure you have rsync
sudo apt install rsync -y
# Sync files
./sync.shRun ./apply.sh to restart any services that use config files. It doesn't restart Firefox.
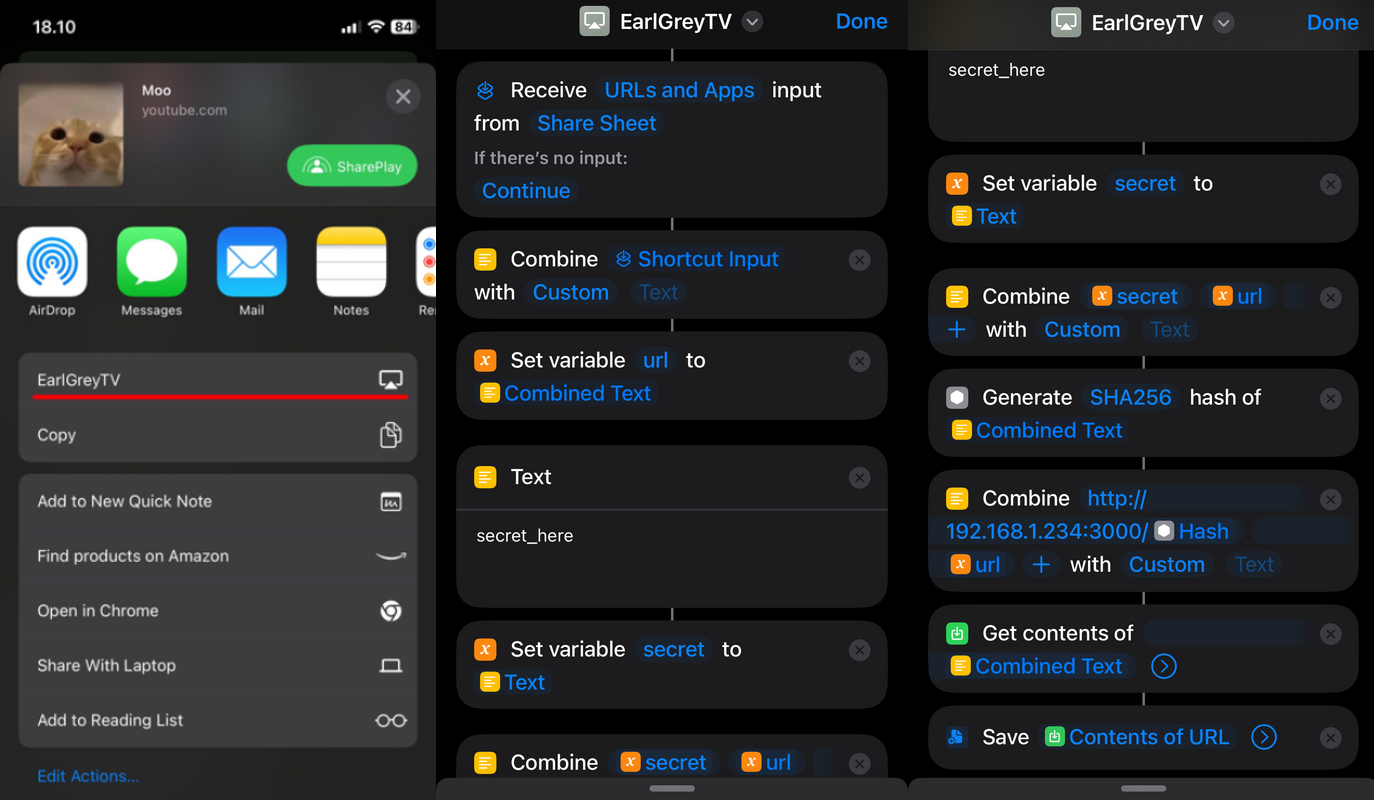
./apply.shEarlGreyTV implements a very simple casting mechanism. A server will receive a URL from an HTTP request, and paste it into the Firefox address bar. The script for the casting server can be found here: config_files/home/tv/casting_server.py.
To make calls to the casting server easily from my iPhone, I created a shortcut that shows up in the Sharing Sheet when sharing a link from any app.
If you want to recreate the shortcut yourself, you can refer to these screenshots:
- I ran into some issues with
ydotool. This solution helped. - Your TV screen might not be primary on the initial Debian login screen. This can correct that.
- Cup drawing logo: BorogoveLM, https://www.deviantart.com/borogovelm/art/Not-My-Cup-Of-Tea-297646401
- Background drawing: Rebecca, https://krita-artists.org/t/drawing-with-water-soluble-ink/3069
- Web SVG icon by HASTA ICON from Noun Project (CC BY 3.0)
- Folder SVG icon by Waldiz Production from Noun Project (CC BY 3.0)
- Document SVG icon by Adiyogi from Noun Project (CC BY 3.0)
- Send/shortcut SVG icon by HideMaru from Noun Project (CC BY 3.0)
- Kevin Balicot for making https://cataas.com (used as example "app")
- Igor Chubin for making https://wttr.in (used as example "app")
This project is licensed under the MIT License - see the LICENSE file for details


