This repository contains an OpenAPI specification for the OpenAI API.
- Introduction
- Prerequisites
- Installation
- How to use the YAML file
- API Endpoints
- Authentication
- Code Examples
- Chat Completions
- How to use CURL Code
- How to use Python Code
- Troubleshooting
- Contributing
- License
- Acknowledgements
This repository contains the OpenAPI (formerly Swagger) specification for the OpenAI API. It provides a comprehensive description of the available endpoints, request/response structures, and authentication methods for interacting with OpenAI's powerful language models and tools.
- These instructions will get you to view the
openapi.yamlfile in a browser. - There are examples of using OpenAI's code to do things, like chatting with an AI and asking for a picture.
- CURL and PYTHON code is used for the examples.
- 10 minutes to install and get up and running with the
openapi.yamlfile in a browser. - More time needed to play with the examples.
- The
openapi.yamlfile is a YAML file that contains the OpenAPI specification for the OpenAI API. - Not too much experience is needed to use the
openapi.yamlfile, just follow the instructions below and use ChatGPT to help you with any issues.
- Chat Completions: Generate human-like text responses based on prompts.
- Audio Transcription and Translation: Convert audio files into text or translate them into different languages.
- Image Generation and Editing: Create or modify images using text prompts.
- Embeddings: Convert text into numerical vectors for machine learning models.
- Fine-tuning: Customize pre-trained models for specific tasks.
- File Management: Upload, manage, and retrieve files used for training and other purposes.
- Moderation: Check text for content that violates OpenAI's usage policies.
- Assistants API (beta): Create AI assistants to help with various tasks.
- Download VSCode: A wonderful program for running Python files. Download VSCode
- Install Required VSCode Plugins: Learn how to install the necessary plugins for this project. VSCode Plugins Guide
- Introduction to Python: Learn what Python is, how to install it, and the top commands to use it. Python Installation Guide
- Understanding HTML: What is HTML and its role in web development. HTML Introduction
- Using HTTP-SERVER: Learn how to use HTTP-SERVER and its functionalities. HTTP-SERVER Guide
- YAML File: What is a YAML file, its uses, and functionalities. YAML Introduction
- An OpenAI API key: Sign up at OpenAI Platform to get your API key.
- Basic understanding of RESTful APIs and JSON:
- RESTful APIs: A style of web service that uses HTTP methods (GET, POST, PUT, DELETE) to interact with resources. Learn more at RESTful API Introduction.
- JSON: A lightweight data-interchange format. Learn more at JSON Introduction.
- A text editor or IDE: Such as Visual Studio Code (VSCode), Sublime Text, or Atom. VSCode, Sublime Text, Atom
- (Optional) Postman, curl, or any API testing tool:
- Postman: An API platform for building and using APIs. Learn more at Postman.
- curl: A command-line tool for transferring data with URLs. Learn more at curl.
- API testing tools: Tools like Insomnia, Paw, or RESTClient. Insomnia, Paw, RESTClient
This repository contains an OpenAPI specification file, which doesn't require installation in the traditional sense. However, to make the most of it, you may want to set up some tools:
-
Clone this repository:
git clone https://github.com/openai/openai-openapi.git
-
Install Swagger UI (optional, for visual exploration):
- Swagger UI: A tool to visualize and interact with the API’s resources. Learn more at Swagger UI.
- npm: A package manager for JavaScript. Learn more at npm.
- Install these two packages one at a time
npm install -g http-server
npm install swagger-ui-dist
npm update
Check for Updates Regularly: Regularly check for updates to your dependencies to ensure you are using the latest versions and avoid deprecated modules.
npm audit
npm audit fix
By following these steps, you should be able to address the deprecation warnings and ensure that your project uses up-to-date and supported dependencies.
-
Install an OpenAPI generator (optional, for client library generation):
- OpenAPI Generator: A tool to generate API client libraries, server stubs, documentation, and configuration. Learn more at OpenAPI Generator.
npm install @openapitools/openapi-generator-cli -g
- You might get this error like I did, I continued with the instructions and I was able to get the .yaml file open in my browser.
-
Open the
openapi.yamlfile in your text editor to explore the API structure.- YAML file: A human-friendly data serialization standard. Learn more at YAML.
- Text editor: Such as VSCode, Sublime Text, or Atom.
-
To view the specification in Swagger UI:
-
Just check that the
swagger-ui-distfolder to your node_modules folder or directory. -
Create an
index.htmlfile with the following content: -
Save the
index.htmlfile in the same folder as theopenapi.yamlfile.<!DOCTYPE html> <html lang="en"> <head> <meta charset="utf-8" /> <meta name="viewport" content="width=device-width, initial-scale=1" /> <title>OpenAI API Specification</title> <link rel="stylesheet" href="node_modules/swagger-ui-dist/swagger-ui.css" /> </head> <body> <div id="swagger-ui"></div> <script src="node_modules/swagger-ui-dist/swagger-ui-bundle.js"></script> <script> window.onload = () => { window.ui = SwaggerUIBundle({ url: "openapi.yaml", dom_id: "#swagger-ui", }); }; </script> </body> </html>
-
Run
http-serverin your project directory terminal. -
Open a web browser and navigate to
http://localhost:8080 -
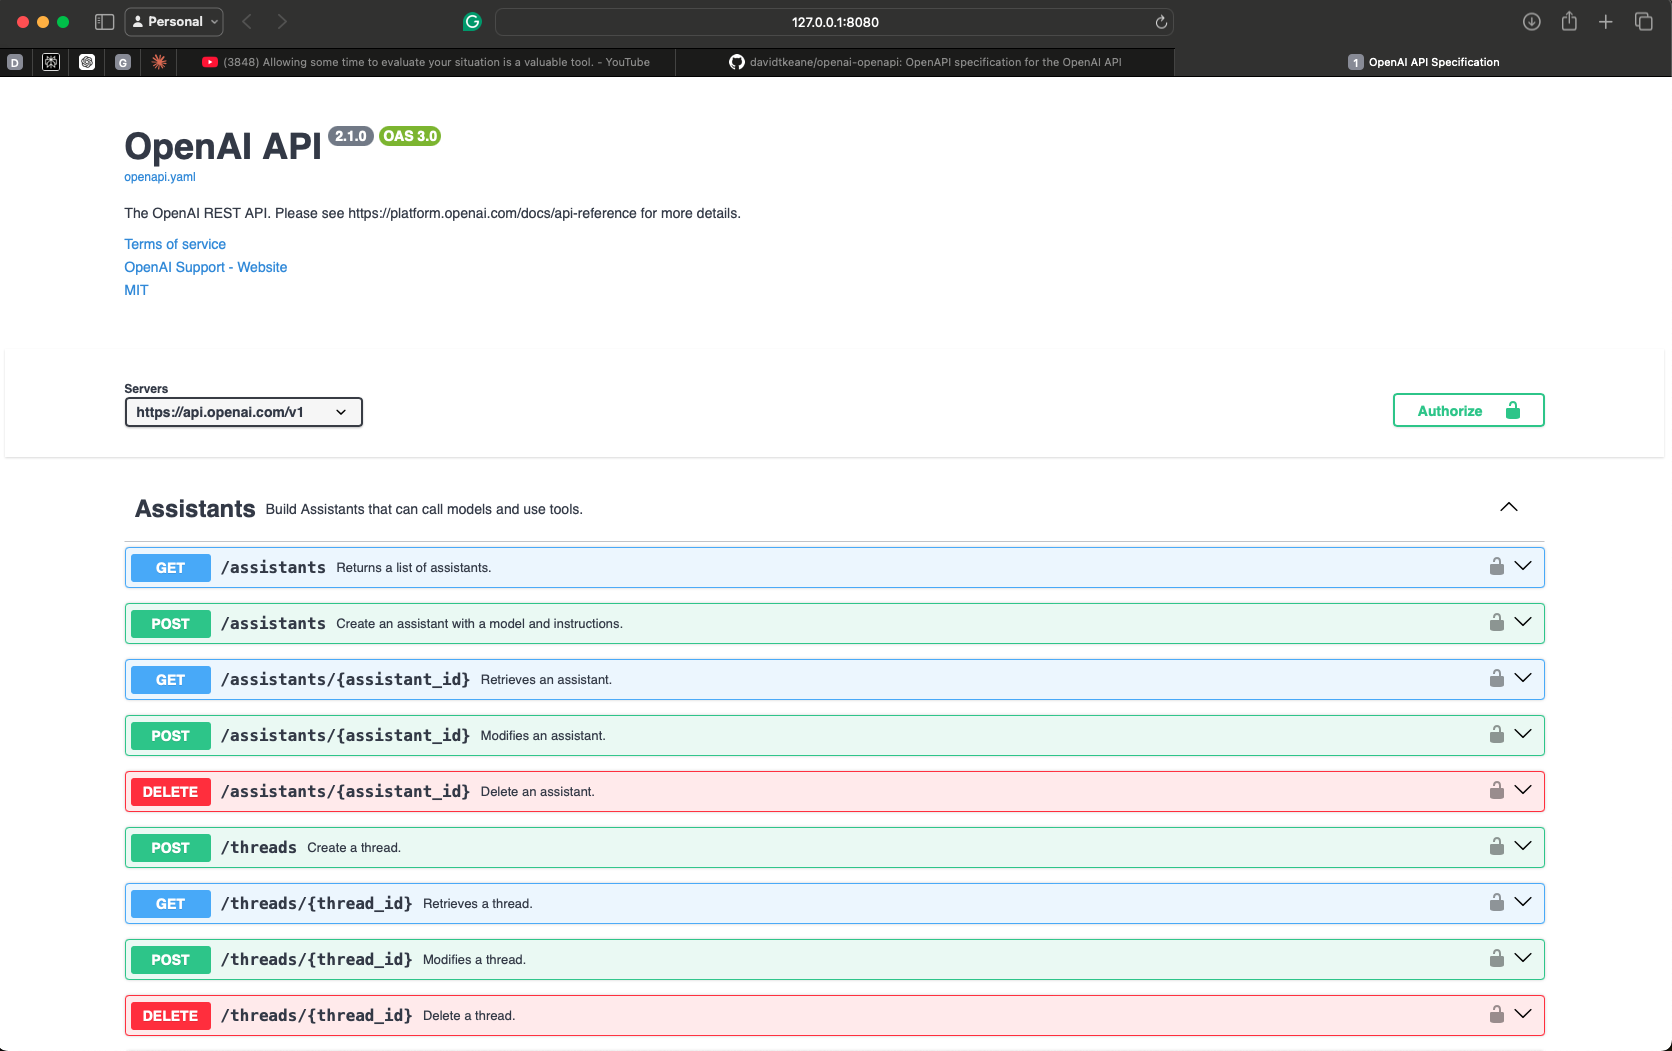
You now should see this!
-
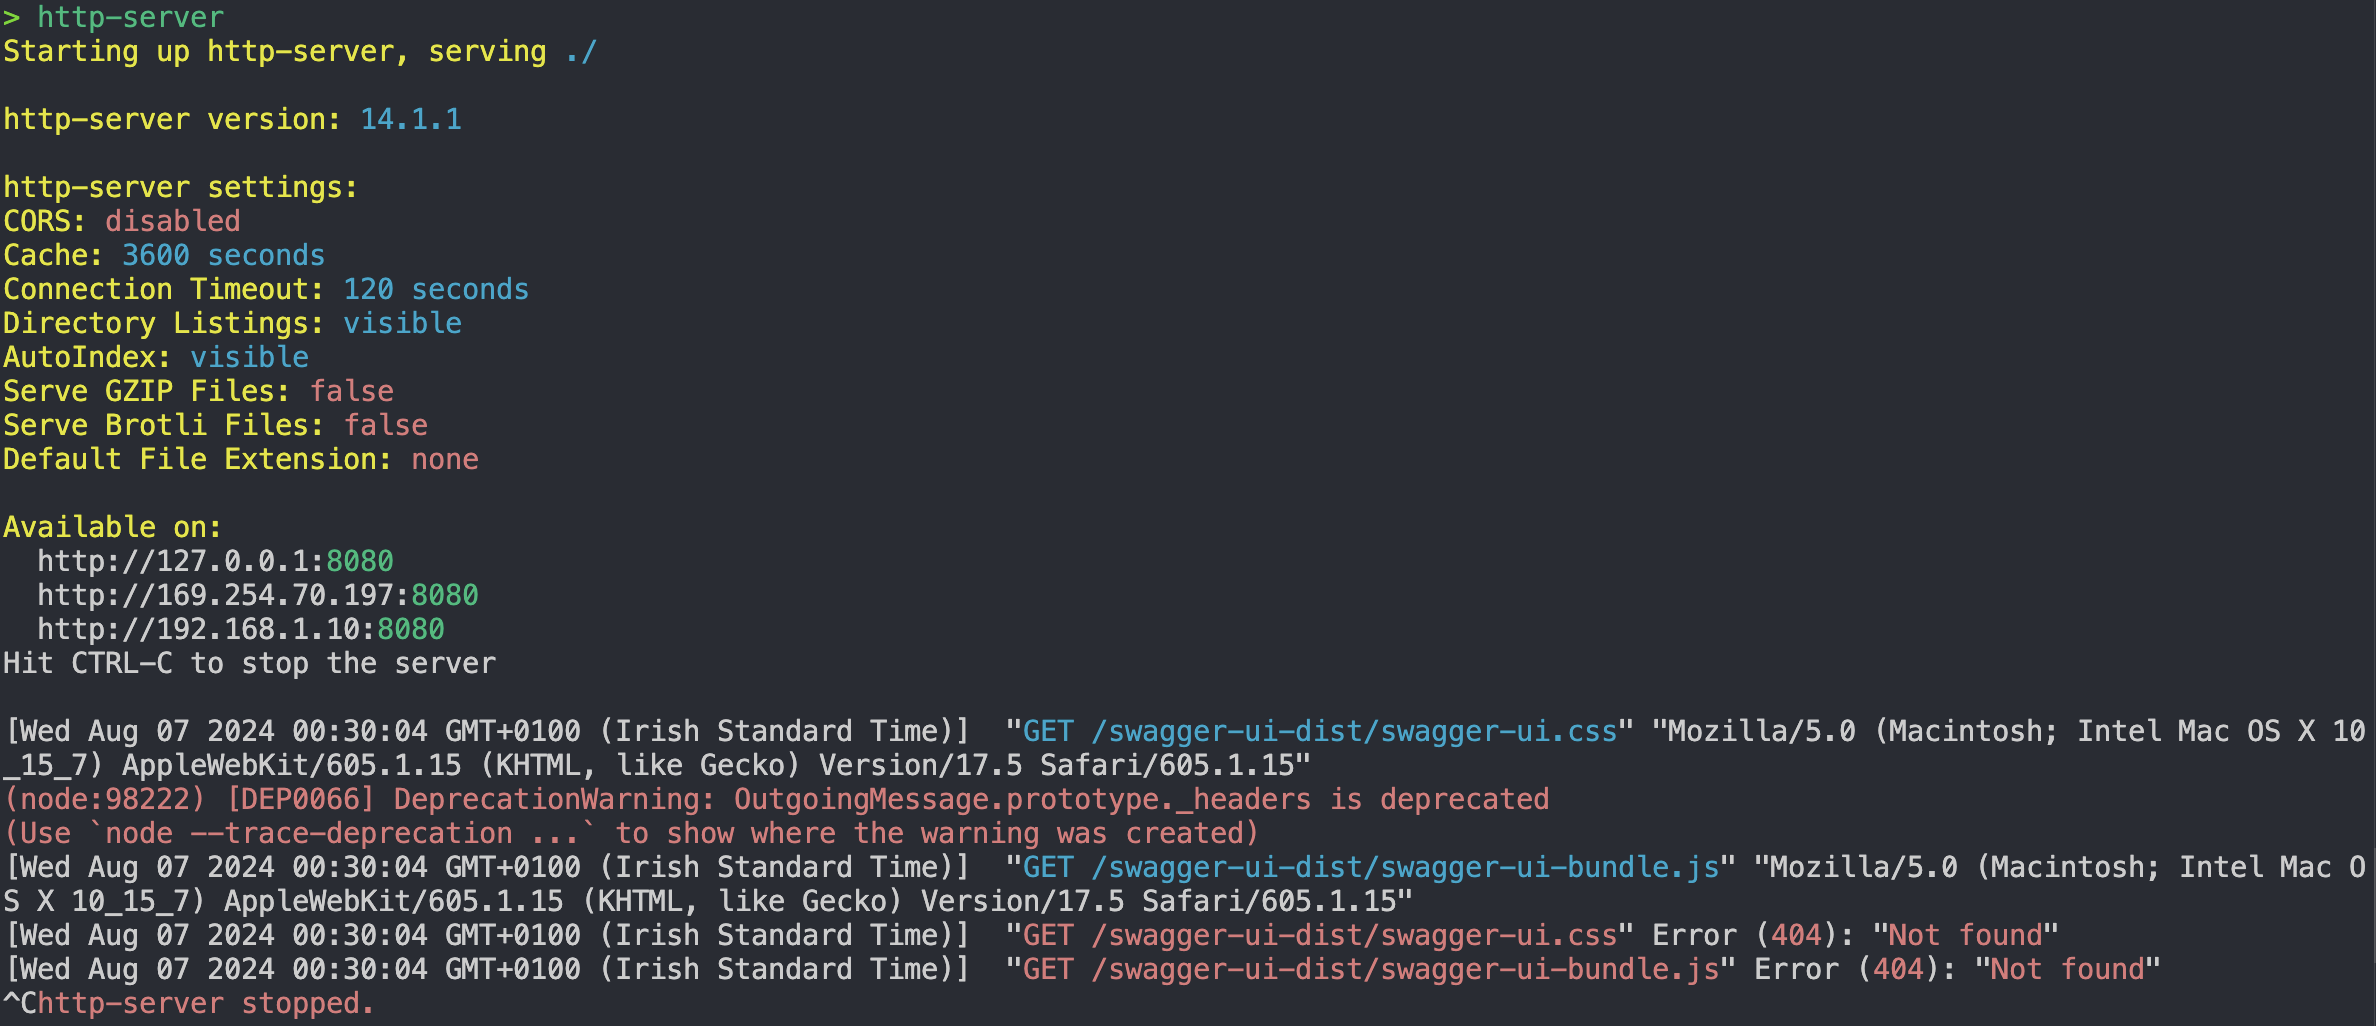
If you see this error below, reinstall the
npm install swagger-ui-distagain, then make sure the swagger-ui-dist is inside the none_modules folder. Then runhttp-serveragain and navigate tohttp://localhost:8080. -
When you reinstall and make sure the node_modules is in the correct place you should see this in the terminal.
-
To generate client libraries for your preferred programming language:
- I didn't have to do this step, as I am only learning .yaml.
openapi-generator-cli generate -i openapi.yaml -g <language> -o ./clientReplace <language> with your desired language (e.g., python, javascript, java).
The specification covers the following main categories of endpoints:
/chat/completions/audio/transcriptions/audio/translations/images/generations/embeddings/fine-tuning/jobs/files/moderations/assistants(beta)/threads(beta)
Ensure you have curl installed on your system. Most Unix-based systems (like macOS and **Linux) come with curl pre-installed. If you're on Windows, you might need to install it or use Windows Subsystem for Linux (WSL). The output will be in JSON format, which you can parse or view directly in the terminal.
By following these steps, you should be able to send a request to the OpenAI API and view the response.
- Open your terminal.
- Replace
YOUR_API_KEYwith your actual OpenAI API key. - Copy and paste the following
curlcommand into your terminal:
Assuming your API key is abc123, the command would look like this:
Generate a response to a user message:
curl https://api.openai.com/v1/chat/completions \
  -H "Content-Type: application/json" \
  -H "Authorization: Bearer abc123" \
  -d '{
    "model": "gpt-3.5-turbo",
    "messages": [{"role": "user", "content": "Hello, how are you?"}]
}'- Press Enter to execute the command.
- The output will be displayed in the terminal.
curl https://api.openai.com/v1/chat/completions \
  -H "Content-Type: application/json" \
  -H "Authorization: Bearer YOUR_API_KEY" \
  -d '{
    "model": "gpt-3.5-turbo",
    "messages": [{"role": "user", "content": "Hello, how are you?"}]
}'Transcribe an audio file:
curl https://api.openai.com/v1/audio/transcriptions \
  -H "Authorization: Bearer YOUR_API_KEY" \
  -F file=@path/to/audio/file \
-F model="whisper-1"Generate an image based on a text prompt:
curl https://api.openai.com/v1/images/generations \
  -H "Content-Type: application/json" \
  -H "Authorization: Bearer YOUR_API_KEY" \
  -d '{
    "prompt": "A cute baby sea otter",
    "n": 1,
    "size": "1024x1024"
}'All requests to the OpenAI API require authentication. You need to include your API key in the Authorization header:
Authorization: Bearer YOUR_API_KEY- Install Python: Ensure Python is installed on your system. Download it from Python.org.
- Install Requests Library: Run
pip install requestsin your terminal. - Create a Python File: Create a file named
openai_example.pyand paste the Python script above. - Run the Script: Open a terminal, navigate to the directory containing the script, and run
python openai_example.py.
import requests

url = "https://api.openai.com/v1/chat/completions"
headers = {
    "Content-Type": "application/json",
    "Authorization": "Bearer YOUR_API_KEY"
}
data = {
    "model": "gpt-3.5-turbo",
    "messages": [{"role": "user", "content": "Hello, how are you?"}]
}

response = requests.post(url, headers=headers, json=data)
print(response.json())
curl https://api.openai.com/v1/chat/completions \
-H "Content-Type: application/json" \
-H "Authorization: Bearer YOUR_API_KEY" \
-d '{
"model": "gpt-3.5-turbo",
"messages": [{"role": "user", "content": "Hello, how are you?"}]
}'Ensure your API key is valid and has the necessary permissions. Check that you're using the correct endpoint URLs and request structures. Verify that your requests include the required headers and parameters. Consult the OpenAI documentation for specific error messages and their meanings.
Contributions to improve the OpenAPI specification are welcome. Please follow these steps:
- Fork the repository
- Create a new branch for your changes
- Make your changes and commit them with clear, descriptive messages
- Push your changes to your fork
- Submit a pull request with a description of your changes
This OpenAI API specification is provided under the MIT License. Please note that while the specification itself is open-source, use of the OpenAI API is subject to OpenAI's terms of service and pricing.
Special thanks to the OpenAI team for developing and maintaining the powerful API that this specification documents. We also acknowledge the contributions of the open-source community in creating tools and libraries that facilitate the use of OpenAPI specifications.
Made with ❤️ by David


