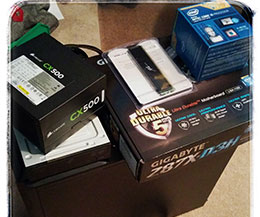
Having had to rebuild my system this past weekend I thought I would document my journey for my Hackinstosh. This guide is intended as a roadmap as a fresh install for my developer setup.
Be kind to your future self
- 8GB USB Drive
- OSX Mojave from the App Store
- 🤞 Lots of patience
- NZXT Tempest 210 case
- GIGABYTE GA-Z87X-D3H motherboard
- Intel Core i5-4670K Haswell 3.4GHz
- 16GB memory
- Corsair CX500 Power Supply
- 256 SSD and 1TB HD
Hard to believe this build is over 4years old and is still running great. Hackintosh's are very picky on hw so make sure you choose wisely. Tonymacx86 Buyers Guide is a great resource to choose from guaranteed working builds.
Great video explaining the process- You will need to have a copy of Mojave from the App store.
- Format USB Drive to
MacOS Extended(Journaled)and name itUSB. - Open Terminal and run:
sudo /Applications/Install\ macOS\ Mojave.app/Contents/Resources/createinstallmedia --volume /Volumes/USB/
Clover configuration is a two part process. You'll have to do it once on the USB Drive and then again on the install drive. TechHowdy has a great guide for this.
- Download Clover EFI Bootloader
- Make sure your USB Drive is inserted.
- On the Destination Select tab, click on the option Change Install Location.
- Select the USB Flash Drive.
- Now on the Installation Type Tab Click on the Customize option. Select the option Install for UEFI booting only.
- Click on the Dropdown for Drivers64UEFI and Select the following options:
- AppleImageCodec-64.UEFI
- AppleKeyAggregator-64.UEFI
- AppleUITheme-64.UEFI
- DataHubDxe-64.UEFI
- FirmwareVolume-64.UEFI
- FSInject-64.UEFI
- SMCHelper-64.UEFI
- VboxHfs-64.UEFI
- Apfs
- OsxAptioFix2Drv-64
- PartitionDxe-64
- Go to Finder and open mounted EFI. Now open the folder EFI > Clover > drivers64.
- Copy the apfs.efi file in
drivers64and thedrivers64UEFIfolder. - Now go back to the
Cloverfolder and open thekexts/Otherfolder. - Copy the kexts in the
Otherfolder. - Now go back to Clover folder and Delete
config.plistfile and Paste the emptyconfig.plistfile.
- Boot from your new USB Drive (on USB2 port) and when it boots up, Go to
Disk Utiltyand format your SSD to useAPFS. - Install MacOSX Mojave. -During installation process the Mac OS will reboot several Times.
- Now you will need to do Clover EFI steps again but this time to your new Mojave SSD. Follow same steps as in Step 2 but choose Mojave SSD rather than the USB Drive.
- I had issues with Intel 4600 video and sound drivers.
- Sound Issues with my ALC 892 kexts solution. I've added the sound kexts and Lilu so hope this won't be an issue.
- Video issue was not using 2K screen to full resolution. Solution was found in this YouTube Video that describes using Clover Configuration to tweak video settings.
- Save Clover Configuration and reboot to make sure everything is working.
The next steps are not related to Hackintosh installation but just things specific to my dev setup.
First things first is to get Homebrew setup.
/usr/bin/ruby -e "$(curl -fsSL https://raw.githubusercontent.com/Homebrew/install/master/install)"
Next install development tools.
brew install brew-cask-completion git node python sqlite yarn zsh-syntax-highlighting gdbm icu4c openssl readline tree zsh gettext libyaml pcre2 ruby xz zsh-completions
Next install programs from brew casks.
brew cask install adobe-creative-cloud etcher font-inconsolata font-source-code-pro moom transmission alfred firefox font-merriweather font-source-sans-pro plex-media-server visual-studio android-file-transfer font-fantasque-sans-mono font-open-sans google-chrome rocket visual-studio-code bitwarden font-fira-code font-pacifico iterm2 sensiblesidebuttons vlc caffeine font-fontawesome font-raleway mono-mdk slack
First Time Setup
vscode as default git editor
Git configuration for use with Github and SSH.
I use Iterm2 and oh-my-zshell with night owl iterm theme.
I am using Visual Studio Code with these extensions.
- advanced-new-file
- Auto Rename Tag
- Bracket Pair Colorizer
- Cobalt2 Theme
- colorize
- ESLint
- File Utils
- Material Icon Theme
- Night Owl
- npm Intellisense
- Path Intellisense
- Prettier
- Simple React Snippets
- Sublime Text Keymaps
- SVG Viewer
- TODO Highlight
- vscode-styled-components


