This application was generated using JHipster 4.14.4, you can find documentation and help at http://www.jhipster.tech/documentation-archive/v4.14.4.
Curent version: 1.4.7
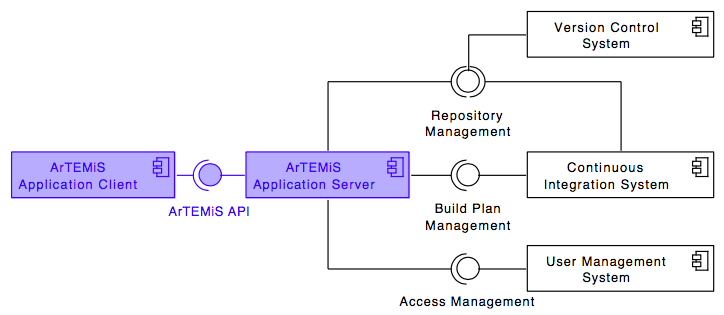
The following UML diagram shows the top-level design of ArTEMiS which is decomposed into an application client and an application server. The application server then connects to a version control system (VCS), a continuous integration system (CIS) and a user management system (UMS).
While ArTEMiS includes generic adapters to these three external systems with a defined protocol which can be instantiated to connect to any VCS, CIS or UMS, it also provides 3 concrete implementations for these adapters to connect to:
- VCS: Atlassian Bitbucket Server
- CIS: Atlassian Bamboo Server
- UMS: Atlassian JIRA Server (more specifically Atlassian Crowd on the JIRA Server)
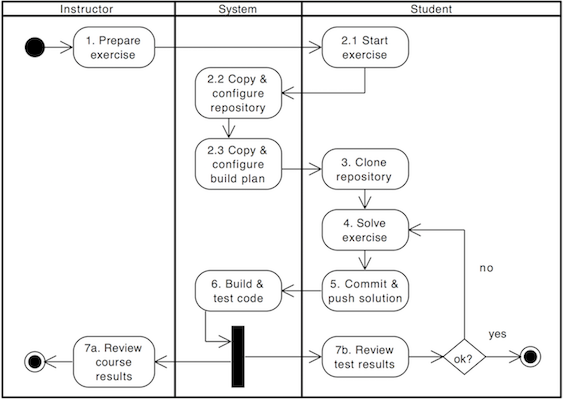
Conducting a programming exercise consists of 7 steps distributed among the instructor, ArTEMiS and students:
- Instructor prepares exercise: Set up a repository containing the exercise code and test cases, build instructions on the CI server, and configures the exercise in ArTEMiS.
- Student starts exercise: Click on start exercise on ArTEMiS which automatically generates a copy of the repository with the exercise code and configures a build plan accordingly.
- Optional: Student clones repository: Clone the personalized repository from the remote VCS to the local machine.
- Student solves exercise: Solve the exercise with an IDE of choice on the local computer or in the online editor.
- Student uploads solution: Upload changes of the source code to the VCS by committing and pushing them to the remote server (or by clicking submit in the online editor).
- CI server verifies solution: verify the student's submission by executing the test cases (see step 1) and provide feedback which parts are correct or wrong.
- Student reviews personal result: Reviews build result and feedback using ArTEMiS. In case of a failed build, reattempt to solve the exercise (step 4).
- Instructor reviews course results: Review overall results of all students, and react to common errors and problems.
The following activity diagram shows this exercise workflow.
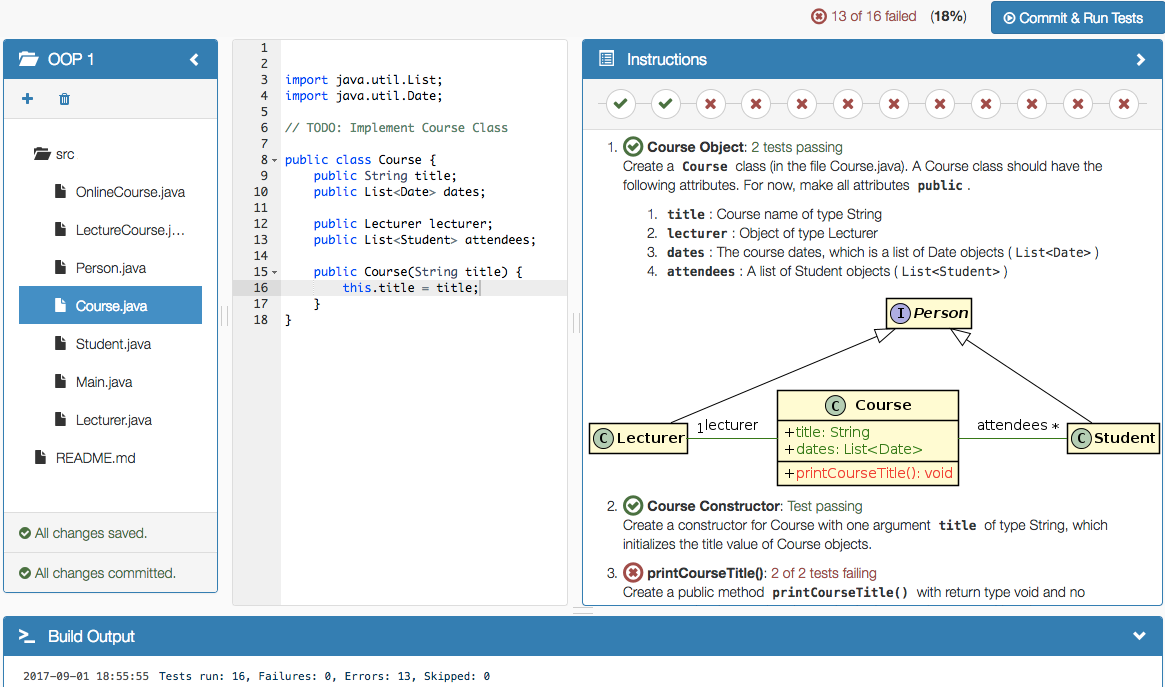
The following screenshot shows the online editor with interactive and dynamic exercise instructions on the right side. Tasks and UML diagram elements are referenced by test cases and update their color from red to green after students submit a new version and all test cases associated with a task or diagram element pass. This allows the students to immediately recognize which tasks are already fulfilled and is particularly helpful for programming beginners.
Before you can build ArTEMiS, you must install and configure the following dependencies/tools on your machine:
-
Java 8 JDK: Java is the main development language for the server application of ArTEMiS.
-
MySQL Database Server 5.7.x: ArTEMiS uses Hibernate to store entities in a MySQL database. Download and install the MySQL Community Server (5.7.x) and configure the 'root' user with an empty password. (In case you want to use a different password, make sure to change the value in application-dev.yml and in liquibase.gradle)
-
Node.js 9: We use Node (>=6.9.0 && <=9.11.1) to run a development web server and build the project. Depending on your system, you can install Node either from source or as a pre-packaged bundle.
-
Yarn: We use Yarn to manage Node dependencies. Depending on your system, you can install Yarn either from source or as a pre-packaged bundle.
After installing Node, you should be able to run the following command to install development tools. You will only need to run this command when dependencies change in package.json.
yarn install
We use Gulp as build system. Install the Gulp command-line tool globally with:
yarn global add gulp-cli
Run the following commands in two separate terminals to create a blissful development experience where your browser auto-refreshes when files change on your hard drive.
./gradlew
gulp
Bower is used to manage CSS and JavaScript dependencies used in the ArTEMiS application client (in the browser). You can upgrade dependencies by specifying a newer version in bower.json. You can also run bower update and bower install to manage dependencies. Add the -h flag on any command to see how you can use it. For example, bower update -h.
For further instructions on how to develop with JHipster, have a look at Using JHipster in development.
ArTEMis is based on JHipster, i.e. Java Spring Boot development on the application server and Javascript (Angular 1) development on the application client in the browser. To get an overview of the used technology, have a look at https://jhipster.github.io/tech-stack and other tutorials on the JHipster homepage.
You can find tutorials how to setup JHipster in an IDE (IntelliJ is recommended, but it also runs in other IDEs as well) on https://jhipster.github.io/configuring-ide.
To start ArTEMiS in your development environment, first import the project and then make sure to install the Spring Boot plugins to run the main class de.tum.in.www1.artemis.ArTEMiSApp. Before the application runs, you have to configure the file application-dev.yml in the folder src/main/resources/config/ and add the following details:
artemis:
  repo-clone-path: ./repos/
  encryption-password: <password>
  result-retrieval-delay: 5000
  jira:
    url: https://jirabruegge.in.tum.de
    user: <user>
    password: <password>
    admin-group-name: <admin-group>
  bitbucket:
    url: https://repobruegge.in.tum.de
    user: <user>
    password: <password>
  bamboo:
    url: https://bamboobruegge.in.tum.de
    bitbucket-application-link-id: de1bf2e0-eb40-3a2d-9494-93cbe2e22d08
    user: <user>
    password: <password>
  lti:
    id: exerciseapp_lti
    oauth-key: exerciseapp_lti_key
    oauth-secret: <secret>
    user-prefix: edx_
    user-group-name: edx
  git:
    name: ArTEMiS
    email: <email>
Change the entries with <...> with proper values, e.g. your TUM Online account to connect to the given instances of JIRA, Bitbucket and Bamboo. Alternatively, you can conncet to your local JIRA, Bitbucket and Bamboo instances (see Docker Setup below).
In addition, you have to install MySQL, setup a root user without password and create an ExerciseApplication scheme.
Then ArTEMiS should startup by running the main class de.tum.in.www1.artemis.ArTEMiSApp using Spring Boot.
To access ArTEMiS in your browser, you have to install npm and execute the following commands in the terminal / command line in the ArTEMiS root folder:
npm install
bower install
gulp
After that you should be able to access http://127.0.0.1:8080/ and login with your TUM Online account (if you use our JIRA instance).
ArTEMiS uses Spring profiles to segregate parts of the application configuration and make it only available in certain environments. For development purposes, the following program arguments should be used to enable the dev profile and the profiles for JIRA, Bitbucket and Bamboo:
--spring.profiles.active=dev,bamboo,bitbucket,jira
This is in particular important, when you want to use your TUMOnline account as credential to login, because the class JiraAuthenticationProvider is only activated, when the spring profile jira is active in the run configuration.
To optimize the ExerciseApplication application for production, run:
./gradlew -Pprod clean bootRepackage
This will concatenate and minify the client CSS and JavaScript files. It will also modify index.html so it references these new files.
To ensure everything worked, run:
java -jar build/libs/*.war
Then navigate to http://localhost:8080 in your browser.
Refer to Using JHipster in production for more details.
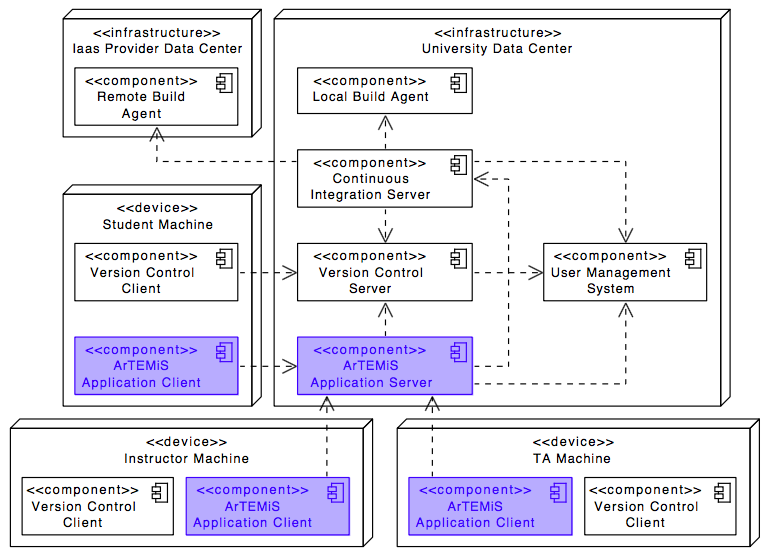
The following UML deployment diagram shows a typical deployment of ArTEMiS application server and application client. Student, Instructor and Teaching Assistant (TA) computers are all equipped equally with the ArTEMiS application client being displayed in the browser.
The Continuous Integration Server typically delegates the build jobs to local build agents within the university infrastructur or to remote build agents, e.g. hosted in the Amazon Cloud (AWS).
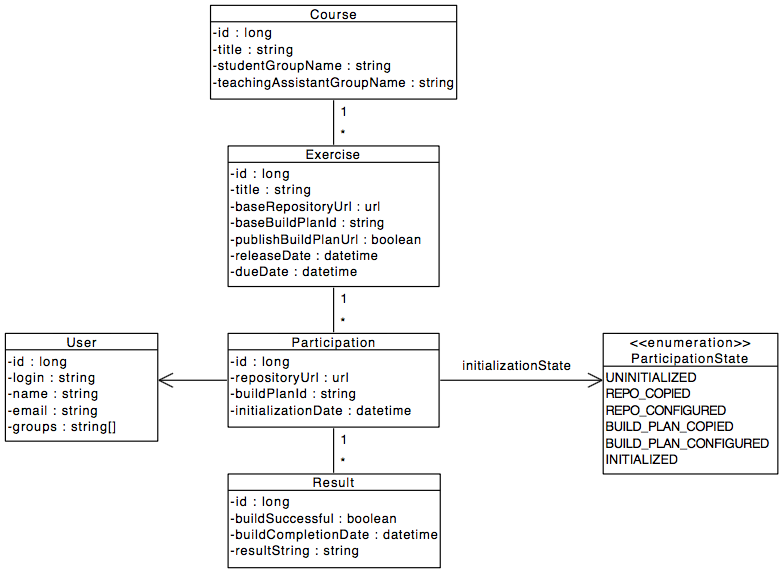
The ArTEMiS application server uses a data model in the MySQL database. The followind UML class diagram shows a simplified version of it. It supports multiple courses with multiple exercises. Each student in the participating student group can participate in the exercise by clicking the Start Exercise button. Then a repository and a build plan for the student (User) will be created and configured. The initialization state variable (Enum) helps to track the progress of this complex operation and allows to recover from errors. A student can submit multiple solutions by committing and pushing the source code changes to a given example code into the version control system. Each submission is automatically tested by the continuous integration server, which notifies the ArTEMiS application server, when a new result exists. In addition, teaching assistants can assess student solutions and "manaully" create results.
Please note: The real data model has become a bit more complex. We allow different types of exercises by having multiple subclasses for programming, modeling and quiz exercises. For each result, we store feedback and a submission. Quiz exercises support multiple choice and drag and drop questions.
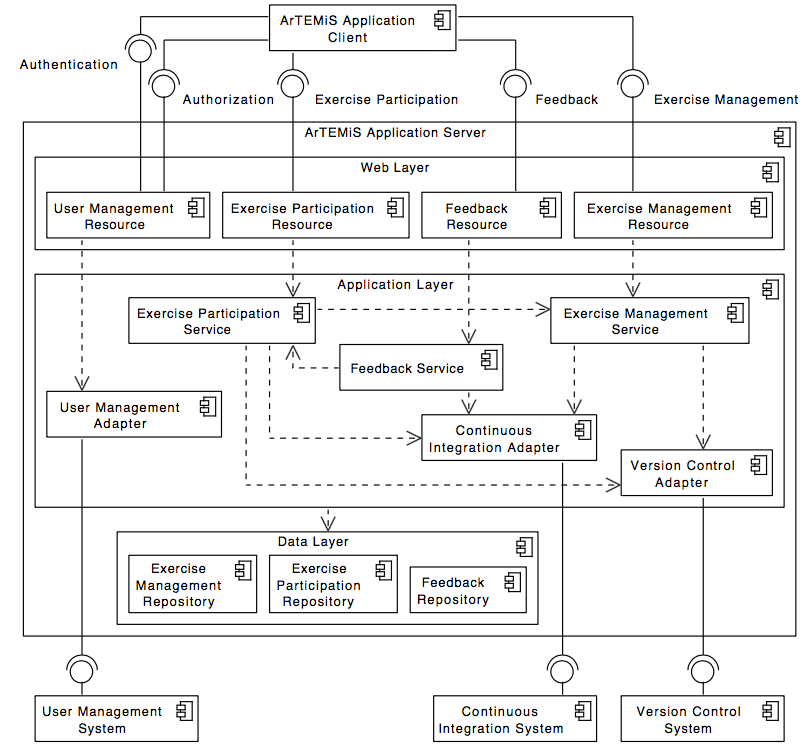
The following UML component diagram shows more details of the ArTEMiS application server architecture and its REST interfaces to the application client.
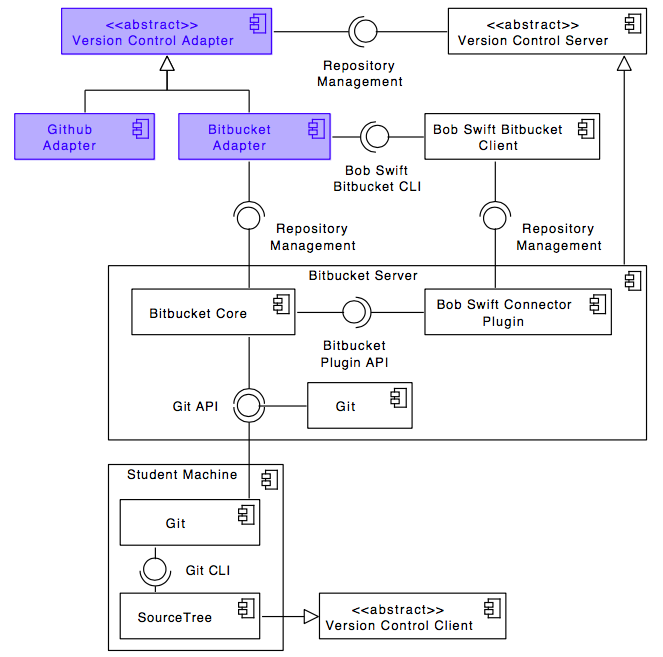
The following UML component diagram shows the details of the Version Control Adapter that allows to connect to multiple Version Control Systems. The other adapters for Continuous Integration and User Management have a similar structure
The Version Control Adapter includes the following abstract interface that concrete connectors have to implement:
+ copyRepository(baseRepository, user)
+ configureRepository(repository, user)
+ deleteRepository(repository)
+ getRepositoryWebUrl(repository)
The Continuous Integration Adapter includes the following abstract interface that concrete connectors have to implement:
+ copyBuildPlan(baseBuildPlan, user)
+ configureBuildPlan(buildPlan, repository, user)
+ deleteBuildPlan(buildPlan)
+ onBuildCompleted(buildPlan)
+ getBuildStatus(buildPlan)
+ getBuildDetails(buildPlan)
+ getBuildPlanWebUrl(buildPlan)
