sobotify is a framework for turning a robot into a social robot. Currently it supports controlling the humanoid robots Pepper and NAO as well as Cozmo and initial support for MyKeepon. Additionally a virtual "robot", called stickman, can be user. It is planned to support further robots (Cue, Bioloid, ...).
It has been tested with Python 3.8 (and Python 2.7 for accessing NAO/Pepper) on Windows 10. Future versions should also support Linux and MacOS.
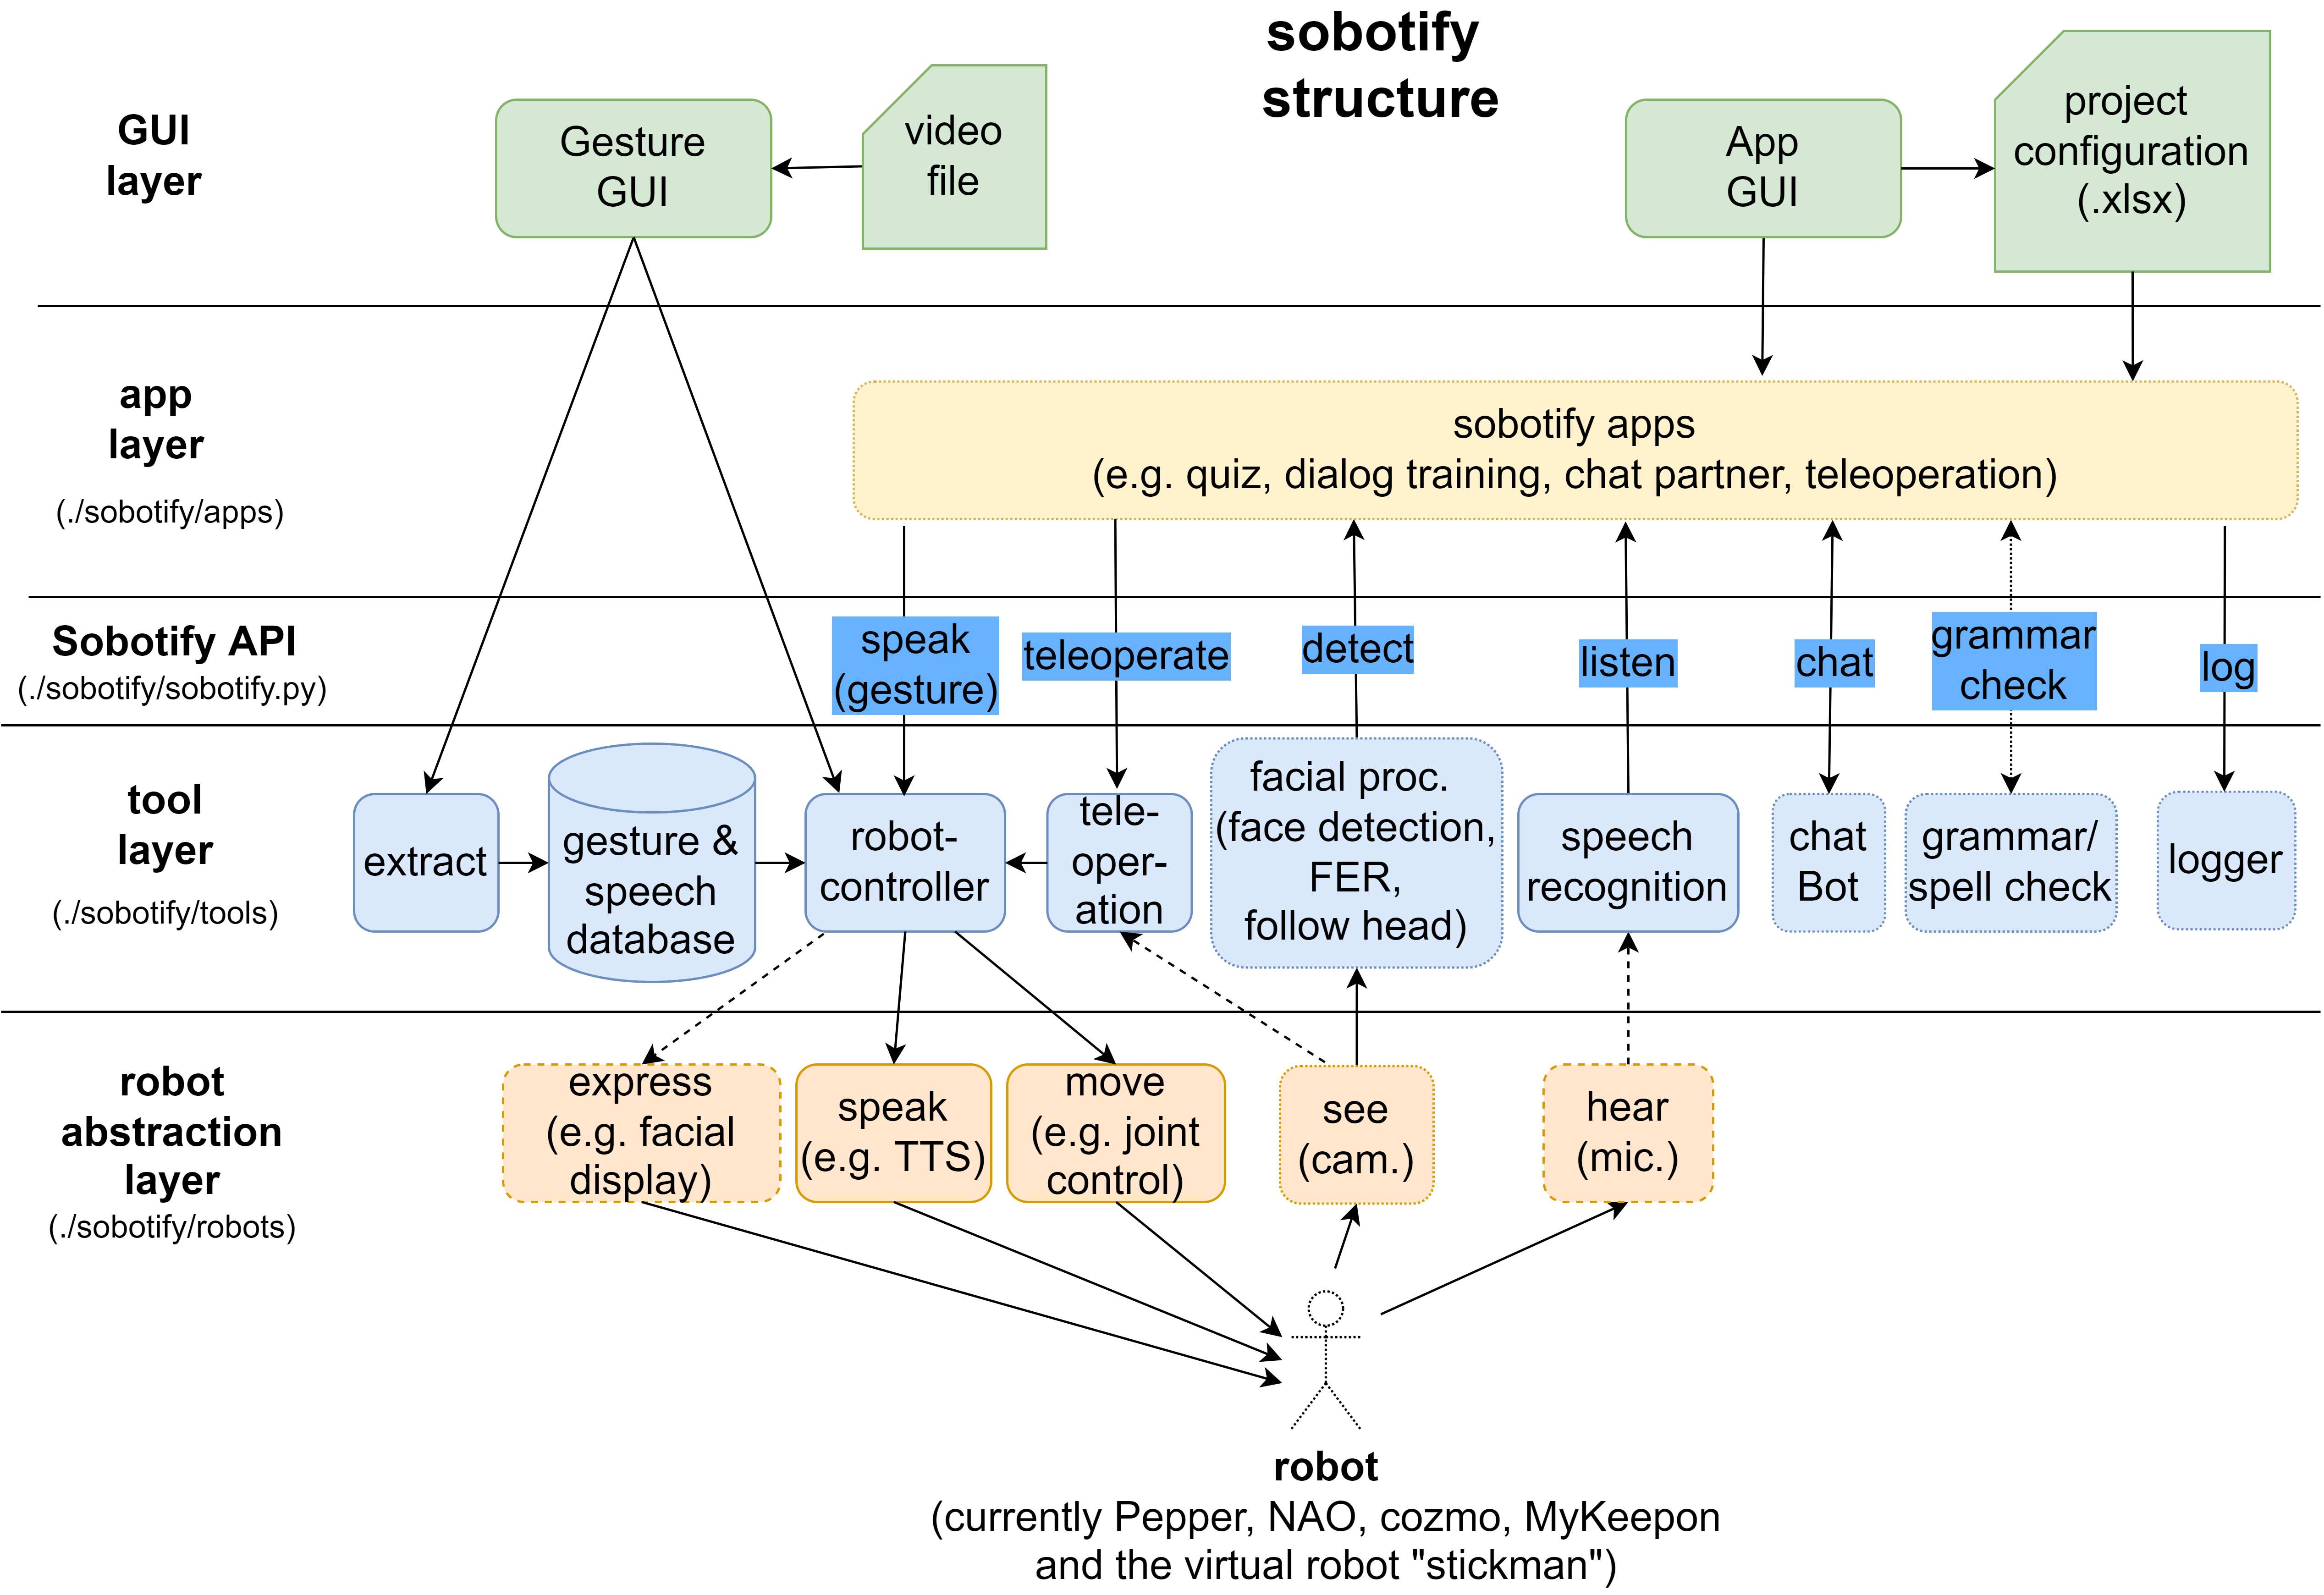
The following diagram shows an overview of the soboitfy framework structure.
Sobotify is separated into four layers:
- robot abtraction layer: defines for each robot the necessary interfaces for accessing the robots features (moving, talking, hearing,...) and for providing an robot agnostic interface to the tool layer
- tool layer: defines all the tools available for creating an app, for example speech and face recognition or logging facilities
- app layer: defines apps, that can be used to control the robot's behaviour
- gui layer: provides graphical interfaces for starting and editing apps and for extracting gesture/speech from video files and testing them on robots
Additionaly the sobotify API acts as an simple interface between the tool and application layer.
- Usage of non-ASCII characters (such as German umlauts) in user, directory or file names will (likely) cause issues. Also it is not recommended to uses spaces in these names.
- Chatbot (LLM - Large Language Model) currently only provides a dummy and a JSON API
- Issues with NAO and Pepper simulators (very slow execution)
- extracting gestures for Cozmo and MyKeepon currently creates only predefined movements of the robots (not based on the actual human gesture)
- currently Miniconda3 is required for creating python environments (usage is hard coded within sobotify)
-
Download the current version of sobotify here : https://github.com/hhuebert/sobotify/archive/refs/heads/main.zip
-
Unzip the sobotify-main.zip file
-
Copy the unpacked sobotify-main folder to a permanent location (i.e. where it can stay, as this will be the installation folder), for example copy it to your home directory, such as C:\Users\MyName\sobotify-main
-
go into the sobotify top folder (e.g. C:\Users\MyName\sobotify-main)
-
double click the file
install.batto automatically download and install all required tools and packages.
It downloads several other project and tools (Miniconda, Mosquitto, VOSK, FFMPEG, LanguageTool, pybullet, qibullet, Python SDK for Pepper/NAO (pynaoqi), PyCozmo animations via download script, ...).
Please check their licenses before installation and usage. You can find the corresponding download URLs in install.bat and Python package (PyPi) names in requirements.txt. pybullet is downloaded from the conda package repository (conda-forge) -
Keep the default settings during installation of Miniconda and Mosquitto
-
The installation process might take from several minutes up to 30 minutes or more depending on your system and internet connection speed. Don't close the command window during this time, wait until you see the message "Press any key to continue ..."
You can use the following batch files to quickly start different usage scenarios.
-
For starting a predefined app (e.g. the quiz app) double-click the following file to start the GUI:
start_app.bat
This will start the following GUI:
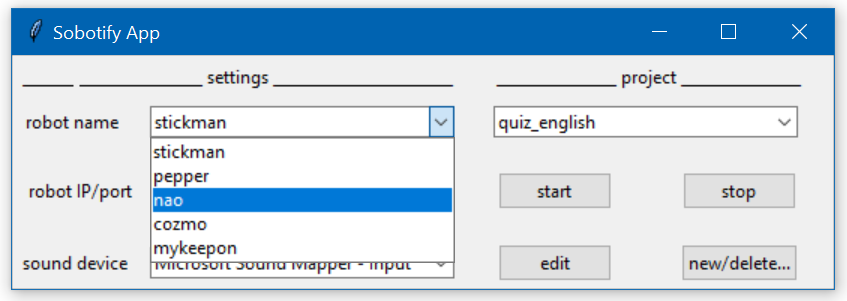
You can choose the robot, the robots IP (necessary for Pepper and NAO) or COM port (necessary for MyKeepon), a sound device for speech detection and the app/project you want to start. For a first trial, use the virtual robot ("stickman") and the "quiz_english" project.
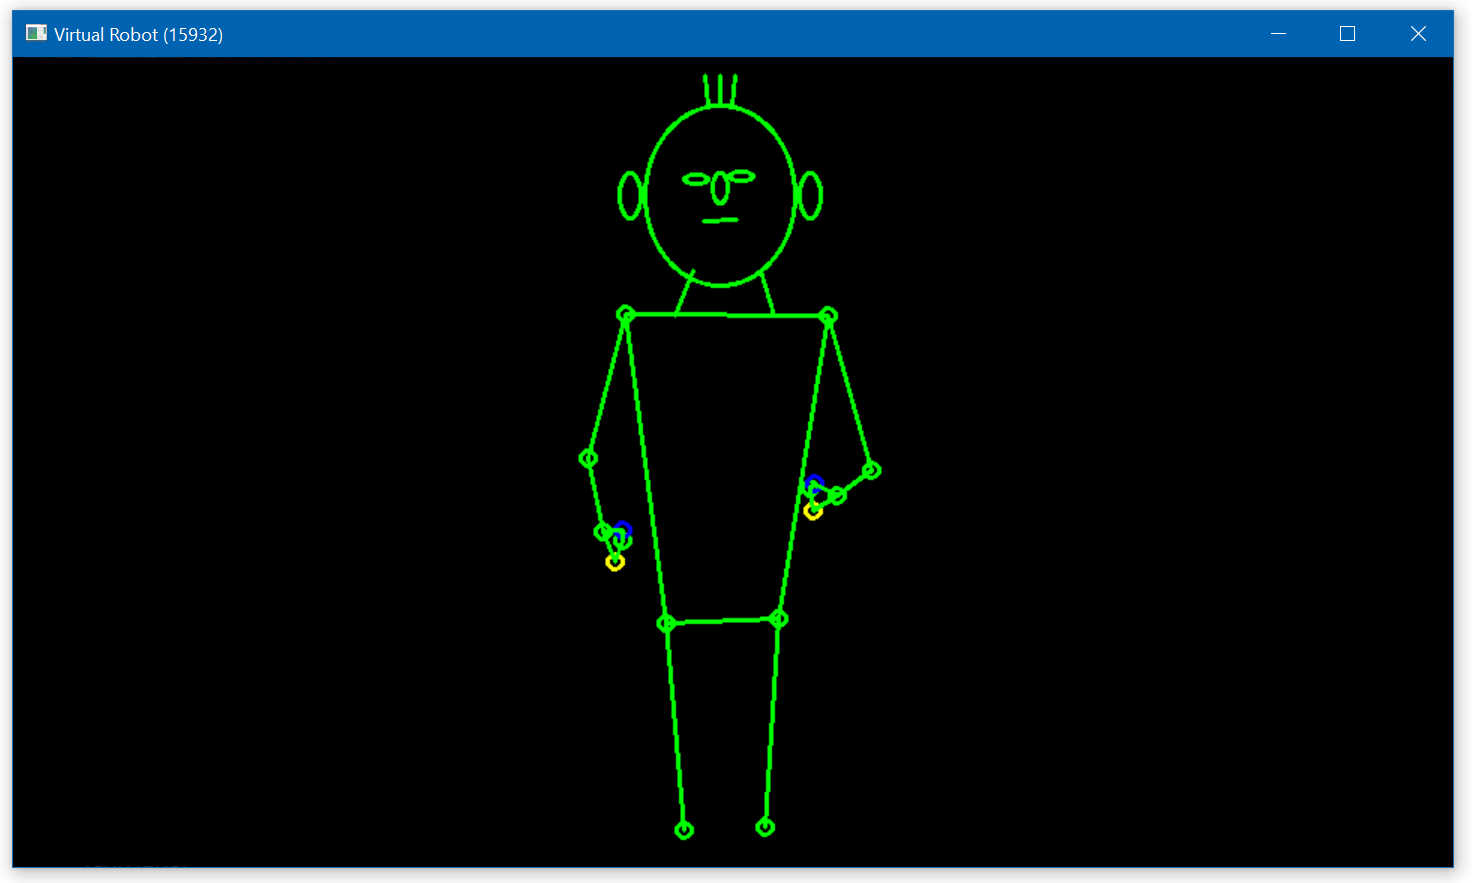
Press the "Start" button to start an app, this should show (after a few seconds for initializing the tools) the virtual robot stickman:
To end the app you need to press the "Stop" button to make sure, that all processes of the application are stopped properly.
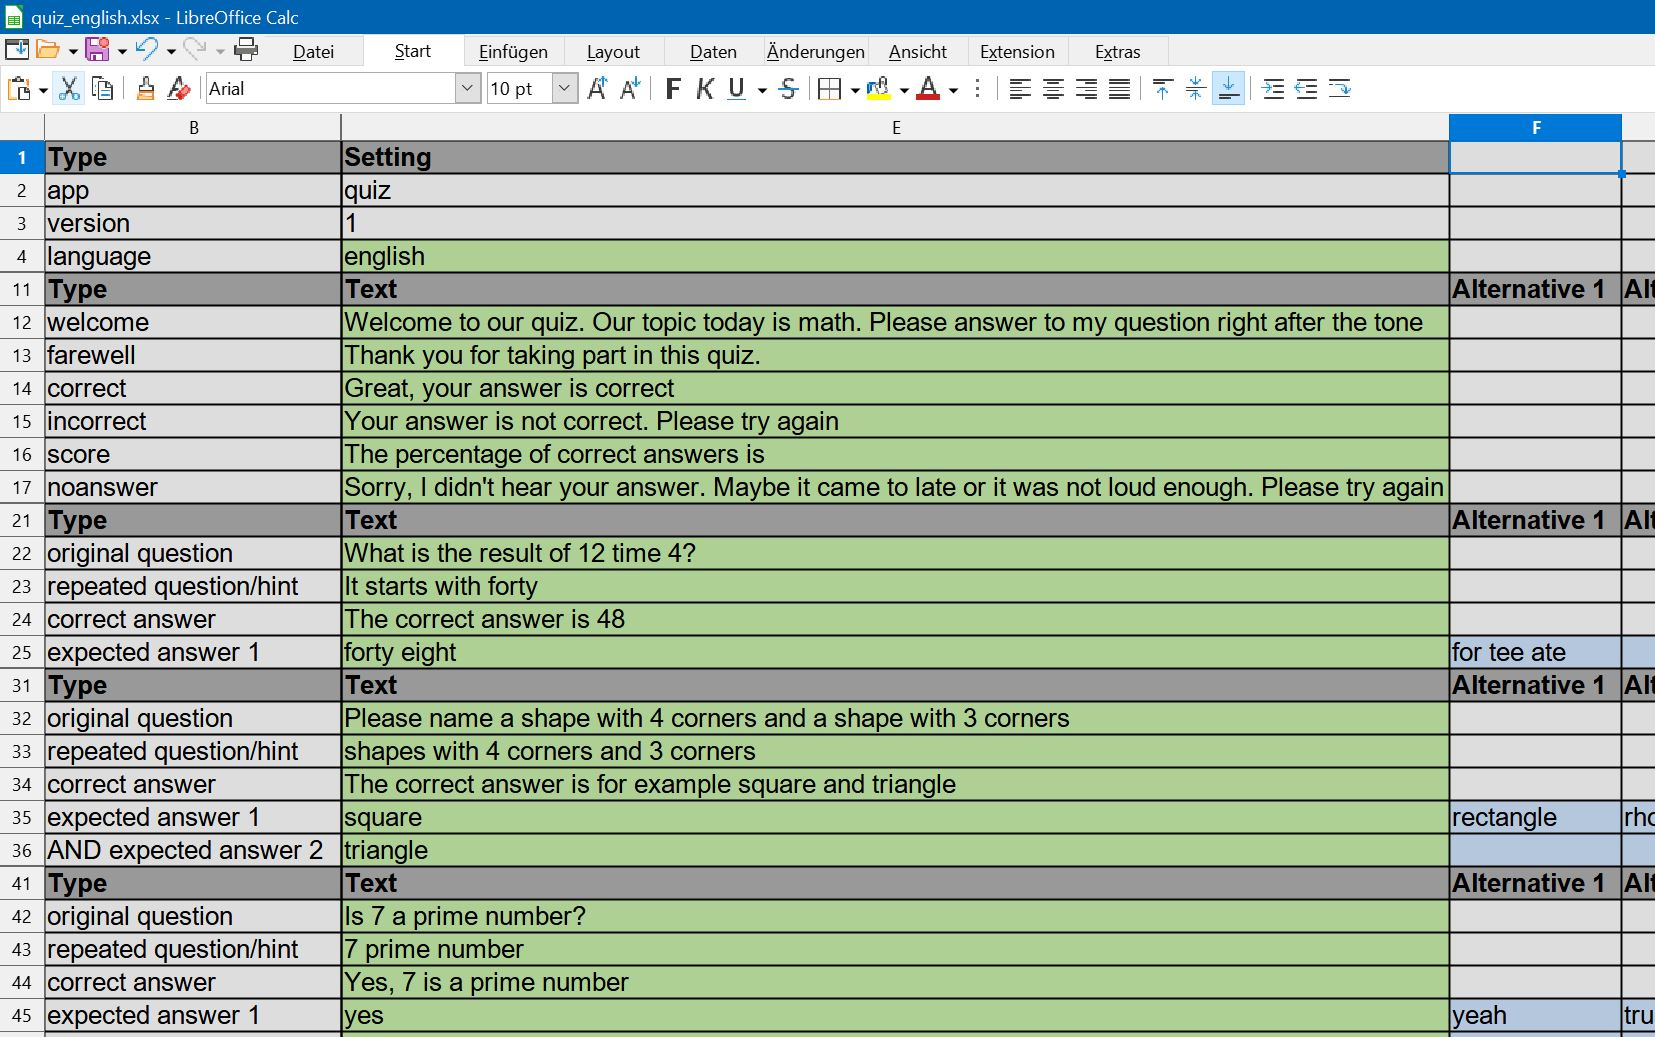
Actually, you are starting the app with user defined settings, so called projects. These projects are stored as .xlsx file in the .sobotify folder.
You can edit the projects setting by pressing the "edit" button. This will open the project file with a spreadsheet program.
Notes:
- For the "stickman" and Cozmo robot to speak, it's necessary to have the following TTS voices installed on Windows ("add voice" in Windows settings):
- for English : English (US) TTS voice "Zera"
- for German : German (Germany) TTS voice "Hedda"
- For editing project files (Button "Edit") a default program for handling ".xlsx" files need to be installed, e.g. LibreOffice Calc or Microsoft Excel
-
For running a previously recorded gesture and speech on the robot double-click the following file to start the GUI:
start_gesture.bat
This will start the following GUI:
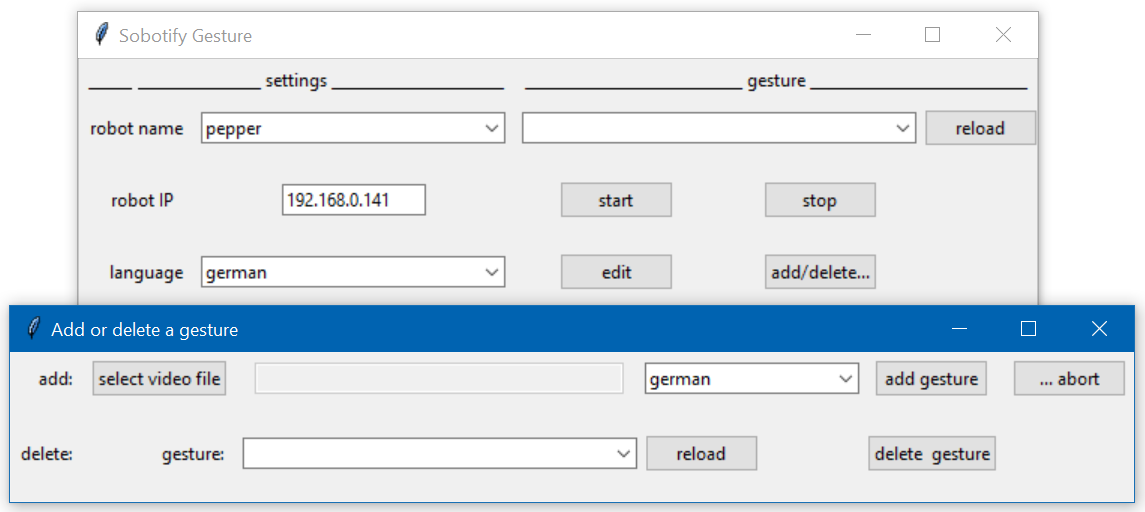
- You have to record a gesture and speech, for example with your webcam or smartphone (Important: you always need a speech with the gesture, otherwise the gesture will not be replayed)
- Use the "add/delete" button to get to a new window, where you can select the video file, the language of your speech and then press "add" for extracting and adding gesture and speech to you database.
- Close the window and watch the CMD window to see the progress of the extraction process, it might take several minutes depending on the length of your video (final message is "...done extracting gesture and speech!")
- After completion, press the reload button and the new gesture is added to the list
- choose the gesture
- choose the language of your speech in the main window
- press the start button
Instead of using the GUI to start apps, you can also start them via the command line or with batch files.
For example, the chat-partner app can be started by running the following batch file :
examples\start_chat_partner.bat
(You might want to adjust the robot name, robot IP address, the language or sound device in the batch file beforehand. IMPORTANT: after usage, CLOSE all command windows, that have been opened by the script.)
The app can also be started directly with Python. For commandline testing you need to open a miniconda prompt. Then you can use the following commands. Before using the actual sobotify commands, you need to activate the sobotify conda enviroment (as can be seen below). You can finish each programm with the CTRL-C key combination.
open a miniconda prompt and type the following commands to start the app:
conda activate sobotify
python sobotify\apps\chat_partner\chat_partner.py --robot_name=stickman --language english --project_file "%USERPROFILE%\.sobotify\projects\chat_partner.xlsx"
Also most of the tools offer a commandline interface, to start them. For example, the facial processing tool can be started by running the following batch file :
examples\facial_processing.bat
open a miniconda prompt and type the following commands to start the app:
conda activate sobotify
python sobotify\tools\facial_processing.py --cam_device 0 --frame_rate 2
for finding more command line options of tools use the "--help" option:
python sobotify\tools\facial_processing.py --help
You can start the robot control tool with a "Hello world" message with these batch files:
  examples\hello_stickman.bat
  examples\hello_nao.bat
  examples\hello_pepper.bat
(You might want to adjust the robot name, robot IP address or the language or message in the batch file beforehand. IMPORTANT: close the stickman window by pressing q on your keyboard).
For testing "Hello world" with the stickman open a miniconda prompt and type the following command to start the robot control tool from the sobotify API:
conda activate sobotify
python sobotify\sobotify.py -r --message "Hello, I am stickman, a virtual robot. Please close this demo by pressing q on your keyboard"
or start the robot control tool directly like this:
conda activate sobotify
python .\sobotify\tools\robotcontrol\robotcontrol.py --message "Hello, I am stickman, a virtual robot. Please close this demo by pressing q on your keyboard"
For testing with Pepper you can start the robot control tool like this:
conda activate sobotify_naoqi
python .\sobotify\tools\robotcontrol\robotcontrol.py --robot_name pepper --robot_ip 192.168.0.141 --message "Hello, I am pepper"
You can start the gesture extraction by drag&drop a video file to the following batch file:
examples\extract_gesture_speech.bat
You can also start the a video to robot control file (movement and speech) for the pepper robot you can use
conda activate sobotify
python sobotify\sobotify.py -e --language english --robot_name pepper --video_file MyTest1.mp4
or for converting for all robots you can use "all"
conda activate sobotify
python sobotify\tools\extract\extract.py --language english --robot_name all --video_file MyTest1.mp4
This will create the robot control files in the data base (by default: %USERPROFILE%\.sobotify\data):
- MyTest1.srt ==> spoken words with timing information (for robot speech)
- MyTest1_lmarks.csv ==> landmarks for controlling the stickman
- MyTest1_pepper.csv ==> joint angles for controlling peppers joints (movement)
- MyTest1_nao.csv ==> joint angles for controlling nao joints (movement)
- MyTest1_cozmo.csv ==> (currently random) data for controlling cozmo motors (movement)
- MyTest1_mykeepon.csv ==> (currently random) data for controlling mykeepon motors (movement)
- MyTest1_wlmarks.csv ==> world landmarks (internal data)
- MyTest1.tsp ==> time stamps (internal data)
For running the previously extracted gesture/speech you can use the gesture App, as described above.
Instead of using the install.bat script for installation as described above, you can perform a manual installation.
-
Download the current version of sobotify here : https://github.com/hhuebert/sobotify/archive/refs/heads/main.zip
-
Unzip the sobotify-main.zip file
-
Copy the unpacked sobotify-main folder to a permanent location (i.e. where it can stay, as this will be the installation folder), for example copy it to your home directory, such as C:\Users\MyName\sobotify-main
-
Create a directory .sobotify (IMPORTANT: there is DOT in the beginning) in your home directory (%USERPROFILE%), e.g.
- C:\Users\MyName\.sobotify\
-
Inside this folder create the following sub folders:
- .\data : all motion and speech data will be stored here
- .\data\trash : deleted data will be moved here
- .\projects : projects will be stored here
- .\projects\trash : deleted projects will be moved here
- .\face_db : images of faces for face recognition can be placed here
- .\log : logging data will be stored here
-
Copy all *.xlsx files from the sobotify-main\apps\ subfoders to the .sobotify\projects folder, e.g.
- sobotify\apps\quiz\quiz_english.xlsx
- sobotify\apps\quiz\quiz_german.xlsx
- sobotify\apps\chat_partner\chat_partner.xlsx
- sobotify\apps\dialog_training\dialog_training.xlsx
For speech recognition sobotify uses Vosk. Depending on the language you want to use, you have to download the approriate language model.
- Create at first a directory in your %USERPROFILE%.sobotify\vosk\models to store the models
- Download models from https://alphacephei.com/vosk/models,
- unpack them and rename the folder to "english or "german"
- copy the folders to the directory %USERPROFILE%.sobotify\vosk\models (e.g. the README file of the english model can then be found at %USERPROFILE%.sobotify\vosk\models\english\README) If you copy them to a different location, then provide the path to sobotify with the option vosk_model_path (e.g. --vosk_model_path %userprofile%\Downloads\vosks\models)
The different tools within sobotify communicate via mqtt, a messaging protocol. For this you need a broker, which distributes the messages to all tools. Mosquitto can be used for this purpose.
- Download mosquitto from here and install https://mosquitto.org/download/
By default sobotify expects mosquitto to be installed at C:\Program Files\mosquitto\mosquitto.exe. If you install to a different location, you can provide the path to the mosquitto directory with the option --mosquitto_path (e.g. --mosquitto_path "C:\Program Files\mosquitto")
sobotify uses ffmpeg tools to extract information (e.g. time stamps and audio data) from the video files.
- Download ffmpeg tools ("essentials" are sufficient) from here https://ffmpeg.org/download.html
- unpack the directory
- rename it to ffmpeg
- copy it to %USERPROFILE%.sobotify (ffmpeg.exe can then be found at %USERPROFILE%.sobotify\ffmpeg\bin\ffmpeg.exe).
If you copy it to a different location, then provide the path to "bin" sub directory to sobotify with the option --ffmpeg_path (e.g. --ffmpeg_path %userprofile%\Downloads\ffmpeg-essentials_build\bin)
sobotify uses LanguageTool for grammar and spell checking
- Download LanguageTool tools from here https://languagetool.org/download/LanguageTool-6.3.zip
- unpack the directory
- rename it to languagetool
- copy it to %USERPROFILE%.sobotify (languagetool.jar can then be found at %USERPROFILE%.sobotify\languagetool\languagetool.jar).
The following instruction are based on using Miniconda3 to set up the two different Python versions required for the Sobotify main part (Python 3.8) and for the Pepper robot (Python 2.7)
- Get and install for example miniconda https://docs.conda.io/en/latest/miniconda.html However, you can also use regular Python installation instead of Conda, as sobotify is not dependent on any other Conda packages (everything requried can be installe with pip)
Create a Python 3.8 environment for most of the sobotify tools:
-
open anaconda prompt and type the following commands:
conda create -y -n sobotify python=3.8
conda activate sobotify
conda config --add channels conda-forge
conda install pybullet
:: cd to sobotify folder (where README.md is)
pip install -r requirements.txt
pip install -e .
Create a Python 2.7 envirnoment including the Python SDK (pynaoqi) and a if you want to use Pepper and Nao robots:
-
download the Pepper Python SDK under "Old: Pepper SDK": https://www.aldebaran.com/en/support (pynaoqi 2.5.x for Python 2.7)
-
unpack the ZIP file, e.g. to %HOME%.sobotify\pynaoqi (or different location, then adjust also path in conda env below) (e.g. the naoqi.py can then be found at %USERPROFILE%.sobotify\pynaoqi\lib\naoqi.py)
-
open anaconda prompt and type the following commands:
conda create -y -n sobotify_naoqi python=2.7
conda activate sobotify_naoqi
:: cd to sobotify folder (where README.md is)
pip install -r requirements.txt
pip install -e .
conda env config vars set PYTHONPATH="%USERPROFILE%\.sobotify\pynaoqi\lib"
For downloading animations for Cozmo use:
  conda activate sobotify
  python %USERPROFILE%\miniconda3\envs\sobotify\Scripts\pycozmo_resources.py
  :: or (depending on your miniconda installation location)
  python
  "%USERPROFILE%\AppData\Local\miniconda3\envs\sobotify\Scripts\pycozmo_resources.py" download
The easiest way to crate an app is to copy an existing app and adjust it to your needs
- copy an existing app folder (e.g. the \sobotify\apps\teleoperation) and rename it (e.g. into \sobotify\apps\teleoperation\myApp)
- Rename the .py file, it MUST have the same name as the app-folder (e.g. "myApp.py")
- Rename the .xlsx file, it might have the same or another meaningful name (e.g. "myApp.xlsx")
- within the .xlsx file adjust the following fields (here based on the teleoperation example):
- field E2 MUST have the app name as value (e.g. "myApp")
- field E4 can be used to adjust the language (currently "english" or "german")
- fields E12 und E13 can be used to adjust the welcome and farewell messages. ==> see the quiz app on how to add (quiz.xlsx) and read (read_project_data.py) more content
- copy the .xlsx-file to the %USERPROFILE%.sobotify\projects folder
For testing restart the App-GUI, select the project with the name of the .xlsx file, z.B. "MyApp", and click the "start" button
Then you can adjust the Python code (myApp.py) to change the fucntionality of the app, e.g. in method run() you might add more lines such as:
-
for starting a self-recorded gestures (e.g. "MyGesture", which needs to be located in %USERPROFILE%.sobotify\data) :
self.sobot.speak("",gesture="MyGesture") -
or for speaking further hard-coded text:
self.sobot.speak("Hello to my new App")
The tools, which are used by your app, need to be started in the __init__ method, e.g.
- if the teleoperation tool is not required, it can be removed
- if the speech recognition tool (listener) is required it can be added, see other apps such as the quiz app for more examples.
The easiest way to integrate your own robot, is to a start from an existing robot.
-
copy an existing robot folder (e.g. sobotify\robots\mykeepon) and rename it (e.g. into sobotify\robots\myrobot)
-
replace the code in the landmarks2angles.py file with code for converting mediapipe pose landmark into robot movements values/angles, that fit to the needs of your robot. For humanoid robots the landmarks2angles.py from the sobotify\robots\nao folder might be a good starting point.
-
Rename the .py-file, it MUST have the same name as the robot-folder (e.g. "myrobot.py")
-
adjust the content of the .py file according to the needs of your robotm e.g. for sending the movement values/angles as commands to your robot. If a feature (e.g. vision/camera or sound/microphone) is not supported by your robot, just inheriting these classes from the default robot base class, then it will use the default devices, e.g. camera and microphone of your laptop.
-
in sobotify\robots\robots.py add your robot at the required places
-
in sobotify\sobotify_app_gui.py and sobotify\sobotify_gesture_gui.py add the new robot in the lists on the top of the files
-
create a default movement file with a name corresponding to your robot (e.g. sobotify\tools\robotcontrol\data\random_myrobot.csv) by opening an Anaconda prompt and typing the following commands:
conda activate sobotify
cd sobotify/tools/robotcontrol/data/
python ..\..\extract\landmarks2angles.py --robot_name myrobot --world_landmarks_file random_wlmarks.csv --data_path .
For testing if the integration of your robot was successful:
- restart the App-GUI, select "myrobot", and if needed an IP address or port (e.g. 192.168.1.141 (adjust IP address) or "COMx" (adjust x)) if needed fo your robot, and select "teleoperation" as project and click the "start" button
- restart the Gesture GUI and follow the instructions here: Sobotify Gesture GUI
Sobotify itself is licensed under MIT license. However, some part of the code are taken from other project which are under other licenses (e.g. Apache License Version 2.0). The license is then stated in the code. Additionally, sobotify uses several packages (see requirements.txt), please check their licenses and terms of use before using sobotify.
Part of sobotify include and are based on others code, especially from Fraporta (https://github.com/FraPorta/pepper_openpose_teleoperation) and also elggem (https://github.com/elggem/naoqi-pose-retargeting), which also uses code from Kazuhito00 (https://github.com/Kazuhito00/mediapipe-python-sample).
Additionally several members of the Science Of Intelligence research project contributed to this project, whom I would like to thank.
And special thanks go to Haeseon Yun for her inspiring inputs and fruitful discussions in creating and applying these tools (https://www.scienceofintelligence.de/research/researchprojects/project_06/)
