An API wrapper for puppeteer to generate PDF documents and screenshots from URL's and HTML content
- Clone the repo
- Enter location
- Set .env variables as per table below
- Install dependencies
- Run DB migrations
- Generate API key
npm install
npx sequelize-cli db:migrate
npm run dev
npm run create-key
When not using docker, please note to set the CHROME_PATH value to the chrome executable on the machine.
Run the docker-compose stack to build the local image and run in a container. Please check the available environment variables and docker network to adjust for your own setup.
When not running in Docker the CHROME_PATH to the executable needs to be set, eg on Windows the chrome executable could be something like:
C:/Program Files (x86)/Google/Chrome/Application/chrome.exe
docker-compose up -d
| Variable | Description |
|---|---|
| PORT | The network port to bind the application to |
| NODE_ENV | Required for database config (development, testing or production) |
| DATABASE_TYPE | The sequilize database dialect |
| DATABASE_NAME | Sets the MySQL database name |
| DATABASE_USER | Sets the MySQL database username |
| DATABASE_PASSWORD | Sets the MySQL database passoword |
| DATABASE_HOST | Sets the MySQL database host |
| DATABASE_PORT | Sets the MySQL database port |
| DATABASE_USE_SSL | If the database connection uses SSL or not. value must be one of, true/false |
| CHROME_PATH | Optional, defaults to /usr/bin/google-chrome. If not using docker, eg on Windows you need to provide the exe path C:/Program Files (x86)/Google/Chrome/Application/chrome.exe |
| RABBITMQ_URL | The connection url for the RabbitMQ instance e.g. amqp://{username}:{password}@{hostname}:{port} |
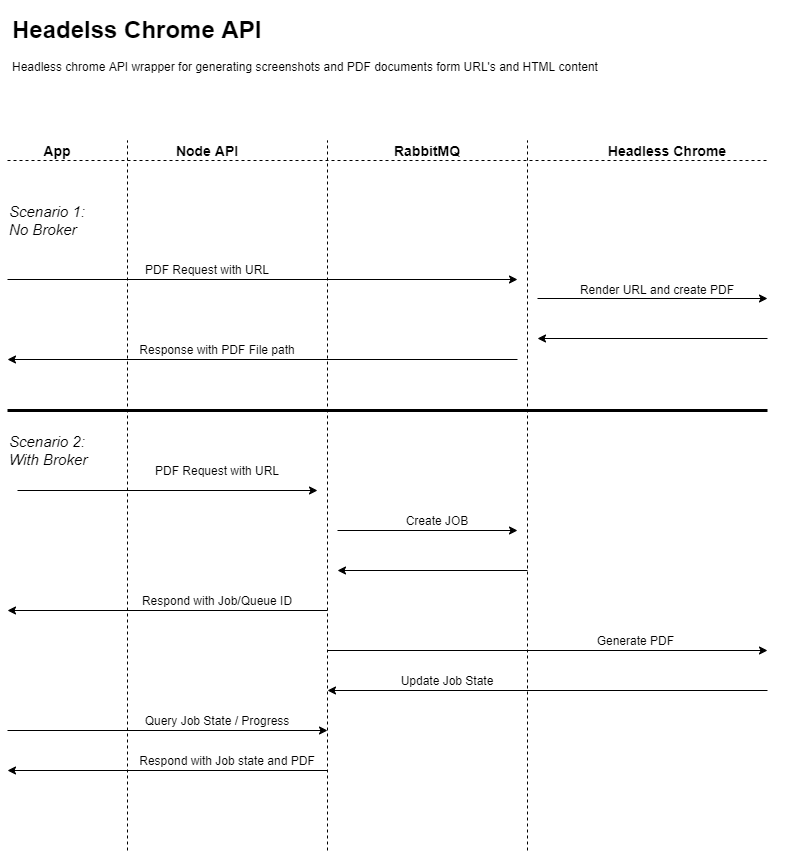
when the RABBITMQ_URL variable is not set the service will process the request synchronously and respond with the created filename
Uses the Sequilize ORM
Run database migrations with
npx sequelize-cli db:migrate
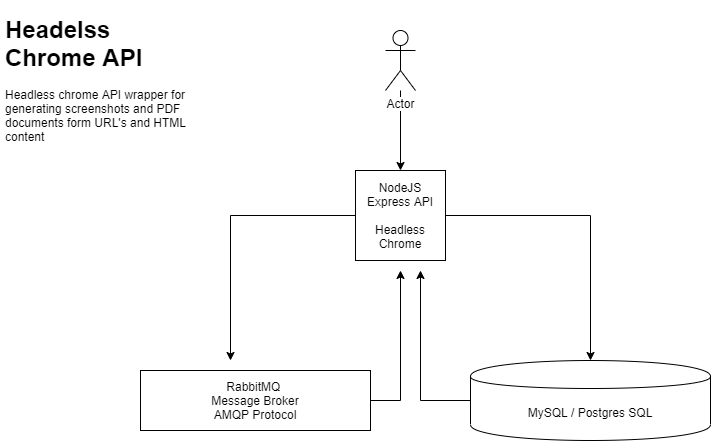
For high traffic workloads a message broker (RabbitMQ) can be used. When the RABBITMQ_URL is set, the API endpoints will place jobs on a queue and return with the queue id for subsequent lookups.
Takes a screenshot from a webpage or HTML content
input parmeters:
| Variable | Description |
|---|---|
| width | The width of the screenshot, defaults to 1920 |
| height | The width of the screenshot, defaults to 1080 |
| output | Output file type, png or jpg |
| url | The url of the webpage |
| html | The HTML content capture a screenshot of |
returns:
| Variable | Description |
|---|---|
| success | The outcome of the call |
| jobId | The id of the job in the task queue |
| message | The error message if the operation was not successfull |
Creates a PDF document from a webpage or HTML content
input parmeters:
| Variable | Description |
|---|---|
| width | The width of the screenshot, defaults to 1920 |
| height | The width of the screenshot, defaults to 1080 |
| url | The url of the webpage |
| html | The HTML content capture a screenshot of |
returns:
| Variable | Description |
|---|---|
| success | The outcome of the call |
| jobId | The id of the job in the task queue |
| message | The error message if the operation was not successfull |
Returns the status of a job in the task queue
returns:
| Variable | Description |
|---|---|
| id | The task id |
| complete | The completion status of the job |
| success | If the task was processed successfully or not |
| filename | The output filename, can be accessed with {endpoint}/{filename} |
| message | The error message if the operation was not successfull |
| parameters | The input prameters for the task |
| createdAt | Timestamp of when the job was created |
| updatedAt | Timestamp of when the job was updated |
Every API call needs to have an the "Authorization" HTTP header set with an api key, e.g.
Authorization: {api key}
API keys can be creted by running the "create_token.js" script e.g.
node create_token.js


