This project is an MQTT Alarm Control Panel for use with Home Assistant's Manual Alarm Control Panel component. However, the Alarm Control Panel whould work with any home automation platform that supprts MQTT messaging such as OpenHab, Node-Red, and SmartThings.
This project was built for a Android devices and is available from the Google Play Store. There is also a version available for Android Things and Raspbery Pi 3.
For support you can use the Home Assistant Community Dsicussion page of file an issue using the Github issue tracker.
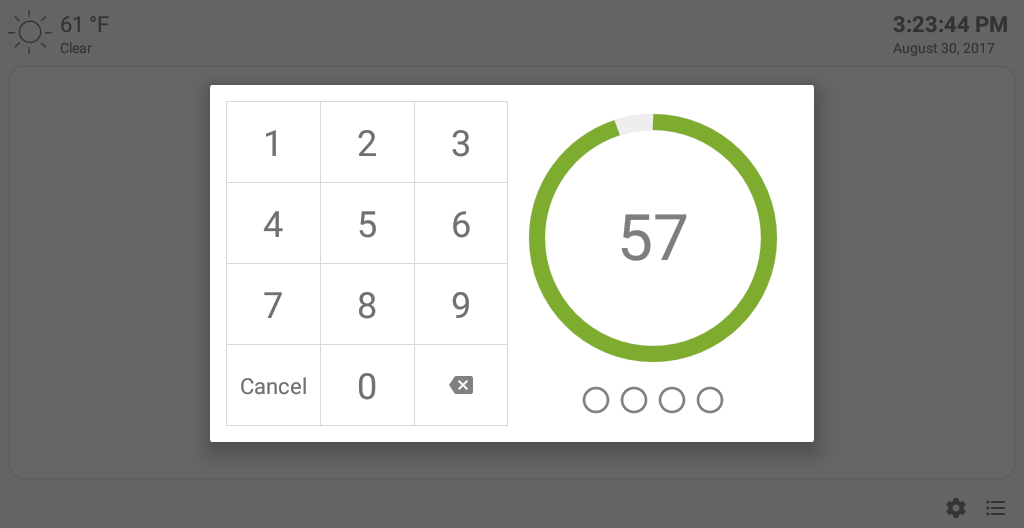
The alarm panel acts as an interface for Home Assistant's manual alarm control panel component. You can set the alarm state to away or home, or disarm the alarm using a code. In addition it has some nice features such as weather forecast and screen saver mode.
MQTT allows for communication between the alarm panel and the manual alarm panel. The alarm panel interface will reflect the current state of the manual alarm control panel component and vice versa. However, your home automation platform is responsible for triggering the alarm through automation and sensor states.
- Camera support for capturing and emailing images when alarm disabled (requires Mailgun api key).
- Google Text-to-Speech support to speak MQTT notification messages.
- Optional screensaver mode using clock or Imgur images.
- 7 day Weather forecast (requires Darksky api key).
- Home Automation Platform webpage support for viewing your home automation website.
Supported Command and Publish States
- Command topic: home/alarm/set, home/notification
- Command payloads: ARM_HOME, ARM_AWAY, DISARM
- Publish topic: home/alarm
- Publish payloads: disarmed, armed_away, armed_home, pending, triggered.


- Android Studio with Android SDK 14 or above.
- Setup Home Assistant
- Configure the MQTT service note thr broker address and username/password if applicable.
- Add the MQTT Alarm Control Panel to your configuraiton with the default settings for now.
- Add any sensors (like Zwave door sensors or sirens) and configure automations to trigger the alarm.
You can clone the repository and compile the APK using Andoid Studio, then side load the APK file onto your device. You can also side load the built APK from from the release section or just install the application from the Google Play Store.
-
Under the settings (gear icon) enter the MQTT information that you configured in Home Assistant for your MQTT service.
-
Be sure you adjust the time intervals to match those set (other than defaults) in the Home Assistant MQTT alarm control panel. Here is an example of the setup I use in Home Assistant's configuration.yaml file.
alarm_control_panel:
  - platform: manual_mqtt
    state_topic: home/alarm
    command_topic: home/alarm/set
    pending_time: 60
    trigger_time: 1800
    disarm_after_trigger: false
    delay_time: 30
    armed_home:
      pending_time: 0
      delay_time: 0
    armed_away:
      pending_time: 60
      delay_time: 30
-- If I set the the alarm mode home, the alarm will immediately be on without any pending time. If the alarm is triggered, there will be no pending time before the siren sounds. If the alarm mode is away, I have 60 seconds to leave before the alarm is active and 30 seconds to disarm the alarm when entering.
-- Notice that my trigger_time is 1800 and disarm_after_trigger is false, this means the alarm runs for 1800 seconds until it stops and it doesn't reset after its triggerd.
-- Be sure to change the settings in the Alarm Control Panel application to match these settings. By default the pending_time and delay_time are used for all alarm modes unless otherwise changed.
If you would like to get weather updates, create and enter a Dark Sky API key and your current latitude and longitude into the weather setting screen. You can get your current location by using maps.google.com in a web browser and copying the lat/lon from the url (they look like -34.6156624,-58.5035102 in the url).
To use a photo screensaver rather than the digital clock, turn this feature on, using the screen saver settings screen. You can load other Instagram images by changing the Instagram profile name in the settings.
If you would like to capture and email images when the alarm is deactivated then you need to setup a Mailgun account. You will need to enter the domain address and API key from your Mailgun accoint into the application setting screen along with other information.
You may also use Telegram to recieve a notification with the image when the alarm is deactivated. To use Telegram you need a chat Id and a Telegram Bot API token. Follow the Telegram guide on Home Assistant to setup Telegram. Enter the chat Id and token into the application settings screen.
The camera only captures images when activated in the settings and MailGun is setup properly. Images are captured each time the alarm is deactivated. You may use either Mailgun, Telegram, or both to send notifications.
To use a screen saver other than the digital clock, turn this feature on in the screen saver settings. You will need an Imgur key and a tag for which images you would like to use from Imgur Client Id
You can load your Home Assistant (or any web page) as alternative view by entering your Home Assistant address. The address shuold be in the format http://192.168.86.240:8123 and include the port number. You can use HADashboard or Home Assistant kiosk mode as well. This feature uses an Android web view component and may not work on older SDK versions. There is also a limitation when saving username/passwords and screen reloading. The username/passwords are not rememebered, and you will need to login again. I recommend using this application as on a dedicated tablet rather than your day-to-day device for best results.
- To use TTS and the Camera you will need Android Lollipop SDK or greater as well as camera permissions. Older versions of Android are currently not supported. The application is locked into the landscape mode for usability. It is meant to run on dedicated tablets or large screen devices that will be used mainly for an alarm control panel.
Special thanks to Colin O'Dell who's work on the Home Assistant Manual Alarm Control Panel component and his MQTT Alarm Panel helped make this project possible. Thanks to Juan Manuel Vioque for Spanish translations and Gerben Bol for Dutch translations