Using a Vacuum Fluorescent Display (VFD) with an ESP8266 as information display
The displayed VFD is the IEE 03602-122-09220, 20x2, Dot Matrix ASCII VFD module.
See a video on youtube
And for the technical documentation of this VFD click here
Find out more about this project on https://jurjan.info
| Picture A | Picture B |
|---|---|
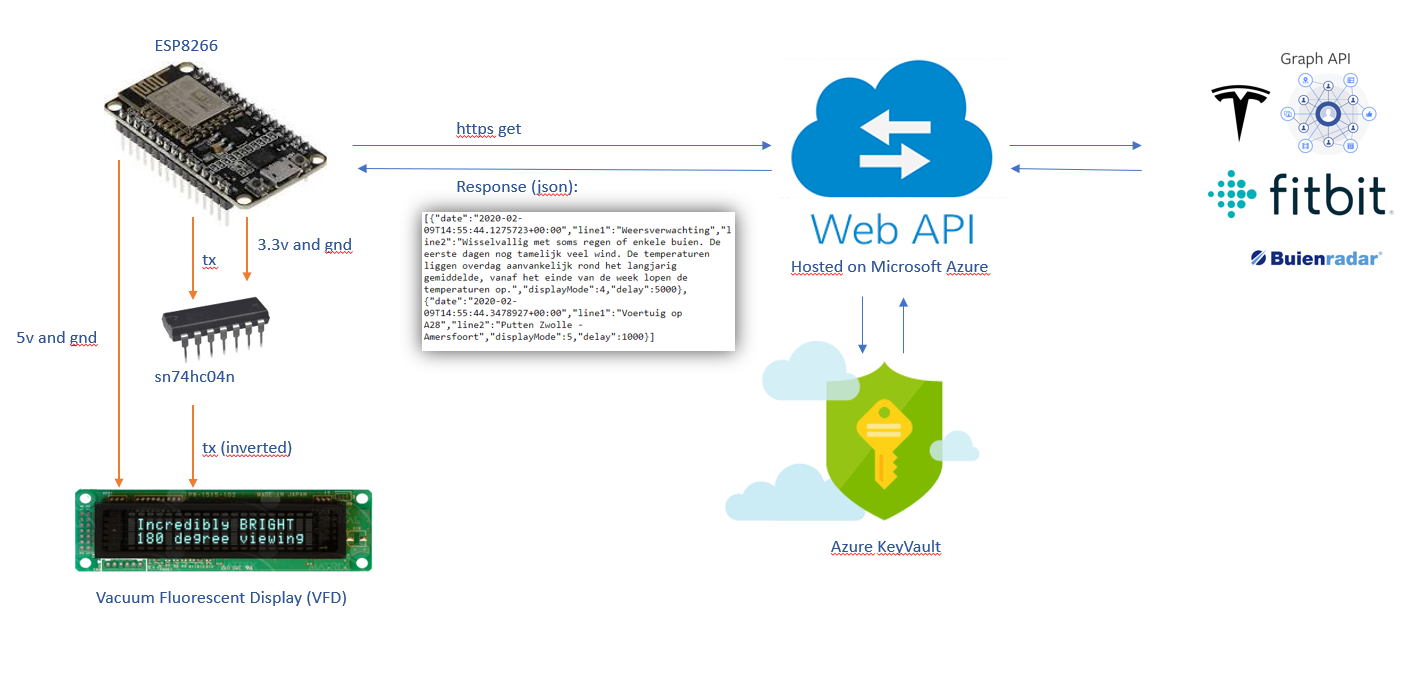
The scheme displayed below shows the components involved.
First there is an ESP8266 that is being used as the controller of the VFD. Because the serial port of the VFD is inverted an invertor is needed to invert the bits transmitted on the serial port. I used a sn74hc04n for this, but this is probably a bit of overkill and a transistor should also do, like the picture below.
Note that I have been informed that this solution can also be achieved using software. To accommodate for this, I have included a boolean flag in the main.cpp file that allows switching between a hardware and software solution.
For the software part I decided to keep the software on the ESP as simple as possible. So the ESP only has logic to control the display, display the time and do some fancy animation tricks.
The Web-API contains all the logic to gather and prepare the information that needs to be displayed on the VFD.
Currently the WEB-API gathers the following kinds of information:
- weather forecast
- news feeds from various sites
- traffic information
- calendar (central family)
- fitbit (weight goals of me and my partner)
Other possible future things to add are:
- Tesla car status (charge level, location)
- Spotify integration + VU meter
When the ESP makes a call to the WEB API (source code is included in this repository) the following JSON is returned:
[{"date":"2020-02-09T15:23:25.5169582+00:00","line1":"Weersverwachting","line2":"Wisselvallig met soms regen of enkele buien. De eerste dagen nog tamelijk veel wind. De temperaturen liggen overdag aanvankelijk rond het langjarig gemiddelde, vanaf het einde van de week lopen de temperaturen op.","displayMode":4,"delay":5000}]
The returned JSON contains the following elements:
- date: datetime of the information
- line1: first line to display on the VFD
- line2: second line to display on the VFD
- displaymode: the way the information needs to be displayed on the VFD (see enum in the sourcecode).
For example:
- horizontal scroll
- vertical scroll
- knightrider mode.
The WebAPI uses the OAuth 2.0 for both the Graph API and Fitbit API. For the Graph API the following steps are needed:
- Make an App-Registration in your Azure AD and select for 'Supported account-types' : 'Accounts in any organizational directory (Any Azure AD directory - Multitenant) and personal Microsoft accounts (e.g. Skype, Xbox)'
- Select 'Authentication' in the menu and 'Add a platform'
- Select 'Web' as the application
- Enter 'http://localhost' as the Redirect URIs
- Select 'Certificates & secrets'
- Add a new client secret (description = vfd, exires = [what you want])
- Copy the 'Value' of the secret and keep it for later use
- Open 'Overview' and take a note of the 'Application (client) ID' for later use
- Open Auth-Code-Flow and click in the 'Run in Postman'
- This will import the following collection into Postman:
- Open the 'Authorize Request' and change the 'client_id' with the one you copied in the 'Overview' page
- Change 'redirect_url' to http://localhost/
- Change 'scope' to openid%20offline_access%20User.Read%20User.Read.All%20Calendars.Read%20Calendars.Read.Shared
- Now we are ready to get the auth-code. Copy the URL generated by Postman (left of the Send button and paste it into a browser). Note that we cannot use postman for this step, because we need a browser.
- Once you authorized the application you should see a auth-code in the URL like: http://localhost/?code=M.R3_ABC.a1234vcde-1aaa2-11aa-aaaa-aa11112aa1111&state=12345
- Copy this code for the next request 'Token Request - Auth Code'
- Change the body of the request with the correct 'client_id', ' redirect_url', and 'code'. Deselect 'scope'.
- This will return an 'access_token' and a 'refresh_token'
- Copy these values into the WebAPI/Services/Agenda.cs and follow the instructions (Or create the secrets in keyvault manually)
The WebAPI will store and update the tokens into AzureKeyVault on its own. Another usefull collection of Postman request to get a look at is: GraphAPI calls
A screenshot of my resourcegroup
The keyvault should contain the following secrets for the Graph integration to work
Since the WebAPI needs to access these secrets, the WebAPI should be added to the 'Access Policies' of the keyvault. The WebAPI will have a system assigned managed identity (if not enable it in the Identity settings for the App service of your WebAPI)
I set the App Service Plan to a F1:free plan. Make sure that the application settings contains the 'VaultUri' setting with a value to your keyvault 'https://yourkeyvault-prod.vault.azure.net'
No other configurations are needed
Tech news:
- Techcrunch
- Engadget
- CNET
- The Verge
- Ars Technica
- Wited
- Gizmodo
Other news:
- CNN, BBC, New York Times, Washington Post
- Scientific American
Well thats it!
If this project help you reduce time to develop, you can give me a cup of coffee :)


